A shawl is a large scarf that can be knitted or fabric. This article will discuss how to knit a shawl with a pineapple pattern using a regular crochet hook; a step-by-step selection of patterns and descriptions of the knitting principle will be given and explained below.
We crochet a beautiful pineapple shawl: patterns and description of work
The first production of shawls was in Kashmir in the 15th century. It was a purely male profession - weaving a shawl, as well as an exclusively male wardrobe accessory. Sooner or later, fashion changes, and the shawl “migrated” to the women’s wardrobe. The fashion for this accessory originated in Europe. This movement was started by Josephine Beauharnais, who was given a shawl by Napoleon Bonaparte. Very quickly, fashion spread throughout Europe, and also did not pass by Russia.
At that time, the talented tailor Leroy received patronage from Josephine and gave the world a new fashion trend - the empire style, in which all fashionistas began to dress. These were light, transparent, slightly strict dresses, which, unfortunately, were not suitable for the climate of Paris. But the desire to be elegant and fashionable pushed women to the decision to complement this style of clothing with warm shawls, which had a wide variety of shapes, colors and sizes. The art of dressing began to be measured by how competently and beautifully the shawl was laid on the owner. Weighting elements were sewn into the accessory for perfect drape and fit.
Shawls were made in a variety of ways, some requiring several months of work. But the ancestor of all openwork shawls is a shawl made of goat fluff, knitted in Orenburg. To this day, such lightweight accessories are in great demand. And needlewomen got the opportunity to realize the production of not only knitted, but also crocheted shawls.
A fairly common openwork pattern when crocheting shawls is “pineapples”. It is on them that we will focus our attention.
Let's look at the main ways of knitting a shawl with a pineapple pattern
An openwork and elegant shawl will perfectly complement the wardrobe and image of any woman. Simple and at the same time beautiful pattern There is an openwork with the name “pineapple”, it is loved by needlewomen, so you can find a wide variety of it. Shawls require a logical extension of the pattern, so this pattern is ideal.
There are two ways to knit a shawl:
- from the corner;
- from the wide edge of the product.
In the first case, the beginning of work is in the lower corner of the shawl; the fabric gradually expands when knitting upward.
In the second case, the beginning of work is located in the middle of the wide line of the shawl, while there is a central line and increases go in two directions from it.

It is worth noting that for the first option it is advisable to complement the edges with brushes, because they are straight and require a laconic edging. And the second option turns out to be very elegant and complete, even without tassels and borders. The described difference is clearly visible in the photo below:

In order to knit such a shawl, no description is required. It is enough to know only the symbols of knitting elements, as well as be able to read diagrams. If the choice fell on an accessory knitted from a corner, then the beginning of the work will be either an air loop into which a number of double crochets will be knitted, alternating with air loops; or a ring of several air loops for a more openwork corner of the shawl.
The beginning from the central point of the wide side will also be a ring of air loops. If you look closely, you can see that the shawl knitted at the top is nothing more than two corner shawls folded together. Therefore, “from the corner” you get a narrower and longer one, and “from the center” you get a wider one, but not so going down.
In addition to the two varieties of shawl shapes discussed above, one more can be distinguished - in a semicircle. This shape is interesting for needlewomen because you can create an exclusive accessory using half the pattern of a round napkin or tablecloth.
If you knit according to this principle, you will get an accessory that will add femininity to the image, and will also almost completely cover you from the coolness thanks to its shape, which is demonstrated in the photo:

As you can see, pineapples can be located not only over the entire area of the canvas, but also elegantly complement any other pattern.
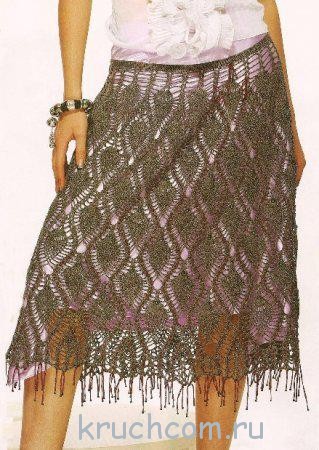
The most common model of this shape is this shawl:
It gained its popularity due to its ease of execution, since it does not require thin threads or special skills in knitting shawls. On the contrary, it is recommended to take fairly thick yarn, the composition of which is 50/50 wool/acrylic, and the meter is 280m/100g. Hook No. 4 is recommended for it. Having knitted all the rows according to the pattern proposed below, you should steam the fabric so that the shawl straightens and becomes softer for better drapery.

And the highlight of this model is the binding with “Travka” yarn, the composition of which is 100% acrylic, and the meter is 200m/100g. The binding consists of 3 rows with double crochets, and the straight edge needs to be tied 1 row with the same stitches.
Video selection on the topic of the article
Below is a series of videos in which you can learn any of the methods of knitting a shawl with the pineapple pattern.
“Pineapple” is considered one of the most common openwork patterns in crocheted needlework. It's all about not only the relative simplicity of knitting it, but also the final result of the process - a “pineapple” pattern made using any of the many patterns turns out to be truly magnificent!
What is the pineapple pattern? The specified openwork crochet element is used both in the classic wedge-shaped form and in a modified form - improved in shape, degree of density and size. At the same time, any “pineapple” scheme will contain three main components:
- leg - a fan-shaped solid base, all columns of which have a common beginning (can be a double crochet stitch, a double crochet stitch or a double crochet stitch). It can be short (knitted from 1-2 rows) or modified (elongated), including up to 15 rows and giving the pineapple an elongated shape;
- the central triangle is the decorative part of the “pineapple” with the main pattern (can be solid or openwork). Knitted from fillet mesh, arches from air loops, lush columns, “bushes” and many other patterns;
- the frame is a kind of “pineapple” frame, which is often knitted from “bushes” and is the common boundary for combining adjacent pineapple motifs.

The size of the future “pineapple” depends on how many double crochets are tied at the base; more double crochets mean a larger pineapple. There are plenty of options for knitting a pineapple - this pattern is knitted in the usual way, in a checkerboard pattern, in a spiral, with or without expanding the fabric.
Scope of application of the “pineapple” pattern
"Pineapple" is ideal for knitting flat or expanding fabrics. That is why it is often used in knitting models of women's and children's clothing (blouses, skirts, dresses, tunics, capes, shawls, boleros), as well as to create original items interior decoration (napkins, tablecloths, pillows, bedspreads, curtains and drapes). 
You can learn how to knit a pineapple pattern quite quickly. We recommend starting with knitting the simplest items - kitchen napkins, after mastering which you can move on to more complex projects. We offer several detailed master classes on knitting “pineapple” patterns using the following examples: a butterfly napkin, an original Christmas tree garland, an exclusive collar, as well as two stylish models women's wardrobe– a bright vest and an elegant blouse. 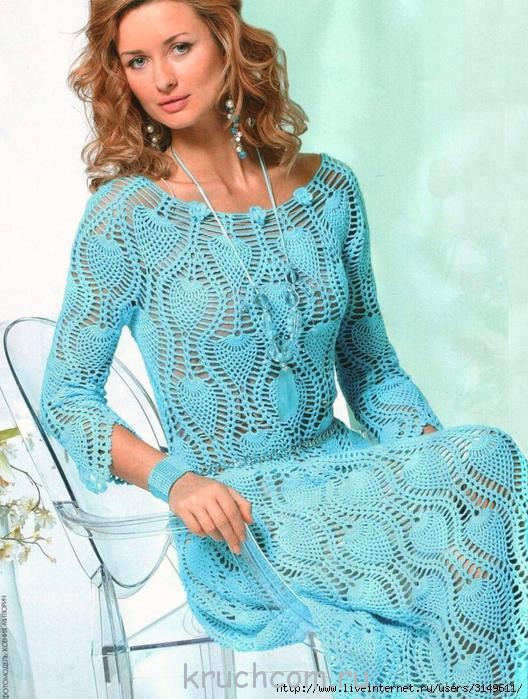
Abbreviations in the text:
- VP – air. loop;
- Runway - air. lifting loop;
- Art. s/n – double crochet;
- Art. b/n – single crochet;
- pet. – loop;
- flail - chain;
- PR – previous row;
- СС – connecting column.
A simple pineapple pattern using a butterfly napkin as an example

Knitting pattern:

Knitting steps:
We collect the flail. on 10 VP, in the SS ring.
Row No. 1: 3 runways, 2 illegal. Art. s/n, united by one vertex with the last one. Runway, into the first runway - we knit 2 more runways. Then there are 11 rapports: “3 is illegal. Art. s/n, united by one vertex, knitted into a ring from a base chain + 2 VP.” SS. We knit in the forward and backward direction.
Row No. 2: 3 runways, 2 tbsp. s/n in the arch from 2 VP PR, 2 VP, 10 rapports: “3 tbsp. s/n in next arch from 2 VP PR, 2 VP.
Row No. 3: 3 runways, 2 tbsp. s/n in the arch from 2 VP PR, 2 VP, 3 tbsp. s/n in the same arch, 10 rapports: “3 tbsp. s/n in next arch of 2 VP PR, 2 VP, 3 tbsp. s/n in the same arch.”
Rows No. 4-5: knit according to the pattern. We cut off the thread.
Let's start knitting the wings, knitting each one separately, attaching the thread to the right place. Knitting direction: forward and backward.
We knit two large wings according to the pattern, rows No. 1-11, we knit two small wings according to the small wing pattern, rows No. 1-10. We finish SS. We cut off the thread and carefully hide it.
We knit the antennae according to the pattern: we collect a flail. from VP, we tie them st. b/n.
The openwork butterfly napkin is ready. All that remains is to starch it thoroughly and iron it with a hot iron to give it the correct shape.
Openwork Christmas garland made of pineapple motifs

Knitting pattern:

In a ring of closed SS of 6 typed VPs, we tie:
Row No. 1: 3 runways, 1 st. s/n, 3 rapports: 2 VP + 2 tbsp. s/n in the ring. We knit straight and back.
Row No. 2: 5 runways, 2 tbsp. s/n in next arch from 2 VP PR, 2 VP, 2 tbsp. s/n in the same arch, 3 VP, 7 tbsp. s/n in next arch of 2 VP PR, 3 VP, 2 tbsp. s/n in next arch from 2 VP PR, 2 VP, 2 tbsp. s/n in the same arch from 2 VP PR.
We continue to knit according to the pattern until the garland reaches the desired length. The finished decoration should be properly starched, stretched and ironed with a hot iron.
Ornate pineapple collar

Knitting pattern:

Work progress:
We collect the flail. of 5 VPs (2 VPs + 3 VPs).
Row No. 1: 2 tbsp. s/n in the 4th VP chain, 3 VP, 3 tbsp. s/n in the same VP chain, 3 tbsp. s/n in next VP chain basics, 3 VP, 3 tbsp. s/n in the same VP chain.
Row No. 2: 4 runways, 3 tbsp. s/n in the arch from 3 VP PR, 3 VP, 3 tbsp. s/n in the same arch, 5 VP, 3 tbsp. s/n in next arch of 3 VP PR, 3 VP, 3 tbsp. s/n in the same arch.
Row No. 3: 4 runways, 3 tbsp. s/n in the arch from 3 VP PR, 3 VP, 3 VP., 3 tbsp. s/n in the same arch, 5 VP, 1 tbsp. s/n in next arch of 5 VP PR, 5 VP, 3 tbsp. s/n in next arch of 3 VP PR, 3 VP, 3 tbsp. s/n in the same arch.
Rows No. 4-94: knit according to the collar pattern. We do not cut the thread, leave it for tying.
We tie the collar in a circular manner, in three openwork rows (the diagram is also attached). Sprinkle the finished collar with starch solution, stretch it to size, iron it and leave it to dry.
Bright women's vest with a pineapple pattern

A stylish vest with a yoke, knitted using a pineapple pattern and decorated with a lush knitted flower, will definitely appeal to the fair sex. The knitting process is not so complicated, especially since we provide everything necessary for this: a pattern, a knitting pattern for the vest fabric, as well as a flower.
Knitting pattern:
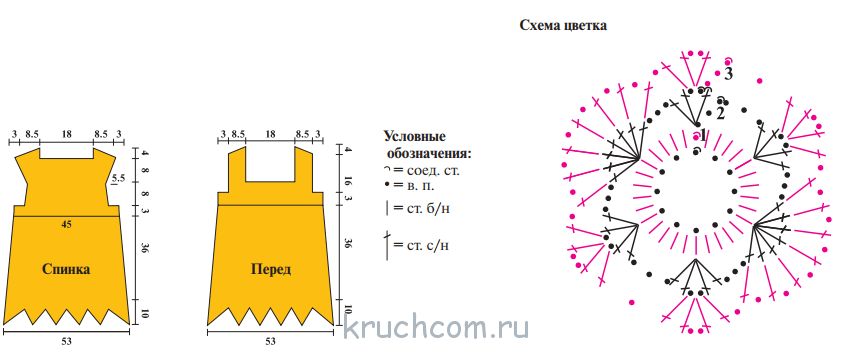
Knitting order:
We knit a yoke: we close the SS into a chain ring. out of 160 VPs.
Row No. 1: 3 runways, 159 st. s/n in next 159 VP chain basics. SS. We knit in the forward and backward direction.
Rows No. 2-3: 3 runways, 159 st. s/n in next 159 Art. s/n PR.
We divide the loops by quantity, marking them with markers for convenience:
- 65 Art. s/n – to the front;
- 15th century s/n - to the right armhole;
- 65 art. s/n - on the back;
- 15th century s/n - to the left armhole.
We continue from the back.
Row No. 4: 3 runways, 64 st. s/n in next 64 Art. s/n PR. SS.
Rows No. 5-9: knit as the 4th row.
Rows No. 10-14: knit st. s/n, make decreases on both sides of the back - remove 1 st. s/n, by the end of the 14th row we get 55 stitches in total. Don't forget to end each row with a SS.
From the 15th row: we knit the back and the front part with the armholes at the same time.
Row No. 15: 3 runways, 54 st. s/n in next 54 art. s/n PR, 40 VP, skipping 15 loops in the area of the right armhole, 65 st. s/n in next 65 art. s/n of the third row of the front. Again 40 ch, skipping 15 loops in the area where the left armhole is located. SS. It is advisable to mark the start and end points of the armholes with a knitting marker or colored thread.
Rows No. 16, 18, 20: knit st. s/n, knit over the marked points in 4 unfinished. Art. s/n, united by one vertex. We end each row with a SS.
Rows No. 17, 19, 21: knit in s/n stitches. We process the free edges of the yoke (neck and armholes) using the circular method using the “crawfish step”.
Let’s start knitting the main part of the vest with a “pineapple” pattern.
We attach a thread to the yoke, evenly distribute the loops in a circle with markers into ten repetitions of the main “pineapple” pattern, taking into account one repeat of 16 columns of s/n.
We continue knitting according to the above pattern, in a circular manner, along the 35th row. We knit each scallop separately.
Knitted flower for decorating a vest:
From closed to circle connection. Art. We knit chains for 12 VP:
Row No. 1: 1 runway, 29 stretched sts. in a circle SS.
Row No. 2: 3 VP, 1 tbsp. s/n in the first runway, 2 VP, 2 tbsp. s/n in the same VP, 3 VP, 7 tbsp. s/n in the fifth is extended. pet. PR, 3 VP, 2 tbsp. s/n in the 5th will be extended. pet. PR, 2 VP, 2 tbsp. s/n in the same pet., 3 VP, 2 tbsp. s/n in the 5th will be extended. pet. PR, 2 VP, 2 tbsp. s/n in the same pet., 3 VP, 7 tbsp. s/n in the 5th will be extended. pet. PR, 3 VP, 2 tbsp. s/n in the 5th will be extended. pet. PR, 2 VP, 2 tbsp. s/n in the same loop, 3 VP.
Row No. 3: 3 runways, 1 st. s/n in the first runway, 2 VP, 2 tbsp. s/n in the arch from 2 VP PR, 1 VP, according to the 1st art. s/n in next 7 tbsp. s/n PR, between Art. s/n - we knit along the 1st VP, then - an arch from 1 VP, 2 tbsp. s/n in next arch from 2 VP PR, 2 VP, 2 tbsp. s/n in the same arch, 1 VP, 2 tbsp. s/n in next arch from 2 VP PR, 2 VP, 2 tbsp. s/n in the same arch, 1 VP, according to the 1st art. s/n in next 7 tbsp. s/n PR, between Art. s/n - along the 1st VP, again an arch from the 1st VP, 2 tbsp. s/n in next arch from 2 VP PR, 2 VP, 2 tbsp. s/n in the same arch, 1 VP.
Decorating the vest: sew the finished flower to the product, optionally decorate with a decorative bead or rhinestone.
Fancy summer blouse with a yoke and pineapple scallops


Knitting progress:
Knitting a blouse moves from top to bottom.
At the beginning, the front, back and sleeves are knitted in one piece.
We collect the flail. on 160 VP, close it into a ring using SS.
Row No. 1: 3 runways, 1 st. s/n in the first runway, 3 VP, 2 tbsp. s/n in the same VP, 5 VP, continue to knit with rapports (we repeat the following combination 20 times): “2 tbsp. s/n in the 8th VP of the base chain., 3 VP, 2 tbsp. s/n in the same VP, 5 VP.” SS.
Rows No. 2-4: 3 runways, 1 tbsp. s/n in the arch from 3 VP PR, 3 VP, 2 tbsp. s/n in the same arch, 5 VP, 20 rapports: “2 tbsp. s/n in next arch of 3 VP PR, 3 VP, 2 tbsp. s/n in the same arch, 5 VP", SS. Row No. 5: 3 runways, 1 st. s/n in the arch from 3 VP PR, 3 VP, 2 tbsp. s/n in the same arch, 3 VP, 10 tbsp. s/n in next arch of 3 VP PR, 3 VP, 10 rapports: “2 tbsp. s/n in next arch of 3 VP PR, 3 VP, 2 tbsp. s/n in the same arch, 3 VP, 10 tbsp. s/n in next arch from 3 VP PR, 3 VP.” SS.
We continue to work according to pattern No. 1 of the pineapple pattern, thus knitting rows No. 6-23.
Then we divide the blouse fabric into 4 parts:
- 2 repeats - on the right and left sleeves;
- 3 rapports each - on the back and front. We do not cut the thread.
We knit the back and front parts in one piece.
Row No. 24: back and front repeats. We close the parts into a ring and continue knitting according to patterns No. 1-2 of the “pineapple” pattern. We knit inclusively along row No. 49. We finish each of them with SS.
We knit each of the six “pineapples” separately, in the forward and backward direction (according to pattern No. 2, 11 rows).
We tie the bottom of the blouse in a circular fashion with a fancy pattern (pattern attached). SS.
Sleeves: attach the thread to the lower part of the armhole, knit in a circular manner using a fancy pattern (rows 1-12).
Knitting patterns for the pineapple pattern
Using the “pineapple” pattern, magnificent openwork products are created, such as dresses, tunics, Panama hats, napkins, bedspreads, pillowcases and much more. There are many varieties of pineapple crochet patterns. Such a motif can be created in various ways, the only requirement is that, regardless of the chosen knitting, the result should be a pattern shaped like a pineapple. 


We bring to your attention large selection various knitting patterns for this pattern:
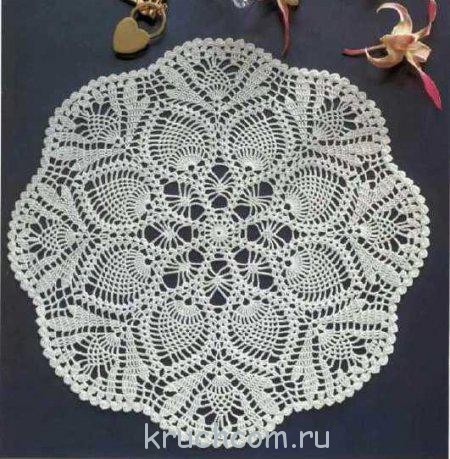
1. Openwork napkin:

2. Pineapple collar:


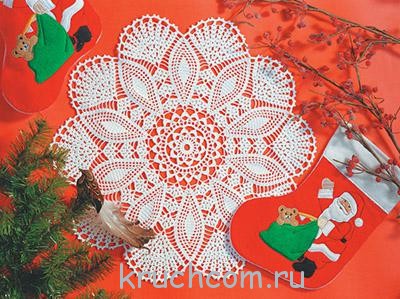
3. Original New Year's napkin:
4. Snow-white top with a pineapple yoke:

5. Summer Cardigan Cape:


6. Turquoise blouse with pineapples


7. Luxurious shawl with large “pineapples”


The pattern is old, but popular, and has not gone out of fashion today. Products associated with the use of “pineapple” lace can be found in the chests of our grandmothers and on models of famous European catwalks.
Things with “pineapples” are light, elegant, and effective. Beauty and simplicity allow you to use the pattern when crocheting:
- cardigans and summer coats;
- blouses and jumpers;
- skirts and evening dresses,
- capes, shawls and scarves,
- tablecloths, bedspreads and napkins.
Ribbon stitching, border or scallops knitted with “pineapples” give a luxurious look and completeness to the simplest product.
What kind of crochet “pineapple” pattern is this?
The “pineapple” openwork is not difficult to make; for its knitting, columns and chains (arches) from the prescribed number of air loops are used. “Pineapple” can be narrow and long or, conversely, wide and small. The height and width of the pattern depend on the number of rows and the height of the columns with which it is knitted.
The pineapple canvas is always double-sided, that is, the front side can be either side. It can be knitted from bottom to top, top to bottom, in the round, as an edging of a finished product.
“Pineapple” can be crocheted using a fillet mesh. It can be bordered by rows of “shells” or lush columns. Elements such as “spiders”, “diamonds”, “cones” are friends with “pineapple”. You can knit “pineapples” with a square, and use the squares to assemble an amazingly beautiful bedspread.
How to crochet pineapple
In order to do everything correctly, you need to carefully study the pattern diagram and knit one or two repeats (“pineapple”) with an accurate count of all rows and arches. And everything will work out - things made from “pineapples” are crocheted easily and quickly.
By the way!Sometimes the pattern is confused with “peacock feather” or “fish”. What's the difference?
The “peacock feather” is more elongated; an “eye” is always knitted at its base. And the “fish” is a separate element of Bruges lace.
Pineapple models from our website
White openwork crochet blouse. I recently came across designs for a blouse based on a napkin with a “pineapple” pattern from Japanese magazine. And here is the result of my work. The work of Petrova Victoria.
Yarn “Coco” VITA cotton, 240 m in 100 g, 100% Merc. cotton. It took about 200 g of yarn.
Hook 1.50. Size 44.
Openwork crochet blouse, description
I started knitting from the middle of the flower. Gradually, according to the scheme, the armholes and neckline are formed. On one side you get a small seam. I tied the parts in several rows of st.b. yarn over and the last row with a “fan” pattern of half-columns (5 stitches in one loop, passing between them one loop of the bottom row. I did a WTO.
Crochet pineapple pattern


The dress is knitted for ages 1-1.5 years. The work of Natalia Levina.
Yarn Lily YarnArt 100% mercerized cotton, 225 m/50g (100g) colors lilac, a little white and emerald, hook No. 1.25, silk ribbon, lace and thin staple for lining.
Scheme of a yoke from the Internet.
The skirt pattern has been tested by me more than once; I really like it for children’s dresses. I just always knit the first row a little in my own way - I skip more stitches between reports so that the skirt is not too full.
The dress is knitted from top to bottom, starting from the yoke, with several additional rows on the back for the sprout.
A staple lining is sewn to the lace part of the skirt.
There are buttons at the back, a ribbon is threaded into the belt and into the upper part of the yoke for decoration.
Elegant baby dress for a girl. The dress is crocheted from 100% Italian cotton. The top of the dress is knitted with a “Pineapple” pattern in accordance with the diagrams. The skirt is knitted with the “Pineapple” pattern in accordance with the attached pattern. Decorated with crocheted flowers and decorated with pearls. The girl's age is 4 - 5 years. Yarn consumption - 300 g. Work by Valentina Litvinova.


The weight of the resulting shawl is approximately 175 g. Despite its lightness and delicacy, the shawl turned out to be very warm. The width of the presented shawl is 166 cm, height 62 cm.
Crochet napkin with pineapples. Work by Tatyana Razumovskaya
Good time of day!!! The napkin turned out very beautiful!!! It is knitted from Pekhorka Openwork yarn (50g/280m), 100% cotton, crochet number 1.10, consumption is 1 skein (280m). The napkin is knitted quite easily. The first 16 rows in a circle, and then according to the letters (A, B, C, D, F) that are indicated on the diagram. I hope my advice was useful to you.
I'm Natalya. I was born in Bashkiria, but I have been living in a Ukrainian village for 20 years, working as a librarian. My work is called “I wanted beauty.” I knitted a handbag from Lily yarn; factory named after Kirov (my favorite material). 4 balls went, hook number 3. The “Pineapples” pattern (in my opinion, one of the most beautiful) - the pattern is in any magazine.
For the handbag, I knitted two fabrics measuring 35 by 40 cm, connected them with single crochets, and continued with them about 5 cm down. For rigidity, I inserted a wooden stick and sewed 2 of the same on top for the entrance to the purse. I tied the handles (my bag is 45 cm, but you can choose any size, depending on how you wear it: in your hand or over your shoulder). I inserted wooden handles and sewed on the loose ends. Washed, starched, ironed. Beauty is ready!
Several options for crochet patterns for the pineapple pattern
Crochet blouse Pineapple
An elegant, openwork blouse is crocheted No. 1.1 with the “Pineapple” pattern. Size 46 - 48. Yarn 100% cotton. In 100 gr. - 600 m. Consumption 400 g. First, I knitted the main fabric in a checkerboard pattern according to the given pattern. Then I knitted the yoke and connected it to the main fabric in the last row of the yoke. Next I knitted the sleeves. Can be worn with a skirt or trousers. Work by Valentina Litvinova.
Turquoise beret with a bow. The beret is knitted from Alize Forever yarn. Yarn composition: 100% microfiber acrylic, 50 g, 300 m. Head circumference 48 cm. The beret is knitted from top to bottom according to pattern 1. When the “pineapples” are already knitted, we knit 3 rows fillet mesh, making decreases to the desired head circumference. Then we continue with an elastic band from dc (I have 6 rows). Work by Elvira Tkach.
Crochet umbrella with pineapple pattern
I knitted the umbrella last year and only recently pulled it properly onto the frame. Knitted from 10 bobbin threads, it took a little less than a bobbin. I took the napkin pattern from the Internet. The pineapple and leaves pattern is knitted very easily and quickly. Knitted in stitches with 3 crochets. Hook No. 1.8 Knitted for a child. Work by Galina Eronina.
Sundress based on a dress from Free People. Work by Olga Arikainen.
Yarn “Lotus” 100% cotton 250m - 100g. Consumption about 600g. Hook 3 mm. The dress is knitted from top to bottom, starting from the straps. Finish the bottom pineapples separately.


Crochet skirt for girls (pineapple patterns). Work by Kristina Filina
Skirt for ages 2-3 years. The pattern is pineapple, the belt is double crochet, 10 rows, 2 of them are folded inwards and sewn on, a rubber thread is inserted. Yarn alize bella 100% cotton, 50g/180m. Yarn consumption - 1.5 balls. Hook 2.7. I took the diagram from the Internet.
Crocheted triangular pineapple motif
Making products from individual elements is very convenient and relatively not difficult. Using this technique, it is possible to achieve excellent results - to create a spectacular and memorable model that will please the eye and fit perfectly into your wardrobe. This triangular pineapple motif might inspire you to create a new piece.
You will need: about 10 g of cotton yarn “Snowflake”; hook No. 0.9-1.
Cast on 10 VPs, close the chain into a ring and knit in a circle according to pattern 1. In the 8th row, start making flowers (without tearing off the thread). For the step-by-step execution of such a flower, see diagram 1 a. Pay attention to the execution of arches with “picot” in the last rows - the direction of knitting is shown by arrows.
Products with a pineapple pattern, crocheted from the Internet
Classic pineapple pattern in ribbon:
We knit into a ring of 6 air loops:
- Row No. 1: 3 VP, 1 tbsp. s/n, 3 rapports: 2 VP + 2 tbsp. s/n in the ring. We knit in turning rows.
- Row No. 2: 5 VP, 2 tbsp. s/n in next arch from 2 VP PR, 2 VP, 2 tbsp. s/n in the same arch, 3 VP, 7 tbsp. s/n in next arch of 2 VP PR, 3 VP, 2 tbsp. s/n in next arch from 2 VP PR, 2 VP, 2 tbsp. s/n in the same arch from 2 VP PR.
- We continue to knit according to the pattern until the garland reaches the desired length. The finished decoration should be properly starched, stretched and ironed with a hot iron.
Size 42 - 44.
To knit a tunic you will need:
200 g angora gray;
hook No. 3.5.
TYPES OF LOOPS.
Chain loop: insert a hook into the loop, throw a thread over it and pull it through the loop. Single crochet: insert the hook into a loop of the chain or bottom row and pull out a new loop, grab the thread and knit 2 loops on the hook in one step.
Double crochet: yarn over the hook, insert it into a loop of the chain and pull out a new loop, knit 3 loops on the hook in pairs in 2 steps.
Half double crochet: yarn over the hook, insert the hook into a loop of the chain and pull out a new loop, knit 3 loops on the hook in one step.
Fantasy pattern: according to the diagram.
Knitting density: 10 cm = 19 loops.
KNITTING A TUNIC WITH A PINEAPPLE PATTERN.
Back.
At a height of 51 cm, mark with a thread of a contrasting color on both sides of the armhole and continue knitting straight.
Before.
Cast on a chain of 89 chain stitches and knit in a pattern according to the diagram.
At a height of 51 cm, mark with a thread of a contrasting color on both sides of the armhole and knit straight. At a height of about 60 cm from the beginning of knitting, taking into account that the 8th row of the pattern must be knitted, close the central 43 loops for the neckline and knit 23 loops for each shoulder separately.
Finish knitting at a total height of 70 cm.
Sleeves.
Cast on a chain of 67 chain stitches and knit in a pattern according to the diagram.
After row 7, cut the thread.
Collar.
Cast on a chain of 111 chain stitches and knit in a pattern according to the diagram.
After 14 rows, cut the thread.
Assembly.
Pin the pieces onto the pattern, moisten them and let them dry. Sew the seams and sew the sleeves into the armholes. Fold the collar in half, sew the short sides and sew the collar to the neckline.
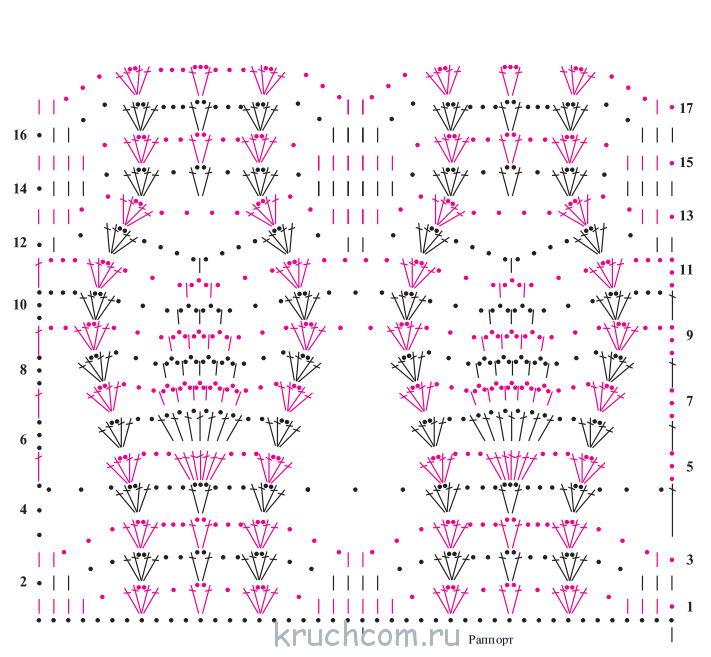
Knitting pattern for a tunic “Crochet Pineapples”
Openwork crochet top “Pineapples”

Beautiful and cozy shawls are becoming more and more firmly established in every woman’s wardrobe every year. In times of unstable weather conditions, this thing comes in very handy. And one of the most popular patterns that has won the hearts of many ladies is “Pineapples”. This one is incredibly beautiful openwork pattern At first glance it may seem like hard work, but it only seems so! Having basic knowledge of crochet and symbols, even a beginner can cope with this task. We bring to your attention a detailed lesson on crocheting a shawl “Pineapples”; diagrams and descriptions of the work will be given below.
There are several ways to knit a shawl with the Pineapple pattern:
- from the corner;
- semicircle;
- from the wide edge of the product.
Before considering these methods in more detail, let's get acquainted with the basic conventions.

With this knowledge, it will be very easy for you to read crochet patterns.
Crafting from the corner
This method is very convenient for beginner craftswomen because it is easy to perform.
We will need:
- hook No. 2, No. 2.5;
- yarn (preferably “Iris”, then your shawl will be light and airy).

We start work from the bottom corner, from bottom to top. The pattern is expanded by adding shells, from which our “Pineapple” is subsequently knitted.
Detailed job description. We start working with three air loops. From the third loop we knit two double crochets, two chain stitches, three single crochet stitches, again two chain stitches and the last three single crochet stitches. Turn it over. We knit five chain loops into an arch from two chain loops of the previous row, then three single crochets, two chain loops and again three single crochets. We turn the work around.
We knit five chain stitches into an arch from two chain stitches of the previous row, three double crochet stitches, two chain stitches and three single crochet stitches. Next we knit an arch of four air loops. In the arch of three chain stitches of the previous row we knit three double crochet stitches, two chain stitches, three single crochet stitches, again two chain loops and three single crochet stitches.
Next is an arch of four air loops, we knit into the next arch of two air loops. Three double crochets, two chain stitches and three double crochets again. We are turning the work around. Next, we continue to knit according to the pattern, repeating the report to the sizes that you need.

At the end of the work, the upper edge should be tied with a fillet net, and such a shawl can also be decorated with tassels, as in the photo:


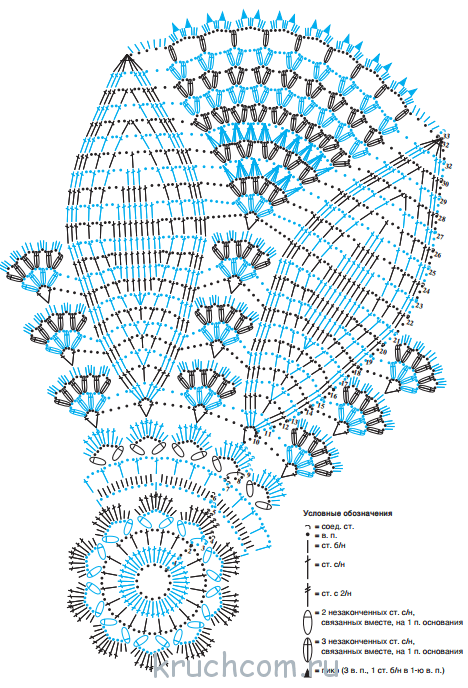
Knitting in a semicircle
There are several patterns suitable for such knitting. Using this technique, you can knit with both a continuous “Pineapple” ornament and a partial one. Let's look at examples.
Example 1
The diagram looks like this:

The differences from the previous method are that the pattern is present only along the edge of the product, but at the same time the product looks no less impressive.
This method has won attention because it is also easy to perform and does not require a special thin thread. It is believed that a shawl knitted using the “semicircle” principle looks better in a large version.
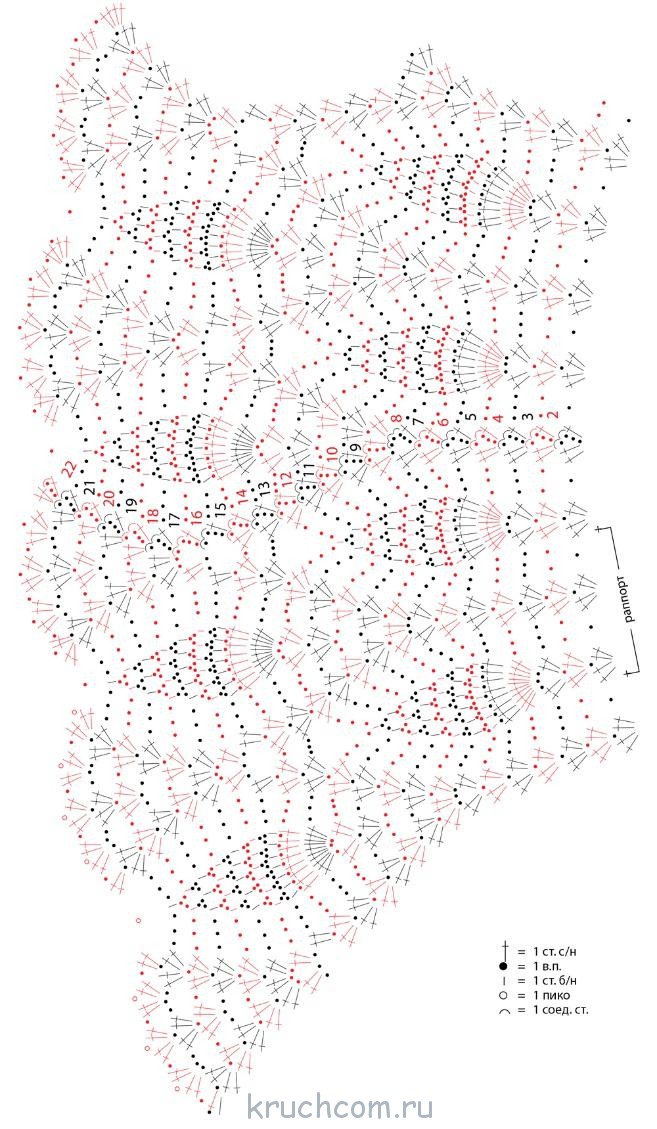
Example 2

In this example we see that the pattern is located throughout the product:


From wide edge
Another equally effective way is to knit a shawl from a wide edge.
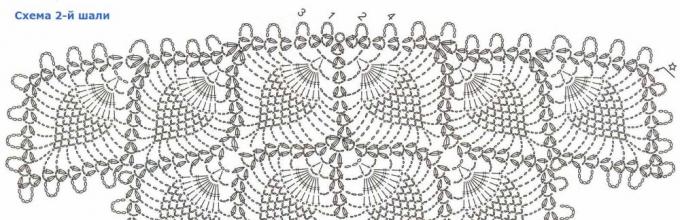
Knit according to the pattern below:

And its peculiarity is that with this knitting the edge of the shawl can be left as it is - without tying it, since this way it looks even more interesting.
Beautiful and cozy shawls are becoming more and more firmly established in every woman’s wardrobe every year. In times of unstable weather conditions, this thing comes in very handy. And one of the most popular patterns that has won the hearts of many ladies is “Pineapples”. This incredibly beautiful openwork pattern may seem like hard work at first glance, but it only seems so! With a basic knowledge of crochet and crocheting conventions, even a beginner can handle this task. We bring to your attention a detailed lesson on crocheting a shawl “Pineapples”; diagrams and descriptions of the work will be given below.
There are several ways to knit a shawl with the Pineapple pattern:
- from the corner;
- semicircle;
- from the wide edge of the product.
Before considering these methods in more detail, let's get acquainted with the basic conventions.

With this knowledge, it will be very easy for you to read crochet patterns.
Crafting from the corner
This method is very convenient for beginner craftswomen because it is easy to perform.
We will need:
- hook No. 2, No. 2.5;
- yarn (preferably “Iris”, then your shawl will be light and airy).

We start work from the bottom corner, from bottom to top. The pattern is expanded by adding shells, from which our “Pineapple” is subsequently knitted.
Detailed job description. We start working with three air loops. From the third loop we knit two double crochets, two chain stitches, three single crochet stitches, again two chain stitches and the last three single crochet stitches. Turn it over. We knit five chain loops into an arch from two chain loops of the previous row, then three single crochets, two chain loops and again three single crochets. We turn the work around.
Related article: DIY robot from waste material for beginners
We knit five chain stitches into an arch from two chain stitches of the previous row, three double crochet stitches, two chain stitches and three single crochet stitches. Next we knit an arch of four air loops. In the arch of three chain stitches of the previous row we knit three double crochet stitches, two chain stitches, three single crochet stitches, again two chain loops and three single crochet stitches.
Next is an arch of four air loops, we knit into the next arch of two air loops. Three double crochets, two chain stitches and three double crochets again. We are turning the work around. Next, we continue to knit according to the pattern, repeating the report to the sizes that you need.

At the end of the work, the upper edge should be tied with a fillet net, and such a shawl can also be decorated with tassels, as in the photo:


Knitting in a semicircle
There are several patterns suitable for such knitting. Using this technique, you can knit with both a continuous “Pineapple” ornament and a partial one. Let's look at examples.
Example 1
The diagram looks like this:

The differences from the previous method are that the pattern is present only along the edge of the product, but at the same time the product looks no less impressive.