A hat is one of the universal accessories. This headdress can be sewn from fabric or knitted from yarn. The last option is especially suitable for hot summer days or vacation time. Any needlewoman can master crocheting summer hats, they are so easy to make.
How to crochet a hat?
All hats are crocheted using the same principle. First you need to take your measurements and think about the future model. Place a measuring tape around your head. It should pass through the back of the head and the middle of the forehead. The resulting number should be remembered. This will be the size of the finished headdress.
Knitted hats can be completely different - with large, small brims, openwork or a solid pattern. It is also worth paying attention to the type of yarn. Summer hats are often crocheted from cotton and linen threads. They keep their shape perfectly. In addition, they are easy to starch. This treatment makes the edges more rigid. It is best to use threads of medium thickness.
The technique of knitting hats comes down to the fact that first you knit the crown. To do this, close the air loops into a ring, and then begin to make increases. After uniform knitting, you get a bottom that has folded edges. After that they move on to the fields. Make increases and knit the same number of loops to the desired width.
Crochet hat: knitting pattern

You will need:
- Measuring tape
- Threads of medium thickness
- Hook 3 (or any other that matches the yarn)
Manufacturing instructions:
- Tie 3 air loops and close them around with a half-column. Knit 2 single crochets into each stitch.
- Start the 2nd row with a lifting air loop. Then, in each column of the previous row, knit 2 loops according to the pattern. Complete the knitting by connecting the beginning and end with a half-stitch. This action should be repeated at the end of each row.
- In the 3rd row, start repeating: 1 single crochet in the 1st loop, 2 in the 2nd. We start the row with an air loop and end with a connecting post.
- 4th row: the first 2 loops - along the 1st stitch, and in the 3rd we knit 2 single crochets.
- Making additions in this way, knit another 10 rows. We got the bottom of the future hat. There are about 68-70 loops at its base.
- Next we knit the crown. To do this, we perform 1 stitch in each loop. In this way, you need to knit the fabric to a height of 12 cm. We knit 2 stitches into the last loop of the row.
- Start making additions. Knit 2 stitches into the first loop and skip the next one. Knit the fabric in this way up to 18 cm (total height from the beginning).
- Next row: 1 loop in the 1st column, 2 in the next. Repeat alternating until the end of the row.
- Continue knitting the hat by knitting 1 single crochet at a time. Knit in this way until the brim of the hat reaches the desired width. Cut the thread and pull the tail through the loop. Then carefully hide it.
Crochet hat for a girl: job description

You will need:
- Thin yarn like “Iris” - 100 g.
- Hook 2
Manufacturing instructions:
- Knit 12 air loops and close them into a ring.
- 1st row: 1 double crochet, 1 air loop, 2 double crochets in 1 loop, 1 air loop. Repeat this way until the end of the row.
- 2nd row: 1 double crochet, 1 chain crochet, 1 double crochet, 1 chain crochet, 2 double crochets in 1 chain, 1 chain crochet.
- 3rd row: 1 double crochet, 1 chain crochet, 1 double crochet, 1 chain crochet, 1 double crochet in 1 chain, 1 chain crochet. Knit the next 3 rows in this manner.
- 7th row: knit 1 double crochet into each loop, and 1 chain stitch between them.
- Let's move on to the fields. And we knit 2 double crochets for each loop of the previous row. Between them there is 1 air loop.
- The next rows are double crochets in each stitch. We knit in this way until the fields reach the desired width. We cut the thread and pull it through the last loop using a hook. We carefully hide the tail on the wrong side.
- You can decorate the finished hat with a ribbon or crocheted flowers.
Crochet summer hats: how to knit?
This hat model is quite simple to make. At the same time, she looks quite stylish. It can be worn with a summer sundress, denim shorts or linen trousers. The headdress is universal and suitable for any style of clothing.

You will need:
- Cotton or linen yarn, 320 m. per 100 g. - 1 skein.
- Hook 2
- Line for fixing fields
Manufacturing instructions:
- First, we calculate the diameter of the bottom of the future hat. To do this, take a head circumference measurement. Divide the resulting number by 3. Then subtract 2 cm from it. This is done because after washing the product will shrink a little, but then stretch during wear.
- We begin to knit the bottom. To do this, we close 3 air loops into a ring. Then we knit 6 loops into it.
- We start adding from the 2nd row. To do this, we knit 2 single crochets into each loop.
- 3rd row: 2 single crochets in 1 loop, 1 in the 2nd. We alternate knitting in this way until the end of the row.
- We knit according to the pattern until the diameter of the bottom of the crochet hat is equal to the number that we obtained thanks to the calculation at the very beginning.
- Let's move on to making the crown of our headdress. To do this, we knit 1 single crochet into each loop. The 1st row is performed quite tightly. Thus, we continue knitting, periodically trying on the workpiece. You need to finish the crown when it reaches the height of your ear. At this point, you need to create holes for threading the decorative tape. To do this, we knit the last row of the crown with single crochets.
- Next we move on to the fields.
- 1st row: in every 10th loop of the previous row we knit 2 single crochets. We perform the next 3 rows without additions, according to the drawing.
- 5th row: make an increase in the form of 2 single crochets in every 12 loops. We knit the next 3 rows without increases.
- Row 9: adding 2 stitches to every 14 stitches. The next 3 rows are unchanged.
- 13th row: adding 2 stitches in every 16th loop to the end of the row. Next we knit 3 stitches without increases. We have formed a slightly flared brim of the hat. Let's move on to strengthening them.
- Cut a long piece of fishing line. We press it to the last row and carefully tie it with a single crochet. When we come to the end of the row, we should cut the fishing line and connect its edges. To do this, they are melted with a lighter. We cut the thread and carefully hide it inside the headdress. Summer hat crochet ready!
- Almost all hats do not hold their shape when finished. They can be made tougher in a variety of ways. Usually starch and sugar syrup are used. A gelatin solution is no less effective. Take and heat 1 tbsp. water. Pour a 25 g bag of gelatin into the hot liquid. Mix everything thoroughly. Then add 0.5 tsp to the solution. salt and 4 tbsp. l. 9% vinegar. The liquid should be poured into a large bowl. Then they put the knitted hat there and let it get wet. Next, the product is wrung out and the water is allowed to drain.
- Cover the table with a bag or polyethylene. We put a three-liter jar on it. We put a hat on her. Let's give it shape. Special attention We pay attention to the crown. Let it dry a little. Then we remove the hat and leave it standing on the polyethylene. We wet the fields with a sponge and smooth them thoroughly. They should lie flat on the table. Let the product dry. After this, the headdress is ready to wear.
Crochet hat: photo


In order to crochet a hat, you need to take a head circumference measurement. Knitting starts from the bottom. Usually the air loops are closed into a ring, and then the additions begin. So they knit until the workpiece reaches the right size. Then they move on to the crown. It is knitted without any additions. For fields, a certain number of double columns must be made. They will help expand them. Then the fields are knitted without increments until they reach the desired width.
Thread - begonia, hook 2.1. 1 skein was enough.
I'll try to write how I knitted (from memory)
I knitted a strip around the circumference of my head from loin mesh(4 rows) - in a circle - the bandage turned out like this
Then I attached the thread and knitted the strip on top with fillet. I tried it on my daughter. The holes were large. I tied them with fans, but at the same time adjusted the pattern so that it did not expand, but vice versa
Fields:
When moving to the brim, I knitted 1 row of sc (I always knit 2-3 rows of sc, but here I didn’t knit it and the hat doesn’t fit so tightly to the head - I did this deliberately so that the hat would be looser at sea)
then 3 rows of arches from 5th century. p.
And then fans according to your favorite pattern
Then I tied a double ring of regilina sc, then with a crawfish step.
Hat “Little Lady”
diagram and description of the side part
Diagram of the bottom and crown for exhaust gas 49-50 cm.
My yarn
My connected 13 rows of the bottom:
Up to the 13th row inclusive, we knit the same for all sizes.
* * *
ATTENTION:
When knitting a pattern in those places where we stick the hook into the post, it is advisable to use the “deep” sticking method. The hook must be inserted not under the two upper half-loops of the column, but into the body of the column itself. This method will not allow the pattern to shift when we knit with the crown.
* * *
Starting from the 15th row for all sizes we knit according to the pattern. Repeat rows 15-20 two more times.
They differ from the 15-20th only in the last row. Instead of a dc, I knitted a sc.
We also knit rows 33-38 according to the pattern.
38th row - RLS in each column.
The fields start from the 39th row.
We finish with the CROWN and insert the FIRST regelin equal to the circumference of the head. I made one vein. This is where we complete the work of the RLS. Steam.
We knit the BRIMS of the hat.
In the 39th row we make increases in every 3rd column,
In the 45th row - every 4th, in the 51st - every 5th.
The point is that in each row with increases you need to add 56 CH (7 reports). That is, in the 39th 168/56 = 3, in the 45th (168+56)/56 = 4, etc.
STRENGTHENING FIELDS.
After the last row of fields is knitted, they need to be steamed well.
On a horizontal table surface, the fields should have the shape of a flat circle.
We take the SECOND regilin (TWO veins at once) and tie it with RLS. The length of regiline is not measured in advance!!! They just cut off the excess later.
We straighten the fields well.
Let's steam!
We tie the same row of RLS again. And we tie the last row with a “crawfish step” through the post.
On a plane, the fields should still be shaped like a flat circle.
Once again we steam the fields with an iron through a damp cloth!!!.
To add rigidity, I used SALVITOSE, which is used in felting.
Air dried.
DECORATION.
It must be removable - on a pin or button.
Knitting daisies is very easy.
Dial a chain of 2 v. n. In the first of them, knit 8 half-stitches and close them in a circle in the 1st half-stitch.
When the whole chamomile is ready, tie each of its petals in succession with connecting posts. This will allow them to keep their shape and not curl.
For the centers of the daisies, make small pom-poms using a regular dinner fork.
We wrap thread around the teeth of the fork. Then we tie it with an additional thread in the middle, remove it from the fork and tighten the knot. Then fluff and trim. Sew to the center of the daisy.
Two daisies are small, and one is slightly larger. For it, the scheme is the same, only for the petals we dial not 7, but 9 v. p.
I made a decoration on a button clasp for bags.
We will need a button and a knitted circle - this is what the daisies will be sewn on:
In finished form:
We attach the button to the hat
Scheme (for petals only):
Designations: the sketched dots on the diagram are the loop that is on the hook; the numbers in brackets are the number of loops that we pull from the connected column (to make it easier to count loops)
Blind (connecting) loop
I knit from Soso threads (50g=240m) with a regular hook No. 1.5 (without a handle)
Step by step photo process:
1. We knit 6 single crochets into a sliding loop
tighten the thread and close it in a circle.
2. Grabbing only the back half of the loops, we knit 11 single crochets (1 sc in the first half and 2 sc in the subsequent ones), connect them in a circle.
Half loops of a smaller circle will be needed for the upper petals.
3. We knit arches for the lower petals: cast on 5 air loops (c), skip 3 loops of the circle, fasten to the fourth; repeat 2 more times, fasten the last arch into the loop from which the first arch was knitted.
4. We begin to knit the first lower petal: Cast on 4 stitches. p. If you turn the knitting a little, the back (purl) jumpers will be visible
there is one loop on the hook (shaded point in the diagram), we pull out one loop at a time from the purl jumpers (4 sticks), we pull the last one out from under the arch (outermost stick)
there should be 6 loops on the hook
5. Close the row: grab the working thread and knit loops in pairs on the hook (grab the working thread and pull it through 2 loops, grab the working thread and pull it through the next 2 loops). We have the first row (connected column)
6. If you turn the knitting a little, the purl jumpers will be visible,
We knit one in. p.; we pull out the loops from the purl jumpers (1 on the hook + 5 from the jumpers + 1 from under the arch = 7 loops).
We close the row in pairs.
7. Next, we begin to cut the loops. In the sixth row, we begin knitting from a blind loop (insert the hook into the first jumper, grab the working thread and pull it through the loop on the hook). from further jumpers we pull out a loop and the last one from under the arch
We close the row in pairs.
To finish the first lower petal, we knit a blind loop into each purl jumper, and one under the arch
We make one blind loop in the next arch and begin to knit the second lower petal in the same way as the first. After you tie all three arches, it will look like this
To move to the upper petals, make 1 in. p insert the hook into half the loop of the small circle and knit a blind loop
On a small circle you need to tie 3 arches from 4 in. p (2 arches for petals and 1 for the core)
8. Dial 5 v. p and knit the first connection. upper petal column
First upper petal:
Two petals
We tie the upper petals with single crochets (I laid thin wire along the contour to better hold their shape). The lower petals were tied with stbn (without wire). It turned out like this
Sew on beads, maybe small beads, and admire
Starching caps
1. Wash the hat in warm water(30-40 degrees). I use bleach to wash my white hats. washing powder, for colored - powder for colored things.
2. Prepare the starch. To do this, pour 2 tablespoons of starch into a bowl and dilute it with 1/2 cup of cold water (to avoid the formation of lumps). Then pour boiling water, about 1 - 1.5 liters, stirring constantly. The mixture should be thick and transparent. Leave to cool.
3. Carefully starch the washed hats, squeeze them (without twisting), removing excess starch.
4. To dry the hats, I use regular inflatable balloons, after inflating them to the desired size.
5. During the drying process, I periodically give the brim the desired shape, and iron the brim of the openwork caps through a layer of fabric.
MORE HATS AND FLOWERS WITH THEM WITH DIAGRAMS
click on the picture to enlarge
Of course, you can find and buy a hat for your little fashionista in any children's store. But not a single store-bought hat can compare with one that is knitted with your own hands. Girls in handicrafts stand out from others.
Such products are ideal for the off-season, when it is no longer cold outside, but not yet warm. And in the summer it will protect from the sun and not heat up the child’s head.
Hats can be knitted or crocheted. The hats look especially beautiful crocheted made from beautiful and bright yarn. You can knit a product for your child’s small head even in the evening if you know how to handle this handicraft device and read knitting patterns correctly.
Requirements for a knitted hat
You can crochet a hat of any shape and design, as much as your imagination allows.
For beginning needlewomen, crocheting a hat for a girl can be a difficult and even nerve-wracking process.
But with a little practice, you can easily create different patterns using basic types of loops.
Crocheted autumn hat for girls
To knit a hat you need good yarn(anora, mohair or alpaca, bouclé threads) and of course, a good hook. The product is knitted with a double crochet.
The scheme will be as follows:
- 1st row - one chain loop is made, 12 double crochets must be knitted from it;
- 2nd row – in each loop of the previous row, knit 2 double crochets. The result should be 24 columns;
- 3rd row - knit in the same way according to the pattern: 2 double crochets in one loop; 1 double crochet into a loop. You will get 36 pieces;
- 4-6 row - 2 columns in one loop, then also one column in 4 loops. Then the pattern is repeated;
- Rows 7-14 – each stitch is knitted in one loop.
The hat is tied around the edge with scallops or simple posts. The edge can be made with threads of a different color, the main thing is that they are in harmony with the main one. The decoration is a flower on the side.
Description of the flower scheme:
- an air loop is made and tied with 15 stitches;
- Next, there is a diagram: 6 columns (2 in each loop) and a simple column;
- the next row is done in the same way;
- you will get a flower with five petals.
Scheme of a crocheted hat with a brim for girls
If you are great at patterns, you can knit a lightweight cotton hat like this with a brim for the summer. For this you will need cotton yarn and our handmade “device” No. 1.7-2.
Knitting should start from the top.
Headband hat for summer
Basic first openwork pattern a rectangle is made. Then the mesh and pendants are added. The flower is knitted separately. The pendants are gathered into a bunch and a flower is sewn on top. You can knit the main part in the round with a 2*2 elastic band, then make a binding on top.
Autumn knitted beret
For a girl, you can crochet a beret hat. It will look very beautiful and impressive. This headdress is suitable for autumn, although you can knit it for summer only from thin yarn. For cold weather you need to use thick yarn.
So, below is a diagram of a beret hat for a girl, a description of crochet.
To crochet a warm hat for a girl for autumn, you need warm yarn from soft threads. This option is quite suitable for a girl of 10-15 years old.
Hand-knitted hats for children will always be in fashion because they attract attention with their originality, beauty and uniqueness. They can be very diverse in shape and appearance, suitable for any time of year. The selection of hats for girls is especially rich. They can be decorated with flowers, stones, ribbons and other decorative elements.
Who would have thought that you could crochet a hat! Despite the apparent difficulty, even beginners can do this within one day. This is a traditionally feminine accessory, so our article will look at various ways of knitting hats for girls and little girls who do not want to lag behind fashion.
Photos of women's crocheted hats
Women's hats knitted by themselves look incredibly elegant. With such a headdress you will definitely not go unnoticed. Look at the photo finished works from professional craftsmen, perhaps very soon you will become the owner of such an original and cute hat.


Children's options are no less beautiful. The hats of little fashionistas can be decorated in any way you like. Pineapples, violets, roses, daisies and berries are ideal.


Master class and description of crochet hats
As children, many girls were jealous of their dolls because they had such beautiful hats. Now you can make your dream come true and become the owner of an ultra-fashionable and modern headdress.

Our master class is dedicated to creating a small children's model with improvised brims and a satin ribbon as an additional decoration. Openwork knitting makes the product airy and soft - ideal for the summer season.
To get started, select suitable color thread You can take any patterns, but we suggest using ours if you do not yet have experience in knitting such products. Our description will help you figure it out if anything is unclear.

The amount of yarn depends on the size. But, considering that we are knitting a model for a girl, 100 g of cotton thread will be enough for you. To work, use hook number 2.
At the very beginning you need to knit a simple chain of air loops. Secure it in a circle. The next row consists of three lifting loops and 30 double crochets. Then you need to lift again, and then knit, alternating two chain stitches and one double crochet. The third row will already have 44 double crochets.
Now pay attention to the diagram. It shows how to knit further. Just follow the directions and you'll soon be able to enjoy the sight of a beautiful pattern. You should end up with a large dome with connected openwork petals. It needs to be carefully starched and the brims turned outward. Then you need to thread satin ribbon in lace and tie it with a beautiful bow. At this point the work is completed, and you can already show off your brand new hat in front of your girlfriends.
How to create a crochet hat with a large brim: diagram and video
The hat in the previous master class has very small brims. If you like a model with large edges, you will have to use a wire frame. The fact is that starch will not overcome the weight of the knitted pattern, and the brim can quickly drop, and the product itself will lose its appearance.

For knitting you will need white cotton yarn, at least 150 g. The work begins by making 6 air loops that are connected into a ring. Knit the next rows according to the pattern shown below.

Once the hat is ready, attach the wire frame to it, giving it the correct shape. It would be advisable to additionally starch the product and place it on the mold.
Another interesting lesson is offered in the video. You don't need a pattern to create this hat. Its author comes up with the patterns himself. Just listen to the recommendations and see how to knit a hat correctly. The beauty of the finished product can be enjoyed after a few hours of effortless work.
Photos of hats in retro style, with large brims and made of lace
A woman's hat can be made in any shape. Recently, retro-style products have been in particular demand. We offer several options for this type of hat.

In the summer, you need to protect your face from the sun more carefully. A beautiful hat with a large brim will help you with this. In it you will be like a real English lady at a reception with the Queen.

Summer children's hat for girls! A wonderful decoration for a little princess!
We will need:
- yarn for a hat 169m/50g (consumption for the hat itself - 1 skein);
- hook No. 2.1 and No. 2.5.
We’ll take this pattern as a basis, but we’ll make our own adjustments during the knitting process. The hat will fit on an OG of 48-50 cm.

We will use abbreviations: v.p.- air loop; SS- connecting column; RLS- single crochet; CH- double crochet; S2H- double crochet stitch; С3Н- double crochet stitch.
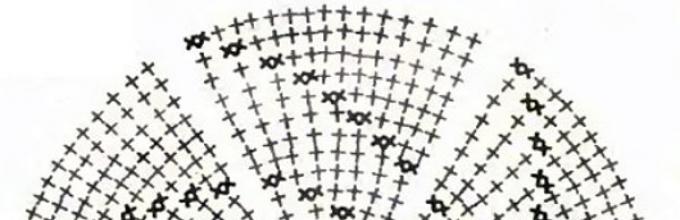
I draw your attention: Each row starts with 4 ch. - 3 lifting loops and 1 ch. for the arch.
The hat pattern is knitted in the form of the so-called. "tick" - 2 dc, separated by 1 ch. into the arch of the previous row. The expansion of the bottom to the required diameter occurs by uniformly adding 6 “checkmarks” in each row. To ensure that the corners in the places of increases do not stand out sharply, the increases in each subsequent row are made offset by half a segment relative to the previous one.
So, let's start: 4 ch. - we close it in a ring.
1st row - 4 v.p. (3 lifting loops and 1 ch for the arch), 11 CH.
2nd row - in each arch of the previous row we knit 2 dcs, separated by 1 ch. It turns out 12 t.n. "tick".
3rd row - we begin to make “tick” increases. In each subsequent row there will be six such increases. The essence of this increase is to knit an additional “tick” between the arches of the previous row.


Row 4 - make 6 tick increments every 3 ticks of the previous row.
Row 5 - make 6 tick increments every 4 ticks of the previous row.
Row 6 - knit without increments. In each arch of the previous row we knit 2 dcs, separated by 1 ch.
Row 7 - make 6 tick increments every 5 ticks of the previous row.


Row 8 - knit without increments. The bottom begins to round out a little.
Row 9 - make 6 tick increments every 6 ticks of the previous row. This is where the increases end and we continue to knit the hats to the required depth without them. The bottom was 13 cm. I got 26 rows from the beginning of knitting and the height of the hat to the brim was 17 cm.


This is what the seam looks like.

For the fields we knit 2 rows of sc. In the second row we make increases in every 5th column. In the next row, in each top of the column of the previous row, we alternately knit 1 embossed column and 1 DC. That. crochet number 2.1 we knit three rows of fields. Now change the hook to No. 2.5 and knit 2 more rows. The photo shows that the brim becomes perpendicular to the hat itself from the first row of knitting. We knit the last row in crab step with crochet number 2.1.


