To make a pattern of children's dresses and sundresses, it is not necessary to be able to sew dresses for adults and be a sewing master. Many models of dresses and sundresses are sewn very simply, and it will take no more than 30 minutes to build a pattern. And a dress with a size for little ladies will be special and individual, unlike the one bought in the store.
Easy option
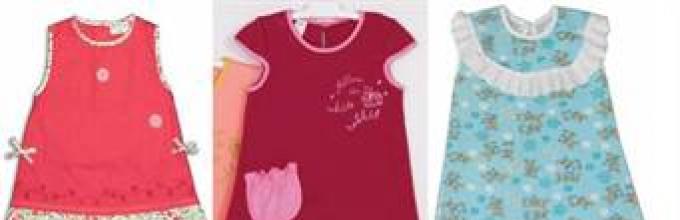
The simplest dress is one-piece, which is sewn from any materials. Suitable for ages 1 to 3 years old. For 3 years, many sew more difficult dresses, but in quality summer lung option this style is suitable for 5 years. Patterns of children's dresses for girls can easily be found in our material.
The basis for the dress can be downloaded for free on the Internet, and then adjusted to fit the right dimensions and add details - ties, pockets, an additional skirt, buttons. But it is more interesting to do it yourself, especially since it does not take much time. Learn how to make this outfit below.
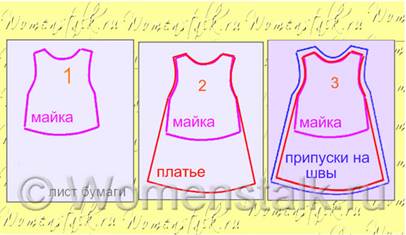
- Prepare pattern paper. Find a T-shirt in your daughter's wardrobe that is not small for her;
- Next, lay the T-shirt on the paper and smooth it out so that there are no extra wrinkles. Circle the outline of the shirt, or only the outline of the neck and armholes. Next, the lines need to be expanded to the bottom, and rounded at the bottom. It’s not scary if the pattern turns out to be asymmetrical, since only half of the product is needed for sewing.


- Choose the length of the dress, choosing by age. Choose the neckline of the dress. Next, measure the circumference of the child's chest, divide it in half, getting a half-girth. Determine the size of A and B. If there is no child nearby, or you are sewing as a gift to someone, you can refer to the tables that indicate the sizes for small children.

- Measure the distances for allowances so that the dress sits freely on the child;
- Divide the pattern in half and cut it, since only one half is useful, you can choose the most successful half if they turn out to be different.
summer model
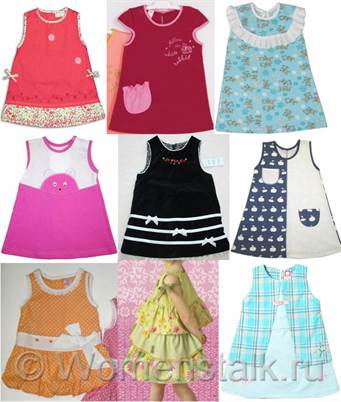
Summer sundresses come in completely different models: from simple ones with ties to complex patterned multi-layered sundresses. Consider two sundresses. For a sundress, a child under five years old will not need difficult patterns. You can make a simple sundress with straps.


It is even easier to sew a sundress that is tightened with a ribbon. And it looks bright and beautiful, suitable for any age of the child.


For a teenage girl
It’s not much more difficult to sew a sundress for 10 years, but it’s unlikely that everything will be done by eye, so it’s better to take the basic dress pattern as a basis.

It will be a fitted, sleeveless dress with a large bow in the front.
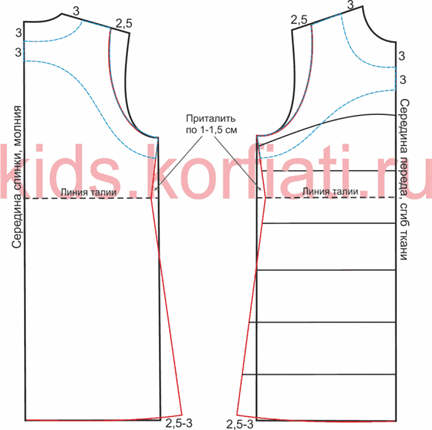
Front and back. The neckline needs to be deepened by 3-4 cm, a new cutout must be built according to the specified parameters. In order for the dress to emphasize the beauty of the figure, it must be fitted and extended downwards. On the back, on the waistline, retreat 1.5 cm, increase the bottom line by 3 cm. Since the dress has thin straps, the shoulder needs to be reduced by 2.5 cm and a new armhole should be made. Next, with a width of about 3 cm, make the facing of the neck and the facing of the armhole.
Color transition. The dress will be with a color transition, so the color change on the dress should be marked with horizontal lines. You need to do both on the front and on the back pattern.
Cut the pattern and you can start sewing.

The basis of the outfit

In order to sew many dresses for your child, you can make a base pattern, according to which in the future it will be easy to sew any dress. To do this, you need to take measurements:
- Lengths: back to waist, total length, shoulder, sleeve;
- Semi-girths: neck and chest.
Construct a rectangle on graph paper ABCD, AD is the length of the dress, AB and BC are the width=Lift+4cm for the allowance.
Please note that the allowance can be made smaller, then the dress will fit more tightly.
From A, retreat 1/3 * Pog + 6 cm and put G. From G, draw a line to BC, mark G1. From A, retreat Ds and note the longing of T, draw a line from it to BC and put a point T1. Divide GG1 into two equal parts, mark G4 and draw a line from it to DC, designate H and H2. From G4 to the right and left, set aside ½ * the width of the armhole (Shp = ¼ * Pog + 2 cm). Put G2 and G3. From G2 and G3, build straight lines up to AB, put P1 and P. From B and P1, retreat 2 cm, put P2 and P3. Make a segment P2P3. Divide PG2 into two equal sections, and divide P1G3 similarly into three sections.
From A, step back to the right 1/3 * Posh + 0.5 cm, and another 1.5 cm to the right, connect the curve with A, you can use a pattern. From P, retreat 1.5 cm, draw a shoulder line along the points obtained, length \u003d Dp. Divide the G2 angle in half and step back on the resulting line 2.5 cm, draw a line to G4.

From T2, retreat 2 cm, through G4 and the resulting point, draw a line to DC, without leading to the end of 1 cm. Divide DH in half, connect the resulting point with 1 cm. From P3 retreat 1/3 * Posh + 1 cm down. From P3, retreat 1/3 * Posh + 0.5 cm to the left. Connect the points obtained with a curved concave line. From P2, retreat 3 cm and draw a shoulder line. Divide angle G3 in half. Draw an armhole line through the division P1G3 to the point G4. From T2, step back 2 cm to the left, draw a seam line from G4 to DC, without finishing 1 cm. From T1, step back 2 cm down and connect to point 2 on the seam. From C, make segment BC 2 cm longer, connect the points along the bottom.
The pattern is ready, it can be used as a basis for any dress of little princesses!
Video on the topic of the article
Hello. I spread the size range from 80 to 152 cm of dress patterns for girls. Dress of a free cut, with a sleeve.
The pattern is like this.

Simple cut dress. Sleeve pattern with a fold, the same line for front and back.
The neck is high, such to which the collar is sewn. If there is no collar, the neck should be deepened and expanded.
Despite the fact that the dimensions are given up to a height of 152 cm, the patterns are designed for undeveloped children's figures.
The sleeve, of course, can not be sewn.

Dress length to the knee.
Patterns:
| Age / Height / Bust | Pattern |
| 1 year / 80 cm / 50 cm | Download |
| 1.5 years / 86 cm / 52 cm | Download |
| 2 years / 92 cm / 54 cm | Download |
| 3 years / 98 cm / 55 cm | Download |
| 4 years / 104 cm / 57 cm | Download |
| 5 years / 110 cm / 59 cm | Download |
| 6 years / 116 cm / 61 cm | Download |
| 7 years / 122 cm / 63 cm | Download |
| 8 years / 128 cm / 66 cm | Download |
| 9 years / 134 cm / 69 cm | Download |
| 10 years / 140 cm / 72 cm | Download |
| 11 years / 146 cm / 75 cm | Download |
| 12 years / 152 cm / 78 cm | Download |
The second pattern is built according to the system of the Müllers. According to German accuracy, it carries the display of anatomical features. In general, this pattern is for fans of the German pattern building system and not for beginners.
You can use the tuck on the back armhole for a good fit, or you can ignore it.

Pattern in PDF file in full size. When printing, set the scale to 100%. After printing, you need to glue the sheets side by side, without overlapping the sheets and without cutting the margins.
Patterns are given without seam allowances.
Patterns:
| Age / Height / Og / About / Length | Pattern |
| 1 year / 80 cm / 54 cm / 57 cm / 38 cm | Download |
| 1.5 years / 86 cm / 55 cm / 58.5 cm / 41 cm | Download |
| 2 years / 92 cm / 56 cm / 60 cm / 44 cm | Download |
| 3 years / 98 cm / 57 cm / 61.5 cm / 47 cm | Download |
| 4 years / 104 cm / 58 cm / 63 cm / 50 cm | Download |
| 5 years / 110 cm / 59 cm / 64.5 cm / 53 cm | Download |
| 6 years / 116 cm / 60 cm / 66 cm / 56 cm | Download |
| 7 years / 122 cm / 62 cm / 68 cm / 60 cm | Download |
| 9 years / 134 cm / 66 cm / 72 cm / 68 cm | Download |
| 10 years / 140 cm / 68 cm / 74 cm / 72 cm | Download |
You can decorate the dress with a collar and lace

shuttlecocks

make the dress layered.

I also collected several options for modeling patterns: how to modify a dress.


You can cut off the skirt and make the assembly. The width of the skirt is doubled.

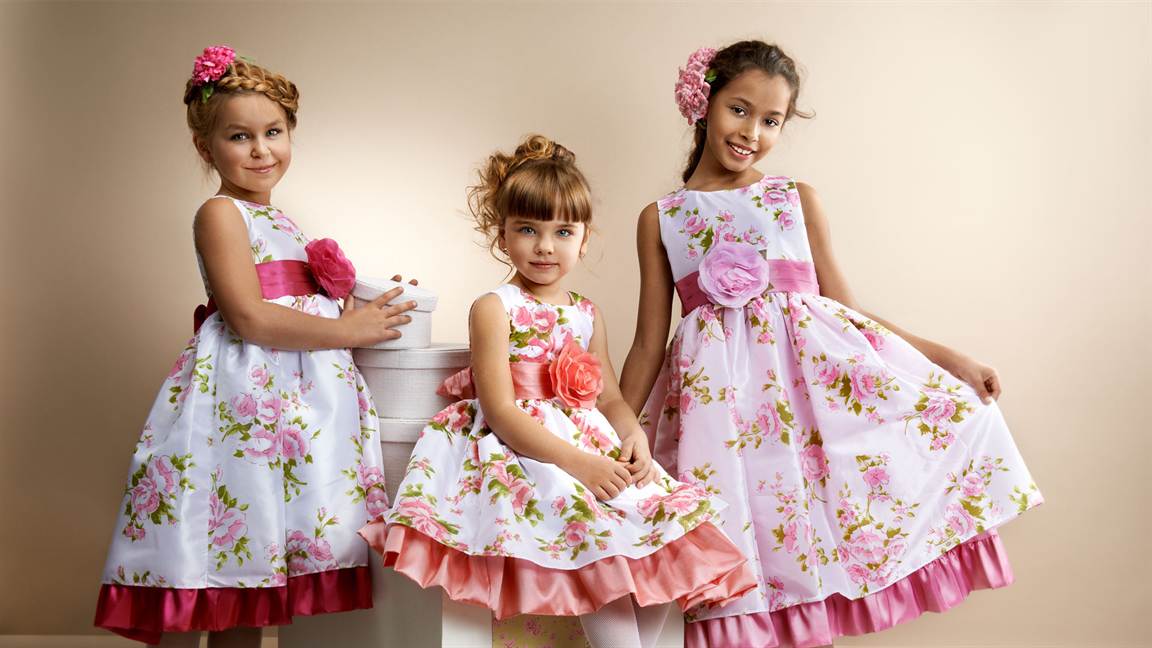
Any little girl, even at the age of one, dreams of becoming the most beautiful princess in the world. And in the life of your beloved daughters so often there are children's holidays. At matinees, concerts, birthdays or any other important event for a child, your little fidget turns into the most beautiful lady. But for this you need to visit several stores or malls, because choosing a dress can be far from an easy task.
Let's say here it is, the cherished purchase, it would seem that the dream has come true, but the price simply does not allow you to buy this expensive thing. This is where your headache begins, but not everything is so sad. There is no need to worry about this kind of difficulty. Now you can sew Christmas or holiday dress for little beloved mademoiselle himself, while not even knowing how to properly sew. Since there are a large number of patterns, both complex and simple. In this case, your desire is an important priority.
Be patient and good mood get to work.
Invest in every detail, in every stitch, a piece of your soul, only then you will get a result that will exceed all your expectations. Let's take a closer look at a few patterns of dresses for girls.
Ball gown with tulle
 First of all, you need to make a skeleton, that is, a ball gown pattern. But most first step there will be a choice of material that is more appealing to your masterpiece. It should be organza, satin or silk, in general, see for yourself. So, we make the necessary measurements and approximate values \u200b\u200bfor the age from 3 years to 6 will be described here:
- shoulder length (9 cm);
- neck girth (12 cm);
- bust (27 cm);
- sleeve length (27 cm);
- dress length (45 cm);
- back length back to waist (23cm).
It will have slightly different sizes, so be sure to clearly measure the child, and then transfer everything to paper. Try to carefully calculate each segment in the drawing, this is very important.
Basic steps to pattern dresses for girls
 Now, step by step, to make it clear, let's do do-it-yourself ball gown pattern for a girl:
- We take a blank sheet of paper and draw a rectangle on it, which we denote by ABCD.
- In length on both sides of AD and BC, it will be 45 cm.
- The width of AB and SD must be calculated as follows, the number 9 for any size is added to the circumference of the chest, that is, 27 + 9 = 36 cm.
- We calculate the depth of the armhole: 1/3 of the chest circumference plus 6 cm. We get the following calculation: 27: 3 + 6 = 15 cm. From point A to point D, mark 15 cm and call it the letter G.
- Now we draw a horizontal line from G to the intersection with BC and call this point G1.
- We denote the waist line: from point A towards AD, we count the length of the back to the waist 23 cm and call it the letter T. From here we draw horizontally to the right and get point T1 at the intersection with BC.
- We calculate the width of the back and mark it on the drawing: add 4 cm to 1/3 of the chest circumference: 27: 3 + 4 \u003d 13 cm. From the point G in the direction of the segment GG1, we determine 13 cm and call this place G2. Then from this point we draw a perpendicular and the intersection with AB, denoted by the letter P.
- We find the width of the armhole, for this we add 1 cm to 1/3 of the chest girth, calculation: 27: 3 + 1 = 10 cm. From G2 to GG1 we count 10 cm and call G3. Now from G3 we draw a perpendicular crossing AB, marking this place, point P1.
- Let's do the lifting of the shelf, draw vertical lines from P1 and B 2 cm up, getting new points P2 and W. It remains only to connect them to each other.
- Another calculation of the side line. We count 3 cm from G2 to GG1 and get G4. From the last point we descend perpendicularly to the DS line and get the point H. The middle of the intersection with TT4 will be called the letter T2.
These were basic pattern steps, but there are also auxiliary ones that definitely need to be completed.
Additional Steps for the Ball Gown Pattern
Take a break, look at what drawing you got on this moment, and proceed to complete this pleasant and useful business with your own hands.
- First, the first step of the additional pattern steps from the back:
- So, we determine the auxiliary points of the armhole and shoulder lines for this PG2 and P1G3 divide into equal four parts.
- We proceed to cut the neckline on the back: add 0.5 cm to 1/3 of the neck circumference, 12: 3 + 0.5 = 4.5 cm. From A to AB we count 4.5 cm, and then from this point another 1, 5 cm and connect with a line with t.A.
- Now the slope of the shoulder and the line of the armhole from the back. We divide the angle PG2G4 in half and draw a dotted line. From the point G2 we count 2.5 cm, and from G4 - 0.5 cm, and through the middle place of dividing these lines we draw a line that highlights the line of the armhole.
- Let's make a side seam. From T2 to T4, we count 1 cm and draw a line through 0.5, T4, 1, to SD, call H1. Now we rise up 1 cm from H1.
- Decorate the bottom line by dividing it into two equal parts of the DN. And then we combine the center and the place with the name 1.
2. We begin the second stage of the pattern of additional front steps:
- Let's make a neckline, from Ш towards ШП2 we set aside the number that we get by adding 0.5 cm to 1/3 of the neck girth, that is, 4.5 cm. From this place we go down 5.2 cm along the ШС.
- Now the slope of the shoulder and the line of the shoulder. From point P2 we go down 3 cm. Then we combine place 3 and 4.5. From the last we count 9 cm.
- Remained armhole line and side seam. In the first case, we divide the angle P1G3G4 in half with a dividing line and count 2 cm from the place G3. From P1G3 to the right 0.5 cm. We connect with a smooth line 9.0.5 and 2. Now for the side seam we count 2 cm towards TT1 from T2. And, finally, we draw a line through 0.5, G4 and 2 until it connects to the place of SD, we call the point H2. Then we rise from it by 1 cm.
Complete pattern ready puffy dress for a girl who, at first glance, may seem complicated. But gradually going through all the steps, you can easily draw it. Then it remains only to cut the fabric and carefully sew. This do-it-yourself ball gown can be sewn for any event.
We sew an elegant dress for girls
 It will not be difficult to sew an elegant dress for girls with the above pattern. After making a drawing and choosing a fabric, we start sewing. Cut out the ball gown pattern. If you want to make some interesting collar, then you will need a special separate pattern for this.
The clasp is mainly made in the back of the product, but it can also be done in front. Let the girl try on the dress, and only then grind the side and shoulder seams. Separately take care of the gate, if it is needed there. Similarly, the sleeves, but better without them. And if you still decide to make sleeves, then there is a very easy way. Take an old, unwanted dress with sleeves that can be undone. Then cut the sleeve along the seam and circle the resulting product. Now measure your child’s hand with such a pattern, adjust it, but do it with a small margin. First, baste the sleeve with your material and put it on your arm again. If everything is in order, then you can safely continue to sew.
After you finish sewing the sides, you can make all kinds of embellishments on the dress. Beautiful flowers from organza or lace, for which your imagination is only ready to fly. And separately sew all this beauty to your magnificent masterpiece.
Well, you are just magicians, you could still sew an elegant dress with your own hands. It doesn’t matter how old your child is, 3 years old or 5 years old, just follow these recommendations clearly step by step, and everything will certainly work out.
The simplest pattern for an elegant dress for girls
If it was difficult for you to work with the first pattern, then try this one, the easiest and most convenient. To do this, take a children's T-shirt or T-shirt, then cut it off along the waistline. As you already understood, here you do not need to measure your hand and make patterns for sleeves. Separately, we sew a beautiful, fluffy skirt from a fabric cut into a rectangle. And the bottom of this skirt can be decorate with some airy frill.
After that, we simply sew the wrong sides of the top and bottom, that is, a T-shirt and a skirt. By the way, a lush beautiful bow on the belt will look good.
Do you want to make an elegant dress for a girl with your own hands? It can be sewn or knitted or crocheted. The article contains simple options that even a beginner can handle. Choose models, read comments. Make outfits for your little fashionista.
Advantages of self-production
Does your princess like to spin in front of the mirror? Does she like to wear beautiful and original things? Please your daughter with a gift own production. elegant dress for a girl with your own hands, you can sew or knit. Both options have the following advantages compared to buying a finished item:
- made exactly to size;
- have an individual design (your daughter will not be in the same outfit with another girl);
- both of you like it, as the model was chosen jointly from the pictures and tried on during the creation process.
How to make dresses: which one to choose
If we compare the two manufacturing methods with each other, tailoring an outfit has several advantages over knitting. They are the following:
- takes less time;
- allows for a simple pattern to get beautiful thing due to expensive and spectacular material;
- you can guess in advance how the product will look on the girl by attaching the fabric to the figure or even wrapping the child in the material;
- allows you to create a spectacular in the form of a ball or evening option.

If you want to do light beautiful complete with panama hat and bag, and also have the patience to count the loops and the pattern, feel free to choose the crochet method.

Tools and materials
When you have decided on the method of making things, start looking for a specific model and buy everything you need to create it. In the case of crocheting, you will need the tool itself, yarn and a pattern. For tailoring, you need much more:
- pattern;
- fabric for dress;
- material for a petticoat, such as tulle (required in a lush version);
- regilin and corset tape to stiffen the seams and bottom;
- pins;
- tailor's chalk;
- scissors;
- needle and thread;
- sewing machine.
The list can be both large and small, because children's dresses for girls, elegant or casual, are sewn in different ways. Schemes and technologies are used both the simplest in the form of one-piece models, and very complex ones.
Decoration methods

An elegant dress for a girl with your own hands can be sewn using the most

Beauty will be created by the material from which the thing is made, and the decor. You can add the following details to the product:
- frills on a skirt or top;

- fabric flowers;
- lace;
- original belt;
- bows;
- beads and beads;
- satin ribbon embellishments.
A set with a handbag and a headband or hair clip made of the same fabric will look stylish and original.
How to sew an elegant dress for a girl with your own hands?
Regardless of which model you will make, the general scheme of work is as follows:

In each specific model, there may be other specific steps, for example, making a petticoat, fixing regilin or corset tape, making darts, frills.
How to take measurements?
Children's dresses for girls are elegant, as well as everyday ones, are sewn in accordance with the size of a particular child. This is the advantage of custom manufacturing. The main thing is to correctly determine all the values by which you will build a pattern or adjust the finished template.

So, you will need to know:
- breast size;
- waist
- hip girth;
- the height of the dress from the shoulder line to the desired length (to the floor, below the knee, etc.)

Using these parameters, you can easily build a simple pattern-template, which can then be improved in accordance with the selected model.
How to make frills?
Elegant dresses for girls (photos below) are made according to simple patterns.

Their beauty lies in the use of a large number of ruffles both to finish the bottom edge and to form the skirt itself.

It is easy to make such decor. The scheme of work will be as follows:

How to sew a fluffy dress?
The frills mentioned in the previous section create relief, decor and at the same time add volume to the dress.

However, it takes a lot of time and patience to make a large number of layers with frills. There is another option, how to make an elegant dress for a girl.

Lush and at the same time airy, it will look spectacular on any figure.
To create such a model, you will need the following:
- Make a certain pattern for the skirt.
- Sew a petticoat, preferably with regilin.
As for the template, you can also take it ready-made or build it yourself. The figure below shows a pattern where the front part is made as one piece. In this case, the skirt will have an easy assembly.

The second way to make a lush hem
To get a wavy surface, you will have to cut out the corresponding part, which is called a sun skirt.

The direction is indicated on the workpiece. It is not difficult to build such a template according to your size. This can be done with a stick with a thread tied to the upper end with a writing instrument (pencil for paper, chalk for fabric).
The paper template is applied to the fold line. The detail is cut along the oblique. As a result, you should get a circle with an inner hole with a diameter corresponding to the waistline.
The petticoat can be made according to the same pattern or another. As can be seen in the diagram above, lush elegant Long Dresses for girls can be made from several additional layers petticoats. They are connected to each other and the base. If, for example, tulle is used for them, the outer layer may be from a different material or from the same.
To obtain a shape-holding edge, regilin is used. It stiffens the seams and allows you to get beautiful waves on the bottom. You can process the edges but the effect will be somewhat different.
How to choose the right model?
So, you have seen how different elegant dresses are. For teenage girls, they can be both lush, with frills, and straight. It is important here that the style fits the figure and is liked by the schoolgirl herself. For thin ones, any options are suitable, for plump ones it is better to choose those that make wide hips invisible and do not focus on the waist. Little girls will do just about anything.
If you are going to sew with your own hands, measure the desires of the child with your experience and capabilities. If you are new to this business, take the most simple patterns. It is better to use additional decor. It's always easier to make it. And also do not forget that there is another equally interesting alternative to tailoring - dressy for girls. They may not be suitable for graduation or some too solemn official event, but for family celebration, visiting or summer holiday on the street will be just right.
Crocheted elegant dress for girls
Entire sets look very cute and beautiful when panama hats and handbags are made from the same yarn.
Summer dress with straps is made of two parts. The knitting patterns for each are shown below.

After both blanks of the product are completed, you need to connect them into one.

An elegant crochet dress for a girl can be crocheted according to the second pattern, which is shown below.

This version even includes different ways cutout decor. The manufacturing technology is the same as in the previous case. Here are the front and back detail diagrams. They are knitted in two parts, for which you can take yarn of different shades. It will look more interesting and spectacular.

As a result, you will get a product, as in the next photo.

You saw a lot of ideas and ways to make an elegant dress for a girl with your own hands. Choose your favorite model, sew, knit. Please your princess with new outfits.
In any children's store you will find a lot of dresses for little fashionistas, be it festive, knitted. Leading fashion houses also do not deprive their youngest clients of their attention. But quite often, children's things cost so much that the mother will think three hundred times before taking out her wallet. Do you want to dress up a child or teenager, but finances do not allow? You can do a lot on your own if you try hard enough. Where can I get baby dress patterns for beginners? It is not difficult to make simple patterns with your own hands and for free, we will talk about some methods now.
Not everyone knows about this, but in order to sew a dress for a girl, a pattern is not at all necessary! Without a pattern, you can sew:
- outfit in folk style;
- ball gown;
- summer sundress.
Are you wondering where to start? Let's do a sundress then - it's the easiest. But first you need to take some measurements - it's best to write them down if you are not going to be limited to just one product.
Measure:
- your little daughter's height;
- chest girth;
- waist circumference;
- hip girth;
- shoulder length;
- sleeve length (you won’t need it for a sundress, but if you already took measurements, it’s useful to do everything at once);
- estimated product length.
Important! For a sundress with straps, measure the length of the product from the armpit to the intended bottom line.
Choosing a fabric
In general, sewing for small children is a pleasure. The seams are short, the fabric needs little, no darts and intricate details. The simpler the style, the better. It is enough to choose a beautiful fabric, and even the most elementary, but neatly sewn dress will look like a princess.
Important! You can also use the scraps left over from a new mother's dress, or change something of your own for your daughter - good, but managed to get bored.
If you choose material for a summer sarafan, it is better to choose one that drapes well:
- crepe de chine;
- chiffon;
- thin chintz;
- satin;
- poplin;
- gauze.
Important! Chintz fits just perfect - inexpensive, very hygienic, bright, suitable for a New Year's dress. And it's okay that it quickly fades - anyway, by next summer, my daughter will grow out of this dress.
Also, to sew a baby, light dress DIY, you need:
- linen gum;
- braid to match the fabric - for straps and edging.
We sew a sarafan
Perhaps this model with an elastic band and straps is the simplest do-it-yourself dress for a girl. If you sew it from an opaque fabric, it will be single layered. It is better to fold gauze in two layers or make a cover. Below are photo sketches.
Operating procedure:
- Spread the fabric in one layer inside out.
- Draw a top line perpendicular to the edges.
- From this line, lay down the length of the product, plus allowances for the drawstring on top and for processing the bottom - you can immediately outline the drawstring lines.
- Through this mark, draw another perpendicular to the edges.
- On the line that goes along the lobar, set aside a segment equal to the circumference of the chest, multiplied by 1.5 or 2 (depending on how well the fabric drapes: if it is gauze, it is better to make lush gathers, if chintz or satin are more modest ).
- Cut out the detail.

Assembling a sundress
How to sew child dress with your own hands? Very simple. This model has only one seam, plus bottom processing, plus a drawstring:
- Start with a drawstring - iron the upper cut to the wrong side, then bend the fold by 0.5 cm and sew it all up (it is better to make a decorative stitch on the front side).
- Stitch the back seam on the wrong side, leave the area near the drawstring unsealed so that you can insert the elastic.
- Insert rubber band.
- Try on the blank for your daughter.
- Mark the places for the straps.
- Cut 2 pieces of braid, sew on the straps.
- Hem the bottom - hem it by hand or stitch it.
- Along the hem, you can sew the same braid from which the straps are made.
Important! The straps of such a sundress can be made tied.
Sundress on a yoke
If you need a dress for a girl, you can sew it yourself from two different fabrics. For example, for a coquette, take satin, and for the bottom - crepe de chine. But nothing prevents constructing a similar little thing from the same material.
This summer dress on a yoke is also made like a sundress, only the shoulder straps are better to be made wide and from the same fabric as the yoke, and this model does not have drawstrings.
Important! It is better to cut out the yoke first on paper - it looks like a strip 5-6 cm wide and a length equal to the half-girth of the chest. There will be 4 parts - two for the front and two for the back. Here are some simple patterns of children's dresses for beginners that you can use.
Operating procedure:
- Spread the fabric along the share (you can immediately in two layers).
- Cut out 4 strips of the specified size from it (do not forget to add allowances for all cuts) - the shared thread coincides with the short side.
- Cut out the hem - for this, subtract the width of the yoke from the total length of the product (like the previous model, it is measured from the armpit to the bottom).
- Cut out 2 straps - these are also strips 5-6 cm wide, but, unlike the yoke, when cutting, the shared thread coincides with the long side.
Straps
To assemble this model, start by preparing the straps:
- Fold the strips in half right sides out.
- Insert long allowances inside.
- Iron them.
- Stitch the seam and topstitch the straps all around.

Yoke
To sew a baby dress with your own hands quickly, connect the yoke with the straps, and then sew on the bottom:
- We sweep the strips in pairs: one for the outside, the other for the inside.
- We sweep each into a ring.
- We try one of them on the model.
- We outline places for the straps - both on that part of the coquette that will be outside and on the one inside.
- Carefully unpick the basting, straighten the rings.
- We fold the strips intended for the front, right sides to each other.
- We put straps between them.
- Sew off the top seam.
- We twist the yoke - the long parts of the straps should be on the front side.
- We iron the seam.
- We do the same with the back parts - after you stitch them, the straps should be sewn in.
- We cut the side seams of the coquette - the allowances should be inside.
Putting together a summer dress
Your yoke with straps is ready. It remains to sew the hem, but first you need to prepare it:
- Sew the back seam.
- Iron the allowances on the sides.
- Sew along the joining line to the yoke with a basting stitch and gather.
- Place the top edge of the body between the yoke pieces and tuck in.
- Attach the main part to the yoke.
The dress is almost ready, it remains to trim the bottom.
Dress according to the pattern
You can also sew a children's dress with your own hands according to a pattern. Clothing for small children is also good because many things can be sewn according to the same patterns. For example, on a T-shirt or T-shirt. To do this, it is not at all necessary to unpick the thing - you can simply circle it. It's better to do this on paper first so that you can model the cutout:
- Circle the shirt.
- For the back straight dress just continue the side lines down to the desired length.
- For the shelf, also continue the lines down to the same length.
- Find the middle of the cutout.
- Draw a line down from this point.
- Set aside 2 cm.
- Connect this new point to the beginning of the shoulder seams.
- Cut out 2 pieces - front and back.
- Cut out the facings for the neck and armholes - just circle them first along the contour of the pattern, and then make a parallel stroke at a distance of 2.5-3 cm (you need to circle by aligning the front side of the part with the wrong side of the facing).
- Sew the shoulder and side seams of the main parts, while ironing the allowances to the sides.
- Sew along the shoulder seams of the neckline.
- Iron the allowances.
- Turn the main dress inside out.
- Baste the facings so that their front sides are on the wrong side of the dress.
- Sew along the cutouts.
- Bend the free edges by 0.5 cm and stitch - better finishing stitch from the front side.
- After that, all you have to do is trim the bottom.
Elegant dress for a girl with her own hands
Have you thought about how to dress up the princess for a matinee, but there is almost no time left? Nothing complicated. Now we will talk about how to sew a baby dress with fluffy skirt- This the best option Yes, and you can do it in a couple of hours.
You will need:
- material for the top (if there is a beautiful swimsuit or bodysuit, it will be very good - the upper part can also be made from these items);
- tulle or guipure for a skirt;
- wide elastic band for the belt;
- large compass;
- long line.
Top
The top is done in the same way as for a simple sleeveless dress - that is, a T-shirt is circled, but only to the waist. The notch is modeled.
If you are sewing a dress from a swimsuit, simply cut (cut) the lower part or turn the swimsuit into a bodysuit by cutting it between your legs and sewing an inconspicuous button there. Why is a clasp needed? Then, so that your little princess does not feel any inconvenience and does not puzzle over what to do if she needs to go to the toilet.
We start the assembly from the top - we simply sew the parts in the same way as in the manufacture of any other clothing. You can immediately process the top and armholes, unless, of course, you are going to sew in a zipper.

Making a skirt
The sun skirt on a little girl looks just perfect. It can be floor-length or very short, in the style of dudes. Only two measurements are needed - the waist circumference and the length of the skirt itself.
Important! What to sew from? The ingenious invention of designers is tulle. Holds its shape well - no need to starch. You can cut as you like, it costs nothing to cut several layers at once.
The template is better to make in advance:
- Calculate the construction, the radius of the notch - divide the waist circumference by 6.28.
- Draw a circle on the sheet with this radius.
- Add the length of the product to the radius.
- Draw a second circle from the same center - you will get a ring.
- Cut out several layers of tulle - they may be the same, but you can make frills of different lengths.
Your next steps depend on what the top is made of:
- Materials such as supplex or jersey have excellent stretch, so you can simply sew the skirt first to the elastic, and then to the whole structure. - to the bodice.
- If the material is not so remarkably stretched, a zipper is indispensable. It is best to sew it in the middle of the back, from the top to the skirt. In this case, the neck is processed after the lightning takes its place.
footage
In a word, there are a lot of models for little girls from 2 months old, and many can be sewn according to the most primitive patterns. The most important thing is to carefully handle all the details. The slightest negligence on children's clothes is visible much better than on adult clothes, and can significantly spoil the look.