This filigree technique with which you can create a large number of exquisite models, it uses long ribbons in the form of curls and arabesques.
Bruges lace, often confused with the Irish crochet technique, allows you to create elegant and complex projects. Knitting a lace ribbon is quite simple, but you should not neglect the precise execution of the knitting sequence, which determines the harmony of the product. Knitting the ribbons and connecting them must be done very carefully. Connecting ribbons is aesthetically important - it is easier to connect straight ribbons. Working with rounded parts requires special care, because you need to get beautiful curves.
MAIN TAPE
The Bruges lace ribbon shown consists of 5 tbsp. s/n. Depending on the model, its length and number of st. s/n may change. Alternating st. s/n and cells, you can also knit a fancy border. At the beginning of each row, an arch is made for lifting, the number of air loops of which depends on the length of the ribbon and the style of the motif.
Bruges lace ribbon master class
Lace connection
There are many ways to connect the ends of ribbons.
You can use either a hook or a needle.
As in modular products, the ends of the knitted strips can be joined using an over-seam or a loop stitch using a hook. The easiest way to connect is to seam over the edge. It looks best on a crocheted strip without a main chain as it leaves no visible binding marks.

Bruges lace connection for beginners
Basics and tips for knitting.
This braid consists of two rows of lush columns, which, taking into account the relief of the pattern, are made on a base of 9 loops.

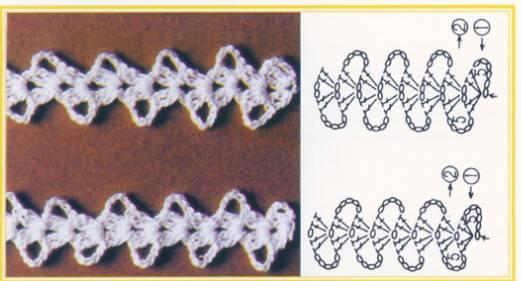
The two models shown are very similar to each other; the only difference is that in the first the central arch consists of one loop, and in the second of two: this gives the latter greater transparency.
In this model, the braid expands and splits, creating rounded lines and a central picot motif. By repeating this motif, you can knit a charming braid that will serve, for example, as a bookmark.

The magnificent fantasy braid consists of checks and lush columns, which are made on a base of 14 loops. Please note: the uneven arrangement of the arches adds originality to the model.

Performing small motives allows learn to crochet different types of braid from Bruges lace.
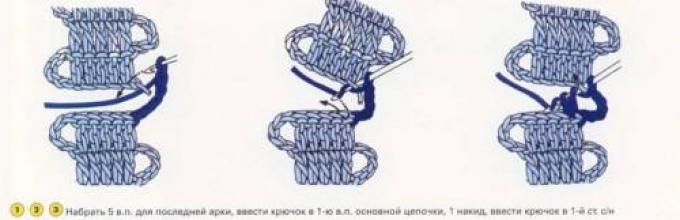
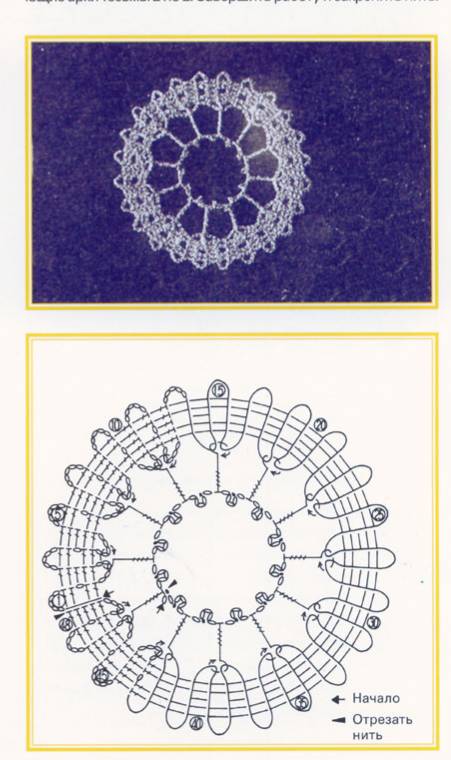
Leave 10 cm of thread free, tie 5 ch. for the 1st arch, then perform 5 tbsp. s/n at the beginning of the thread, 5 vp. for lifting. Continue knitting in a straight line until the 35th row. and attach the 1st row. in the process of fulfilling the 36th r. braid to close it in a circle, then cut the thread. To fill the central part, perform 1 ch, pulling the thread to tighten the product, perform 6 yarn overs, insert a hook under 2 internal, successive arches of the braid, 1 yarn over and pull out 1 loop, then 7 times: 1 yarn over, knit 2 loops. Continue knitting in the same way, inserting the hook when performing a new st. from 6/n to the next 2 arches of braid. Then finish the work and secure the thread.

Leave 10 cm of thread free, perform 5 ch. for the 1st arch, then knit 2 tbsp. s/n, 1 v.p. and 2 tbsp. s/n on the remaining 10 cm of thread, tie 5 vp. for lifting. In the 2nd r. perform 1 tbsp. s/n on all points of the previous row, 5 v.p. for lifting. Knit 47 rows in this way, then add the 1st row. in the process of fulfilling the 48th r. and cut the thread. To fill the central part, tie 1 ch, “4 yarn overs, insert a hook under 2 successive arches of the inner part of the braid, pull 1 yarn over 1 loop, then complete the st. from 4/n, knitting loops 2 to 2, then 4 ch, 1 joint st. in the 3rd stitch from the hook (= 1 picot), 1 ch. and go to * again, connecting the next arches of braid 2 by 2. Finish the work and secure the thread.
Crochet Daisy motif
Leave 10 cm of thread free, tie 5 ch. for the 1st arch, then perform 5 tbsp. s/n at the beginning of the thread, 5 vp. for lifting. Continue knitting until the 25th row. At the beginning of the 26th and 28th r. replace the arch of 5 v.p. on 2 vp, 1 connecting st, tied into arches of the 4th and 2nd rows located opposite each other and 2 vp. so as to attach the central part of the braid. Continue knitting until the 47th row. and attach the 1st row. in the process of performing the 48th row, then cut off the thread. For 2 filling motifs, first perform 1 ch. and alternate st. with 2/n, art. from 3/n, art. with 4/n, inserting the hook into the inner arches that remain unknitted on each side of the braid, then secure the end of the thread.

Cast on a chain of 5 vp. + 5 v.p. for the 1st arch, start knitting at the 6th st from the hook, alternate rows of 5 sts. s/n and from 2 cells. Continue knitting until the 7th row. and at the end of the river For the 1st corner, perform 2 ch. and 1 tbsp. b/n, connected simultaneously under the three previous internal arches. Continue knitting in this way, working the other 2 corners of the triangle in the same way. Cut the thread at the end of the 48th row, leaving 10 cm to sew on the last row. to the cast-on chain with a seam “over the edge”. For the filling motif, perform 1 ch. and repeat 9 times: 1 tbsp. b/n, 3 v.p. into the starting loop; finish 1 connection st. in the 1st art. b/n and link extra. connection art. in the 1st arch. In the process of completing the 2nd round. r. connect the inner arches of the braid that remain unknitted using a group of 2 tbsp. with 3/n, tied together; close this circle. r. 1 joint st., connected in the 3rd of 3 ch., replacing the 1st st. s/n, cut the thread.

http://youtu.be/1fWw1XKB20k
http://youtu.be/3SdWFNMnx_E
This article is for those who love unusual and original crochet. Bruges lace, the patterns of which are shown here, is a modern version of ancient needlework.
A few words about lace
At first, knitting was a men's craft, but gradually it became a women's craft. Like any handicraft, lace knitting is very calming to the nervous system. Openwork interior items always add coziness to the apartment. Even a small napkin on the coffee table can set the mood for the entire interior. Just don't overdo it. A lace dress or accessories are great for creating feminine looks. To achieve the desired effect and correspond to modern style, openwork must be used, guided by artistic taste and a sense of proportion.

Distinctive features of the Bruges openwork
What is Bruges lace? The diagrams clearly show that this is braid laid out in a beautiful, smooth, rounded pattern. It is also called vilyushka. Belgian lace is almost three hundred years old. Over the course of three centuries, interest in him either faded or flared up again. There are different ways to create fabric using the Bruges lace technique. which you see in front of you on the screen is just one of the options for weaving openwork.

Bruges lace from factory braid
In sewing supply stores you can find braid with oblique weft threads and loops evenly spaced along the edges. It is great for creating modern items that are reminiscent of ancient Bruges lace. Models and diagrams invented by experienced craftsmen are also suitable for working with ready-made, factory-made braid. The diagonal arrangement of the main thread makes the braid elastic, so the thickening on the folds of the pattern is almost not noticeable. You don't have to put this lace under the press to give it more flatness.

Creating a Pattern
From this braid, which is very rarely on sale, lace is created as follows. A simplified sketch of a flower, butterfly, etc. is made with a one-color pencil, the corners are rounded, most of the lines are closed, and now you have exclusive Bruges lace in front of you. The diagram is enlarged to life-size. It is then placed on a soft, elastic surface into which pins can be inserted. The braid is laid and pinned along the drawing line. Those places where the loops touch each other are sewn together. This is done with very thin threads and a needle. The color of the threads should match the color of the braid. It turns out to be a very beautiful canvas. In this way, elegant collars and napkins, that is, small-sized items, are made.

The ancient way of knitting
Bruges lace: napkins, the diagrams of which are presented in this article, items of clothing, are reminiscent of the products of Vologda and Flemish craftswomen who worked with bobbins. They did not knit the braid separately in order to later lay out a pattern from it. The stripes wove, connected and branched, bypassing the pins, directly on the substrate, in accordance with the wide and thin lines of the design applied to it. Currently a popular technique is to crochet a long ribbon with loops on the sides and join it into a pattern right during the knitting process.

Modern way of crochet
The photographs clearly show Bruges lace. The diagrams show several braid options. All of them are very simple to perform. Try tying different ones and choose which one you like best. You are free to treat it like a factory one: tie a long ribbon, place it beautifully on a pattern or on a clothing pattern if you plan to turn the ribbon into a dress, blouse or skirt, and fasten it with a thread, a needle, a thread or a hook. Even easier - pin the braid onto a mannequin with a felt or knitted covering. You will immediately see how much more braid needs to be tied.

Fitting a lace product on the figure
The tape can be laid out taking into account the curves of the body, and then, without creating darts and raised seams, you will achieve a perfect fit on the figure. There is some difficulty in making the sleeve. Here's the advice. On the mannequin, place the neckline taking into account the armhole, as on a dress pattern with a set-in sleeve. Lay out the braid intended for the sleeve on the paper dress, pin it in the form of a pattern, sew it through the loops, fill the gaps with a mesh of air loops or small lace floral motifs. Before connecting to the main part, press down the sleeve with a heavy press so that the folds of the braid become flatter. You cannot wash or steam the product yet, because you will be connecting the sleeve to the front and back with the same threads using chains of air loops crocheted.

When all the details of the dress are ready and connected, it can be subjected to wet-heat treatment without fear of uneven shrinkage. At home, this usually involves washing, starching (if the item is made of cotton) and ironing.
Simple and stylish dress
If you change the pattern, making the armholes square, then the sleeves can be knitted rectangular, without rounding at the edges. With such a shoulder girdle, the dress does not need to be narrowed at the waist. This style is considered classic and universal for those with slender, thin figures. Try tying it up. Technically it is not difficult, it just requires perseverance. If you take a risk and get down to business, you will end up with a stylish and elegant dress. Bruges lace, the diagrams of which are in this article, are ideally suited for such a thing. If it is very translucent, then you can experiment with the choice of underdress-sheath. It is selected to match or contrast.

At one time it was fashionable to wear guipure with a lining. This is an interesting option, but there are few situations where this is appropriate, since the flesh-colored fabric of the lining creates the illusion of a naked body. Choose the thread color that best matches your color type and go for it!
Lace haute couture collections
The collections of many famous designers include models made of lace. This is the white collection of Valentino, and the masterpieces of Jean-Paul Gaultier, and others. Couturiers constantly turn to historical costume and national handicrafts. If you look at each model individually carefully, it becomes obvious that modern fashion is very inclined to combine lace from different eras and different peoples in one dress.

Combination of different types of lace
Bruges lace, crocheted from winding braid, often requires addition in the form of elements of Irish, Venetian, fillet or other lace. Bruges lace gives the products austerity and laconicism. Napkins or tablecloths decorated around the perimeter with stripes of Bruges knitting take on a finished look. An inexperienced knitter will be right if she begins to learn crocheting from the braid from which Bruges lace is made. For beginners, the circuits are not very difficult, because they consist of simple elements.

The first napkin of a beginning needlewoman
For a small, but very cute and elegant napkin, you need to knit 5-7 strips 10-15 cm long; their number may vary depending on the thickness of the threads and the density of knitting. Starting from the second strip, connections should be made using loops. This operation is known to everyone who knows how to knit stitches and loops. The strips of this napkin lie parallel to each other, without folds. The width of the stripes is 4-5 double crochets, plus lifting loops. Decorative arches of the rise consist of 7 air loops. The connection is made like this. You need to knit three chain loops, then make it into an arch, perform three chain loops and then knit a regular row of double crochets. Iron the finished napkin through a wet cloth.

More complex types of work
Having coped with this work, you can take on more complex Bruges lace for beginners. Knitting patterns for curved forks clearly demonstrate that at the bends, three adjacent arches of one strip are fastened with a connecting post. If the fold is a smoother wave, then two adjacent arches are connected.
How else can you use Bruges lace? Schemes of various types of braid make you want to use them for finishing dresses made of linen or cotton fabric, such as matting. You can create an amazingly beautiful set in boho or style.

Bruges lace is laconic in design, the patterns of all the stripes of the braid confirm this, it is very suitable for knitting fashionable avocado bags. They can be made from both natural and synthetic yarn. It is better to take thicker and stronger threads, and a 3-4mm hook.
If you decide to take up knitting, then first determine the place where you will do your needlework. It should be well lit. Light is one of the main conditions for enjoying work and maintaining good vision.
When choosing yarn, give preference to mercerized yarn. The thinner the thread and the smaller the hook number, the more beautiful the lace. Knit with loose loops, do not tighten them. After washing, the item will shrink and become denser. If you knit too tightly, the product will be rough and thick to the touch.

If you knit with colored threads, in order to avoid troubles when washing, check before starting work to see if they are fading. Try not to combine threads of different composition and quality in one product. This mix works well only for people with ideal taste. Cotton lace looks better when starched.
For beginners, learning to crochet will be useful master class on knitting napkins using the Bruges lace technique. You will learn how to knit beautiful flower-shaped doilies and how to make large and small curls from knitted braid, which are the main decoration in Bruges lace.
The napkin is knitted continuously, a large curl is made from the braid for the first petal, then a small one in the opposite direction, so seven petals of the napkin flower are knitted sequentially, the last petal is connected to the first in the process of knitting in a circle and the ends of the braid are sewn together.
To start knitting the braid, cast on a chain of 10 chain stitches and knit 4 double crochets, starting from the 7th loop from the hook. On the side you will get a loop of 6 air loops, reminiscent of an eyelet.

For the second row, dial 6 air stitches. and knit 4 treble stitches over the previous ones. A second ear is formed from 6 air points. on the other side of the tape. Continue knitting the braid as the second row.


Knit 34 rows of braid so that there are 17 ears on one side of the braid; when knitting the 18th eye, we connect the beginning and end of the braid into a large curl.

To do this, when knitting the 18th eyelet on the inside of the braid, make 3 chain stitches, insert the hook into the second eyelet from the end of the braid, knit a connecting stitch, 3 chain stitches, then 4 chain stitches along the row of braid.

After a row, repeat the connection, once again connecting the eyelet on the inside and the first eyelet from the beginning of the braid. You will get a large curl, connected by two ears at first with a void inside.

To make a small tight curl, to turn the braid in the opposite direction, tie 4 more rows of braid and when making the next eyelet on the inside of the curl, make 3 chain stitches, insert the hook into the last 3 ears of the braid and knit a connecting stitch through them, 3 air.p. and knit the next row of braid 4 tbsp.


To make the next large curl, knit another 34 rows of braid, connecting four loops to the first petal along the side.


Make the next small tight curl, turning the braid in the opposite direction, like the previous one.
Tie 7 large and 7 small curls; they form the base of the napkin - a flower. Sew the beginning and end of the braid.

To fill large curls and the center of the napkin, you can choose threads of a different color.
Attach a thread to the outermost first loop, make 8 chain stitches, alternately knit a stitch with 3 crochets and 1 chain stitch from each free loop, then make a connecting stitch in the first stitch with 3 double crochets, 8 chain stitches, connect st into the last free loop of the braid, fasten and cut the thread.