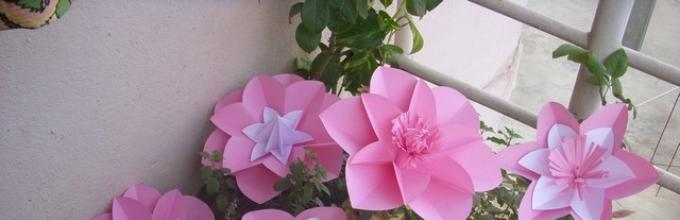
Our whole life is accompanied by various celebrations and holidays that give us joy and fun, only for which it is worth living in our difficult times). Any festive atmosphere must include flowers, and not just fresh ones. Recently, it has become very popular to decorate the hall or any other room where the banquet will be held with large paper flowers. Below are several options for paper flowers, which, in my opinion, are very cute and original, and are perfect for decorating a festive interior. The flowers are quite large, measuring 11 cm in diameter. Are we watching a master class?


Let's look at a photo master class on creating paper flowers to decorate a holiday. More information about all existing holidays, about their history and features of celebration in different countries world, you can find it on the website http://female-happiness.com/. On the "Women's Happiness" website you will also find many interesting articles about beauty and health, fashion and style, Feng Shui and magic, travel and much more.
For work we need an office colored paper, A4 format, which can be purchased at any stationery store
We cut a sheet of paper to get a square. And then we put it together according to the photographs. 


We cut it, open it and get a flower like this. This will be the basis for all the color options below.


Add fringe to the center of the flower, cut a strip of colored paper folded in half


Instead of fringe, you can glue crumpled foil into the middle

You can add a rosette of the same paper color or a different shade


Interior decoration in floral style is gaining popularity: giant peonies, roses, sunflowers, poppies are used to decorate wedding celebrations and themed parties, romantic photo shoots and creating unusual store window designs. Even for hats and suits, you can make large flowers with your own hands - it’s no more difficult than assembling a small bouquet or.
Let's talk about materials
When it comes to life-size flowers, you may not immediately believe that this beauty is created from paper. But the corrugated one has unusual properties - in the article on making small flowers we looked at them in detail. Let us remind you that for tall giants, crepe paper with a density of at least 120 g with A and B flute (folds 1.6 and 3.2 mm deep) is most suitable - this will allow the petals to keep their shape.
But! Not all life-size flowers are made from thick corrugated paper. There are models whose petals should bend, curl or fall freely. For these colors, thin paper is used.

To make large flowers, also prepare auxiliary materials and tools:
- thick cardboard for the base;
- scissors or knife for cutting blanks;
- heat gun – large petals are easier to connect with hot glue;
- wire for the stem frame;
- round nose pliers for bending wire;
- fabric, thread, cotton wool for filling the base or for combining materials;
- foam balls or plastic containers as a base.
You will also need: imagination, good mood and a little magic...
Basic techniques and secrets of creating life-size flowers from corrugated paper
The whole decorative effect finished product depends on the beauty of the flower head. The process of its formation is similar to making flowers from isolon, but adjusted for the properties of the material. Let's learn how to create big ones!
Accordion method
This funny hat can be made with children - the flower is assembled according to the accordion principle.

We will need several sheets of thin corrugated paper 20–25 cm wide. The length and quantity depend on the desired splendor of the finished flower. Before starting work, the sheets must be placed one on top of the other and the edges aligned.

Stages of work:
- Fold the sheets like an accordion and use scissors to give the edges a semicircular shape.
- Mark the middle of the prepared strip and tie it with thread or clamp it with floral wire, forming a loop for subsequent assembly.
- Disassemble the accordion, smoothing the edges.

- Lift the layers one by one, straightening each sheet.
- When all the layers are separated, the flower is ready.
- You can make several flowers and connect them through prepared loops.
The hanging balls from the previous photo were created using this principle. To create such colors, you can combine paper of several colors.
The difference with this design is that the inner part of the flower is cut with fringe separately, and then both parts are combined into a single flower.
And here are more flowers made using the same technique.

Detailed method
You will use this method if you decide to collect giant flowers from corrugated paper with your own hands. To do this, you need to cut out individual petals and leaves using templates. Patterns for large flowers differ from small ones only in size, so you can use the ones we offered in the article.

Since you will need a lot of blanks, it is better to make patterns from thick cardboard or pressboard - this way they will last longer. You can cut the petals with scissors or a stationery knife.
Tip: unroll the roll, fold it several times and then cut it out - you will get several blanks at once.
Next begins the most creative stage in creating a flower - giving shape to the petals. Smooth curves and detailed edge work are achieved by straightening the folds with your hands, stretching the workpiece using a metal ruler or the blunt edge of scissors.
First, use a pencil or stick to curl the edges of the petal, pressing firmly to secure the bend.

The volume is created by straightening the corrugations: slightly stretch them in the upper part of the petal and almost completely straighten the middle.

Finally, you can use the same technique to add wavy edges.
Important! When applying the template to the sheet, you need to make sure that the folds go along the petal - then it can be formed correctly.
This type of MK describes in detail the process of making peony petals:
If you are just learning how to collect large flowers from paper with your own hands, many of the nuances may seem incomprehensible. Let's look at them with an example.

This chrysanthemum is assembled from separate parts, mounted on a branch and placed in a stand made of a flower pot. We'll talk about these assembly details a little later.
For the flower head we will need:
- corrugated paper;
- cardboard circle with a diameter of 30 cm;
- glue gun
Cut out the blanks of petals and leaves according to the pattern, process the edges and give them shape.

You will need at least 30 petals of each size, 6 blanks 20 cm high for the sepals and as many leaves as your imagination and the length of the stem dictate.

Assembly is carried out on a cardboard circle. Let's look at the nuances that make the flower look realistic:
- The petals should be directed strictly to the center, thanks to this we will maintain the symmetry of the flower.
- Filling is carried out in circles, with each subsequent layer shifted towards the center by 1.5 - 2.5 cm. This will ensure a smooth decrease in the diameters of the petals, without the formation of voids. Approximately three rows should be obtained from each type of part. If necessary, you should add these or other blanks.
- The closer to the center, the more the petals should be bent upward, and the smallest ones are bent almost vertically before gluing, thereby filling the middle. This principle is laid down by nature - the petals open from the bud.
After the front part of the flower head is ready, we glue a piece of cardboard tube to the back side, the diameter of which is suitable for the future mount.

The reverse side is decorated with six sepals. They should be glued in a spiral, overlapping the next one, to cover the entire surface of the cardboard base.

Belt method
Flowers made in this way differ little from the previous ones. The whole peculiarity is that the petals are not cut out separately, but are formed on the tape: the profile of the petal is formed in the upper part of the paper strip, and the lower part remains uncut.
Peony made using this technique:
And another fancy flower, reminiscent of a dahlia:
Leaves and stem
If you make life-size flowers with your own hands, you will definitely need a stem and leaves. To realistically reproduce the structure of a leaf, make veins and create a relief:
- lay a wire in the middle of the sheet,
- position the corrugations towards the top of the leaf,
- reproduce the wavy edge.
Watch the video for making leaves for growing flowers:
The next element of a growth flower is the stem. Depending on the purpose, the stem can be made to hold the flower in the hands or as a stand.

In these colors, the stem can be made from a cardboard tube, for example, from foil or cling film, or you can cut a piece of plastic pipe. This leg is multifunctional - such a flower can be placed freely on a stand made of metal rods.
To create spectacular photo zones, a flower on a stem, as in this photo, would be an excellent option:
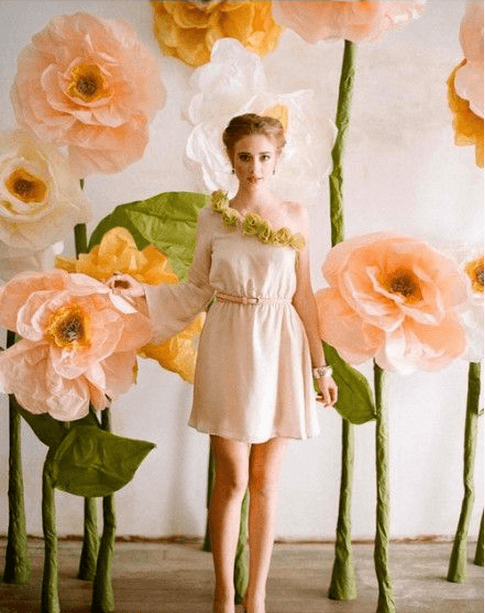
The stem is made of a wire frame. The secret of its stability is in a plastic cup filled with cement mortar.

Advice. Plastic cup can be replaced with a small one flower pot, and cement mortar - any building mixture: gypsum, alabaster and the like.
The resulting stand should be wrapped in thick paper, then decorated with green corrugated paper. Using any technology convenient for you, make leaves and screw them to the trunk using wire.
A metal-plastic tube or even a real branch can also serve as a stem - for beauty they need to be decorated with green tape.

The metal-plastic tube securely holds the flower
and looks great in the interior
Stand
Guests of the holiday will be very surprised when they find out that you made life-size flowers from corrugated paper with your own hands. And to decorate everything, you will need a stand. It can be metal, wood or a weighted flower pot.
It is especially important to make a stable stand if you plan to install not just one flower, but a whole branch or a giant bouquet.

For options for making stands for full-sized flowers, see the video:
Important! Take care of stable stands when decorating wedding ceremonies. Flat supports are perfectly camouflaged under a layer of artificial grass.

Compositions of large flowers on the wall
If you do not need a separate flower for a photo shoot, but a whole photo zone, you need to decorate the wall. There is no need for permanent fastening, since the flowers gather dust over time, can accidentally tear, or you simply get tired of them, so you should use simple options:
- Double-sided tape - tapes or ready-made mugs are sold. This method is not suitable for a wall in a room, since marks remain on the surface. The solution is to use a portable smooth plastic surface as a base and lean it against the wall, supporting it so that it does not fall.
- Hooks – ready-made ones with Velcro are available for sale, but you can attach homemade wire hooks to the back surface with hot glue.
- Velcro - ordinary sewing ones are used, which are attached to the surface with a construction gun, and on reverse side flower with hot glue. Adhesive-based Velcro is also sold, which is also better reinforced for reliability.
What all these methods have in common is that you need a special surface to mount flowers.

But to create an original design, it is not at all necessary to hang the decor on the wall. You can tie a ribbon on a couple of hooks, to which you can attach flowers and threads with petals, as in this photo:

Or string strings under the ceiling to which the decor is attached, creating a magical atmosphere.

Video with visual examples of attaching paper flowers:
However, large corrugated paper flowers can be used not only for photo zones. They can serve as an amazing costume for a theater production or theme party.
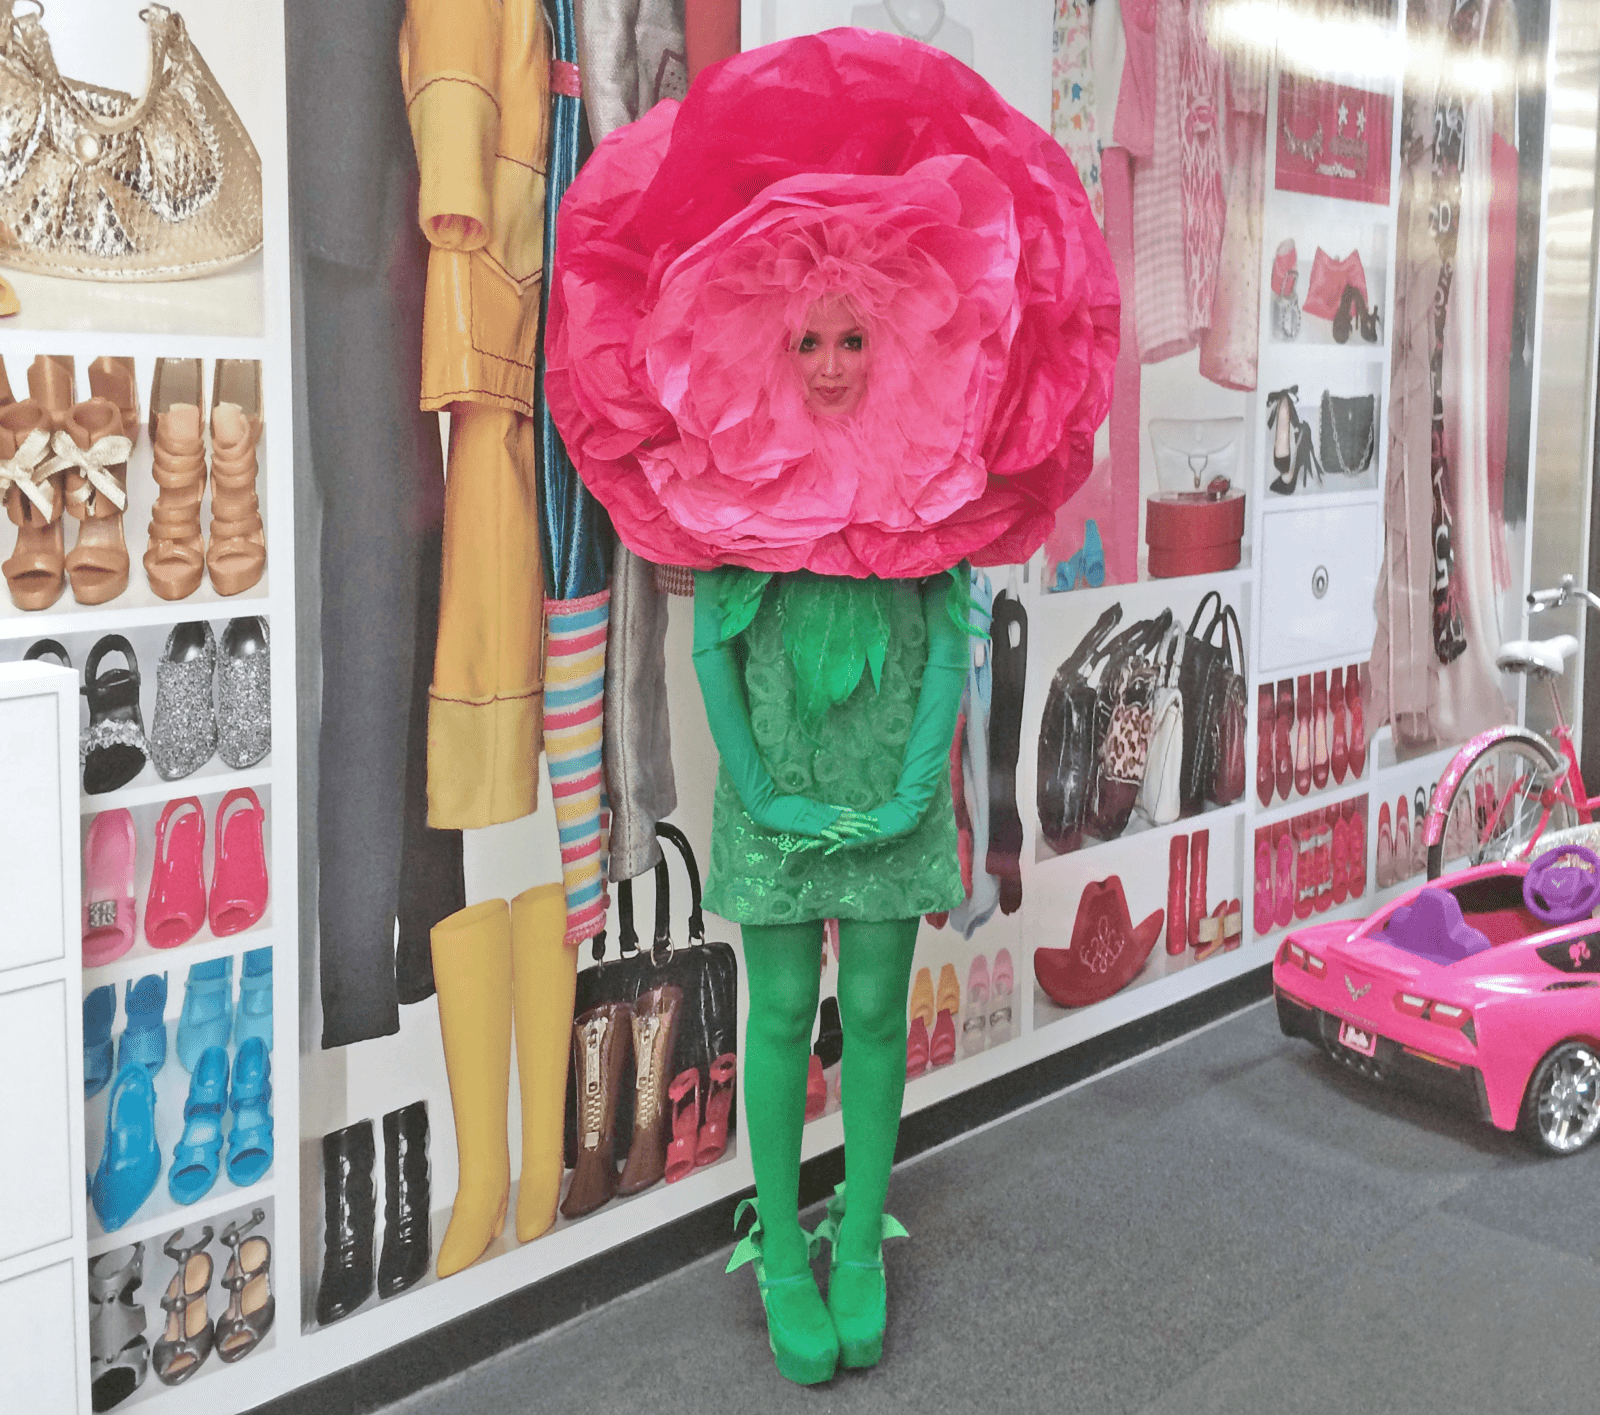

To create these costumes, the designer combined paper with fabric.
Nothing is impossible for limitless imagination! You can even make a chandelier from corrugated paper. The only condition is that there are no problems with the electrical wiring and that the lamps do not come into contact with the flowers.

And this charming cabbage made of corrugated paper will be an excellent setting for a children's photo shoot. It is made according to the principle of flat flowers - on a cardboard base. To make the baby comfortable, there is a pillow in the middle.

There are a lot of ideas for using giant flowers made of corrugated paper - fantasize, create beauty and delight yourself and those around you with your creativity!
CategoriesPaper flowers will greatly decorate your interior and add aesthetics and comfort to your living space. We will show everyone who wanted to learn how to make paper flowers with their own hands a few simple master classes. Step by step photo for beginners will demonstrate the entire process in detail, and our tips will help you get the job done quickly and without unnecessary fuss. From our article you will learn how to make a tulip from paper, how make voluminous flowers for interior decoration, how to cut a rose from colored paper and much more.
To cut out all this floral and paper variety, we have selected for you beautiful schemes and templates so that you can cope with this task easily and quickly.
Paper flowers have a number of advantages that you will not find in living plants. Firstly, they do not fade, do not require special care and do not cause allergies. With the help of multi-colored paper flowers you can profitable to decorate the interior or clothing, voluminous flowers are attached to the wall or on the door, they are placed in large vases and solemnly presented for the holidays. , you can find out in one of our previous articles.
But to make your first paper flowers with your own hands, diagrams and templates can be printed on a printer. And then - glue the petals according to the suggested instructions.  Do you dream of being given a scarlet flower? Make it yourself! Cut out several templates of different sizes and glue the petals onto a special sponge located in the middle of the flower.
 And for this purple flower you will need:
- white piece of paper;
- watercolor paints;
- scissors or stationery knife;
- aluminum wire;
- balsa wood;
- paper tape;
- green electrical tape or floral tape.
- Cut a sheet of paper into even strips, not reaching the edge of the sheet.
- Fold the cut leaf into a flower shape.
- Make paper leaves and roll them as in the photo.
- Connect the flower with the leaves and secure with tape.
- Attach a small piece of cork to a wire and twist it in half.
- Insert the wire into the middle of the flower instead of the stem.
- Wrap the stem with tape and then with electrical tape.
- The delicate purple flower is ready.


 For a promotion, for example, to March 8th or May 9th, you can make several origami tulips according to the pattern shown in the photo.
 If you have a special stencil, you can make a whole bouquet of scarlet roses and give them as a gift to a loved one. Detailed instructions for creating flowers just present in the photo. If there is no stencil, draw the flowers yourself on a sheet of A4 paper yourself.
For other decorative experiments we offer a selection of videos for children and adults With detailed instructions about how to make crafts in the form of flowers.
Flower templates for paper cutting
And in this part of our conversation we will introduce you flower templates for paper cutting. Shapes and sizes of flowers for every taste - from the most delicate color of an apple tree to bright blue cornflower and fiery red poppy.

 A few more templates will diversify your flower gallery.


 Large paper flowers for decorating a room with your own hands: templates and diagrams
Paper flowers – win-win when decorating any room.
 Please note the short but very detailed master class
for making voluminous paper flowers.
Please note the short but very detailed master class
for making voluminous paper flowers.  Application from such a “pink heart” decorate gift wrapping
or greeting card.
Application from such a “pink heart” decorate gift wrapping
or greeting card.
 Crepe paper flowers are the most beautiful trend this season. Such giant paper roses You can form them into a chic bouquet, or you can decorate the hall of a restaurant, cafe or your own apartment with them.
It’s not difficult to make a flower with your own hands from paper, especially if you have instructions and manufacturing diagram. Beautiful roses can be made from simple paper templates.
Popular flowers such as carnations can be easy to make from a regular napkin. These delicate flowers will certainly not wither soon.
 Scrapbooking is another popular form of creativity for both children and adults. From special colored paper you need cut out simple flowers for cute bouquets or decor.
 Easy ideas for scrapbooking - try cutting roses, leaves and petals from special sheets of paper. And then glue everything onto the card along with bows and decorative embellishments.
Making flowers can captivate you so much that you won’t notice how you transfer your hobbies to other materials, such as fabric. Such cute flowers can make an unusual garland or a delicate flower basket.
Personally decorating a hall for a celebration or the interior of your own apartment is becoming increasingly popular. Flowers are perhaps the most common decorative elements.
Thematically they are suitable for decorating practically any celebration. For their manufacture they use the most different materials. The simplest and most accessible is paper. At the same time, paper flowers turn out to be very impressive and colorful.
Where to start decorating the hall?
Before you start creating a flower arrangement, you need to think about its location. This will determine its size and shape.
As a rule, the location for flowers is chosen walls, ceiling, podium. When decorating a wedding area, it would be appropriate to place them along the edges of an impromptu path or staircase. Small bouquets placed on guest tables or curtains look very cute.
Material for making flowers
As a basis To make a bright, voluminous flower you will need paper. Depending on the type of flower, it can be glossy or corrugated. To connect the parts, glue, threads, metal staples for a stapler, and tape are used.
To highlight some details you can use acrylic paints, satin ribbons, decorative beads. Having collected everything you need for creativity, you can begin the process of creating flowers.
Basic techniques for modeling a flower
The simplest design that can be created from paper is is a ball. It can be easily attached to any smooth surface. In addition, experimenting with the color and thickness of paper you can create very unusual compositions.
It is created very simply. Several sheets of corrugated paper must be folded into an accordion. Secure the middle with wire or thread. Give the shape of a ball using scissors. The final stage will be straightening the ribs of the structure.
The size, color scheme and texture of the ball will depend only on your imagination and the quality of the paper. The thinner it is, the more elegant the finished product will be.
Flowers look more complex from craft paper. Thanks to their durable texture, they are very dense and hold their shape well. To make them, you need to cut out a spiral using scissors with a figured nozzle.
What kind of flowers are made from paper?
If desired, you can cut it out of paper practically any kind of flower or plant. The most common ones are roses, peonies, and snowdrops.
In order to make peonies, you will need paper no smaller than A4. It is important that it is colored on both sides. This condition is necessary for the flower to be realistic. The sheet will need to be folded into an accordion.
In the middle, you should tighten the accordion with nylon thread. The formed accordions must be positioned perpendicular to each other. The more accordions, the more magnificent the bud will be in the end.
You can add volume, spreading the petals. Add flower arrangement You can use such cute plants as daffodils. They also look great as individual decorative elements. To make them you will need to cut out a small square of paper measuring 15 by 15 cm.
The resulting figure must be bent at 45 degrees. the resulting accordion should be leveled. Use glue to connect the sides of the folds. In total you need to make 4 accordions.
You can add originality to the daffodil with the help of multi-colored petals. The flower head should be formed from the stem. It will act as a fixing base. Stamens can be made from beads.
How to make a garland?
The most common form of volumetric decor is a garland . It is universal and suitable for decoration almost any celebration area - ceiling, walls, arch. To make it you will need the following parts: fishing line, paper and decorative elements meaning beads, sparkles. The auxiliary materials you will need are cardboard and glue.
At the preparation stage also you should make a stencil. It can be cut out of cardboard. After which you can start preparing the petals. They must be strictly the same shape and size. After which they can be placed on the fishing line. This must be done strictly in the middle of the elements.
For ease of placement, loops should be formed at the end of the fishing line. You can add to the garland based on your own imagination. Thus, making paper flowers is not difficult at all. The main thing is desire, patience and creative thinking.
Large flowers, handmade from paper, are a spectacular decor designed to create a festive interior. They are used to decorate photo zones at children's and adult events, as well as as floor or wall decorations for weddings and stages. The technology for making such decor is simple, and the materials are affordable.
There are many ways to decorate the interior festively - these are balls, arches, topiaries, garlands, screens, lanterns, candles, natural and artificial flowers. Paper flowers have gained particular popularity recently. They are made using cardboard and various types paper:
- white;
- colored;
- craft;
- velvet;
- creped;
- corrugated;
- shagreen;
- silence;
- newspaper and magazine;
- musical notation;
- paper napkins.

In addition, to create flowers from paper you will need glue, wire, a stapler, tape, ribbons, beads and other decor, which are additionally used to decorate the flower blanks.
To effectively decorate the living room, voluminous and flat paper flowers are used. They are placed on walls, ceilings, floors, curtains in separate elements, groups or in the form of garlands. If flowers are used to decorate the stage, they are placed along the ramp, in the background, decorate the backstage with them, or simply hang them above the stage. When using voluminous flowers to decorate a wedding hall or outdoor ceremony, they are used to arrange a photo area, arch, columns, decorate tables and a path.
How to make a simple three-dimensional flower
For crafts, it is recommended to use sheets of paper; in their absence, ordinary table napkins will do. This simple and manageable material is also suitable for making decorative onion buds, chrysanthemums and peonies. The technology for making dandelions is similar to how paper pompoms are made.
- Take some napkins suitable color or cut into square blanks from tishu, stack them, and fasten them crosswise in the center using a stapler.
- Trim the edges of the future flower, giving it a rounded shape.
- Cut each petal into narrow strips, without cutting all the way through.
- Spread the fringe of the petals, giving the workpiece volume.
- If the dandelion will be used as a floor decoration, then it is supplemented with a stem. To make a stem, you need to wrap a piece of thick wire with corrugated green sheets.

A glue gun will help attach it to the dandelion. If desired, the dandelion can be supplemented with leaves by cutting them from the same material and attaching them at the bottom of the stem. For stability, it is recommended to attach the stem itself to a special stand.
Advice! Paper flowers made in this way can be attached to a hoop or assembled in the form of a garland and hung from the ceiling or wall. In addition, single blanks are randomly placed along the paths and in the photo zone.
How to decorate a wall with flowers
Any one will take on an attractive look if you decorate it with charming flowers made from colored paper. To make a flower, you need to cut a petal in the shape of an elongated heart from a sheet of double-sided colored A4 paper and bend it in half lengthwise. Prepare 7 more blank petals in the same way. Fold them in the shape of a flower and fix them by gluing the folded halves onto a paper base. Using this manufacturing principle, you can make many blanks of various sizes.
Attention! Floral decor will look especially impressive if you use sheets of different shades and glue them to the base using a gradient principle.
Using newspapers or sheet music, you can easily make a huge flower to decorate your wall. To do this, you need to make blanks of petals by rolling up individual sheets in the form of paper bags, and then, overlapping each other, gluing them to a round base with a glue gun.
To create paper peonies, in addition to paper, you can use corrugated and crepe sheets suitable shades. To make large paper flowers you will need 5 sheets of crepe paper measuring 50x80 cm and the same amount, but smaller in size.

- Fold the sheets into a stack and bend everything together like an accordion in increments of 4-5 cm.
- Tie the workpiece folded into an accordion in the center with a rope so that one end remains long. With its help, you can attach the finished flower to a wall, banner, curtain, or simply hang it from the ceiling.
- Give the ends of the workpiece a rounded shape, cutting off the excess with scissors.
- Straighten the accordion and separate the paper layers, giving the flower volume. Secure the edges of the petals together with a stapler.
- To make the flower center, you need to do the same thing, but using smaller sheets. Place the finished blank of a small flower in the middle of a large one, staple the edges of the petals.
Spectacular flower buds are made from craft sheets. The density and flexibility of this material allows you to give the petals a curved shape. To create flower blanks, individual petals are cut out of craft paper and connected in a spiral with a glue gun. Then, using special tools, the petals are given volume and a curved shape.
By choosing suitable materials and using the techniques described above, you can make any paper flowers yourself, after practicing on simpler models.
How to make paper flowers: video


