2014-10-25 Maria Novikova
Do you want a beautiful hat? How to quickly sew a hat for yourself and your child? This master class with a pattern will tell you step by step and show you how to sew a beautiful hat with your own hands. As a result, you will receive not only several beautiful and original knitted hats, but also pleasure from the process. You will also learn how to make a hat pattern yourself, sew knitwear on a regular machine, develop your imagination and much more.
Selecting a hat model
Here are some models of fashionable hats: 


If you don't know how to choose a hat, then take a look.
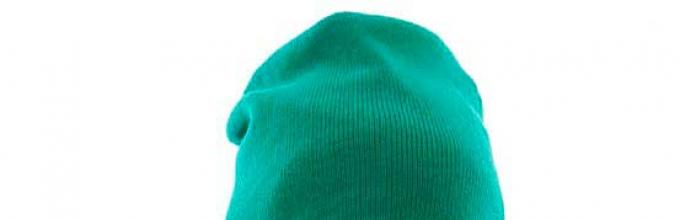
And we will sew something like this:

You will need: knitted fabric, which must have good stretch, since the hat must fit tightly on the head.
Fabric consumption: width 1.5 m. length 0.30 m.
The hat consists of: main part and lining (from the same fabric)
Cut out knitted hats
In this master class I will tell you how to sew a two-layer hat from knitted fabric.
How to sew a hat from knitwear pattern:

Hat dimensions: head circumference 52.0 cm. — 4 cm.(this value may vary depending on the density of the fabric) =
volume of the cap around the head 48.0 cm.
48.0/2=24.0 cm(cap width according to the scheme). Magnitude 24.0 cm. may vary individually for each person.
To find out your size, take a measuring tape and measure around your head. The resulting value will be the head circumference.
Seam allowances:
- top cut = 1.0 cm.
- bottom cut = 1.0 cm.
- middle cut = 1.0 cm.
- by wedges = 0.7 cm.
You will need: tailor's scissors, safety pins, one spool of thread in the color of the fabric, machine needle for knitwear № 70-75 , hand needle, ruler, measuring tape, sharpened chalk or soap.
Preparing fabric for cutting
Check the fabric for defects and textile defects, if there are any, draw a chalk line around it and take it into account when cutting.
We define front, back side

Decatation: check the fabric for shrinkage; to do this, iron the fabric from the wrong side with an iron adding steam.
How to cut a hat correctly
Cutting out the main part
Since knitwear is knitted and not woven, it has its own thread direction. How to determine this? Find the cross thread on the fabric sections and pull it. If the loops begin to unravel, as on things knitted with knitting needles, then this will be the top of your future hat, let's call it - top cut , and where the loops do not unravel - bottom cut.
We cut out the details of the cap according to the diagram.
We place the fabric on a flat surface with the wrong side down, with the bottom cut towards you and fold the fabric on the left side to (24.0 cm + 1.0 cm.) = 25.0 cm. with the right sides facing in, this will be the main part of the hat.
1.0 cm.
Then we divide the top cut of the cap into 4 equal parts: 24.0/4 = 6.0 cm.
Then at each segment 6.0 cm. find the midpoints of the segments 6.0/2 = 3.0 cm.
6.0 cm. below from the top cut of the cap. We draw with arcuate lines, as shown in the figure and mark the allowances 0.7 cm.

After the hat design is built on the fabric, we check all the dimensions again. Then we cut out the main part of the hat using tailor's scissors. If the fabric moves or slides, then to do this you need to pin the part together with safety pins so that the pins do not get under the scissors blade.

Open the lining of the hat: We arrange the fabric in the same way as when cutting the main part.
On the right side, fold the fabric over (24.0 cm + 1.0 cm) = 25.0 cm. right sides facing in
Set aside an allowance from the top cut 1.0 cm.
Then we divide the top cut of the hat lining into 2 equal parts: 24.0/2 = 12.0 cm.
On these segments we find the midpoints (12,0/2 ) = 6.0 cm.
We connect the midpoints of the segments with the lower points that are located on 8.0 cm. below from the top cut of the hat lining. We decorate with arcuate lines, mark allowances 0.7 cm. as shown in the picture:


We check all the dimensions and cut out the lining of the hat, taking into account all the allowances.

Sewing a hat
We select threads to match the color of the hat fabric

Stitching parts
We begin to grind the wedges along the upper cut of the cap, starting on the main part

And then on the lining of the cap

We grind the wedges one by one in a circle

Finally, we sew down the middle seam on the main part of the hat, and then on the lining of the hat. Pin the middle seam:

Sew the middle seam, starting on the main part, then on the lining. If the seams move when sewing, they can be basted with temporary hand stitches.

Connection with lining
Thus, we got two processed parts of the hat, the main part and the lining.

Now they need to be connected to each other. To do this, turn the main part of the hat inside out, and leave the lining on the front side. Next, we insert the lining into the main part with the right sides inward, matching the middle seams of the main part and the lining. We align the lower sections of the parts and pin them along the entire circumference.

We sew on a sewing machine (the width of the allowance 0.7-1.0 cm.) with a light, zigzag stitch, this is necessary so that the stitch does not burst when worn.

After all the seams are finished, remove all the pins and turn the hat right side out.
To do this, in the middle of the middle seam of the lining, rip the seam with a distance 8.0 cm.

and through the hole formed, turn the entire hat right side out.

Then we secure the opened seam gap using hand blind stitches.

Header presentation
Sewing a hat with your own hands is not at all difficult; such a simple model can be sewn from various fabrics and worn a new one every day.

There are several options on how you can decorate your hat with various interesting applications to give it uniqueness.
What kind of hat to sew for a child
With a bunny:

With a bunny and flowers: 
With a girl and flowers: 
With cherries: 
With red cherries: 
With a bouquet of flowers: 
With company logo: 
DIY hats for girls
To do this, you need to cut out the parts for the applique from the fabric. You can come up with whatever design you want, I decided to make a carrot with bunny ears so that the ears extend away from the hat. The effect is as if a hare was hiding behind a carrot.

When the parts are ready, they need to be stitched in a zigzag along the edge so that the ears fit into the seam.

On the finished carrot, you can make lines with a small zigzag. Then carefully iron the applique with an iron. To prevent the knitwear from stretching when stitching, you can glue interlining (adhesive non-woven material) to the applique site on the wrong side.
Then we grind all the seams and hem the bottom. The hat is ready!

Now we take a large clamp needle and embroider the eyes with black yarn. Sew on the button for the nose, gathering the openwork fabric.

This cute hat can be worn with your own baby clothes. Watch my master classes: and a flat cap in a man’s style? How to sew a hat with your own hands so that everything turns out correctly and neatly? No need to rack your brains anymore, buy fabric and start sewing according to these instructions. And everything will definitely work out!
I wish you creative success!
To better understand the material, watch the video:
P.S. Did you like this material?!
Leave your comments, add to your wall and subscribe to blog news! 🙂
Best regards, Maria Novikova
Stop being a gray mouse, join the ranks of the fashionable and stylish! Don't know how? I'll help you!
Right now, place an order for a personal pattern or consultation on sewing and cutting clothes. Including consultation on the choice of fabric, style and personal image.
My . I'm on Twitter. Watch on Youtube.
I would be grateful if you use the buttons:
A familiar situation - the closet is packed to capacity, there’s nowhere to even stuff socks, but all you can wear out of it is a pair of jeans, an oversized cozy sweatshirt, two simple sweaters and a T-shirt bought a hundred years ago? Because, no matter how beautiful and elegant a thing is, we will always be drawn to coziness and comfort. And that is why some new clothes, after their only release, lie untouched for years, and some are worn out to holes. Then they become “household”, patched, trimmed and worn a little more... And then more or less “living” flaps are cut out of them and used as potholders, kitchen towels, etc.... Conclusion - with your favorite thing as with It is very, very difficult to separate from a loved one! So I suggest reviewing your wardrobe for “no five-minute throwaway items” and giving them a second chance! After all, how many useful, beautiful and original things can be made from the same sweater!
1. Socks
These bright and warm socks are sewn in one sitting from the sleeves of an old sweater. You just need to cut a piece of the sleeve to the desired length and carefully hem it at the cut site so that the edge does not fray. These socks look very stylish under high boots or on top of ankle boots.

2. Poufs and pillows
Puff bags are now in fashion. They are very light, as they are filled with weightless holofiber or padding polyester, comfortable and soft like down pillows. In addition, such poufs look quite stylish. It's easy to sew them yourself. All you need is: an unnecessary sweater, thick fabric for the bottom, fabric for the inner cover, stuffing, scissors, needle and thread.


Sew the inner cover and stuff it with holofiber or other stuffing, and secure it with thread. Cut off the sleeves from the sweater and sew the resulting holes from the inside. You insert a padded cover into the sweater and sew a bottom cut out of thick fabric at the bottom.


3. Pillows


4. Bags
Unusual knitted bags can be easily made, even if you don't like to knit! You can use a ready-made knit of an unnecessary sweater - just cut out two pieces of the desired size and shape, sew them together, attach the handles, make an inner cover with pockets for your favorite little things, and the new thing is ready!


5. New dress or skirt?
If you have several relatively new things that you don’t like or that are partially out of order, you can combine them into a new thing, for example...


6. Fashionable winter accessories
From one sweater, if you try hard, you can sew yourself a very original set of warm clothes - a hat, mittens and even a scarf! And if you decorate them with felt flowers, ribbons, beads or buttons, you will have a few more favorite things.


7. Pencil
Cut out a piece of fabric from a sweater or other unnecessary knitted item and sew a warm cover for a glass (a tin can without a lid, a miniature coffee can, an old cup with a broken handle...) - now you have a cute pencil holder.

8. Diary case
Notebook covers, unless of course it is high quality leather, wear out quickly. Sometimes you don’t even have time to fill it halfway - and it’s already pretty worn out. Sew him a cover from a not very rough sweater! Choose a brighter piece with a pattern, or decorate it yourself.


9. Clothes and soft bed for your beloved pet


The simplest scheme for a fashionable jumpsuit...

But a comfortable and practical bed for your pet...

I think it’s easy to guess how it is sewn. Cut off the top of the sweater from the bottom (draw a straight strip just on the “chest” and cut). Sew the neckline, sleeves on the “tassels” and the bottom from the inside, and fill it tightly with stuffing. From the “bottom” of the sweater, cut out and sew an oval pad. Fill it with stuffing too. Now sew both parts and that's it!
10. Vintage candlestick
For this candle holder, all you need is jars and scraps of knitted sweater!


11. We insulate flower pots for winter

12. Knitted bracelets


13. Christmas balls in a “fur coat”
An original way to update New Year's toys is to cover them with knitted patches. Such toys “warm” themselves.


14. Bottle case
Another idea on how to set the New Year's table in an unusual way! Let all the bottles be in winter “fur coats”.

15. Sox balls
Sox is a variation of the game “footback”, in which all sorts of tricks are performed with a small ball filled with sand or cereal. They are made mainly from old socks, but you can also use sweaters for the same purpose! Children or your favorite cat will especially be delighted with such a fake!

16. Potholders


17. We insulate our phones, netbooks and e-books

Don't rush to throw away the old one. It will be suitable for something that will serve you for a long time and will delight you with its usefulness! To remodel, you will need basic materials and the desire to make a stylish new accessory. Arm yourself with scissors and start an exciting crafting session! This idea can rightly be called precious...
Stylish hat made from an old knitted sweater
After watching this video, you will learn in detail the process of making a warm hat from a knitted sweater. You don’t need to be a master at all for everything to turn out great! The girl remakes an old thing with ease and pleasure, and is tempted to repeat it after her...
Knitted items are associated with comfort and home. Simple knitted elements will add warmth and comfort to any setting! A cover for a chair or ottoman, which can also be easily made from tired knitted clothes, will look very cool. A patchwork blanket made from knitted scraps is what I'll be making after making this awesome hat!
This brilliant idea will be useful to everyone: a man’s, woman’s or children’s hat can be made in just half an hour. Before you run out to buy your old sweater, share this useful article with your friends!
Useful tips
It's not always a good idea to throw away old things or hide them in the closet.
Almost any old thing can be given a second life.
Here are just a few ideas on how you can turn old clothes and other items into something new and useful:
We give life to old things: a children's dress from a men's shirt
If your shirt gets dirty and you can't wear it anymore, then don't throw it away because it can be used to make a beautiful dress for your daughter.

You will need:
Shirt
Scissors
Pins
Rubber bands
Dress in the right size to serve as a sample
1. Place the dress size you want on the shirt to trace it and get a sample.
* Try to do everything carefully and keep the shirt straight so that the buttons are in the middle.
2. Secure the drawn sample with pins and cut it out of the shirt.
3. Insert elastic bands into the sleeves and neck and secure them in these places with a stitch.
4. Connect the halves of the dress with a stitch.
New life for old things: mittens and two hats from an old sweater

You will need:
Scissors
Pins
Sewing machine or thread and needle
Fabric of a suitable color (if desired) to cut out patterns - in this example, a heart.
Making a hat
1. Cut off the sleeves of the sweater, excess threads, and lay it open on a flat surface.

2. Cut off the excess on the left. Take any hat of a suitable size and use it as a sample - place it on the sweater and cut off the desired part (see image). Measure everything so that when you fold the sweater in half, you have enough width for the hat.

* When you cut part of the sweater (around the hat) leave some space for the stitching, i.e. trim a little more than the cap itself.

3. Secure both halves of the hat with pins and then stitch them together to make a hat..

4. If you wish, you can cut out any decoration for the hat from fabric (in this case, a heart) and sew it on.

Making another hat from leftovers

5. Lay out the sleeves and excess material that you first cut off - all this can be used to create another hat.
6. Attach the hat and measure about 1.5 cm from it. Cut off the tops - you will need them for the mittens.

7. Fold each piece in half lengthwise, attach a hat and cut off the excess pieces along the edges (see image).

8. Secure all parts with pins and stitch. You will get an extra hat.


Making mittens
You can cut material for mittens from the leftovers. Place your hand, trace it and cut it out. After this, the halves can be joined with a stitch.


*You can decorate with another heart or other fabric decoration.

What you can make from old things with your own hands: a children's dress from a sweater

You will need:
Scissors
Sewing machine or thread and needle
Pins
1. Lay the sweater on a flat surface and cut off the sleeves and slightly side parts (see image). It is worth noting that on the side of the sleeves it is worth cutting off a little more, namely along an arc. Cut the sides according to the waist of the child you are making this for.


2. Now sew the halves of the future dress with a sewing machine from the wrong side.
3. You can cut the sleeves to the desired length.


4. Attach the sleeves back - first turn them inside out, secure with pins, and then stitch them to the base of the dress.


5. You can decorate the dress with fabric flowers. To find out how you can make different flowers from their fabric, visit our articles:
Second life of old things: children's bodysuit from an old T-shirt (photo)


You will need:
T-shirt any size
Bodysuit (jumpsuit) sample
Sewing machine or thread and needle
1. Place the baby bodysuit on thin paper, trace it and cut out the stencil.
2. Place the stencil on the T-shirt and secure it with pins.

3. Cut out according to the stencil (do not touch the neck of the T-shirt).


4. Cut the upper part of the workpiece so that you get sharp tops (see image).


5. Connect the halves and secure them with pins. At the top, where the neck is, adjust the desired diameter for the head.


6. Prepare the cut sleeves and fold them in half. Place them next to the main piece, see how it will roughly look, and connect the sleeves to the main part using a sewing machine.

* Adjust all parts of the bodysuit so that in the end the sleeves and other parts are even.

7. Connect all parts of the bodysuit with a stitch, having previously secured it with pins.
*If necessary, cut off excess parts.


8. Fold the bodysuit in half crosswise and cut a “triangle” at the bottom (where the legs are) (see image).


9. Lay out the cut triangle, secure with pins and stitch to the bottom (between the legs).


10. Follow the photo instructions and don't forget to add buttons at the end.


Repurposing old things: a dollhouse from an old suitcase

You will need:
Old suitcase
2-3 wooden boards of suitable size
Screws and screwdriver
Slate paint (you can paint with chalk on the painted surface), brush and chalk (all if necessary)
Wrapping paper and felt (if necessary)

1. Clean your old suitcase well, both outside and inside.
2. Measure the inside of the suitcase so you know what size boards you need (for shelves) - width and depth.

3. When you have cut the boards to the desired size, try to round the ends.
4. You can paint the outer part with slate paint (do everything carefully according to the instructions, applying several layers of paint).


5. It's time to decorate the inside of the suitcase.
*You can add a little felt to the bottom - the fabric will act as a rug.
* You can decorate the walls with wrapping (gift) paper.

6. Secure the shelves with screws, screwing them onto the outside of the suitcase.
7. Instead of making holes, you can simply use chalk to draw windows and doors for the house on the outside of it. You can erase the chalk and draw something else at any time.
8. Fill the house with furniture.
New thing from old: water pump for balls

You will need:
Bottle with dispenser
1. Fill the bottle with water.


2. Bring the ball to the dispenser spout and start filling it with water.
*If the spout is too wide, you can trim it with scissors.


Do-it-yourself old things: toy storage
This craft can be made from an old box.

You will need:
Old locker
Wheels
Screws and screwdriver
Handle (if necessary)
Paint and brush (if necessary)
Sandpaper (if necessary)

* If the shelf is in good condition and processed well (there will be no splinters), then you can simply attach wheels to it using bolts and a screwdriver (wheels can be found at the market or in furniture stores).


*If you wish, you can paint the box a bright color or decorate it with stickers.
* This kind of toy storage is convenient to take out from under the bed or hide it under it.

Remaking old clothes (video)
Recycling old T-shirts


