On New Year's Eve, you want to decorate your home, fill it with a special atmosphere, and also please the Mistress of the Year - the Yellow Pig. Making cute crafts following the instructions provided is easy and very fun. Children will be especially delighted if you take on such magical creativity together. Let's find out what crafts you can make for the New Year 2019 with your own hands - the symbol of the Year of the Pig.
Felt pigs
It’s very easy to make such a piglet, a symbol of the New Year 2019, with your own hands; for this you need to have the following arsenal of materials:
- Felt of different colors,
- Sintepon for stuffing toys,
- Sewing accessories,
- Scissors,
- Buttons,
- Beads.
It is necessary to cut out the parts from felt according to the proposed or your own pattern.

We sew the two parts of the head together, not forgetting to put the ears between them, using overlock stitches, leaving a hole for stuffing with padding polyester. After stuffing, we also sew up the hole using overlock stitches.
We also sew together two parts of the patch, stuff it with padding polyester and sew two buttons to the patch.
Sew the finished patch and two beads for eyes to the head.
Sew the head to the body. The ponytail can be curled using a pencil. You can sew an elegant bow on the piglet’s neck.
If you attach a string to the pig's head, you can use the toy as a Christmas tree decoration.
Based on the proposed option, you can make many interesting options toys, using additional materials for decoration (sequins, ribbons, beads) and your own imagination.


Sock pigs

This DIY symbol of the New Year 2019 is made from ordinary socks. Required materials:
- Two socks of different colors or with different bright prints,
- Buttons,
- Sintepon,
- Sewing accessories,
- Scissors,
We stuff one of the socks with padding polyester so that we get a spherical shape, and cut off the rest. We sew the edge of the sock, tighten it and sew it with a hidden seam.
We put the previously cut part of the sock on the resulting ball. We sew its edge, tighten it and also sew it with a hidden seam.
Cut off the upper part of the second sock and cut it crosswise into two halves. The blanks must be rounded, giving them the shape of ears. We sew each piece from the wrong side and turn it inside out. We sew the ears to the body with a hidden seam.
Sew on the buttons - the patch and the eyes.


Pompom pig
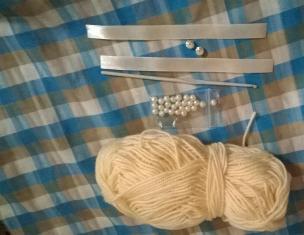
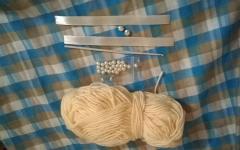
 The symbol of the New Year 2019 - the Pig - is made with your own hands from knitting threads. To do this you need to stock up:
- Threads made of wool or acrylic,
- Chenille wire pink color,
- Felt,
- Buttons,
- Cardboard.
You need to cut out two rings from cardboard, put them together and wrap them with yarn in several layers. Next, cut the yarn along the outer edge and tie in the middle between the rings with thread. Cut the rings and get a pompom.
We make legs and a tail from wire and glue it to the pompom. We cut out ears from felt. We use a button as a snout, buttons as eyes, or ready-made eyelets. Glue the parts to the pompom and get a cute pig.


Piglets from cones

Making such piglets will be easy even for children. You need to stock up on cones, plasticine and wire. The cone can be painted pink. We use large scales from cones as ears and glue them to the body. We make the nose, eyes and paws from plasticine, the tail from wire.
Polymer clay pig

We will need:
- Polymer clay,
- Tools for working with clay.
Roll out a ball of pink clay. Shape the muzzle. Supporting the head with your fingers, level the patch on a flat board.
Use a ball-end tool to shape the head and make the necessary indentations.
Use small black beads or black clay balls as eyes.
Make indentations - nostrils and mouth.
Connect the head and body with a wooden stick. Make and attach the piglet's arms and legs, as well as ears and tail, as shown in the picture.


New Year's bustle with gifts and preparation holiday menu This also applies to home and office decoration. Decorating the room creates a festive mood and helps you forget about fatigue and the annual report.
New Year-themed crafts provide an opportunity to awaken the dreamer and inventor in your soul. Involving children of any age in the process helps strengthen family traditions and values.
Any available material is suitable for crafts; if you wish, you can buy something in handicraft stores. Don’t be afraid of experiments: it is non-standard solutions that attract attention and deserve admiration.
It will complement the exclusive interior made of cardboard boxes, which we have already talked about earlier.
New Year's figures: Santa Claus, Snow Maiden, Snowman
Well, what's the New Year without the main characters? Flat or voluminous, made of paper or plastic, simple or complex - there are plenty of options for every taste. It all depends on the time you are willing to spend on the craft and patience.
Santa Claus made of cardboard and felt
To make a cheerful and cute Santa Claus you will need: a toilet paper roll (or a cylinder of the required size from cardboard), small scraps of red, white, black and yellow felt, glue, cardboard and 2 beads or buttons for the eyes.

Manufacturing process:
- cover the sleeve with red felt;
- cut out felt and glue a black “belt” and “plaque”;
- from white felt we make a “face”, “beard”, “mustache” and “nose”;
- We make a cap from red felt, glue it, and cover the seam with a white felt ribbon, like a real hat;
- from cardboard and black felt we make a flat base for a figure in the form of boots;
- We make handles in mittens from red and white felt and glue them to the “body”;
- At the tip of the cap we make a white pom-pom (glue two felt disks together);
- glue on bead eyes and a red mouth.

The craft can be placed or hung on the Christmas tree. In the second case, when making a pompom, a beautiful ribbon or shiny cord is glued between the discs.
Santa Claus from a plastic bottle
For the craft you need to prepare: a plastic bottle (volume 0.5-1 liter), acrylic paints of red and white, glue, scissors, black marker and white thread.

Manufacturing process:
- paint the bottle red or cover it with paper;
- we draw the eyes with a marker (here you can improvise: “sly squint”, “mischievous wink”, “delight”);
- for the beard and hat we glue the material and paint it with white paint;
- Glue a thread pompom onto the bottle cap;
- draw snowflakes and mittens;
- Cut out a snowflake from felt and glue it to the hat.
The finished figure of Santa Claus can be decorated with sparkles or tinsel.
Clay Snow Maiden
An interesting version of crafts made from modeling clay, suitable for both kindergarten and home decor. The Snow Maiden figurine turns out to be hollow.

The sculpting technique includes the following steps:
- from “sausages” of medium thickness we make a pyramid (smoothing the seams to get a solid, even figure);
- for the head we roll a ball, which we secure with a match;
- we braid a braid from thin flagella, make a “fur” frill and a collar for a fur coat, a kokoshnik and sleeves with mittens;
- When the figure hardens, we begin to paint (mix the paint with glue).
You can make other New Year's characters in a similar way.
Paper Snow Maiden
To make a cheerful Snow Maiden from paper you will need cardboard, colored paper, glue and pencils.

We roll a sheet of cardboard into a cone and get a base, which we then cover with blue paper. We also make sleeves from cardboard.
On thick white paper we draw the Snow Maiden’s face with pigtails and carefully cut it out. From white paper we cut out the openwork trim of the “fur coat”.
Glue all the parts together and paint on them if desired. decorative elements marker. Instead of blue colored paper, you can take white paper and color it with a pencil.
Snowman made from white plastic cups

The craft can be of different sizes, but it will be equally easy to work with due to its light weight. You need to prepare: several packages of disposable cups, a stationery stapler, glue, colored cardboard for a cap, a marker and an old scarf.
Manufacturing process:
- we connect the cups around the circle using a stapler (orient the bottom towards the center of the circle);
- adding rows, we get the first hemisphere;
- we make the second hemisphere unfinished (without a top) so that the sphere stands stably on a flat surface;
- we connect the parts with a stapler and get a “lump”;
- in the same way we make a second “lump” of smaller radius;
- glue two spheres together;
- We make a cap from cardboard (you can sew it from fabric or take a ready-made one);
- we make eyes, nose and mouth;
- we decorate the buttons (you can put tinsel, a wad of foil or colored paper in the required cups).

Come up with original decoration The snowman is quite simple.
Snowman made of thread and glue

For this craft you will need: white threads (preferably thick ones for knitting), PVA glue, 4 balloon, colored paper and markers.
Manufacturing process:
- inflate balloons of the required sizes (torso, head and arms);
- wrap each ball with thread dipped in glue and leave to dry;
- after a day, we pierce the balls with a needle and remove the scraps;
- from the resulting white balls we collect and glue the figure of a Snowman;
- we make eyes, a nose and a smile from paper or draw with felt-tip pens;
- create a headdress - a paper bucket;
- tie a wide ribbon children's scarf or tinsel.

To complete the composition, you can make a broom from a wooden kebab skewer and wide ribbons of colored paper.
Decorative Christmas tree
The Christmas tree, which is usually decorated, is recognized as the indisputable and permanent symbol of the New Year. But the Christmas tree itself can become a decoration. We present the 5 best options for a decorative Christmas tree.
Christmas tree from pine cone

A small but cute Christmas tree will be made from a beautiful pine cone (fir cones are smaller and more elongated). Possible different options coloring and decoration.
To make the Christmas tree look more realistic, “plant” it in a small plastic flower pot (flowers are sold in stores in them, but after being transplanted into a ceramic pot, they often do not find use at home). You can also make a pot from puff pastry or plasticine.
Fluffy Christmas tree with sweets

New Year's holidays were remembered from childhood by the aroma of chocolates. It will be great if a New Year's harbinger, strewn with sweets, appears on your desktop. We make a cone from white cardboard. Starting from the bottom, glue green tinsel in a circle, alternating each row with a row of candies. The top of the Christmas tree can be decorated with a star made of colored paper or candy. Instead of chocolates, you can use different sweets.
Vegetable tree

For registration festive table You can make a Christmas tree out of cauliflower. Small or chopped carrots, pomegranate seeds, and tangerine skin clippings are suitable as decorations. You can hold the cabbage florets together with puff pastry.
Christmas tree made of threads “with lights”

A simple Christmas tree made of threads with the light of a tea candle flickering inside will fill your home with coziness. To make it, we wind any threads soaked in glue onto a cone of the required size.
After 24 hours, when the glue has dried, take out the cone and decorate the craft with beads or other small and light decor.
Natural mini-Christmas tree made from spruce branches

When there is no room in the apartment for a real spruce, but you really want a resinous smell, you should think about creating a mini version from small branches. To do this, place an elongated piece of floral sponge in a decorative bowl or clay pot.
At the next stage, the branches are evenly stuck into the sponge, repeating the silhouette of a real Christmas tree. You can decorate the finished composition with physalis, dried flowers or dried orange slices (natural spruce branches go better with natural materials).
DIY Christmas tree toys
Handmade toys of unique design are increasingly popular and create a special atmosphere in the interior.
Gnomes from fir cones and felt

Cute toys with pendants will be a great decoration. There are many different variations and room for creativity.
Felt Snow Maiden

The Snow Maiden can be made using a ready-made pattern or you can prepare your own version on paper. In the pattern you need to take into account all the elements. We decorate the finished figurine with beads or sparkles.
Garland of woven paper balls

Eat different techniques weaving 3D figures from paper. The simplest of them: cut colored paper into strips, take one strip and glue it into a ring, intertwine two more strips and also glue it into a ring.
For balls of small diameter you need to take strips of 8-10 cm. bigger ball, the more strips will be required. We string the finished balls onto a ribbon or decorative rope and get a bright multi-colored garland.
Northern penguins made from plastic bottles

All you need for the craft is an even number of bottles (if they are of different sizes, you will get a funny family), threads for pompoms, scraps for cutting scarves and multi-colored acrylic paints. Coloring does not require artist skills - just desire and a festive mood.
Plastic snowflakes

A wonderful decoration in the form of multi-colored snowflakes can be made from the bottoms of plastic bottles of any size: cut off the bottom, use a hot nail to make a hole for the ribbon and paint with felt-tip pens or draw patterns.
Button decoration

Buttons are actively used in needlework to decorate any crafts. Both decorative buttons of the same color and old unnecessary buttons can be used to create a Christmas tree decoration. The elements are strung on copper wire, and the junction of the two ends is decorated with a bright ribbon bow. A similar version of the craft is a vertical decoration in the form of an icicle.
The symbol of the coming 2018 is the Earth Dog
When decorating the interior, you cannot ignore the “mistress” of 2018 - the Earth Dog. In 2019, the relay race eastern calendar The Yellow Pig will continue, and in 2020 - the White Rat.
White dog made from cotton balls

For the craft, a cardboard frame is first made, which is covered with cotton balls or pieces of cotton swabs.
Pompom dog

You will get a cute puppy from pompoms. For the craft, take two pom-poms of the same size (head and torso) and one small one (nose).

We tie the pompoms together with thread and glue the felt ears. For the eyes, you can take black beads, and for the nose, sew a lump of black material.
Cute felt puppies

A great idea would be to hang funny felt puppies on the Christmas tree. The pattern for the craft is easy to make yourself.
Funny puppy made from socks

To create such a dog, you will need basic cutting and sewing skills. Initially, the future body and head are formed from one sock, which are filled with padding polyester and then separated by tightening them with threads. Afterwards the head is completed with eyes, a mustache and eyebrows are embroidered.

From the other two socks, a pattern is made for the ears, paws and tail, which are also filled with padding polyester and secured to the body.
Selected ideas for crafts for the New Year 2018 will help make the interior not boring and magical in a festive way. More ideas on New Year's decoration V .
New Year 2020 is coming soon and this is a great opportunity to make simple and beautiful crafts with your own hands from scrap materials: pine cones, paper, tubes and much more. You can not only brag about them on school exhibitions, but also to decorate the apartment, but also to present it as a priceless gift to your family and friends. We have prepared for you best crafts for the New Year and we will start our article with a craft for the symbol of 2020, which will pass under the sign of the Yellow Metal Rat and we decided to show you a simple and useful craft.
Symbol of 2020 made of paper and cardboard
In order to do this New Year's craft you will need:
- Cardboard
- Colored paper
- Scissors
Carefully make the toy:
- We cut out our future rat, as well as its details and clothes.
- Using glue we glue crafts, clothes and small details. The toy is ready!
Clay rat craft

Even a child can make such a simple craft, prepare:
- Polymer clay
- rolling pin
Work progress:
- Roll a ball of clay, then stretch it out and shape it into an egg.
- Using a knife, we mark the paws and the circle on the sides of the rat.
- Take clay of a different color, form a scarf and attach it to the figure
- We make small balls from clay of the main color, then press them down to form feet and palms. Fingers can be marked with a needle. Attach them to the figure
- Making and attaching a tail
- Making the head of a rat. To do this, roll the ball, then carefully pull it out so that it looks as much like a rat’s face as possible.
- Making eyes for a rat. You can make them one color, or you can mold them using white, black and blue clay.
- All that remains is to bake the resulting figure according to the instructions on the package. polymer clay. The craft is ready!
Craft for New Year 2020 felt rat

Even a schoolchild can make a rat out of felt; to do this, prepare:
- Template of a rat’s body, a dress for it and a flower for decoration (you can print it out or draw it and cut it out yourself)
- Felt of the desired color
- Needle, thread
- The lace is thin
Making a rat:
- By ready-made template cut out their felt of different colors for the body of a rat, a dress and a flower
- We put the body and dress together and carefully stitch along the edge. It is better to do this using the “needle forward” technique.
- Sew the rat's tail using lace or thick threads.
- Now we embroider the rat’s face with colored threads: eyes and antennae
- Sew on the flower. The craft is ready!
Balloon snowman

To make this beautiful craft you will need:
- 3 balloons
- Thick white thread
- Accessories for decoration
Manufacturing process:
- inflate three balloons according to the principle of a snowman figure (large, medium and small)
- Carefully lubricate the thread with glue and wrap the balls one by one. Waiting for it to dry
- We collect three balls together and fix them with the same glue
- We decorate the snowman with accessories, designate the eyes, nose, mouth, etc.
- The snowman is ready!
Paper lantern


Making this simple craft will take very little time:
- Colored paper
- Scissors
The manufacturing process is very simple:
Following these instructions, we measure and cut out the necessary parts from paper, glue them together with glue. The craft is ready!
Beautiful DIY candlesticks: 3 ideas
One of the popular and understandable gifts for everyone are candlesticks. They can be given to anyone, be it a colleague or a close relative. A young man, a student, and an older person will be happy with such a gift. You can make a candlestick with your own hands from scrap materials, and the cost of the souvenir will please those who do not have a large budget.
To make an original candlestick, you will need a glass cup and regular nail polish of different colors. You can paint any pattern on the outside of the glass using varnishes, and after drying, the pattern will not be erased or washed off with water. The choice of drawing depends only on the preferences and imagination of the author himself.
Idea #1

To make an original Christmas tree candlestick, you need a green ribbon, several small branches of spruce or pine, nail polish in white, blue and green, and a small heat-resistant glass cup.
On the outside of the glass you need to draw snowflakes, Christmas trees, or simply write a handwritten greeting for the coming New Year. If the candlestick is large, then you can leave fingerprints on it as a keepsake. On top you need to place several branches around the perimeter of the glass and tie them with ribbon. Make a bow from the ends of the ribbon.
Idea No. 2

A lace candlestick is an original thing that will appeal to the female sex. Place a lace ribbon on a smooth glass made of heat-resistant glass. You can use Moment glue or a glue gun. Don't worry if the edges of the fabric protrude slightly beyond the edges of the glass - this will give the souvenir an additional highlight.
Idea No. 3

A small candlestick made of twigs is a good gift for those who appreciate things made with their own hands and know how to use them in the interior. Along the perimeter of a transparent glass glass, small twigs cut to the size of the container are glued using a glue gun. The branches must be dry, pre-treated with an antiseptic. If such a present seems small for a gift, then you can make a few more candlesticks of different sizes to complete it. They will look great on a shelf together.
Scented bath bombs

A gift in the form of a set of bath bombs looks stylish and original. With the help of such balls you can perfectly relieve stress and relax in a foam bath. The products are completely safe for human health, since they contain only natural ingredients that do not cause allergies.

To make a bomb with your own hands, you will need:
- 4 tablespoons of baking soda;
- 2 tablespoons of citric acid;
- A few drops of any essential oil;
- 2 tablespoons of cosmetic sea salt.
Mix all dry ingredients thoroughly in a separate container, add a few drops of your favorite essential oil. For example, you can use essential oil lavender, bergamot, orange or lemon, rose. Then the mixture must be gradually moistened with water from a spray bottle until it begins to hold its shape when squeezed. When the powder can be used to make snowballs, this means that bombs can be formed. The mixture can be compacted tightly into any shape, making funny bears for children or a flower for adults. In this position, the bomb should dry for several days, after which it can be used.
Instead of colored food dyes, you can use natural ones - coffee, colored sea salt, cocoa.
Boot for gifts

A handmade boot for gifts is a wonderful interior decoration. Even a beginner can sew it and give it to every family member. To do this, you need to draw a pattern of the required size on paper and cut out all the details of the future product from it. Then they are sewn together using a machine, choosing a stitch that is not too small. Remember that the boot must have a lining, which is also sewn according to a paper pattern. The lining is secured to the top of the boot with a hidden seam, after which a loop is attached so that the souvenir can be hung on a hook.
DIY amulet

An interesting option for a New Year's souvenir could be a talisman, which is given as a symbol of prosperity, happiness, monetary abundance, love, and career growth. It could be a small ball - Temari, which can bring laughter, happiness, health into the house. Or original amulets for your home that will protect you from everything negative for a whole year. And you can make temari in 10-15 minutes, thanks to our video below.
DIY New Year's cracker craft

Everything is appropriate for the New Year: noise and fun. Therefore, a bright holiday cracker would be a wonderful craft. After all, who among us has not dreamed of finding ourselves in the rain of glittering confetti? This craft is made with your own hands very easily and quickly from simple available materials, and to make it easier for you, we have found suitable videos with a master class.
New Year's diary

A super cool craft for the New Year - a diary in which you can plan and schedule all your affairs and meetings for the whole year. Ideally, it will depict the symbol of the coming year of the Rooster. On the first page you can write your wishes for the person in the New Year. It would seem banal, but such a necessary and cute gift that can be made in just 30 minutes if you watch our video with detailed instructions.
New Year's cookies

If you have a wonderful relationship at work and need to congratulate a large number of colleagues, do not rush to buy expensive New Year's souvenirs for everyone. In a very original way we can congratulate and confectionery products, made in the form of small holiday symbols. These could be cakes, candies or cookies. You can make them yourself or order them from almost every confectionery shop. Such gifts will not only delight your colleagues, but will also serve as an excellent dessert.
Ingredients:
- 1.5 cups wheat flour
- 1 cup sugar
- 2 pcs. chicken egg
- 125 g butter
- 1 tsp soda
- 1 tsp cinnamon
- 1 tsp nutmeg
- 3 tbsp. honey
- 1 tsp citric acid
- pinch of salt
Preparation:
- Add honey, water, sugar to a convenient bowl, stir and heat over medium heat.
- Add soy sauce, oil and spices and stir everything until smooth.
- Let it cool a little, then add salt.
- Then put everything into a saucepan, add flour and knead the elastic dough.
- Then put it in a cool place for 40 minutes.
- Roll out the dough to a thickness of 1-2 mm, cut out with molds.
- Transfer the cookies to a sheet and bake in an oven preheated to 180 degrees for about 5 minutes.
- And finally, you can decorate with anything you like: caramel, chocolate, eggnog with dye.
Video cooking instructions
DIY Christmas tree star

You can make a beautiful Christmas tree decoration with your own hands, using only the materials you have at home. Economical and stylish.
What we need:
- PVA glue;
- Knitting thread;
- Foam;
- Matches;
- Possible template for a Christmas tree.
Cooking process:
- Pour glue into a small bowl and dilute it with water if necessary.
- Prepare a template for the future star and attach it to the foam with matches.
- Soak the thread well in glue. And we begin to wrap the matches counterclockwise, alternately above the match and under the match. First, secure the end of the thread to one of the matches.
- Next we fill the entire space with thread. We leave our masterpiece to dry.
- We tie a string to our star on top and you can hang it on the Christmas tree. Our original toy is ready.
Christmas tree made of cotton pads

How can New Year be without a Christmas tree? Recently, most people have become accustomed to setting up and decorating an artificial Christmas tree. We can make it ourselves. Festive and elegant.
What is needed:
- Large quantity cotton pads(more than three packages);
- White paint;
- Stapler;
- Convenient scissors;
- Glue;
- Beads and braid;
- A2 size cardboard.
Cooking process:
- First we need to prepare the needles for our Christmas tree. To do this, you need to fold the cotton pad in half, then again and fasten it with a stapler.
- Take a sheet of A2 format, roll it into a ball, and straighten the bottom with scissors.
- But we begin to glue our needles to the base from below. Lubricate the fold with glue and secure it to the base. We go through each row with glue again.
- Row by row we glue the cone.
- Next, we decorate our Christmas tree at our discretion and stick on stars. The top can be decorated with a large star. The Christmas tree should look beautiful and stylish.
Snowman made from disposable cups

Anyone can make a beautiful, original masterpiece from absolutely inexpensive materials. Your craft will be appreciated; take the time to please yourself and your loved ones.
What we need:
- Plastic disposable cups;
- Cardboard, preferably black and gold;
- Stapler;
- Textile;
- Carrot.
Manufacturing process:
- We fasten the cups with a stapler, forming first the body and then the head into a ball.
- When the frame of the snowman is ready, we attach a nose from a carrot, and from scraps of fabric we make eyes and a scarf.
- We make a hat from cardboard, make a circle and a cylinder. Glue it together. Decorate with a golden ribbon. Our cute snowman is ready.
Original Christmas tree made of threads

Do you want to come up with something extraordinary and extravagant? Try making a three-dimensional Christmas tree from threads. It will decorate your interior and add a touch of novelty.
What is needed for production:
- Wool threads;
- Convenient scissors;
- Glue;
- Thick paper;
- Film;
- Half a tablespoon of starch;
- Four tablespoons of water;
- Decoration elements.
Manufacturing process:
- Make a cone out of thick paper, cut the bottom and straighten it, glue it together.
- Mix the glue and starch thoroughly;
- Cut the thread, the longer the better. And leave it to soak in glue and starch for at least twenty minutes.
- We take the film and carefully wrap our cone.
- Next, we take the thread out of the solution and wind it randomly around the cone.
- After this we leave it to dry for a day.
- Then we take out the cone. We decorate our Christmas tree with decor: beads, confetti. Our stylish holiday tree is ready. Nothing complicated, but incredibly beautiful.
Souvenir “Snow Tale”

Everyone in childhood loved to play with a ball of snow. He was mesmerizing, there was something intriguing and mysterious about him. It's time to create this fairy tale with your own hands. It turns out that it is not so difficult. And if you also involve a child in the process, it will become an exciting adventure.
Materials required for manufacturing:
- Glass jar of any size, lid;
- Any small details in the form of figures of people, animals, plants;
- The glue is waterproof;
- Glycerol;
- Distilled water;
- Snowball
Manufacturing process:
- We take the figures and glue them inside the jar, as we like, or on the lid;
- Now you can pour water and dilute glycerin in it. Thanks to the glycerin, the snowball will fall to the bottom of the jar slowly.
- Add glitter and invert the jar. If they settle quickly, you need to add glycerin.
Add glycerin until we achieve the desired result. Our fairy toy is ready.
Snowflake

Now I want to tell you about a very original New Year’s craft that you can make from salt dough with your daughter.
Required materials:
- For the dough, 1 cup each of flour and salt and 0.5 cups of water;
- Blue gouache;
- Ribbon;
- Glue;
- Glitter.
Work process:
- Knead the dough and add blue paint to it.
- We roll 7 peas and make a flower out of them as in the photo. We make small indentations in them with a toothpick.
- We roll the flagellum and make an element out of it as shown in the photo. We sculpt a second one to it. We attach the resulting part to the center of the snowflake.
- We make 5 more of the same rays.
- When the snowflake dries, coat it with paint again on both sides.
- Apply a thin layer of glue and sprinkle with glitter and your DIY snowflake is ready.
Salt dough candlestick

On New Year's Eve, schools and kindergartens hold various exhibitions and competitions of themed crafts. So that your child can not only take part in them, but also take a prize, we have selected many simple and interesting master classes with photos and videos on the topic “DIY New Year 2019 crafts.” In them you will learn how to make a New Year's craft - the symbol of 2019, the Yellow Earth Pig, from paper, salt dough and beads, and we have also created a collection of examples of new crafts for the New Year 2019 that every child can make with their own hands.
Cool DIY crafts for New Year 2019 - the most interesting things for kindergarten

It's easy to prepare for an exhibition in kindergarten In honor of the New Year 2019, our readers and their children will be helped by examples of interesting handmade crafts. Simple figures and compositions are assembled quite quickly and easily. Kids just need to look at the photos we’ve selected and make the same New Year’s decorations themselves.
Photo examples of interesting and cool crafts for the New Year 2019 for kindergarten
Among the photos we selected New Year's decorations children from kindergarten can choose original figures and compositions to participate in the exhibition. All the examples we offer are very easy and simple to make.


Simple DIY crafts for the New Year 2019 - the most interesting things for school

Photo examples will help children prepare cool figures and compositions for the school competition. We have selected simple and understandable New Year's crafts from pine cones, plastic bottles and branches that schoolchildren can easily make without the help of adults. The most interesting handmade crafts are ideal for participating in the school competition dedicated to the New Year 2019.
Photo examples of simple DIY crafts for school in honor of the New Year 2019
After reviewing our photo examples, children will be able to easily make the symbol of 2019, a pig and other New Year’s decorations for school. The proposed figures and compositions are made as easily and quickly as possible. But at the same time, they can also be submitted for participation in the New Year’s competition.


DIY craft for New Year 2019 in the form of a symbol of the Year of the Pig - for kindergarten

To participate in the New Year's exhibition held in kindergarten, we invite you and your children to try to make an unusual symbol of 2019 from paper. Make a cool piggy bank as easily and quickly as possible. At the same time he has original look and can be used in the future by the child himself to store money, change or any candy wrappers. Our step-by-step master class will help you learn more about how to make a craft in the form of the 2019 symbol of a pig for an exhibition in a kindergarten held in honor of the New Year.
Materials for making your own pig - the symbol of the New Year 2019 for kindergarten
- colored thick paper;
- scissors;
- toy glue eyes;
- thick glue;
- felt-tip pen;
- box (for example, cereal);
- chenille wire.
Master class with photos of self-made for kindergarten symbol of 2019 - pigs
- Prepare materials for work: from pink (or yellow) paper, cut out sheets of cereal box size that can cover its entire surface. Also cut out a couple of circles from paper: one large and one small.

- Cover the selected box with prepared paper. It should completely cover the box.

- Make the face of the symbol of 2019 from pink circles. Glue a couple of small black nostril circles and toy eyes to it. Make small rectangular hooves. Curl the chenille wire into a spring.

- Glue the pig's hooves to the completely dry box and attach the tail (for example, using glue or plasticine).

- Glue the previously made muzzle on the front. Make a hole in the top of the box.

A simple DIY paper craft for school for the New Year 2019 - symbol of 2019

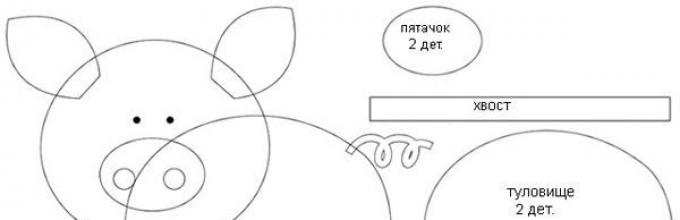
Three-dimensional figures are very easily made from plain or corrugated paper. Therefore, we have put together a simple master class for you that will tell you how quickly and easily you can make a symbol of 2019 using a simple pattern. To work, you just need to print out the proposed blanks and assemble them according to the step-by-step instructions. This craft in the form of a pig, the symbol of 2019, can be easily made with your own hands to participate in a school exhibition held in honor of the New Year.
Materials for making your own New Year's paper symbol 2019 for school
- colored paper or corrugated paper;
- stationery knife;
- plain paper (for printing diagrams).
Master class on making your own symbol for school for 2019
- Prepare materials for work.

- Print out the diagrams below.


- Transfer the diagrams to colored or corrugated paper.

- Cut out the blanks and assemble a figurine in the form of the symbol of 2019, using the video hint and instructions according to the diagram.

Video tutorial on how to make your own New Year figurine in the form of the symbol of 2019
Learn how to make cute piglets from plain paper you can with the help of our next master class. This video explains step by step how to assemble a cool pig figurine using the origami technique. When making several of these figures, they can be assembled into a whole composition. For example, make an original garland or panorama with piglets on a farm. Also, individual figures are suitable for decorating offices and assembly halls.
Beautiful DIY New Year's craft for a school competition - master class with photos

In our next master class, children studying in middle or high school will be able to make a three-dimensional symbol of 2019. Papier-mâché pig can also be used to decorate cabinets. You can also very easily turn it into a real piñata by placing various candies inside the symbol of 2019. A master class with step by step photos. However, it is worth knowing that it will take about 2-3 days to assemble such a pig. The duration of production of the 2019 symbol directly depends on the drying speed of the papier-mâché.
Materials for a beautiful New Year's craft made for a school competition
- balloon;
- wire;
- thin batting;
- primer and pink paint;
- newspapers;
- cardboard tubes (you can use toilet paper);
- PVA glue and silicone glue;
- white thick paper or cardboard;
- a pair of black beads;
- gold ring;
- chain;
- doll or small decorative cylinder;
- masking tape;
- feathers
Master class with photos of assembling a beautiful craft for the New Year for a school competition
- Inflate a balloon and wrap it in dry newsprint.

- Soak newspapers in PVA glue and begin to carefully wrap the ball prepared for work to obtain real papier-mâché. Using masking tape, attach 5 cardboard tubes to the dried workpiece, as shown in the photo.

- Continue pasting the pig figurine - the symbol of 2019 - with newspaper: to securely fix the legs and snout.

- After the workpiece has dried again, make a small cut in the back and install a wire ring inside (in the center of the back).

- And cut out two blanks for the ears from thick cardboard.

- Carefully bend the cardboard blanks to make the ears more realistic. Glue them to the workpiece with masking tape.

- Cover the pig's ears with papier-mâché and, if necessary, expand the ears. But then it will also need to be re-covered with newspaper soaked in PVA.

- When the workpiece is completely dry, it should be coated with a primer.

- Apply pink acrylic paint to the figure, and after drying, cover it with silicone glue and attach thin batting. This will give the figure greater realism.

- Once the glue has dried, you can begin further work.

- Make pig hooves from cardboard tubes, paint them black and glue them to the figurine with silicone glue.

- Make a couple of holes in the back next to the ring using toothpicks.

- Pass the wire between the holes and secure it with silicone glue or a glue gun.

- Cut a pair of wings out of cardboard and glue them to the back of the pig and the wire itself with a glue gun.

- Glue chicken feathers onto cardboard wings.

- Using a glue gun, attach beady eyes, a monocle ring, and a doll top hat to the figure. Cut and glue the mustache.

- Make a small pocket watch out of paper and glue a chain to the figure. Glue the previously made watch to the chain itself.

- The cute symbol of 2019 is ready for the school competition!

An interesting DIY New Year's craft for an exhibition in kindergarten - master class with photos

With the help of our simple master class With photos, kindergarten children will learn how to easily make various New Year's decorations from salt dough. This kind of work can be done by kids from junior group and children from the middle or senior group. The proposed New Year's crafts, made with your own hands for an exhibition in a kindergarten, can also be used as a useful hint. Instead of such ordinary New Year's decorations, according to the proposed instructions, you can make many cute symbols of 2019 from salt dough.
Materials for an interesting New Year craft made for an exhibition in kindergarten
- flour - 1 tbsp;
- salt (fine) - 1 tbsp.;
- rast. oil - 5 tbsp;
- warm water- 2-4 tbsp. (the dough should be thick, but still easy to knead);
- threads or ribbons;
- cookie molds.
Master class on DIY New Year's crafts for kindergarten
- Mix all ingredients to make salt dough.

- Mix the ingredients thoroughly until smooth (children can help, but stir salt dough should be adults after all).

- Prepare cones, beads, and various leaves for squeezing unusual designs on the surface of Christmas tree decorations.

- Roll out the salt dough into a thin layer.

- Using cookie cutters, make many different shaped figures.

- Transfer the salt dough pieces onto parchment.

- Make drawings, patterns or inscriptions on the salt dough pieces.

- Make small holes in the top of each figure for hanging using a regular tube.

- Bake the salt dough at 180 degrees for 1 hour.

- Attach strings or ribbons to the finished Christmas tree decorations. If desired, they can be painted or coated with multi-colored varnishes with glitter.

A simple and beautiful DIY New Year's craft - for elementary school and kindergarten

You can make a cool symbol of 2019 for the New Year's exhibition not only from paper or newspapers, but also from simple improvised materials. Having carefully studied our next master class, children will learn how to make such a simple and beautiful New Year's craft with their own hands from an ordinary tennis ball and a couple of balls. Children must carry out the work of making the symbol of the coming year under the supervision of their parents: children from kindergarten will not be able to complete some stages without the help of adults.
Materials for making your own New Year's crafts for school and kindergarten
- tennis ball;
- two balloons;
- silicone glue;
- toy glue eyes;
- chenille wire;
- velvet cardboard.
Master class on making your own New Year's crafts for kindergarten and school
- The 2019 symbol will be based on a tennis ball.

- To hide the tennis ball, you will need to cut off the thin parts of the two prepared balls - the “necks”. First, you need to put one ball on the ball, and then a second one to cover the remaining visible part of the ball.

- Tie the neck of one ball in a knot, trim off the excess. Glue the resulting circle to the workpiece as a pig's snout.

- Cut out a couple of ears from velvety cardboard and glue them to the workpiece with silicone glue.

- Wait for the glue to harden.

- Glue eyes to the figure. Make a small hole in the back to install a hook tail. Make a tail from chenille wire, coat it with glue and install it in the toy.

Video lesson on how to independently make crafts for the New Year 2019 in kindergarten and school
Children from school and kindergarten can make another simple but interesting figurine in the form of the symbol of 2019 in the following master class. In it, a very beautiful and cool pig is sewn from felt. The production of such a figurine by children from the older group of the kindergarten should be carried out under the supervision of adults.
How to quickly make a beautiful New Year's craft with your own hands - master classes with photos and videos

For New Year's exhibitions, you can make not only symbols of 2019 in the form of pigs, but also simply themed decorations and figurines. And in the next master class we told you how to quickly make a beautiful New Year’s craft in the form of a Christmas tree. The proposed instructions are simplified kanzashi and can be made even by children studying in primary school. But they should still carry out such work under the supervision of adults.
Materials for quickly making beautiful crafts for the New Year
- sewing pins;
- grosgrain ribbon;
- cardboard;
- gift bow.
Master class with photos of making a beautiful New Year's craft with your own hands
- Make a cone out of cardboard that will be used as the base of the Christmas tree blank. Cut the ribbons into small pieces (about 3-4 cm). Using sewing pins, begin fixing the first row of ribbons, as shown in the photo. Make the next row from ribbons of a different color. After the base cone is completely closed, attach a gift bow to the top of the resulting Christmas tree.

Video tutorials on how to quickly make new crafts in honor of the New Year
You can also submit other fairly simple figurines in the form of Christmas trees for competitions in kindergarten or school. The following master classes with videos will help you make such jewelry. They tell you step by step how to make cool Christmas trees from beads and cotton pads for the New Year. The last video contains instructions for making an original Christmas tree using the kanzashi technique. This kind of work is more suitable for preparing middle and high school students for the New Year's competition.
You need to take care in advance about creating crafts in the shape of a pig from scrap materials in order to decorate your home with the symbol of 2019, give a present to loved ones, build a decoration for the kindergarten or place a piggy bank to attract wealth on your desktop. You need a little imagination and patience to make pigs from plasticine or papier-mâché, and you can decorate a cute card with a pig together with the kids.
Crafts for the New Year of the Pig 2019: what can you do for your home, kindergarten, or as a gift?
When decorating the house, take into account the love of pigs for everything interesting, shiny, made from natural materials. The decoration is accentuated by bright red and orange decorations, fruit compositions of oranges with fir branches and cones are created. Together with the children, they cut out snowflakes and flags for garlands, make funny pigs out of kinder surprises, and use a lot of plastic cups to build a huge snowman.
For crafts choose natural materials, you also need glue and spray paint. Except step-by-step execution, use creativity and imagination.
We decorate the house with branches, pine cones and Christmas balls
- cones and dry branches are covered with white or blue spray paint;
- put pieces of cotton wool, prepared branches and cones into a wide, low vase;
- Spruce branches are laid out, on which red or orange Christmas tree balls are hung.
For the kindergarten we make a bullfinch with a rowan branch
The body of the bird is made from a crumpled piece of newspaper, coated with cotton wool with glue and attached to the workpiece. After drying, add a layer of cotton wool to remove unevenness. Glue two cotton wool balls for the eyes, a beak and a tail made of cardboard. All that remains is to paint it with gouache or watercolor, place it on a stand, decorate it with cotton wool, artificial rowan berries and rain.
Souvenirs in the form of piglets
A hand-made souvenir for the New Year 2019 will be a reminder of the giver and fill the heart with warm memories:
- crocheted or knitted piglets will serve as a keychain or pincushion;
- felt pigs will decorate the Christmas tree and become a gift for the little ones;
- a pig pillow will bring sleep and warmth; you can sew a lot of such pillows - to decorate sofas, for a child’s room or for a car;
- mitten pig from soft fabric Lovers of finger theater will like it.
For a party, buns or pies in the shape of pigs are baked. Round cakes are made from yeast dough, cut at the top and folded down to form ears. All that remains is to attach a patch from a smaller piece of dough in the center of the workpiece, and make holes with a stick for the nostrils and eyes. The pigs are coated with beaten yolk and placed in the oven.

Types of needlework for creating a pig figurine
The color palette of the 2019 symbol inspires optimism - orange, scarlet, carrot, ocher, pink and brown are used to create crafts. Manual labor and an abundance of decor are welcomed, so choose the type of handicraft you like and begin the creative process.
Knitting
If the needlewoman has a skein of pink or red yarn left, she can knit a few funny piglets. First, the body is knitted, then the head and paws, and a small tail. All that remains is to sew the parts together, fill them with cotton wool or padding polyester, sew on a large button for the patch, and embroider a playful smile and eyes with contrasting threads.

Crochet figures
Craftswomen can use a crochet hook to turn threads into a keepsake toy. You can knit a wall panel with three little pigs, a funny keychain or even a backpack in the shape of a pig for a preschooler. A pleasant gift for a schoolgirl will be a pencil case in the shape of Khavronya, which will bring only good grades.
For home decor, you can knit your favorite cartoon characters - Peppa Pig, Piglet or Smesharikov. The leftover yarn is used to make multi-colored balls for the Christmas tree. Such an extraordinary decision will definitely appease the future hostess of the New Year 2019.

Motanka
You can make a pig reel from pink thread in the evening. A piece of cotton wool is coated with glue, and on top - with paste, and left to dry. Legs are made from pieces of wire, they are also wrapped in cotton wool and paste is applied. After drying, they are wrapped with threads and coated with glue to strengthen them. Attach ears, a tail, eyes and a snout cut out of pink cardboard.
Wallow
Felt and wool create creations to satisfy every taste. The evening will fly by unnoticed if you use a felting needle to create soft toys. The technique will help you make original gifts for colleagues and friends, as well as toys in the form of pigs or snowmen for the Christmas tree. They use a coated or dry method, in addition, they make toys on a frame.
A master class on making a pig using the felting method can be found in this video.
Application
Appliqué classes will help you prepare New Year cards for relatives. Snowmen, pigs, and a tinsel-covered Christmas tree are glued onto white or colored cardboard. You can create an interesting composition if you try gluing leftover fabric onto cardboard.
Sewing
You will be pleased with a toy made of soft fabric. For production, the desired cutting pattern is selected, transferred to the fabric, parts are cut out and stitched. The plush pig is stuffed with stuffing, a snout, eyes and mouth are sewn on. You can make the toy flat, then hang it on the wall in the form of a panel or use it as a fun rug.

How to make from paper
The origami technique will help you realize any ideas. On the eve of the holiday, fantastic flowers, pink pigs or teddy bears are made according to the scheme. The pinnacle of mastery is a fabulous snowy city where a family of pigs lives.
It's time to arm yourself with paper, glue and scissors with your kids. We decide to cut out a mother pig who loves to change her outfits. Also, her daughters and sons are not far behind her; they also need to be collected for kindergarten or put to bed. A sea of impressions is guaranteed, and at the same time the flexibility of the minds of little dreamers will develop.

Modeling from clay, plasticine and salt dough
Modeling from plasticine will bring pleasure to the child, and the resulting toy will complement the collection of pigs for the holiday. Clay modeling will help you concentrate and get into a creative mood. If the child is too small, he will like to sculpt animals from polymer clay - it is not as fragile as ordinary clay. It’s easy to knead salt dough and then use the material for creativity.

From socks and gloves
As always, a sock or glove gets lost, and you don’t want to throw away the second copy. They are starting to make snowmen, sheep and pigs out of bright socks. Together with the baby, they assemble a farm or a personal zoo where soft pets live. Or you can go even further - make a Land of Snowmen, covered with artificial snow.

Baked goods with the symbol of the year
The symbol of 2019 is delighted with cakes decorated with fondant in the shape of a pig. A chocolate cake with piglets frolicking in it looks interesting. On a large dish, pieces of sponge cake are laid out in the form of Khavronya, and filled with sour cream mixed with beet juice. All that remains is to make the eyes, snout and mouth from mastic.
Additionally, they bake cupcakes with toy pigs from mastic, put gingerbread cookies, sweets, and lollipops into jars, which is also suitable as a gift.
All the crafts and baked goods will be a surprise for the family. And if you want to attract good luck, you can also make plump pigs from plastic bottles in your garden beds. All the surprises can be made quickly and without spending extra money, and the smiles of the kids will be the craftswoman’s reward.

Creating a New Year 2019 symbol with your own hands
It's easy to make a pig yourself. For the toy, material and threads of all shades of pink are used, complemented with red buttons or beads. The master classes tell you in detail how to follow patterns and sew parts together correctly. And with the little ones, they begin preparing for the New Year by creating piglets from plasticine or paper.
Plasticine charm
The plasticine technique is quite simple to perform. It's time to make Peppa Pig, her parents and brother George:
- Make one red ball for the pig's body, and the second pink one for the head.
- Roll out 4 small balls of pink plasticine.
- They take a red ball, press it to the board and pull it out to make a dress, leaving an indentation on the narrow part.
- From a smaller pink ball they make a muzzle - they stretch out a wide nose, make eyes, a mouth and a snout.
- Handles are made from two balls, attached to the base, and ears are made from the other two balls, attached to the top of the head.
- Insert 2 matches into the hem of the dress, which are covered with plasticine; shoes are made of black plasticine.
- Attach a thin sausage to the back of the dress to create a ponytail.
Plasticine Peppa Pig is ready for adventure. Piglet is made in a similar way, but you can make any cartoon animal.
You can watch a master class on sculpting Peppa Pig in a short video.
Egg craft
The symbol of the year can simply be made from an egg from which the yolk and white have previously been removed. Together with the kids they begin to make a pig:
- Koloboks are rolled out from red or pink plasticine, from which legs, ears and a snout are sculpted. Make a couple of holes on the patch using a toothpick.
- First the legs are attached to the empty egg, then the ears, tail and snout.
- Eyes are sculpted from black plasticine and attached to the body.
- They roll out a thin sausage from red plasticine and make a smile.
A similar craft can be made from polymer clay. In this case, instead of making an egg blank, make an oval body from clay, then repeat the steps described above.

A few lost socks are no big deal
Just a couple of hours of free time in holidays, a few socks, cotton wool or padding polyester, beads and buttons - and the Khavronya craft is ready! You can make funny piglets with bright stripes ready to frolic under the Christmas tree:
- The sock must be cut crosswise almost in half. The upper part is useful, where the legs are outlined, the body is cut and sewn from the inside out.
- Turn the workpiece right side out, stuff it with filler, and sew it up.
- A muzzle is made from the bottom of the sock, filled with cotton wool, and sewn.
- Eyes and a smile are embroidered on the face with thread.
- The legs, snout and ears are made from the second sock.
- Connect all the parts.
The finished pig is decorated with beads and bows to suit your taste.
Another way to make a pig from a sock for the New Year 2019 can be seen in this video.
Pig from an old T-shirt
There are never too many toys, but if you wish, you can add to your collection in an unusual way. Just half an hour, and the soft toy made from a T-shirt will be ready:
- Cut a rectangular piece from a T-shirt, then fold it in half.
- Sew up three sides, turn right side out.
- Fill the corners with filler and tie them with thread to create ears.
- A large ball of cotton wool is inserted from the inside in place of the patch and tied from the front side with a thread.
- They make the head, that is, fill it with cotton wool and sew it together.
- The legs are made similarly to the ears.
- The whole body is filled with cotton wool and stitched.
- The nostrils and eyes of the snout are embroidered with black thread, and the mouth is made with red thread.
If desired, ribbons are knitted onto the pig's ears or decorated with beads. You can also sew a hat or dress separately so that Khavronya becomes a real noblewoman.

A fragrant gift for the New Year 2019
A soft craft in the form of a pig or any other character with a secret will be an excellent gift. Coffee lovers will appreciate the work of the craftswoman:
- Thick fabric is folded in half, the outlines of the pig are drawn, and cut out.
- Sew the model from the wrong side, leaving a hole.
- The product is turned inside out, filled with padding polyester, and finally sewn up.
- A strong thread is secured between the ears.
- Brew coffee with boiling water, add vanilla and cinnamon.
- Add a little PVA glue to the coffee.
- Using an old toothbrush, spread the solution over the surface of the workpiece, do not wet the filling.
- The pig is tied to the oven grate with threads left between the ears.
- Simmer over low heat for about a quarter of an hour, turn off the heat, and dry.
- Paint the craft with acrylic paints and trace the outlines with a gel pen.
You can make several piglets that will exude coffee aromas for a long time in the new year. Crafts cannot be washed, only dry cleaning is allowed.
This video presents a master class on making a coffee toy using Cheburashka as an example.
Peppa Pig performs in the theater
The prankster decided to go to puppet theater. It's time to help her and sew a glove doll for a fairytale performance:
- Cut out two parts of the pig's face from pink material.
- Eyes and cheeks are sewn to one half, and the nose and mouth are embroidered with red thread.
- The ears are sewn together from two parts and stuffed with cotton wool.
- A glove is cut out according to the shape of the palm and a slot is made for the head.
- Sew the parts together from the wrong side together with the head, and sew on handles made of pink braid.
- Hem the edges and turn the product inside out.
In addition to fabric, felt is used. You can make pigs from felt for a finger theater.

Piggy from a jar
Kids will appreciate this educational toy made from a jar. You should arm yourself with a crochet hook and pink thread to get started:
- Use any jar with a screw cap that resembles the body of a pig.
- Tie it in a circle with thread up to the neck.
- The legs and ears are knitted separately, stuffed with cotton wool, and sewn to the body.
- The tail is knitted and also attached to the base.
- Sew on button eyes.
- The lid is painted with pink paint and “laminated” with tape.
Children can put coins or candy into the piggy jar. Fun toy everyone will like it without exception.

Pig made from pompoms
Piglets made from pompoms will enjoy playing in the tabletop theater. Using this scheme, you can make any fairy-tale character: a wolf, a calf or a goldfish:
- Cut out two rings of the same diameter from cardboard.
- A piece of thread is passed between the rings.
- Wrap a thick layer of thread around the connected rings and cut along the outer edge of the workpiece.
- Pull the rings apart, tie the pompom tightly with thread, and trim with scissors.
- Legs, a tail, ears, a smile are cut out of pink felt and glued to the body.
- Sew two black buttons to the pompom, and a couple of beads to the patch.
Pom pom piglets will love to travel around the house. They will not only sit on the sofa, but also jump on the festive tree.

Sow on a street tree
Toys for decoration street tree should be made from simple materials, items that have served their purpose. Old shoe boxes, juice boxes or candy boxes will come in handy:
- The box is wrapped in any bright packaging, reminiscent of a gift.
- Glue on ears made of the same paper, as well as a tail.
- Make a patch out of a bottle cap and paint it pink.
- The eyes are made from foil, which is rolled into balls.
- Eyes and a snout are glued onto the base.
- They tie the pig with a ribbon and make a huge bow.
- A loop of thread is attached to the top to hang the craft on the Christmas tree.
In addition to the pig, you can make a Nutcracker, a doll or a snowman. Such toys will attract the attention of passersby, and the symbol of 2019 will definitely be delighted.

Keychain pig
Even a young needlewoman can make a keychain to please relatives and friends with not only a beautiful, but also a practical gift. A little work and imagination, and several piglets will appear:
- A rectangle of fabric is folded in half, the wrong side is stitched on three sides, leaving space for the ears and paws.
- The paws are sewn in from pieces of tape folded in half.
- Ears are made from pieces of tape and attached to the base.
- A loop is made from the braid and sewn between the ears.
- The product is turned inside out, filled with cotton wool, and sewn.
- Glue on the patch and button eyes.
- A metal ring is attached to the loop.
Now a cute pig will look after the keys. The keychain can also be additionally decorated with beads or embroidery.

Creating a New Year's piggy bank from papier-mâché
The piggy bank has always been considered the prototype for the piggy bank. The animal boasts not only frugality, but also the ability to increase wealth.
Fat piglets symbolize financial well-being and health, which is why there is a huge range of such piggy banks on sale.
What is papier-mâché? The papier-pache technique is based on preparing a mixture of fibrous material and glue. Take any shape as a basis, paste it layer by layer with pieces of newspaper, let it dry and repeat until the result is achieved. A similar mixture is widely used for making masquerade masks, theatrical props and dummies.
A real craftswoman will make a piggy bank herself, although the process is quite labor-intensive, requiring attention and a supply of free time.
Preparatory stage:
- the main materials will be toilet paper and newspapers;
- stock up on PVA glue, which will be needed to form the workpiece;
- buy wide tape, putty, foil and an inflatable balloon.
At home you will find a container for diluting the mixture, fine-grained sandpaper, and a roll spool. To decorate the piggy bank, it is better to use sponges to apply a layer of paint. And with the help of ordinary brushes they are engaged in drawing small details.
Technique for creating the body:
- tear the newspaper into small pieces;
- dilute the glue with water in a suitable container;
- the ball is covered with pieces of newspaper, which are dipped in the adhesive mixture;
- make sure that the balloon does not deflate; its tail must be tightly tied;
- Lay out at least 10 layers of newspaper, maybe more;
- the topmost layer will be a mixture of small pieces of newspaper with toilet paper, glued with PVA.
Start making the legs and snout:
- after the body has dried, the ball is pierced and taken out;
- the hole is covered with adhesive;
- for the legs, the foil reel is cut into four parts, attached to the body with tape, and the joints are smoothed with glue and pieces of toilet paper;
- To make the pig stable, you should add a weighting agent - bolts or nuts - to the legs;
- Make a patch out of foil and attach it to the base in a similar way;
- formed from papier-mâché lower lip, ears and eyes, and for the tail you will need a wire covered with the same material;
- fasten all parts of the body, cut a hole on the back, wait for complete drying.
Decoration of a souvenir piggy bank: the product is sanded and covered with putty, all roughness is smoothed out with a damp cloth. They paint first with dark paint, then red, and then pink on top. Next, draw the eyes and mouth.
A piggy bank will be a worthy interior decoration and a guarantee of future wealth in the New Year 2019. You can also give the craft as a gift by throwing a few coins at the bottom.
In this video you can see detailed technology for making a piggy bank from papier-mâché.
From the variety of homemade pigs, everyone can choose something they like. Experienced craftsmen know how to combine various techniques, offer complex product patterns. For beginners, it’s better to stick to simple models, and if you and your kids make an applique or toy out of soft socks, the process will bring a lot of excitement to everyone present during the New Year holidays!