This section of our website is dedicated to large crafts made from matches, assembled without glue. Such buildings will be based on the most ordinary match cube, which you can find in the instructions for assembling the simplest cube. These instructions are located in the “Training” section -. The only difference is that you don’t need to complete the roof for the cube. And having made a lot of blank cubes, then they can be combined into various models - matchstick forts.
In general, do not forget that at the core of any great diy will lie exactly match cube. But this rule only applies to crafts that you want to assemble without using glue. Glued crafts have a completely different assembly technology, and not even one. That is, everyone can collect different matchstick forts using your own technique.
Connecting cubes from matches, in order to make match forts, there can also be several ways. Reviewed on our website several options, your right to choose the most reliable and easiest method. Yes, huge crafts, which you can already find in this section, basically all are assembled without glue. There are exceptions, of course, when glued works can also end up here. In my opinion, users should see a variety of beautiful matchstick forts!
Collect fortresses and villages made of matchsticks, and send them to our collection! Thousands of users every day will be able to admire your work!
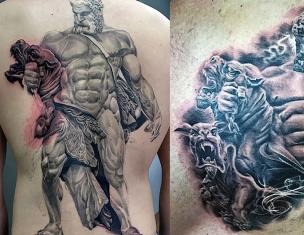
I present one of my works. A special feature is the use of triangular prisms together with cubes.
Which ones did I tell you about recently? So, it all started with them. Because princesses, you know what they are? They don't want to live in the ordinary dollhouse! Give them a castle! And definitely made of cardboard! Can you imagine? It was in approximately these terms that my daughter approached me with a request for urgent provision of separate living quarters for the princesses.
I started racking my brains, wondering why. As usual, I scoured the Internet on the topic of cardboard castles and cardboard palaces and looked at a few interesting ideas, took out cardboard (fortunately we always have plenty of this stuff, since we really love breakfast cereals), took out the bushings from toilet paper(oh, what do we have in the pantry!), scissors, pencil, ruler, I sat down in front of this whole pile and... And nothing... no ideas. At all. Complete stupor. I applied parts this way and that, but it didn’t turn out to be a stone palace and that’s it... In short, on the first evening of working on the project, the first glimpses of my creative consciousness began to appear after about an hour of almost meditative contemplation of a pile of garbage. This is what came out of this meditation.
But in the morning there was a clear understanding in my head that the castle consists of two main parts: a) a palace, b) a fortress. That is, a castle is a palace inside a fortress.
And now the creative consciousness has already been awakened, the process has been launched and away we go!
FORTRESS:
It was decided to make the base of the fortress from two boxes, placing the boxes on top of each other with a shift.It was decided to attach walls to the sides - two more boxes.

The walls of the fortress were covered with strips of cardboard with jagged edges, creating real fortress walls along which patrolmen could walk.

The walls were glued to the base using PVA glue.

They pressed a weight on top to make it stick better.

But, as the chief architect, the child asked, how will the princesses climb these walls? I had to make steps.

Here you can see where they were glued.

The round towers of the fortress are made from three toilet paper rolls connected with tape. The towers themselves are also attached to the walls of the fortress with tape.

The central gate, that is, the entrance to the castle, was made of cardboard, bent in the letter L. The lower part was glued to the base of the fortress with double-sided tape, the upper part was stapled in two places to the towers.

And then we unexpectedly came in handy with a part of the chain that was left over after shortening the handle on my daughter’s purse. Thanks dad for saving it just in case!

The chain is attached to the wall like this: it is inserted into the through holes, and ordinary paper clips are attached to the ends. The clips prevent the ends of the chain from slipping out and serve to make closing the gate easier. Here's an interactive element for you!

The chain is attached to the door with a wire as if you were sewing a button.
I cut out the loopholes of the fortress from some picture found on the Internet, reduced it to the right size, multiplied and printed. The picture was black and white, so I had to color it by hand. But it’s just more interesting, right?

The final touch is brickwork. I painted it with wax crayon on top of a painted and well-dried wall.

CASTLE:
The palace was made from a magnetic alphabet box and cardboard, rolled into tubes and stapled on both sides. Moreover, the outer turrets turned out to be composite. The small cylinders are not attached to anything and can be removed. Many small cuts were made on the bottom cylinder of the central tower, bent outward and glued with double-sided tape.
The base on which the palace towers are installed is a box that has a part with a hole to make it easier to hang goods in a store. It is not secured to the base by anything; it is held solely by this part for hanging, inserted into the slot made in the cereal box. But it holds strong. The round side towers are attached to the box with double-sided tape.
The palace must have a balcony, and for this we attached a cardboard bent in the shape of a C to the wall of the building with double-sided tape. It is attached to the base with double-sided tape like this.

They covered this thing on top with cardboard in the shape of an arch, inserted this cardboard into the slot and glued it with reverse side inside the box with a glue stick.

Based on an idea I spotted on the Internet, railings like these were originally planned for this balcony.

In the end it turned out like this:

The toothpick halves are attached to the cardboard with hot glue, the beads are put on top and not secured by anything. On top of the toothpicks, a piece of braid that remained from the time of manufacture was glued to hot glue.
At the request of the chief architect, ladders were also added to the palace balcony.
In addition, our architect could not figure out how the princesses could get to the large balcony from the entrance to the fortress? Indeed, there was no direct route, but it’s not a princess’s business to jump through the air; we had to cut a through passage from the courtyard to the balcony.
The roofs of the palace towers were made of colored cardboard. The color scheme is daughter's. Empirically, that is, through trial and error, we obtained a pattern for cones from a newspaper; it turned out that half the circumference of a reel of adhesive tape was the right size. We cut out semicircles, rolled them into a cone and secured them with a stapler.

Each princess castle has spiers with flags fluttering in the wind. Therefore, flags were cut out of the same colored cardboard, glued together and placed on kebabs. These skewers were then attached to the roofs using hot glue.

The windows, as in the case of the fortress, were found on the Internet. We had better luck with these windows - we managed to find colored ones that matched the color scheme.
One of the integral parts of castles and fortresses is a wooden lattice door. We made it, or rather they, because we have two of them, from ice cream sticks fastened together with PVA glue.

I love ice cream on sticks! :) We even made them out of them. :)
Since we made the castle in the evenings, due to good weather, the project was delayed. But you know princesses! They are so impatient! Therefore, we started painting the castle when it was not yet finished.
Perhaps still in the very early childhood, having visited your friend and noticed an interesting house made of matches on his table, you have experienced a feeling of white envy. After all, how does he manage to make a castle out of matches? This is just a masterpiece! Below we will provide you with the opportunity to independently learn how to create chic works, crafts from matches.
To begin with, I will describe to you how to make a castle from matches, and then I will show you in pictures.
Instructions.
1st step: first you will need to arm yourself with a coin, plasticine and, of course, the matches themselves. Let's get started: place 2 matches on the crushed plasticine parallel to each other at a distance of 2 centimeters.
2nd step: on top, not forgetting to use your eye, put 8 more matches. In this case, the distance between the matches should not exceed the thickness of the match itself. Perpendicular to the previous layer we arrange another layer of 8 matches. Then we lay out 4 matches along the edges of the base and do this procedure 6 times.
3rd step: two floorings (the first one is made of 8 matches, the second one is made of 6 matches) will complete our frame. The frame is pressed with a coin. How to make a castle from matches so that it does not fall apart and is more durable? To do this, you will need to place matches in all four corners. And then repeat the same action around the entire perimeter of the match castle.
4th step: Now we can safely crimp our match product without worrying about its integrity. Next, press on the vertical matches with such force that they appear on the reverse side. After all, now they will form the basis of the upper floors.
5th step: then we turn the castle upside down and begin to build walls, inserting matches vertically on four sides. We will repeat the algorithm again, only we will lay out the matches horizontally. After completing the procedures on our match architecture, we crimp the lock again.
There you go! Now you will know how to make a castle from matches without much effort.
Illustrated construction of a castle using matches:


Here is a very small house made of matches that will be in our huge castle. Next, we do everything by analogy and use a little imagination.
If you love sushi, then you are probably familiar with the situation when it’s a pity to throw away used utensils, but there’s nowhere to use them... They just sit there, just in case! Today we have put together a selection of several ideas for their use especially for you! Hurry up and see our creative article - crafts made from Chinese chopsticks!
Jewelry stand
If you have enough time, then pay attention to this uncomplicated and very simple idea!
In this example, we used Chinese sticks and a hot glue gun. You can easily use regular wood glue or instant.
How to quickly transform your interior and put your decorations in order

Don't know where to start? Then take our advice! To begin with, connect three sticks into a triangle, and then connect your soul and imagination! How do you like these crafts made from Chinese chopsticks?

Update the design of a mirror made of Chinese chopsticks
For Chinese chopsticks you can find not only practical, but also decorative use! Using a large number of Chinese sticks, you can make a modern solar mirror with your own hands!

A short guide to decorating a mirror

The most problematic and painstaking work is to find the perfect symmetry. First, place long rays, and later work on small ones. By the way, you can lengthen a Chinese stick using two sticks using glue. After completing the work, paint the finished sun gold.
Original stand for dishes

The main thing is to remember that there must be a gap of 3-5 mm between the sticks.
Knitting needles and hooks

Have you decided to take up a new hobby? Then we advise you to save on purchasing the necessary equipment! Making knitting needles and hooks is much easier than you think! First, sharpen the tip with a sharpener. And to give a softer tip, grind off the base with sandpaper. We use the same principle to make a hook!

Source: German interior and decor magazine "Deavita"
Author of the translation:
Chvanova Maria. Especially for the site
By using matches You can not only light a fire at any time, but also build a house without glue or nails. Many people know how to assemble matchstick houses, but some people improve their skills even more and build entire locks causing the envy of others.
You will need
- matches
Instructions
- In order to learn how to build match castles, you need to master the technology of connecting match cubes - such a cube is the basis of any match house, and is the building material for a large castle.
- You can connect the cubes to each other without the use of glue or other devices. Before learning how to connect them, make two identical cubes from matches in the same way as if you were making the base for simple match houses. To do this, we lay out two matches as a base, and on them - six matches, alternating the heads. Six more matches are placed on top of these six.
- Matches must be laid until you get an even square. If necessary, you can treat some parts of the cube with glue so that the matches hold the volume.
- Having collected two cubes of the same size, pull out four matches from each cube, located slightly to the side of the corners of the cube. If the matches do not pull out, push them from below with another match.
- Clean the heads of the four ejected matches from sulfur using a knife, and then, in order to strengthen the structure, insert another match with the cleaned head into the center of the structure. Matches with cleaned sulfur heads will fit into another cube more easily, which means they will stay in it more firmly.
- Compress the workpiece tightly, and then secure the fastening matches from below by inserting supports from scraps of additional matches. This will help the matches stay in position when you press down on them with the second die. Place the second cube on the fastening matches, also squeezing it with your hands, and then check whether the cubes are firmly fixed to each other.
- If the lock structure is planned to be large and heavy, strengthen the junction of the parts with a couple of drops of glue. Make the required number of exactly the same cubes, and then connect them in the desired order, forming the walls and structure of your building from matches.