
For this, we need a pattern diagram; you can use different fabrics
beaks and eyes, can be made from polymer clay, can be sewn from fabric
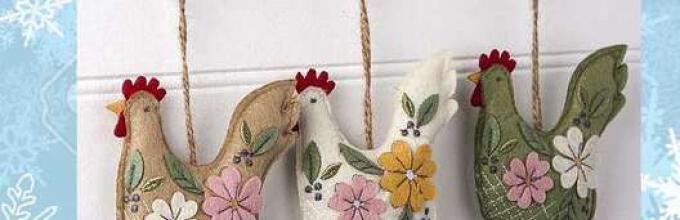
You can stuff the inside of the chickens with cotton wool, cereal or small balls. And you can decorate it with buttons, ribbons, lace.
==========
Rooster-heart
If there are cute trinkets, then this craft is one of them in the first place. You can make it from multi-colored felt, experimenting with color combinations, because the cockerel, as you know, is a motley bird. So, the base of 2 parts is cut out in the shape of a heart, the middle is filled with cotton wool, the edges are carefully hand-stitched. A bright tail, comb-beard, beak, eyes and wings are cut out and carefully sewn to the base. A braid is sewn in the middle, by which it will be convenient to hang the cockerel wherever you want it. This master class involves making cockerels of various sizes and in any quantity. Birds can be an excellent Christmas tree decoration; you can even make a garland out of them, or you can hang them somewhere in the house, where this fun company will delight the eye and soul.
===========
===========
I would like to complement all the above samples with this original toy in the form of a hen with a chick, the attractiveness of which lies in the fact that its production requires very little time and the very minimum of tailoring skills:
For the chicken's dress, you can use fabric of any color that suits your taste, and the chicken can be sewn not from white, but from yellow fabric.
=========
To sew a soft toy chicken, you need a pattern. Using the pattern from the parts, we sew the elements together and then all that remains is to fold the filling inside and sew up the edges.
It’s not difficult to sew a chicken, the pattern is simple.
Need some soft fabric any colors, as well as filler, scissors, pencil and ruler.
For example, here’s a simple pattern with a chicken:
================
=========================
Chicken Galina:
======================================
===================================
=================
=============================
Craft with felt chicken:
Where there is a hen, there is a cockerel:
=================
Chick:
================================
===========
You can sew a sofa cushion in the shape of a chicken. The pattern fits just right. We select fabrics, you can take soft plush fabric. We cut out two parts according to the pattern, sew them together and make soft padding. You can make an edging. Small pillow chicken. Or sew a small one.
================
Below I have posted three patterns with a hen, chicks and a rooster. choose those. which will suit you in terms of complexity of execution and considerations of the availability of the necessary materials.
Let's start sewing soft toys always from cutting, we carefully ensure that the paired parts are cut in a mirror image, we leave seam allowances of at least 5 millimeters, if the fabric is not loose, and if the toy is large and the fabric is crumbling, then you can make allowances up to 1 centimeter.
Soft toys, if they are small, are easier to sew by hand; large ones can be sewn by machine.
You can stuff soft toys with traditional materials - padding polyester, cotton wool, or with herbs, straw, rice or coffee beans.
============================
I suggest sewing souvenirs like these :) They can be used to decorate a holiday cake, and later used in the interior. We have such chickens (and not only) all year round in flowerpots.

For work we will need:
— plain felt and felt with a pattern;
- “Iris” type threads (I have a modern one and from grandma's chest);
- needles, pins;
- scissors;
— templates (I draw mine by hand);
— holofiber filler;
- sushi stick;
- wooden skewer;
- beads, buttons, ribbons for decoration.
We outline and cut out two parts of a chicken egg from yellow felt, and a shell from felt with a pattern, and also two parts. Cut out a triangle-beak and scallop from red felt :)

I'll show you other preparations of my chickens.

We sew on the beady eyes with black thread, and the beak with red thread. Use a hidden seam to create a comb tuft so that no stitches are visible from the front side.
To save felt and not create a double layer where the shell will be, I trim the bottom of the chicken.

Now we sew the shell to the bottom of the chicken.

We sew the shell to the second part - the back.


We put their parts back to back and sew them together.

Leave a small hole for stuffing.

Here we need a sushi stick, since the filler needs to be inserted in small portions and compacted tightly.

Sew up the hole, continuing to stuff so that there are no voids left :)
Carefully pushing the seams apart, insert the skewer into the base of the testicle.
And, voila! Our cutie is ready!

Let's decorate the wand with a ribbon and run to make him friends!

Thank you for your feedback :)
Easter chicken souvenir made of felt. Master class with step-by-step photos.
Author: Morozova Svetlana Sergeevna, MoscowJob Description: I bring to your attention a master class on making a souvenir for the holiday of Easter - a decorative chicken made of felt. This master class is intended for children of any age, starting from preparatory group Preschool educational institutions (those with initial sewing skills), teachers additional education, educators, teachers and parents.
Purpose: Souvenir, gift, addition to gift packaging, decorative insert for themed floral compositions, home decoration.
Target: Making original themed crafts from felt with your own hands.
Tasks:
1. Teach children to work with the proposed materials in various techniques(sewing, applique).
2. Continue to teach children with the help of an adult and independently obtain shapes of varying complexity by cutting out.
3.Continue to teach children to independently select materials to realize their artistic vision.
4.Develop fine motor skills hands, coordination of hand movements, eye;
5. Develop aesthetic taste and compositional skills.
6. Cultivate accuracy when working with materials and tools.
Materials and tools needed for work:

1. Multi-colored felt;
2.Sintepon, holofiber (for stuffing);
3. Multi-colored threads, sewing needles;
4.Paper pattern;
5.Scissors, pencil (or chalk);
6.Wooden skewers (or toothpicks);
7. Multi-colored ribbons, beads, beads, sequins, rhinestones;
8.Acrylic outline;
9.Glue.
Pattern:

Today I propose to sew a funny chicken from felt! After all, figurines of hens and chicks are one of the symbols of the holiday of Easter! Of course, it is chickens that lay eggs!
Step by step process performing the work:
Draw a pattern on paper and cut it out. We lay out the cut out pattern pieces on felt.

Trace it with a pencil (or chalk) and cut it out. We need 2 body parts, 2 wing parts, 1 beak part and 1 scallop part. Additional decorative details can be cut out from felt of a different color.

We put together the details and think through the composition.
We choose threads (in the color of our blanks or in a contrasting color - it all depends only on your imagination). You can sew the parts together right away, or you can pin them together with a pin for reliability.

Sew together the body parts. Don't forget to include the details of the scallop and beak!

We sew the parts together, leaving a hole for stuffing. In our case, we leave a hole in the tummy, since our chicken will “sit” on a stick. Fill with padding polyester and distribute using a skewer or knitting needle.

Sew up the hole after inserting a skewer or toothpick. For reliability, the tip of the skewer can be coated with glue. This is the kind of chicken we get!

We sew or glue the wing parts. Let's start finishing. Let's make eyes. It can be a bead, a small button, an eye can be drawn or embroidered. We have sew-on sequins.

Now we decorate our chicken. It all depends on your desire, imagination and materials! Let's add a couple of strokes with a glitter outline.
Crafts for entertainment, home decoration, and as gifts for holiday events are best done independently. For example, A felt chicken, the pattern of which can be very different, will be a wonderful gift not only for a child, but also for an adult.
Comfortable material
It is most convenient to sew simple toys from felt, because it is a universal material for such crafts. It holds its shape well, does not wrinkle, is easy to process with ordinary scissors, does not crumble or fray, and can be sewn with a regular needle without any effort. And there’s no need to talk about the colors of felt on today’s textile goods market - there’s such an abundance that your eyes just run wild.

Stitched A felt chicken, the pattern of which can be selected as desired, will become a bright decoration for a child’s room, a matching interior toy for the living room, or a functional element in the kitchen.
The principle of felt toys
Since felt is a material that doesn’t wrinkle easily, crafts made from it are mostly sewn with the seams facing out. This can even serve as a kind of advantage for this type of creativity, because the seam can become an additional decoration for the toy. The seams used in making toys from felt are most often the simplest - needle forward, overcast. However, if desired, you can make a felt toy three-dimensional by removing the seams inside, but first the allowances on them will need to be cut, and at the corners cut off as close to the stitching as possible.
Pendant toy
It is convenient to make flat toys from felt; they consist of two identical halves, the space between which is slightly filled with synthetic fluff. This is exactly how you can do itfelt chicken. Patterning it can be quite easy.

Need yellow felt or white, as the main one, and red, orange or brown - for small details. According to the proposed pattern, the toy can be made double-sided, then all the details are cut out twice in a mirror image.
- body - 2 parts;
- wings - 2 pcs.;
- beak - 1 piece;
- scallop - 1 pc.;
- paws - 2 parts.

Since felt is a fairly dense material, small loose parts can be cut out and sewn on one piece at a time. But if you want to do painstaking work, then the comb, beak, and legs can be cut out in double shapes and then sewn together. First of all, the wing is sewn in place on the body, then the two halves are folded inside out, the beak, scallop and paws are placed at their location, and everything is sewn together using the selected stitches. You can attach a ring to the comb or make a loop out of braid to make a pendant.
Surprise for Easter
Easter is one of the brightest church holidays. And it was not without reason that they became its symbol painted egg and chicken with chicken as the beginning of a new life. You can give a souvenir made by yourself for Easter. It would be perfect as a gift felt chicken for Easter. The pattern for such a souvenir is simple and resembles an ordinary egg.

White and yellow felt is used for the egg and chicken. The symbol of Easter can be designed as your heart desires - beady eyes, a beak made of a piece of felt. Although these same elements can simply be embroidered when the entire toy is practically assembled. Having decorated the front side, you can sew the two halves of the souvenir with the seam forward, needle along the front side.

Easter decoration
You can make a lot of interesting decorations for your home and treats. Using the following pattern, you can sew a decoration for eggs - Easter chick from felt. The pattern should match the size of the eggs on which the decorations will be attached. It is also cut from two halves and stitched along the front side, and is complemented by an applique of small details.

The parts are cut out of paper and then from felt. A similar pattern can be used for decorative decorations for a birthday cake, for example. In this case, the lower part of the toy is also not sewn up, but a base stick, for example, a bamboo skewer or a cocktail straw, is glued inside.

Healthy chicken
Felt crafts can be not only beautiful toys or trinkets, but also useful things. For example, This DIY felt chicken is quick to sew and makes a cute oven mitt. Making this household item is absolutely simple. A yellow or orange piece of felt needs to be folded in half and, using a dessert plate, outline a circle, add 5 millimeters around the circumference and cut out two blanks. Using the same plate, cut out a piece of filling from a piece of batting, do not add anything. Cut out wings and legs from felt.

Fold all three pieces like a layer cake - the wrong side, the filling, the front side, put a piece of braid inside so that you get a loop. Place the wings and legs of the chicken in place. Sew all pieces together using an overlock stitch or a needle-first stitch. Decorate the front side with embroidery or applique. The potholder is ready!

Home theater
You can make very small finger toys for showing a home performance with children and for children. For example, the hero of a fairy tale can be a sewn DIY felt chicken. Patterns for such a doll are not difficult to make yourself - trace the finger of the future puppeteer, add five millimeters to the freedom of fit and sew a finger toy from two identical halves, adding characteristic details to it.

A souvenir from the heart
Cute handmade surprise gifts bring a little joy to everyday gray days. You shouldn’t look for a reason to say kind words and show a small sign of attention. CA felt chicken, the pattern of which is universal, will become such a sweet reminder of friendship and love. For a present, you need to draw a heart on a sheet of paper or use a simple pattern.

Are being prepared decorative elements- beak, tail, comb, wings. They can be very different, it all depends on the desire to decorate the craft. The two main parts are folded together, and decorative elements are placed inside. The entire toy is sewn with matching or contrasting threads. If you make such a toy small, it can become a cute keychain. If its dimensions are sufficient, you can fill it with synthetic down before sewing it completely. This toy will become a sofa pillow.

Crafting means enjoying creativity and the process of work. A felt chicken, the pattern of which can be very, very different, will become an occasion for creating beautiful and necessary household items.
A charming do-it-yourself felt chicken – that’s what we’ll be making in this master class! Create such a craft if everyone is present necessary materials doesn't represent special labor. And the pattern and step by step description with photos they will tell you how to do everything beautifully and correctly.
Tools and materials Time: 2 hours Difficulty: 6/10
- pattern (download and print on A4 paper);
- felt in yellow, orange and red colors;
- embroidery threads to match the felt;
- black thread for eyes;
- soft filler/stuffing for toys;
- two small black beads for eyes (2-3 mm) or 2 small circles made of black felt;
- regular and small curved scissors;
- embroidery needles;
- stapler;
- pins;
- cheek blush or fabric paint (optional).
We missed working with felt, so the theme of this master class is a felt chicken, which you can sew for Easter or just because. It took us quite a long time to prepare the template. The first attempts at drawing chickens were quite sad and at the same time funny - the poor thing looked like a mutant from outer space. We were persistent and eventually he looked like a proper chicken (and quite cute, even if we say so to ourselves). Our little one absolutely loves this sunny felt chicken, even though he calls him a duck! However, he does look a bit like a duckling!

You will need:

Step-by-step master class
This tutorial has a number of time-consuming details that can be a challenge for a complete sewing beginner, and to make a beautiful felt chicken requires knowledge of a few hand stitches, such as the hand overlock stitch, the buttonhole stitch, and the backstitch.
Due to small parts, this toy is not suitable for small children. If you still want such a toy for a one and a half year old child, instead of beady eyes, embroider the eyes with thread or use small circles of black felt instead of beads.
Step 1: Cut out the pieces
Download and print out the chicken parts templates and patterns on a piece of thick paper.

Cut out each piece of the design, leaving a small margin of white paper around the picture. Using a stapler or pins, attach the paper patterns to the matching colored felt (we personally prefer staples as the pins distort the pattern somewhat, but that's a personal choice).

Cut out each piece using small curved scissors for small shapes such as legs or bangs.

Step 2: Make a Bow
Prepare the front for the bow. Fold the bow from the front to the back so that you meet the ends in the middle of the bow on the back.

Attach the bottom arc shape to the back of the bow front with a couple of small stitches.

Fold the center around the center of the bow, pulling it tight and securing it with a back stitch. Make sure the stitches are not visible on the right side of the tie.

If desired, stitch the bow on the front of each side using two small rows of back igloo stitches.

Step 3: Prepare your head
- Place two layers of beak on the front side for the head. Attach both layers of the beak to the face using a buttonhole stitch: sew the bottom part completely, and only sew the top part halfway on top. The remaining half will stick out with a beak (see photo below in the diagram).
- Fold the top layer of the beak from the bottom up (to look like an open mouth), then secure it in place with a couple of small stitches in the middle.

- Insert a piece of wool between the two layers of the head and secure it with loop stitches. After this, sew the head around the head using a blanket stitch. Leave a 2-3 cm hole at the bottom of the head. Stuff the head with stuffing through the hole, and then sew the head up completely.
- To attach the eyes, thread a needle with black thread and make a knot at one end.
- Insert the needle straight through the opposite back of the head, place the ball on the needle, then pass the needle through the same hole back. Pull the thread quite tightly to draw the eyes into the head. Repeat 3 times.
- To finish, thread the needle through the stuffing in the middle of the head and bring the needle out. Make a knot close to the seams on the felt, pull the thread a little - and the end of the knot will disappear into the head. The small nodules on the back of the head should also virtually disappear, but the dimples on the back of the head opposite each eye will remain.
Step 4: Prepare Other Body Parts
In the same way as you made the head, fill with filler and sew with a hand overlock stitch the rest of the body: body, wings and legs.

Step 5: Assemble the Chicken
All the parts are ready, and now you can assemble the chicken. First sew the wings onto the body.

- Place one wing on the front of the body and use a loop stitch to attach it to the body. Sew the other wing symmetrically in the same way. If you don't like the stitches on the front of the body, sew the wings to the back of the body.
- Next, sew on the head, then the legs and finally the tie.
- If desired, use a cotton swab to apply a little blush to the chicken's cheeks. You can also use fabric paint.

Your adorable DIY felt chicken is ready! We hope you liked this simple pattern, and the step-by-step description made the work process easier. And if you still have questions about this master class, write to us in the comments and we will be happy to answer them. All the best to you!

You can also watch a master class on sewing a similar chicken from felt in the thematic video we have selected.


