Photo after:

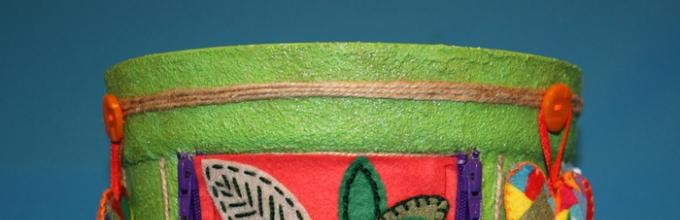
Well, now the story itself about reincarnation. I really wanted to use felt or felt decorations to decorate the pot. But I understood that this was not entirely practical (felt can be accidentally stained when watering or spraying a plant, and it can also lose its appearance due to moisture getting on it). How can this be? I didn’t want to give up the idea with felt. I started thinking and decided to make felt decorative inserts with a zipper. This way, they can be removed when watering or spraying and keep the felt from being damaged. Frankly, I was really fascinated by the idea of this kind of “clothes” for the potty. It sounds strange, but why not try it?
I bought 6 zippers in three colors (the main thing is that they were double-sided!), measured the diameter of the pot, and marked with a marker where the felt inserts would be and where the main decor would be. I cut the zippers to the right size, sewed up the cut area (so that the dog wouldn’t jump off) and glued one part of the zippers to the pot (the second will be sewn onto felt). I used Titan glue. A day later, after the glue had “set”, the husband “welded” the gluing areas that were most exposed to stress (he heated a metal tool on a fire and used it to burn the zipper, soldering it into the plastic).

I was working on two projects at the same time and preparing felt decorations for a house on the wall in the baby’s room and for decorating a pot, so the photographs are used in two sections. I had the pleasure of sewing felt flowers and leaves and embroidering them with beads and floss.


I cut out inserts of the required size from felt, sewed the second part of the zippers to them and glued flowers and leaves.

Using the patchwork technique, I sewed 3 identical Tilda hearts.

Now it was necessary to decorate the plastic and especially the places where the zippers were glued together. I used a proven method - I degreased the pot, coated the surface with PVA glue and sprinkled it with semolina. After the first layer had dried, I applied the second. When the semolina was completely dry, I diluted light green paint in the palette and covered the entire surface with the semolina. I carefully varnished the pot and fastened the decorative inserts into place.
I glued twine around the circumference of the pot, having previously sewn buttons into the marked places. Felt Tilda hearts are hung on buttons, which make the pot even more elegant and original.

(First insert)

(Second insert)

(Third insert)

(Pot with decor - heart)

(Or maybe without hearts)
The money tree has found a new home, and I hope that in such an elegant and positive pot it will grow freely and well. I am very pleased to look at an unusual pot, not only because of its bright colors, but also because I was able to overcome a lot of difficulties when creating it, trying to combine incompatible things. This is one of my most unusual projects from an engineering point of view.
How practical will my decision to create removable decorative elements Time will tell, but for now I look at it and smile, I like it!


Magic felt
Felt is truly a magical material. Working with him is a complete pleasure. It is soft, pliable, steams perfectly with an iron, felt parts are sewn together effortlessly, both by hand and on sewing machine. In general, felt has unlimited possibilities.
Since I like practical things, the first thing I did was make a felt pot for a flower pot. The standard white pot has changed beyond recognition. Now it is garnished with lime wedges.
This is the first flower pot from the “Fruit” series.
 Soon I plan to make several more colorful flowerpots with oranges, lemons and watermelons.
 ![]()

And Sonya and I sewed this spring-like, bright felt box using a kit that is sold in craft stores. But since we try to complement someone else’s idea with something of our own, we also made adjustments to the box. We added hearts to the bottom, decorated felt flowers with a pattern and complemented them with ribbons.


In this article we will talk about how to make original flowerpots for your home and office with your own hands.
Often a home or office is decorated with plants - they are pleasing to the eye and purify the air. In addition, representatives of the flora can be successfully included in the interior, creating your own special style. And various interesting flowerpots will help with this.
Macrame flower pots: master class for beginners, weaving patterns, photos
A macrame flowerpot for a glass vase in which flowers will grow is quite elegant and unusual idea. For such air crafts you will need:
- White nylon threads
- Scotch
- Scissors
The operating procedure is as follows:
- Need to take 8 threads, and fasten them.
- Next, the ninth thread of macrame need to re-tie the main threads under the bond. In the end there should be a loop.


- Now it is necessary divide existing thread bundle for 4 groups. Each of them must, in turn, contain 4 strands of macrame.
- Next you need to adhere to the following weaving patterns:


- At the end of the work it is recommended trim the ends threads, as well as some melt. You can create tassels.


Weaving flowerpots from twine, ropes, jute step by step: diagram
You can use twine, ropes and jute to weave flowerpots in the previous style. Or you can create a miniature bike-pot! And here's what you need for this:


IMPORTANT: You must purchase polymer-based glue.
Operating procedure:
- On cardboard you need draw templates for the wheels. In this case, 3 wheels are required.
- They cut out, and each wrapped with twine.

- Cocktail the tubes need to be cut, departing from the bend approximately 2 cm each. For one wheel will need to create 4 such blanks from tubes.


- Each such workpiece should wrap with twine as tightly as the circles were wrapped.


- Now that's it 4 straws necessary attach the folds to each other. They are necessary glue.


- Received cross from the tubes you need attach to circle- this will be a wheel. They should be made, as indicated, three.


- Now I need to take more 2 straws. One of them has the top cut off. You need to insert the part that is without a top into the fold of the whole tube.
IMPORTANT: The structure must be wrapped with twine in the same way as the previous blanks.
- Necessary cut 2 more tubes near the fold. But this time you need to retreat 2 cm from the top of the fold and 3 from the bottom.


- Now they are needed connect as shown in the picture, and wrap with twine- this will be the steering wheel.

- Need to prepare one more tube the length of which should reach approximately 11 cm. And her, and the steering wheel, and the wheel are desirable decorate with coffee beans.


- Sticks, pre-decorated with twine, you need insert into wheel just as shown in the picture.


- You can start fastening the wheels together.


- Between the two front sticks attached to the wheel, it is necessary install a piece of another stick. All this then wrapped with twine.

- Remains decorate the pot itself.
IMPORTANT: Since it is small, you can use some kind of cream jar as it.


How to buy floor and wall flower pots on Aliexpress?
Those who want to find something original and ready-made can contact the Aliexpress online store. Beginners are recommended to first read the video instructions.
Now about how to find among the variety of products, treasured flowerpots:

 The first stage of searching for flowerpots on Aliexpress is choosing categories For home and garden, Home decor
  Now you need to click on Home and Garden
 In Categories you need to click on the arrow and scroll through the menu to the end
 Next, select the item For the garden and vegetable garden - in it you can easily find flower pots for your home or office
 You need to click on the category Flower pots and flowerpots
 You can choose a pot of any size - for example, compact, size S, medium, large and even giant.
It is also possible to immediately select a flowerpot depending on its location - floor, tabletop, wall-mounted, hanging models.
Style is another indicator by which you can quickly filter what you need. For example, it is possible to choose a pot of European, modern, classic, rustic, American, Chinese, Mediterranean, cartoon style.
The color palette is amazingly diverse! Available in white, red, green, yellow, blue, black and many other colors and shades.
Do you need a specific material? No problem! Pots are available in plastic, metal, ceramic, glass, wood, stone, plant fiber, fabric and so on.
You can even choose the type of metal - for example, cast iron, iron, tin, etc. Or the type of plastic - PVC, polyresin, polyester and other types. The types of ceramics are also different - for example, porcelain, clay.
Even the type of coating can be filtered - glazed, powder, vinyl, epoxy, etc.
How to make beautiful outdoor pots for indoor flowers with your own hands?
For making gypsum floor planters you will need:
- The plaster itself
IMPORTANT: It is preferable to purchase not construction plaster, but special decorative one. It can be found in stores that sell craft supplies.
- Some unnecessary container
- Material such as fabric, linen or paper
- Glue, pins, staples, tape, rope - in other words, anything to attach
- Scissors
Do the pots are very simple:
- The container needs to be wrapped any available material from those listed above. For example, it could be papier-mâché, crumpled paper. In the example under consideration, the container is small - a tin can. But for a floor planter, you can choose something larger.


- Fabric needed secure on the container.


- Now you need dilute the plaster until liquid consistency.


- Next liquid plaster must be applied directly onto the fabric of the blank under the flowerpot. It is recommended to form several layers.
IMPORTANT: Before processing each subsequent side, you should wait for the plaster to dry on the previous one.


How to make beautiful wall pots for indoor flowers with your own hands?
A whole garland of flower pots will decorate any room. For her you will need:
- Small clay pots made of plastic
- Willow or hazel branches
- Pliers
- Wire
Making a wall composition is not difficult at all:
- Branches you just need intertwine among themselves, forming a wreath from them
- Using wire you should attach pots to branches
IMPORTANT: The wire should be passed through the holes in the pots, then thrown over the clay products themselves.


How to make beautiful hanging pots for indoor flowers with your own hands?
A hanging plant pot made of multi-colored tubes that glow in the dark will fit perfectly into the modern style. For such a product need to stock up:
- Neon straws at the rate of 8 pcs. for one flowerpot
- Neon threads
- Scissors


Operating procedure:
- So first of all from the threads need to cut off 8 pieces. Each of them must be within from 90 to 150 cm. It all depends on how close you plan to place the flowers to the ceiling.
- Now all 8 threads should tie so that at the end of the resulting ligament a small brush.
- The workpiece should be placed on the surface and spread out in a special way. It should work out cross shape, on each side of which you will have 2 threads each.


- Now you need to take straws And cut off them where there is a fold.
- These pieces, in turn, also need cut 2 parts.
IMPORTANT: There should be a total of 8 pieces of tubes.
- Every the piece should be put on threads one for each. At the same time, they need to be moved towards the center - to where there is a knot.
- Every 2 threads should be on top of the tubes tie in a knot.
- Again the threads need to be laid out in a cross shape. Only this time you need to connect 2 threads from sections adjacent to each other.
- And we need it again pieces of straws. This time you need to prepare 16 pieces. The length of each should be equal to the length of a small piece of the whole tube before the bend.
- Now 8 pieces need to be threaded, again tied in a knot threads of each section.
- And it needs to be done again cross layout by connecting threads from adjacent sections. And again we need them paint the last 8 pieces of tubes.


- All that remains is hang a flowerpot and place a pot of flowers there.


How to make beautiful tabletop pots for indoor flowers with your own hands?
A small flowerpot made of clothespins looks quite cute and unique. To make it needed:

 Here's what you need for a table planter - clothespins, acrylic paints, decor, glue gun
 Operating procedure:
- First of all, the clothespins will have to be divided into two parts as shown in the picture

 This is how you need to separate the clothespins for the flowerpots
 - Every part is needed paint
- Now all these blanks need to be glued around the pot
IMPORTANT: The pot must be miniature. As an alternative, you can use a cream jar, for example.


- Now you can start decor


Weaving flower pots from newspaper tubes: diagram, photo
Making flower pots from newspapers is quite easy. For this you need the following:


You can start:
- Each package must be marked 8 strips measuring 7 x 30 cm.

- Now these stripes need to be cut out. Place a wooden skewer on the corner of each of them. twisting the paper diagonally. Each tube is needed secure with glue.


The container must be covered with paper– this will avoid gaps in design. You need to glue the tubes to the bottom as shown in the picture. You can also go to the bottom glue the cardboard circle.


- Now you need to cut it out of paper strips measuring 7 by 45 cm. They should also make tubes.
- The already glued tubes need to be pressed against the wall of the container. One of the long stripes should be glued to the side and then weave it around the others.
IMPORTANT: You need to braid as if you were weaving a basket.


- As soon as the bottom of the vertical tubes are braided, we need to continue weaving. But in the opposite direction. If necessary, the tubes should be glued and extended. In this way the entire pot is braided.
- Then you need pierce at the top of the container holes for twine. The easiest way to do this is with a heated nail. Through the holes you need thread the twine, fixing it with knots. The knots should be masked with paper.


DIY felt flower pots
This master class was originally dedicated to Easter, but instead of Easter paraphernalia, you can place fresh flowers in the pot. So, needed:
- Felt in two green tones. You can add brown, yellow and white
- Container-pot
- Hot glue gun
- Scissors
You can get started:
- From dark green felt needed cut the grass.
IMPORTANT: It is advisable to make the blades of grass different in width, height, and shape.
- These are followed by glue with a gun around the container.
- From light green felt is also necessary cut the grass. But this time not in the form of individual blades of grass, but in the form continuous fabric. Moreover, it should be lower than the dark green blank.
- And light green grass needs to be glued.
- Now you need to cut made of brown material boards for the fence, as well as several thin strips.

- Brown pieces are attached glue to the grass at approximately the same distance from each other. They are needed tie with stripes.


- To top it off, you can cut it out of white and yellow felt. details for chamomile. This is an optional step, but it will make the pot look nicer.

 This is what the felt pots look like in the end, in which you can place fresh flowers
 How to make flower pots from an old T-shirt: video
You can also use an old thing to create a flowerpot:
How to crochet flower pots, and from what threads: diagrams with descriptions
Eye-catching pots are desirable from bright yarn, and there are no restrictions on the choice of texture. It is desirable, however, that they be acrylic, thin cotton.
The following scheme will do:


IMPORTANT: Despite the fact that the pattern is presented with a bottom, it does not need to be knitted. After all, many pots are equipped with drainage holes. Perhaps the bottom can be tied if you intend to use a pot for a pot with a moisture-loving plant.
So if bottom still necessary, then you should start knitting with it.
If not, then you should start with chains air loops, which matches the length of the bottom of the pot. This chain needs to be closed, after which, following the diagram, continue knitting upwards. At the same time in every third row you need to add loops.
Cross with a dash means that the hook is inserted exclusively under the back or front wall of the loop. You will get a nice finish at the bottom and top of the plant pot.
IMPORTANT: If the container is shaped like a cylinder, increases in rows are not needed.


How to decorate flower pots: decoupage, photo
In order to make a cute flowerpot in lilac tones in decoupage style, you will need:
- Decoupage napkins
- Lace
- Glue gun
- White water emulsion
- Brush
- Decor elements


Decoupage is done as follows:
- First you need make a primer. To do this, take equal parts water, water-based paint and PVA glue. All this needs to be mixed thoroughly with a brush.
IMPORTANT: Before starting work, it is necessary to check that the surface of the flowerpot is not dirty or covered with anything.
- Then it is added gouache lilac color. Or, if it’s not there, blue and red.
- So colorful The primer must be applied with a brush, ignoring the bottom and edging of the flowerpot.
- After drying of the first layer preferably apply a second one.
- Now you can choose suitable pictures on a decoupage napkin, cut them and separate the color layer.
- Costs try on pictures for the pots, noting where they will be located. These places are needed Cover with glue using a brush.
- Now you need attach pictures while applying glue also on top of them. All irregularities should be smoothed out.
IMPORTANT: Move the brush from the center down.
- The edging should decorate with lace by gluing it. The edges of the lace must be carefully folded, and the junction of the edging must be decorated with decorative elements. A wooden flowerpot stand will decorate any room. Such laconic flowerpots will fit perfectly into a modern style. As you can see, making or decorating flowerpots yourself is not that difficult. Options for implementing the most interesting ideas There are a lot of them in life, and they will transform any room!
Master class on making flower pots: Video
Ideas for flowerpots: Video
Spring is just around the corner, which means it’s time to create beautiful flower pots with your own hands. If you're looking to decorate your clay pots or disguise disposable containers before giving your plants as gifts, check out a few ideas to help you style your green pets.
Flower pots using decoupage technique
You can add bright spring colors to your home decor using regular decorative napkins. Exists special technique decorating various surfaces - decoupage. It consists of applying to various surfaces thin paper with an ornament using PVA glue. Then the surface is protected from damage with acrylic-based varnish. Usually, special sheets or three-layer napkins are used for decoupage, from which the topmost layer with the picture is removed. All materials for this decoration technique are very accessible and it is not difficult to find them on sale.
Preparation of materials for decoupage
Before starting work, prepare necessary materials: Take regular clay pots, patterned napkins, acrylic paints, scissors, PVA glue and a brush. You will also need acrylic varnish. If you want to age the surface, use a special varnish - for craquelure. To transform clay flower pots with your own hands, first wash them well, dry them, and then paint them with white acrylic paint or any other - the main thing is that it matches the background of the napkins. Let the paint dry completely. At this time, you can start cutting out the motif from napkins. A motif is a repeating image. Apply PVA glue to the surface of the flowerpot and use a brush to glue the motif. Smooth out wrinkles carefully - a wet wipe is very easy to tear. When the glue has dried, coat the pots with acrylic varnish. That's it, you can consider that you have made a DIY flowerpot for indoor flowers! Instead of a pot, you can use other objects to work in this technique - teapots, mugs, vases and small boxes.
How to decorate a flowerpot using twine
The second design option for pots indoor plants- using regular twine. Additionally, you will need a glue gun. Everything is very simple - you just need to gradually apply glue to the surface of the flowerpot, starting from the top and then going down. Another option is to make the pot from scratch. For this purpose, you will need thicker twine that can hold its shape. You need to form a pot out of it by applying glue to the top of the rope. In this way, you can create not only pots, but also various vases, wide plates and other accessories in which it is convenient to store various small things. The third option is to use empty reels of wide tape. By connecting three pieces together and gluing a thick cardboard bottom, you can also tie the resulting container with twine and get a full-fledged flowerpot. It is only advisable to coat the inside with varnish so that the bottom does not fall off due to moisture.

Painting flowerpots for decoration
Clay pots are convenient because they are easy to paint. You can give them any color and then decorate them additional accessories. Enough paint in two colors - white and black, as well as regular chalk to give the containers a beautiful and stylish look. Paint the pots first with white paint, and then draw a wide black stripe in the central part. When the surface is dry, use chalk to add some interesting design or inscription, for example, “Water me.” You can paint the pot with white paint and, instead of a black stripe, make an inscription in black paint using a stencil. A stencil makes life a lot easier for a decorator - feel free to use them to create plant pots in the same style. In the interior and in any photo, flower pots made with your own hands using this technique look very stylish. After the paint has completely dried, surfaces can be given texture and an aged effect using regular sandpaper.
Using stamps and other artistic techniques for design
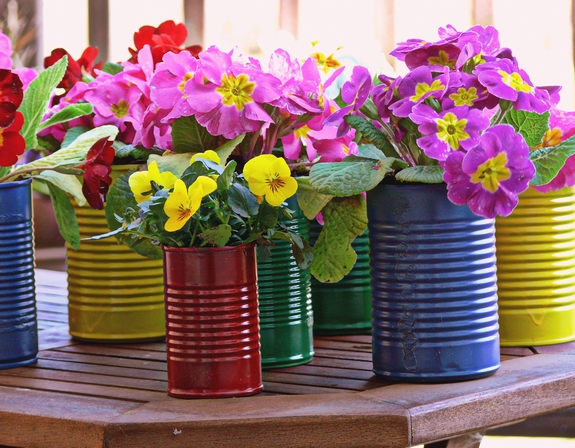
Stamps with letters also add an unusual effect. Simply by painting the pot white, dipping the stems in black paint and signing the names of the plants that will be planted in these containers, you will create universal and stylish flowerpots that will be easy to combine with the interior in any color scheme. An additional bonus of this method is that you will never forget the name of the flower if you label the pot in which it is located. If you take some dark shade and gradually dilute it with white, you can make smooth transition tones from light to dark. It looks very nice. Hand-painted pots are especially chic. You don't have to be an artist - you just need to choose a sample in advance and follow it, painting the surface. Even ordinary tin cans, painted in different colors, can become decorative and stylish flower pots that can decorate any interior.
Painting plant pots using spray paint
Using acrylic paints, you get a smooth matte finish. When applying layer after layer, make sure that each previous one dries well. To make a striped flower pot with your own hands, purchase masking tape. If you stick it on a surface, you can get a smooth, neat strip. Using gold or silver spray paint will make the pot look more elegant and give it a festive look. Before work, protect the table from paint splashes by laying newspapers or plain paper. Light blue shades go well with gold: paint a clay pot with blue paint, sealing the bottom third with masking tape. Then, once the surface is dry, cover the top with tape or foil and apply gold spray paint to the bottom of the pot. If desired, paint the stand the same color. Let the paint dry for at least an hour before placing your plants inside. Add pink aquarium gravel to the top of the soil for a bright and vibrant color combination.
Papier-mâché, or decorating flowerpots with paper
The papier-mâché technique has long been known and allows you to create various unusual compositions, figures and decorative elements. It resembles decoupage and is done using PVA glue, but to decorate the surface, not one layer of paper is used, but several. You can take not only beautiful images with bright prints, but also ordinary newspapers, book pages, just pieces of colored paper or leftovers from gift packaging. Clean the surface of the pot and apply glue to it, and then glue identical pieces of newspaper in a row, overlapping each other. Apply another layer of glue on top of the paper and let it dry. For additional decoration use satin ribbons, ropes, ribbons or twine.
The simplest options for decorating a pot
One of the most simple ways How to make flower pots with your own hands - use fabric to decorate the surface. Small pieces of bright material are enough to change an ordinary plastic or clay container beyond recognition. The fabric is stretched and glued along the edges using a glue gun.

It is advisable to coat it with acrylic varnish on top to prevent rotting in the lower part. You can make flower pots for the garden with your own hands from other materials. Another simple option is to make a decorative flowerpot from ordinary wooden clothespins. It is enough to connect them together in a circle using a glue gun, attaching one side to the surface of a pot that is not very attractive in appearance, until the circle is closed. Another way is to use a low canned food or fish can and simply attach clothespins around the diameter of the can and then place the plant inside.

Recycling materials in garden design
For some reason, do-it-yourself outdoor flower pots are most often made from tires, either simply painting them in different colors, or cutting them and turning them into figures, which are rarely pleasing to the eye and look stylish. But to decorate garden plants, you can use the same techniques as for indoor plants, although the amount of work will be greater. Painting a large container takes more time and effort, so for large flowers it is more convenient to take containers with a surface that does not require modification. For this purpose, containers that are already out of order and cannot be used for their intended purpose are suitable: wicker baskets, iron tanks and troughs, watering cans, boxes. These items themselves look stylish and look harmonious with green foliage and bright inflorescences of plants. It is advisable to treat wooden containers inside and out with special protective varnishes that do not allow the surfaces to get wet. A film can be placed inside iron containers to prevent water from causing corrosion after watering. Some originals use the seats of old chairs, sinks, leaky rubber boots and even shoes as flower pots. You can make a hanging flower pot with your own hands from PVC pipes, if you cut them in half, install plugs on the sides and fasten them together with a rope.
Pots from bedside tables and drawers
You can create unusual designer flower pots with your own hands even from broken bedside tables and drawers. Even if you have two drawers from different tables, it’s easy enough to create an unusual stepladder if you fix them on top of each other using wooden slats. Painted in harmonious colors, such a flower stand can become a real decoration for the garden. You can make hanging flower pots with your own hands for indoor flowers from small wooden boxes fastened together with thick twine.
Seashell flower pot
If you have access to such wonderful decoration material as shells, or you are ready to purchase it, try decorating the pots in nautical style. You can use gypsum as a base - dilute it to a paste, apply it to the surface of the pot and press the shells in a random order. Leave until completely dry. Another option is to glue them using a glue gun. By combining different shapes and colors of shells, you can achieve amazing results. Add small stones to the design, starfish And artificial pearls to give an ordinary flower pot an elegant and expensive look. Very large shells are used as pots for small plants such as succulents.

Macrame technique for decorating plants
Macrame is regaining popularity thanks to the emergence of new materials and the rapid spread of instructional videos on the Internet. DIY flower pots "Macrame" will allow you to decorate the interior in a rustic or modern style. The technique itself is quite simple - you just need to figure out how to properly weave knots from thick twine or threads in order to learn how to work with patterns and create complex patterns. For macrame they also use clotheslines and a special knitting yarn. Additionally, you will need pins, scissors, a small pillow for attaching threads and beads for decoration.
Features of the macrame technique
It is important to choose high-quality and durable material, since pots made from rope for flowers with your own hands, especially after watering, can be very heavy. Those craftswomen who once wove baubles are already familiar with the basics of the macrame technique. There are several types of knots, but the most commonly used are four options: fastening, flat, rep and square. Before you weave flower pots with your own hands, you need to learn how to make a set row and prepare the threads in a special way so that their ends do not fray. First, a loop is made on which the composition will be suspended. To do this, several additional ones are tied to the main thread and knots begin to be knitted from them until a loop is formed. Then they begin to weave according to the chosen pattern until they get a flower pot of the required diameter.
Other ways to decorate flower pots
You can also decorate pots by gluing lace onto the surface using corrugated paper or cardboard, tree cuts and sticks, as well as satin ribbons.

Most materials are attached to the surface using a glue gun. Sometimes pots are decorated with pine bark to give them a more natural, rustic look. Burlap is often used - it is tied in a special way to hide a not very beautiful or disposable pot. Pebbles and tiles laid out in a mosaic pattern are usually fixed to plaster, which is first applied to the surface of the pot. Plaster is a versatile material and very easy to use. The only negative is that you need to work quickly, since the viscous mass hardens very quickly. Choose your option and create stylish and beautiful containers for your green pets.


