Children all over the world enjoy weaving various bracelets, toys and original figures from rubber bands. Rainbow Bloom bands. In order to do this type of needlework, in addition to the rubber bands themselves, you need a hook and a special machine. The pattern of the finished product depends on the type of machine, so in this article we decided to tell you what types of machines are there? for weaving from rubber bands. If you choose the right machine, your children will be able to confidently compete with others in their weaving skills.
Machines for weaving bracelets from rubber bands
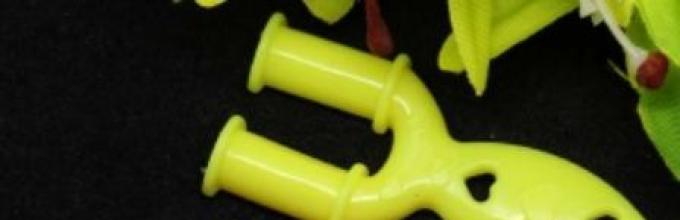
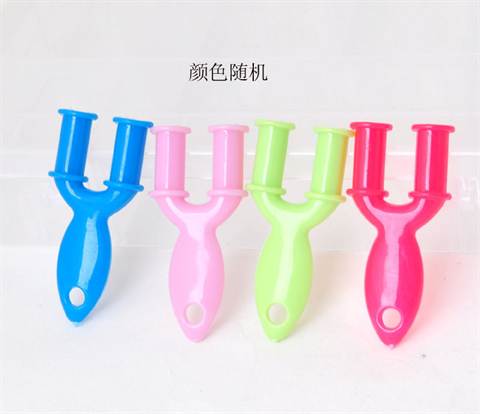
- . This machine is ideal for beginners or small children who find it difficult to remember the various alternations of rubber bands. The slingshot can consist of only two columns or be double-sided (for example, there are two columns on one side and four on the other).

How to weave on a slingshot? If you are right-handed, take the slingshot left hand. The side with the notches should be facing towards you. Right hand put elastic bands on the posts. In this case, the first elastic band is put on in a figure eight, and the subsequent ones are simply pulled over two columns without twisting. After this, start weaving. Hook the lowest of the three elastic bands and remove it from the post to the center on both sides. After that, put on the next rubber band and take off the bottom one again.

What can you weave on a slingshot? On this mini-loom you can easily weave a fishtail bracelet or french braid. She can make a beautiful ring with a flower that matches the color of the bracelet.

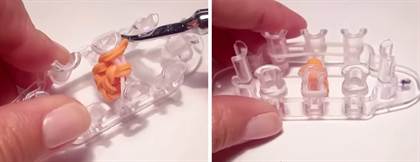
- . He looks like a professional, only smaller in size and has no removable parts. Most often, this machine is included in children's kits for weaving Rainbow loom bands.

How to weave a Rainbow Loom monster tail on a loom? The elastic bands need to be put on four columns at once, and then each of them should be wrapped with this elastic band. After this, other elastic bands are put on four columns, but no longer twisted. You can use all columns at once.
Watch this useful video: Weaving rubber bands on a monster tail machine
What can you weave on a Monster Tail loom? Most often, quarterfish bracelets are woven on such a loom; you can weave a bauble with butterflies, and if you use only part of the loom, you will get a fish tail. With a little more effort, you can create an original lipstick case or other accessories.

- . In appearance it resembles a rectangle and consists of three rows of columns. The entire machine is used when complex products are woven, for example, a cap for a pen, a case for a tablet. You can also use part of the machine, and also remove the middle row so that there are two left.
Weaving from rubber bands on the machine video MK
How to weave on a professional loom? First, decide on the type of product. It is not necessary to weave only bracelets on such a machine; you can significantly expand the range of handicrafts from Rainbow loom bands. Rubber bands are put on the posts around the perimeter. The first elastic bands are twisted in a figure eight, and the next ones are simply pulled on top. The principle of weaving is the same - the bottom elastic band is pulled with a hook through the post and removed.
What can you weave on a professional loom? The bracelet will look original, since it, unlike the Fish Tail, is wider. Some needlewomen managed to weave a dress from Rainbow elastic bands Loom.
If you plan to improve in the art of weaving, then buy a professional machine. Finished products made from rubber bands look quite original, and if you do everything correctly with your own hands, the covers and various accessories will be strong enough.
Such a fascinating craft as weaving has its roots in ancient times. Possessing just one weaving technique, a minimum amount of knowledge and skills, and a small amount of materials, ancient people could easily create things and interior items. If you are interested in the question of how to weave a figure from rubber bands on a machine, then this article is just for you!

Among lovers of creativity, such a new activity as weaving has aroused great interest. Having mastered it, you can create interesting pieces of jewelry, for example: bracelets, rings, belts, unusual three-dimensional 3D animal figures, bright and funny vegetables and fruits, original crafts for home. To do this, you only need one material - special multi-colored rubber bands. Equipment for weaving – a slingshot, a fork and a machine – will also come in handy.


All weaving techniques are based on the macrame technique. This technique consists of knots and is performed using various materials, mostly strong threads. Nowadays, needlewomen often make products using a similar technique. Many weaving techniques, even for beginners, will be simple and very interesting. Weaving from rubber bands for a child has a number of advantages, for example, the development of hand motor skills, memory, perseverance, and attentiveness. Thanks to the easy process of weaving crafts, you can unleash the child’s potential, since when creating his own product, he himself selects the desired color, shape, size and pattern.


First, let's look at the types of weaving machines. All of the listed types are suitable for making products from rubber bands with your own hands.
Types of machines
- Small machine - “Monster Tail”.
There is a special set of elastic bands called “Monster Tail”.
It is not always included in its package necessary tools for work. Therefore, when purchasing sets, you should definitely pay attention to its contents.
On a small machine it is convenient to weave bracelets, laces or small figures of the correct shape (round, square).
Typically the set includes:
- Small shaped loom;
- Hook;
- Elastic bands for weaving;
- Clips.

- Big machine.
It is convenient to make large products that have complex patterns. On a large loom you can also weave small items if you remove one row of posts.

- Mini machine (slingshot).
The slingshot helps you build faster necessary crafts, thereby making the work easier for children. On a mini-machine you can make various animals, fruits, vegetables and cartoon characters, computer games, and also perform simple weaving of bracelets.
On the Internet you can find many photos and videos on making products from rubber bands. And our master class will teach you how to weave a figure from rubber bands on a machine using the “Monster Tail” set for beginners.
"Popsicle on a stick"
Our figurine is a funny popsicle on a stick. To work you will need:
- Three colors of irises. The first color is the stick, the second is the creamy layer, the third is the main color of the ice cream;
- Mini machine. We position it so that the point is on the left. We will do the weaving on the three upper and lower pegs.

Step by step instructions:
- We take an elastic band the color of a stick and throw it in the middle, while twisting it twice in a figure eight, or rather three turns. Then we attach a pair of elastic bands to the two central posts. To the center over the top you need to throw the one that was twisted three times, to the center through the top. Next, add the next two rubber bands.

- After this, you need to throw the bottom layer towards the center. Then we add two more and move the last ones to the middle. We take an elastic band of the color of the layer and hook it to the central pegs. Then we throw off the orange ones. We throw one white elastic band horizontally at the bottom. Next, add irises on both edges in four turns.
- Next we hook on a pair of rubber bands on the right and left. Now you need to throw the horizontal elastic band to the center and twist it four turns. We hook the main color of our ice cream to three pegs. You need to attach a couple more vertically. Then you need to throw off the horizontal pink elastic band and all the white ones. We hook one along the bottom row, two vertically. Remove the horizontal rubber band and the entire bottom layer.
Everyone affected by the “rubber epidemic” knows that you can weave bracelets from rubber bands both on special machines and on any handy object - a slingshot, and even. But the most interesting and unusual bracelets made from rubber bands are made on a small machine, also called “monster tail”. Let's say right away what to weave on small machine bracelets made from rubber bands are somewhat more complicated than other methods, but the result is worth it.
Making a “Double Fishtail” bracelet from rubber bands on a small machine
Let's take a closer look at how to weave bracelets on a monster tail loom. And let’s do this using the example of a weave called “double fishtail”:

- Let's prepare everything you need for work - a small machine, a hook and, of course, multi-colored silicone rubber bands. Their number depends on the desired length of the finished product. What’s so convenient about weaving on a small loom is that you can weave a bracelet of absolutely any length on it, because it in no way depends on the size of the loom itself.
- We twist the first green elastic band in a figure eight and put it on two pegs.
- We put a second green elastic band on the adjacent two pegs in the same way.
- In the second and subsequent even rows, we will put the elastic bands on the pegs without twisting them. In this case, they must be placed diagonally between the four involved pegs. We put on the first elastic band of the second row.
- We also place the second elastic band of the second row diagonally.
- In the third row, as in all subsequent odd rows, we put on two untwisted elastic bands, placing them parallel.
- The next step is to throw the elastic bands of the first row into the center of the weave.
- As a result, our weaving looks like this:
- We put on the elastic bands again, crossing them.
- We throw the elastic bands of the second row into the center of the weave.
- We put on two elastic bands, placing them parallel.
- We throw the elastic bands of the third row into the center of the weave.
- We alternate putting on crossed and parallel elastic bands until the bracelet reaches the desired length.
- Let's start finishing the work. We put elastic bands on the pegs in parallel and alternately throw all the elastic bands remaining on the pegs through them into the center of the weave.
- Carefully pick up the elastic band remaining on one of the pegs and throw it onto a peg located diagonally. We repeat the same manipulation with the elastic band on the second peg.
- Now we only have two pegs involved in our work, each of which has 2 rubber bands.
- We leave one elastic band on each peg, throwing the second one to the center of the weaving.
- We connect both elastic bands and thread a C-shaped fastener into them
- We thread the other end of the clasp on the other side of the bracelet.


What else can you weave on a small loom?
In addition to the “Double Fishtail” bracelet discussed above, you can weave many other bracelets, jewelry and three-dimensional figures on the “monster tail” loom. Here are some types of bracelets that can be woven from rubber bands on a small machine:
- “Slingshot” bracelet, for which you will need approximately 60 elastic bands of different colors.
- “Double chain” bracelet, the weaving of which uses about 80 elastic bands of pink and blue colors.
- Bracelet "Fishtail with a chain around the edges", different from the usual " fish tail» the presence of a single-color edging.
- A very impressive and unusual “Double Infinity” bracelet, the elastic bands of which are twisted in figure eights.
- "M" bracelet consisting of intertwined letters "M".
- “Ladder” bracelet, which is also convenient to weave from rubber bands on a small machine.
- “X” bracelet, the elastic bands in the outer layer of which are intertwined in the form of the letters “X”.
- Bracelet with pompoms
- You can use figurines woven on such a machine as decoration:


Weaving from rubber bands is one of the popular types of needlework. Both children and adults enjoy working with this material, making jewelry, keychains, and toys. One American company has released a special set for creativity, which includes a special machine, multi-colored elastic bands, a hook and clips. Thanks to him, even preschool children can make figures on the machine.
The American Monster Tail machine is a mini version of the standard needlework set. It is convenient to take it with you, because it does not take up much space. The set along with the machine includes a thin plastic hook (usually metal tools are found in sets) and 600 rubber bands of different colors. For jewelry, you can use clips that serve as clasps.
The machine is a stand with pegs. Elastic bands are thrown over them and intertwined with a hook. All weaving from rubber bands on the Monster Tail machine goes in one direction, otherwise the drawing on finished product it will turn out confused. Bright wicker bracelets, necklaces, and hair ornaments will become the favorite accessories of young girls.
Heart made of rubber bands
One of the needlewomen who weaves shares a master class on making a heart keychain. It can be used as a pendant for mobile phone or as a pendant. List of required materials:
- Monster Tail machine;
- small plastic hook;
- orange, red or pink elastic bands.
 Put the first elastic band on the hook, twist it four times, and pull the second through the turns. This workpiece is placed on two pegs of the machine, stretched and put on adjacent protrusions. As a result, it will get caught on four stakes. The hook is threaded through the twisted loop, a new one is grabbed and stretched on four pegs. They do this with two more rubber bands.
After this, the hook turns are removed from the central post and two loops are pulled onto the side ones so that a cross-shaped figure is formed. There are two loops left on the middle pegs. New material Throw it over three adjacent columns, twist it and pull it onto opposite protrusions. One rubber band twisted in half is put on the side pegs.
Remove the middle loop from the center of the device, leaving it only on the middle columns, forming a diamond. Throw two pieces onto the side stakes, remove the double turn from the three posts and place it in the center of the figure. After this, the lower and middle parts are removed from the outer pegs. This procedure is repeated with all columns. You need to put a new loop on the nearest three pegs, twist another elastic band and pull it across six posts.

A new turn is put on the side columns, and the central twisted elastic band is removed from them. Then two new elastic bands are attached to each side, and the central one is removed from three stakes. Three lower turns are pulled from the outer and central posts, two pieces are again thrown onto the sides and the loops are thrown off.
Weaving continues in a similar way: throw on three elastic bands, remove the lower turns, add two parts, throw off three loops. After this, all the turns are symmetrically transferred to the central pegs, the part is put on top and all the loops on it are removed. The coils are pulled together onto one post, the bottom one is removed, leaving only one loop on the peg. The product is removed from the machine and the last turn is tightened. A ring with a chain for a key fob is attached to this loop. Using the same pattern, you can weave an egg.
Ice lolly
Another interesting figurine made from rubber bands on the Monster Tail machine is a colored ice cream on a stick. For it you will need:
- seven orange or brown rubber bands for sticks;
- nine white ones for ice cream;
- thirty-four red or yellow for colored glaze;
- hook and machine.
 For weaving, three columns of the top and bottom rows will be used on the machine. A stick is formed on the two central stakes: put one brown piece on the bottom column, twist it and throw the bottom turn on top. This is repeated again, three loops appear on the peg. The next two loops are placed on top and stretched to the opposite top peg. The first piece is dropped with a hook, placing it in the center of two free loops. This stage is repeated two more times, adding two new turns.
A layer of ice cream is woven on top of the finished stick. Two white parts are pulled on top of the brown ones, which are removed in the center. Another white loop is placed on the three bottom pegs, and the machine is turned over. Add new loops, twisted three times, to two side columns. Then they throw two on the left and right ledge, and throw off the previous turns with a hook. There are two loops left on the columns. The device is turned again, one elastic band is pulled horizontally across three columns and released.
 The final stage of weaving from rubber bands on the Monster Tail machine is the production of a colored layer of the dessert. One loop is put on the three lower stakes, two parts are thrown on each post. Then the lower colored turns are thrown off, and all the white loops are removed on top of them. These steps are repeated until the loops on the columns run out. They are secured, and then rubber bands are put on only the outer pegs.
A twisted loop is placed horizontally on three posts, and two parts are added on both sides. Using a crochet hook, remove the horizontal turns and lower loops from the outer stakes.
The elastic bands are secured in the center, and the turns are transferred from the right column to the adjacent stake. Do the same with the loops on the left column. The machine is turned and the tightening of the coils is repeated.
After this, put one part on two central pegs, all the loops from under it are dropped to the center (starting from the top). After turning the machine, the procedure is repeated. The remaining turns are secured with a knot, dropping the bottom loop onto the top peg. The product is removed from the machine and the ring is attached.
Flower for bracelet
The simplest bracelet can be decorated with wicker flowers. You can attach one large or several small buds to the accessory, combining material of the same color or different shades. For one flower you need to prepare:
- eight blue rubber bands;
- seven white;
- two green ones for leaves.
 in the shape of a flower is easy. The blue piece in a figure eight is placed on the top two pegs. The next twisted loop is placed on adjacent columns. The third turn moves from the top peg to the bottom, the actions are repeated for the lower posts. As a result, the machine should produce a circle. Another blue loop is pulled over six stakes, lowered down and a second loop is thrown on. Using a crochet hook, remove all previous turns to the center.

Now two white parts are put on six pegs, and all the loops of the lower blue elastic band are thrown onto them. Throw on a white loop again and remove the lower ones, repeat until one blue loop remains on the posts. Then the loops are transferred from six columns to three, connecting adjacent turns. The last white elastic band is put on three pegs and the lower loops are removed from them. Two green elastic bands are put on top and the last white turns are removed from them. The finished flower is removed from the machine and straightened.
Having mastered these patterns, even a little girl will be able to create bright gifts for her loved ones. For beginners, crafts made from rubber bands may not seem at all easy to make, but detailed description will allow you to weave any decorations, animals and small items for interior decoration.
We have good news for those who have long dreamed of making bracelets from rubber bands on a monster tail machine - on this page you will find several high-quality video lessons with detailed instructions creating simple and original jewelry.
The monster tail machine is a smaller copy of a regular machine, which has 3 pairs of posts at the top and bottom, as well as one pair on the sides. This compact device is very convenient to take with you on a walk or on a visit to weave your masterpieces with friends. And if you also watch video lessons, you will learn how to weave bracelets very quickly. And to prove it, we suggest you master several simple video patterns that will be an excellent guide for beginners.
What have the masters prepared this time? Here are some simply wonderful bracelets:
- global;
- Ziggle Zaggle bracelet;
- Houston;
- drops of rain;
- triad;
- tropic;
- rainbow;
- road of fear;
- french braid;
- circular knots.
In order to weave such a bracelet from rubber bands on a monster tail loom, we will need a hook and elastic bands of two colors. We put the first elastic band on four columns and wrap each of them with the same elastic band on the inside. We put another elastic band on top, this time just like that and lift the bottom layer up, on all four sides. Next, we change the color and put one elastic band on each column, in this case, blue. We put the elastic on 4 columns again and lift the bottom layer to the top. We add 5 more layers, after which we send our rings into the middle. On top we put 4 more elastic bands on each of the columns and repeat adding layers. We already have a sequence in mind that we will follow.
Here is a very popular raindrop bracelet. Try to make it together with the master.
- Secure the first elastic band by folding it in half on the three posts of the far row.
- We put one elastic band on the side posts (paired).
- We put a colored elastic band on the middle pair of posts.
- We lower the double elastic band from the back posts into the middle of the weave.
- We re-fasten the rubber bands on the paired posts on the sides.
- We fix a pair of colored elastic bands in the middle.
- We remove the lower rubber bands from the side posts, and then from the central ones.
- On the central column we have 2 rubber bands left, which we alternately transfer to the side columns: the top elastic band to the left column, and the bottom one to the right one.
- We put on the rubber bands again: one on the sides and a pair in the middle.
- We continue to lower the lower layers of elastic bands into the middle and add new elastic bands.


