I am keeping this promise and telling you how I knitted a flower for an AMAZINGLY BEAUTY SCARF.
Everyone who saw it liked the scarf. But many - including me - have some technological misunderstandings.
During the trial knitting, nuances appeared that required attention.
In the process of solving them, a harmonious sequence was built, with all the amendments to the original, invented by me for creative convenience, and technological incidents.
CASE ONE: the thread laid to tie the petal kept trying to fall out.
In the original, the craftswoman holds this thread with her finger.
I was extremely uncomfortable, and I decided to make slits on the sides of the cardboard to secure the binding thread, and at the bottom for the main thread.

This gave the desired result: the threads were securely fastened and stopped moving.

Having secured the tip of the main thread in the bottom slot, I made 40 turns around the cardboard.
There were no problems, I even enjoyed laying straight rows.

CASE TWO: having removed the winding, I started tying, as suggested in the original,
where the craftswoman ties the loops of the petal, removing them from the cardboard.

But that was not the case. The threads immediately became tangled, the loops became different heights,
and the result was this fluffy “damn lumpy” look.

Then I decided to tie the set directly on the cardboard. Immediately things went without a hitch.

Here each thread is visible, which easily connects with the next thread with a single crochet.

Having finished tying, I cut the thread longer. We will use it to sew on the petals.

Now we move our threads to the center and tie them at the bottom with the thread
which was waiting for this moment in the side slots.
Hidden here CASE THIRD.
If you simply knit the threads without thinking, you will get exactly the pom-pom
which several people have written about. After repeated attempts it became clear
that, having made the first knot, and without tightening it to the end, you need to remove the element from the cardboard.
We hold one end of the knotted thread - the left one - tightly, and pull the second end - the right one - to the right. The threads gather evenly in a row and the pompom disappears.

I made the first petal on a narrow - 2.5 cm - cardboard. From it I rolled up a bud-like center.

On a cardboard that was twice as wide as the first one - 5 cm - I made the main petals.

So I’m posting the flower.
Every woman likes stylish, beautiful clothes that help her look great every day. One of the interesting details of a woman’s wardrobe that has become popular recently is a knitted poncho. The thing is perfect for both young girls and older women. If a representative of the fair sex has experience in needlework, she can try knitting warm clothes. Crochet poncho, patterns and descriptions for women - all this will help you choose your own version of the cape.
Methods of crocheting a women's poncho with descriptions and patterns
Over the past few seasons, a variety of ponchos have gained widespread popularity. This thing itself is a one-piece cloth cape, which is made with a slot for the head. Modern ponchos are sewn not only in classic style, designers complement them with decorative and functional elements - snakes, hoods, pockets, fringe, embroidery, beads. There are capes different lengths– short, medium length and maxi. Thanks to special warm linings, a girl can wear some types of ponchos in the fall instead of a coat.
This thing first appeared among the Indian peoples. The classic poncho was decorated with ethnic motifs, fringe, and was simple and comfortable. Over time, after the discovery of America by Europeans, warm clothing, with some changes, migrated first to American fashion, and then appeared in Europe. Even today there are small enterprises that produce traditional capes. Below you will see patterns and descriptions for crocheting a poncho for women that will help you create original item wardrobe for everyday wear.
Crochet an openwork poncho
A light openwork poncho will become a semicircle a great addition wardrobe on cold summer nights, late spring and early autumn. A product with an original pattern allows air to pass through well thanks to many holes, so it is not suitable as outerwear for the cold season. You can wear this wardrobe item with light dresses, summer skirts, trousers light shades, even shorts. The material used is yarn with a high silk content (88%) and polyamide composition (12%). How to crochet lace edges, see the diagram:
Master class: poncho made of floral motifs
This delicate floral cape is perfect for everyday wear or for festive events. The original crochet pattern looks interesting and beautiful. This poncho is perfect for a romantic look. To create an original product, you will need cotton threads in white, turquoise and lilac. This tutorial uses a size six hook. The knitting density for one floral motif is 10 cm in diameter. Patterns and descriptions of crocheting a women's poncho can be seen in detail in the photograph. How to make a floral motif:

- Make a chain of eight air loops. Close using one connecting post, forming a ring. Knit a circle according to the pattern.
- Each new circle/row will begin with an aerial lifting loop. End with a connecting column. This element should then go into the upper air lift loop.
- After the second one with the third circle/row, connecting post, go to the beginning of the next one.
- Complete the first to fourth circle/row once.
Warm poncho made of melange yarn
An item created using melange yarn will be bright, stylish and original. In the master class, 650 grams and 50 grams of orange thread were used. A poncho with elongated edges at the back and front fits perfectly on the shoulders and disguises body imperfections. This model is perfect for attracting attention everyday look. The knitting density per 10 cm of fabric (square) is 23 loops and 10 rows. After knitting several parts, the poncho will require assembly. Pattern and description of crocheting a poncho for women:

- Create a chain using one hundred and ten chain stitches and one rise chain chain. Knit the main pattern.
- After seventy-eight centimeters, measured from the cast-on edge, finish the work.
- Make two parts, and then sew them according to the pattern.
- Using a single crochet, tie the edges with melange and orange threads once at a time.
- Tie a decorative detail along the bottom edge - several tassels twenty centimeters long. To do this, use melange yarn.
Original scarf-poncho with a braid pattern
The braid pattern is beautiful decorative element knitted product, which looks cozy and pleasant. To knit such a shawl, scarf and poncho in one product you will need not only a hook, but also knitting needles. The materials used were red melange yarn(750 grams), knitting needles size 6, hook size 4. A woman can wear a ready-made poncho with jeans, trousers, and skirts in cool weather. Ten centimeters per square with an edge - knitting density stockinette stitch is 17 loops and 12 rows. Crochet poncho diagram and description for women, creating a braid pattern:
- The number of loops will be a multiple of 16+5+2 on the edge. Knit using the pattern with the given front rows. The purl rows will be knitted with loops according to the pattern.
- Start with the first edge, as well as the loops before the repeat. Repeat the rapport. Finish with a loop after it, followed by one edge.
- Repeat from the first row to the twelfth.

Job description:
- Cast on one hundred and three loops and knit with a braid pattern.
- After one hundred and eighty centimeters from the edge of the set, close all the loops.
- Fold the poncho in half.
- Sew the right long edge fifty-eight centimeters from the cast-on edge - this will be the shoulder seam. The middle sixty-four centimeters will remain open (32 on each side). This is the neck.
- Tie sixty-six tassels of fringe into the cast-on, closed edges, evenly distributing them. To do this, cut two threads twenty-five centimeters long. Fold the material in half and crochet it. Make sure that the number of tassels is the same on the back and front.
Unusual poncho-vest with sleeves
A poncho vest is an original, stylish wardrobe item that will appeal to true fashionistas. Creating this item will not be easy, so it is advisable to start knitting already having some experience in needlework. The material used was four hundred grams of blue cotton yarn. Tool – hook number 3.5. To decorate the item, the creators of the pattern used buttons to match the threads. You can wear ready-made clothes on tops, T-shirts, T-shirts, blouses. How to make the main pattern of this poncho:


- Using pattern three, start knitting. Please note that the points of the dial chain are side walls double crochet planks.
- Start with the loops that are before the repeat, repeat the repeat loops three times, and finish with the loop after it.
- Do this once from the first to third rows. Then repeat the second, third row, adding according to the meaning. From the purl row, start two double crochets + chain stitch + two double crochets in 1 base loop. This will be an addition.
Beautiful cape-poncho in the shape of a square for obese women
Perfect for women with a fuller figure different types ponchos, because they help to visually hide the figure’s shortcomings in width and make it more harmonious. A stylish cape will definitely appeal to a representative of the fair sex who has a few extra pounds. To create it you will need 600 grams of dark blue cotton yarn and a size 4 hook. Knitting density of the product: 1 square = 13 by 13 centimeters. How to do the job:

- Using the diagram, create forty-three square motifs. Connect them: the first element with the second last circle (to do this, replace the arch from the third air loop in the connecting column into the corresponding arch from the air loop of the previous motif and the third air loop).
- In the corner, instead of nine chain stitches, tie an arch of four chain stitches, one connecting column into the fifth corner chain chain loop of the previous motif, then tie four chain stitches. loops.
- Combine all the following motifs in a similar way.
Video tutorials on crocheting a poncho for beginners
For those who have little experience in crocheting, the steps of how to crochet a women's poncho, patterns and description of the work may not be immediately clear. Instructions with photos alone are not enough. Therefore, experienced amateurs or real professionals record interesting videos, where they tell you how to create original ponchos. Unusual patterns and interesting finishes will look great. It is easy to use wool, acrylic, mohair and other yarn compositions as materials. Watch interesting videos on creating a stylish and beautiful wardrobe item:
From square crochet motifs
Poncho with crochet and knitting neck
How to knit a poncho-cape in one piece
Crochet capes are highly valued by fashionistas and are one of the must-have items in women's wardrobe. No less popular are children's capes and capes, which caring mothers and grandmothers knit with trepidation for their beloved babies.
As a rule, crocheting capes is not a very complicated process, so even a beginner in crocheting can make such an elegant piece of clothing.
Today we invite needlewomen to try their hand at knitting a variety of capes: summer nautical, romantic openwork, warmer autumn-spring ones, as well as a thick children's cape for a girl of three to six years old. 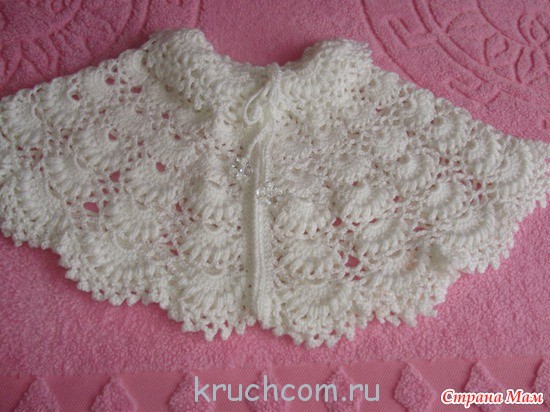
Abbreviations in the text:
- VP or v.p. – air loop;
- runway – air lift loop;
- Art. s/n – double crochet;
- Art. b/n – single crochet;
- Art. s/2n – double crochet stitch;
- Art. s/4n – double crochet stitch;
- pet. – loop;
- flail - chain;
- PR – previous row;
- SS or connect. Art. – connecting column.
Versatile women's cape made of translucent square motifs
The cape can be knitted in any color scheme, but in a combination of red and black it looks especially attractive. Moreover, depending on the selected thickness and type of yarn, the cape can be light summer, and warm woolen, warming in winter time year.

Knitting pattern:
Knitting progress:
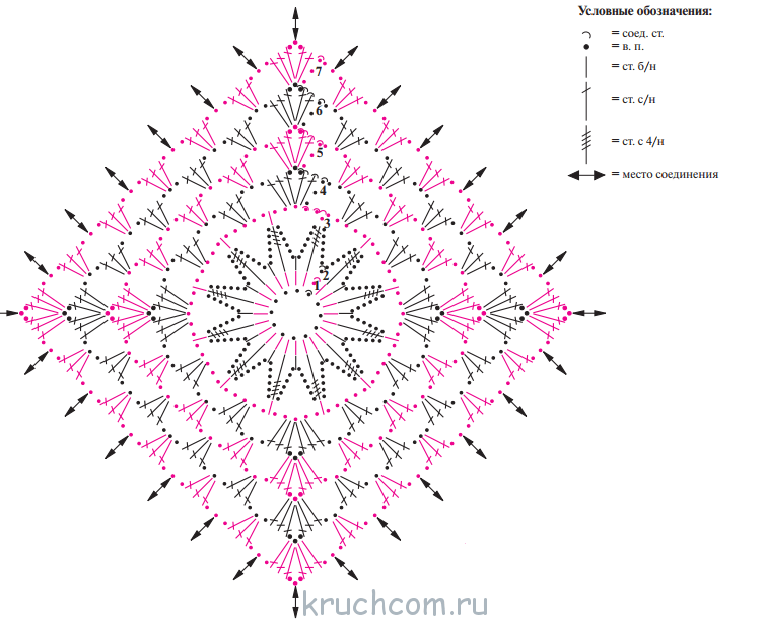
A cape is knitted from a triangular and square motifs, which are subsequently assembled into a complete fabric.
We knit square motifs in the amount of 46 pieces.
Let's draw a chain of 12 VPs with a red thread, close it into a ring and connect it. column.
We knit rows:
1:1 runway, 23 st. b/n in the ring, complete the connection. column.
2: 7 VP (1 VP + 6 VP), 1 tbsp. s4/n next Art. b/n PR, 6 VP, rapports (12 times): “1 tbsp. b/n in the next Art. b/n PR, 6 VP, 1 tbsp. s4/n next Art. b/n PR, 6 VP.” SS. Change the thread to black.
3: 6 VP (1 VP + 5 VP), 12 rapports: “1 tbsp. b/n in the next Art. s4/n PR, 5 VP.” SS.
4-7: according to the motive diagram.
After all 46 squares are ready, we connect them together according to the pattern.
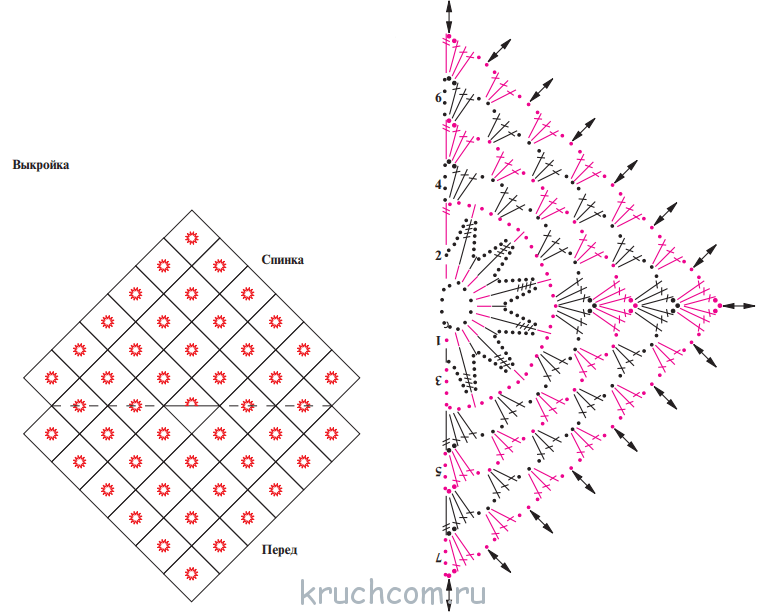
Only one triangular motif needs to be knitted.
We collect a flail with a red thread. on 11 VP, we close it in a circle and connect it. column.
We knit rows:
1:1 runway, 12 st. b/n into the existing ring. We knit “straight and back”.
2: 7 VP (1 VP + 6 VP), 1 tbsp. from 4/n to next. Art. b/n PR, 6 VP, 6 rapports: “1 tbsp. b/n in the next Art. b/n PR, 6 VP, 1 tbsp. s4/n next Art. b/n PR, 6 VP.” Change the thread to black.
3: 7 VP (4 VP + 3 VP), 4 rapports: “1 tbsp. b/n in the next Art. s4/n PR, 5 VP", 3 VP, 1 tbsp. s/2n in VP PR.
4-7: according to the triangular motif pattern.
We attach the triangular motif according to the proposed diagram and pattern.
We tie the cape:
- we attach a red thread to the fabric, knit one row of arches from 5 VP + 1st stitch. b/n.
- we attach a black thread and knit a row of arches from 20 VP + 1st stitch. b/n.
We tie the neckline with regular non-woven stitches: the first and third rows - with black thread, the 2nd row - with red thread.
The cape is ready!
Dark blue shoulder cape made of dense hexagonal motifs
A dark blue knitted cape will be appropriate for both an office style and a casual street look. It will warm you on a cool spring morning, and in early autumn it will be very useful. Knitting such a cape consists of knitting individual pentagonal and hexagonal motifs, which are subsequently connected to each other according to the pattern below:


Knitting steps:
Hexagon (knit in 28 pieces)
We close the base chain of 10 VPs into a ring. column.
Row No. 1: 4 VP (3 VP + 1 VP), rapports 12 times: “1 tbsp. s/n in the ring, 1 VP", SS.
Row No. 2: 4 VP (3 VP + 1 VP), 1 tbsp. s/n into the arch from one VP PR, 1 VP, 12 rapports: “1 tbsp. s/n in next Art. s/n PR, 1 VP, 1 tbsp. s/n in the arch from 1 VP PR, 1 BP.” SS.
Row No. 3: 3 runways, 2 tbsp. s/n into the arch from one VP PR, 1 tbsp. s/n in next Art. s/n PR, 2 tbsp. s/n in next arch from one VP PR, 1 tbsp. s/n in next Art. s/n PR, 2 tbsp. s/n in next arch from one VP PR, 1 tbsp. s/n in next Art. s/n PR, 3 VP, 6 rapports: “1 tbsp. s/n in next Art. s/n PR, 2 tbsp. s/n in the arch from 1 VP PR, 1 tbsp. s/n in next Art. s/n PR, 2 tbsp. s/n in next arch from one VP PR, 1 tbsp. s/n in next Art. s/n PR, 2 tbsp. s/n in next arch from one VP PR, 1 tbsp. s/n in next Art. s/n PR, 3 VP, SS.
Rows No. 4-8: knit according to the pattern, each end will be connected. column.
Rectangle (knit in 8 pieces)
Base chain for 10 chains. pet. We close it in the SS ring.
Row No. 1: 4 VP (3 VP + 1 VP), 10 repeats: “1 tbsp. s/n in the ring, 1 VP.” SS.
Row No. 2: 4 VP (3 VP + 1 VP), 1 tbsp. s/n into the arch from one VP PR, 1 VP, rapport 10 times: “1 tbsp. s/n in next Art. s/n PR, 1 VP, 1 tbsp. s/n in the arch from one VP PR, 1 VP", SS.
Row No. 3: 3 runways, 2 tbsp. s/n into the arch from one VP PR, 1 tbsp. s/n in next Art. s/n PR, 2 tbsp. s/n in next arch from one VP PR, 1 tbsp. s/n in next Art. s/n PR, 2 tbsp. s/n in next arch from one VP PR, 1 tbsp. s/n in next Art. s/n PR, 3 VP, 5 rapports: “1 tbsp. s/n in next Art. s/n PR, 2 tbsp. s/n into the arch from one VP PR, 1 tbsp. s/n in next Art. s/n PR, 2 tbsp. s/n in next arch from one VP PR, 1 tbsp. s/n in next Art. s/n PR, 2 tbsp. s/n in next arch from one VP PR, 1 tbsp. s/n in next Art. s/n PR, 3 VP, SS.
Rows No. 4-8: according to the rectangular motif pattern, we finish each row by connecting. column.
Assembling the cape: we connect the finished rectangular and hexagonal motifs together according to the diagram. We tie the fabric of the cape in a circular manner using non-woven columns. tie better than yarn“Grass” or make chains of VP between the columns, replacing the fringe. The cape is ready!
Warm cape with fringe for baby

In order for the cape to serve not only a decorative role, but also to be warm for the child, we recommend knitting it from yarn with the addition of wool or merino. In this case, the cape can be used as an element of outerwear for the baby in the spring and autumn.
Knitting pattern:

Work steps:
We knit the cape in straight and reverse rows.
Dial a chain of 47 v. p. (44 v. p. base + 3 v. p. rise).
1st row: 1 tbsp. s/n in the 5th century. p. chains from a hook, 43 tbsp. s/n in v. n. base of the chain.
2nd r.: 3 c. lifting point, 43 st. s/n in art. s/n of the previous row.
3rd r.: 4 c. p. (3 v. p. rise + 1 v. p.), 1 tbsp. s/n in art. s/n of the previous row, between st. s/n 1st century p.
4th row: knit in the round according to the pattern for the 21st row. Tie tassels to the bottom of the cape. To tie, tie a chain of 50 v. n. Thread through 2 tbsp. s/n 1st row. Decorate the ends of the ties with fringe tassels (knit long chains from VP, between them - SS or double stitch).
Bright beach cape
An original cape made of multi-colored yarn will become bright accent summer female image. It can be combined with your favorite swimsuit, or with a sexy top and short shorts.
The cape is quite simple to knit: the cut is straight, it does not require seams, and if you use sectional colored yarn to make it, you won’t have to change the colors of the thread. So let's get started! 
Knitting pattern for the main pattern
The number of stitches in the initial row should be a multiple of 16 + 3. Knit according to the pattern. We start each row, as shown in the diagram, with 3 runways instead of the 1st stitch. s/n and s loops before rapport, repeat repeat constantly, ending with loops after rapport. We perform it once from the 1st to the 9th row, then constantly repeat the pattern of the 2nd–9th rows. 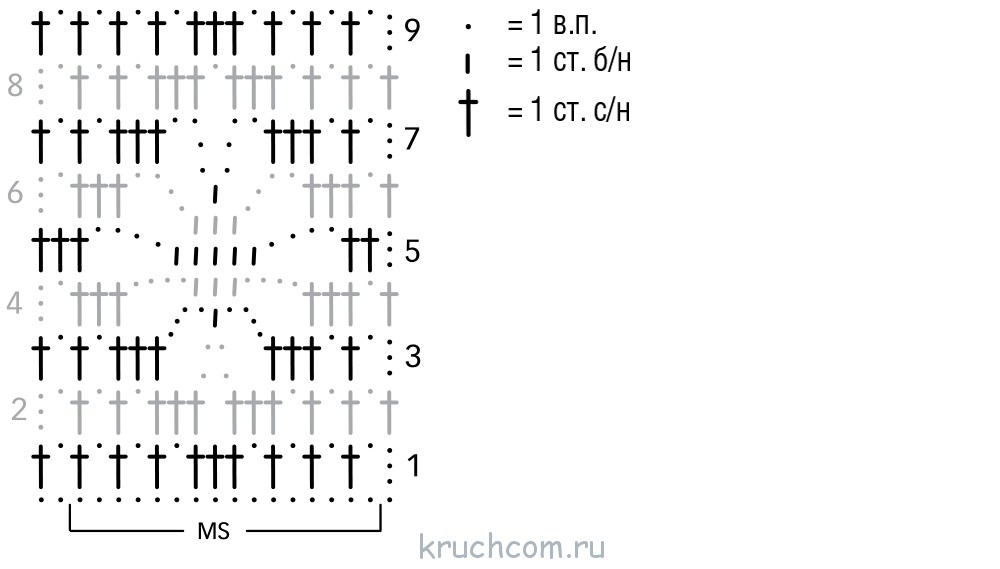
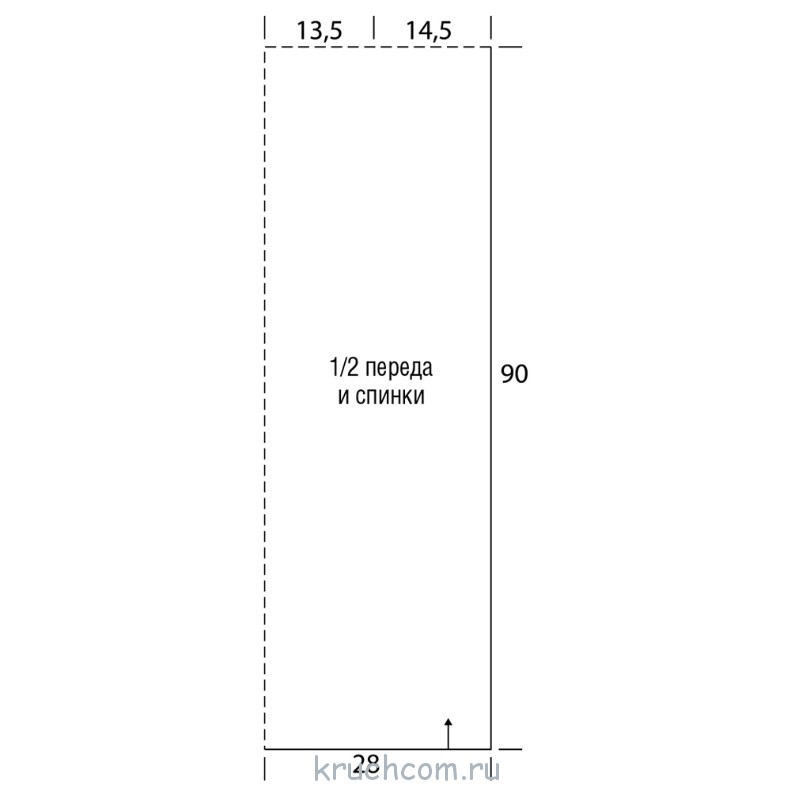
We knit the cape in one piece over the shoulders. The arrow at the bottom of the pattern is the knitting direction!
Pattern
Knitting progress:
We cast on the initial chain for 115 VP + 3 VP, knit according to the pattern.
For sizes 42-44, after approximately 90 cm of knitted fabric (about 77-78 rows depending on the knitting density), the middle of the shoulder will be reached.
For the first shoulder we knit 30 stitches, the central 55 stitches. We leave it tightly unknitted, we connect both sides with an intermediate chain of 55 VP, then we knit a trace. 30 pet. opposite shoulder.
After 180 cm of knitted fabric (approximately 153-155 rows), we finish the work.
We tie the cape: we tie the neck, sides and bottom edge of the product with one circular row of regular non-woven posts. Ready!
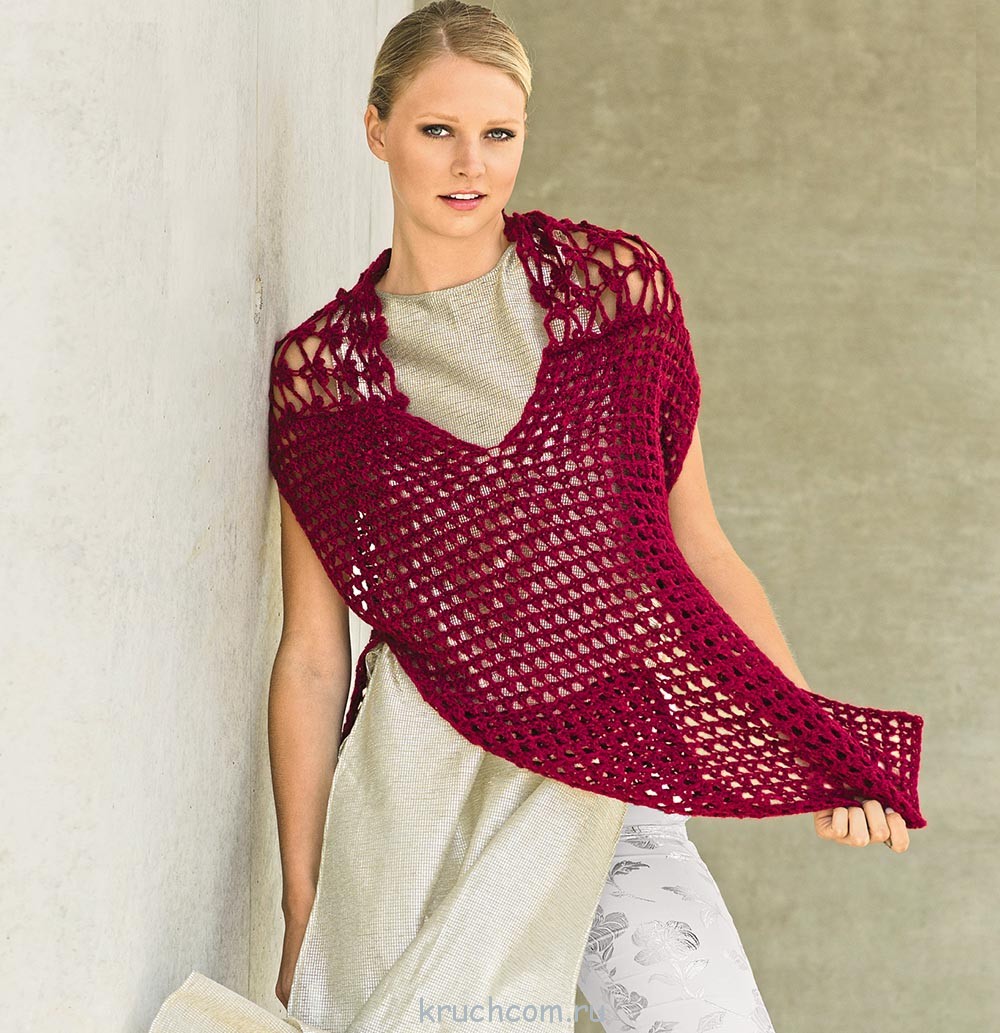
Air cape for romantic meetings

This exclusive cape-blouse will appeal to true fashionistas. It is crocheted from mohair with the addition of silk threads (colors can be combined as desired).
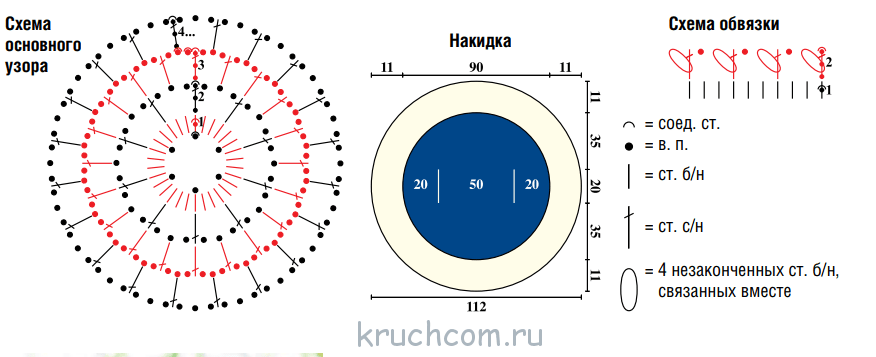
STAR PATTERN
Knit according to pattern A. Complete rows 1–5 once. If the badges are connected at the bottom, tie the loops on one loop of the base. If the badges are connected at the top, knit the loops together.
“HALF STAR” PATTERN
Pattern “Half Star”: knit according to pattern B. Complete rows 1–5 once. 
We would like to emphasize: due to the loose knitting structure, the cape tends to stretch, so it is impossible to give exact measurements for sizes. Thus, if necessary, the number of “stars” can be changed by 1 row in width and/or height.
Pattern:

Knitting progress:
In total, knit 52 “stars” and 14 “halves of a star” with the colors of yarn indicated on the pattern, while, according to the pattern, in the 5th circular row, connect the “stars” in place of the 5th VP of each arch from the VP, do this using 1st SS = each star is connected to each other by 2 arches of air loops. At the outer corners, the stars are also connected to each other in the 5th circular row.
Tying the cape: tie the neckline in 1 circular row with repeats “1 VP + 1 SS”, while doing SS along the straight edges of the “halves of stars”, and performing 4 VP and 1 SS at the connections of the arches from the VP of whole “stars”.
Tie the bottom of the cape alternately with the 5th VP and along the edge of the opposite “stars” alternately with 1 tbsp. b/n. The cape is ready!
An exciting selection of crochet patterns for fashionable capes
For the creative inspiration of needlewomen, we have selected original models capes with a schematic representation of the progress of their knitting. Create, dare, you will definitely succeed!
Elegant spring cape with airy flounces 
2. Straight warm cape “a la tunic”

Pattern

3. Playful beach tunic with floral motifs and fringe

The generalized term “cape” can be used to describe a type of clothing that does not have sleeves and has a characteristic loose cut. Capes are ponchos, capes and their varieties.
Types of capes
A crocheted cape can be dense and warm or, on the contrary, openwork and decorative. The beauty of this type of clothing is that almost any woman can find a suitable model for herself.
Cover-ups are popular because they allow you to hide unwanted elements of your silhouette. For example, long model, reaching to the waist, reliably disguises the tummy and sides. At the same time, openwork elegant capes, crocheted, decorate evening dresses and help cover open shoulders or neckline.
So, based on knitting methods and appearance, capes can be:
- Knitted with a continuous cloth.
- Made up of separately related fragments.
- Round.
- Semicircular.
- Rectangular.
- In the shape of a bell.
Round capes
Such products look very interesting. Plus they are extremely fun to knit. The photo shows an example of a round cape.
Most likely, the basis for her design was a napkin or tablecloth. As a rule, such products have a main decorative element in the center, which is located on the back. At a certain stage, you should take care of the armholes. To do this, you need to measure the width of the back and compare it with the knitted fabric. When the circle is equal to the width of the back, holes are formed along the edges of the canvas using chains of air loops (VP).
When finished, this crocheted cape looks like a jacket or cardigan with a collar. If necessary, it can be used as a shawl.
Semicircle capes
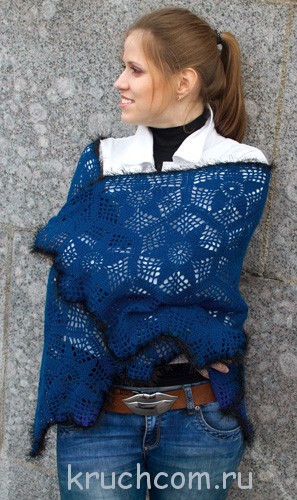
This view knitted capes is one of the most popular. They can also be based on patterns of napkins or simply large openwork fragments. The example below shows a cape knitted in an obviously rectangular fragment.

It can still be classified as semicircular, since the principle of expanding the circular canvas is preserved. A special feature of this product is the use of thick thread in combination with openwork pattern. The knitting texture is very visible and all the elements look attractive.
This type of crocheting of a cape implies the presence of a center near the neck and a gradual expansion of the fabric. Semicircular capes can be made of two parts (as in the photo) or one circular cloth, the first row of which is the neckline.
Openwork cape with pineapple pattern
A variation of the semicircular one is the following crochet cape (patterns are shown in the photo). This wonderful model very successfully combines the now classic “pineapples” with openwork “fans”. After studying the images, it becomes clear that the development of the cape model was based on the design of a round napkin.

Modification of some elements and proportions, as well as a shift in emphasis to the “fans” allows the cape to be airy and very crocheted (diagrams are shown both before and after the improvement) made according to the diagram below.

There are not many rows in the pattern, so the yarn chosen is quite dense.
Rectangular capes
As the name suggests, this crochet cape is shaped like a rectangle or square. It is knitted in the form of a smooth strip with holes for the arms. Sometimes it looks like two stitched rectangles.
Almost any knitting pattern for such capes can be used. These can be either simple, even patterns or intricate multi-row ornaments. The photo below shows a rectangular cape, to create which three equal squares were knitted. Armholes are formed by unstitched areas in the seams between the squares.
Drapes in the shape of a bell
The specific shape of this type of cape allows you to throw them over your shoulders and not worry about them unbuttoning, slipping, or being blown away by the wind. Drapes-bells do not have fasteners or sleeves. True, if such a cape is crocheted long (to the waist or longer), then you have to provide it with vertical slits for the arms.
From the photographs you can see that bell capes are knitted in circular rows. Depending on the purpose of the cape, it can be knitted with a continuous dense pattern, equipped with a warm collar, or be light and openwork.

This one is shown in the photo) expands according to the principle of a circle skirt. It is very spacious and designed for comfort.
The next cape has a more decorative purpose.

It expands quite a bit and looks more like a smooth pipe-like canvas. This cape is perfect for formal gatherings. However, if you knit it from light cotton, it will become an indispensable addition to summer sundresses, helping to keep you warm on cool evenings.
Such capes knitted from angora (rabbit fluff) or mohair (soft wool of goats and sheep with long pile) look very good. They can be knitted in either a dense or openwork pattern, and they will be equally warm.
Which pattern to choose
When deciding which pattern to use to make a cape, you should think about the future product and calculate your capabilities. Knitting an even fabric is much easier than circular expansion or creating a product from fragments. Of course, there are restrictions regarding the choice of variations of the ornament and the model of capes. But at the same time, a simple pattern will allow you to avoid difficulties and quickly finish crocheting a cape. The patterns of modern solid patterns are very diverse and interesting.
On the other hand, lace and complex patterns are always popular, and a new complex task is a challenge for an adventurous knitter.


