How to make a New Year's topiary with your own hands is a question that interests everyone who wants to prepare an excellent gift for family and friends. In addition, such a thing can serve as a wonderful decorative element that decorates the house and gives a New Year's mood.
How to make a New Year's topiary with your own hands is a question that interests everyone who wants to prepare an excellent gift for family and friends
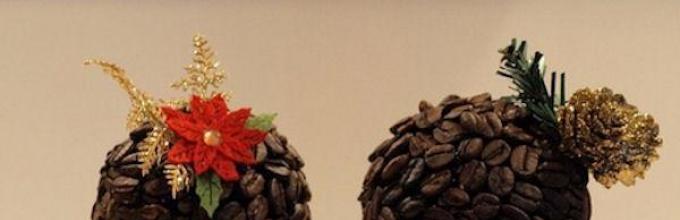
There are many materials from which such excellent crafts are made. New Year. The most popular is coffee topiary. This is explained by the fact that coffee beans are relatively inexpensive, they can be bought at any grocery store, and the alluring aroma of this unique material will not leave anyone indifferent. To create such an exquisite New Year's craft, you will need:
- foam ball;
- wire;
- coffee beans;
- pot;
- latex orchid flowers;
- pine branches (artificial);
- decorative elements (beads or ribbons);
- PVA glue;
- hot glue;
- gouache brown;
- gypsum.
The creation of such a topiary begins with the construction of a frame, for which you need to take a foam ball, wrap it with thin textile napkins and secure it with threads. After this, the frame must be painted with brown gouache and wait until it dries a little. Then you should begin gluing the grains to the surface of the base; hot glue is used for this process. It is very important that the grains are located as close to each other as possible. In addition, a free space is left on the ball where the barrel will be attached.
Then a second layer of beans should be attached on top of the coffee, and the beans should be placed in the spaces of the bottom row. The trunk for the topiary made from coffee beans will need to be made of aluminum wire, which must be decorated using strands of twine. After this, the barrel must be installed inside the ball and glued with hot glue to the joint. Then the wire should be bent beautifully, and a hook should be made at the bottom, which will help fix the craft in the pot. At the next stage, it is necessary to decorate the crown of the product. To do this, you need to attach plastic pine legs, beads, ribbons and an orchid in a chaotic manner. To combine the crown and trunk in the same style, you will need to wrap the trunk in a golden ribbon.
 There are many materials from which such excellent New Year crafts are made. The most popular is coffee topiary.
 Now we need to create a pot so that the topiary for the New Year is a complete gift. This can be done from any container, for example, from a jar of yogurt. It is necessary to cut off the top part and decorate it with gold crepe. Carefully wrap the yogurt container with crepe: cover the top edge of the pot and the bottom. For additional decoration, use a golden metallized ribbon.
At the final stage, you will need to secure the topiary in the pot. To do this, mix cement with gypsum in a 2:1 ratio, dilute the mixture with water and place it in a pot. After this, you need to install the topiary in the pot and secure it with a building mixture. The cement should be covered with PVA glue and gouache, and then covered with coffee beans, which will stick even to brown glue. The final touch will be a small bow tied under the crown of the product.
New Year's topiary (video)
Crafts from Christmas balls
Sometimes christmas tree- not the only decoration of the holiday. Very often, festive topiary made from balloons is used to decorate the house. To make this New Year's craft you will need:
- small Christmas balls;
- base ball;
- stick for the trunk;
- floral pot;
- glue gun.
 Sometimes the New Year tree is not the only decoration of the holiday. Very often, festive topiary made from balloons is used to decorate the house.
 Step by step instructions creations:
- First you need to bring the pot closer to the New Year. To do this, you need to decorate it with fabric and tinsel.
- After this, you will need to take the base ball and cover it with balls. It is best to use colors of balloons that harmoniously combine with each other. For example, red balls with blue, yellow with green or white with golden balls look original.
- Then you need to fix the barrel to the base of the structure, and it can be given any shape.
- At the last stage, the product is installed in a pot, for which a gypsum mixture is used.
If the topiary is made as a gift, then it can be supplemented with a beautiful decorative bow, which is attached to the trunk.
New Year's craft from pine cones
An original topiary for the New Year can be made from pine cones. To do this, you need to prepare gypsum plaster, unnecessary newspapers, a flower pot, a plastic tube, PVA glue, pine cones, white and golden paint, padding polyester, small beads, scissors and a brush. Step by step instructions:
- Creating a gypsum mixture that requires water and gypsum plaster. A flower pot is filled with this substance and a trunk is placed there. It is necessary to ensure that the tube is in the center of the pot and stands level.
- Painting the barrel golden.
- Construction of a newspaper ball. To do this, use unnecessary newspapers, from which they make a lump and wrap it with threads. A hole is made in the ball, PVA glue is applied and a tube is installed in the ball. After this, the base is covered with padding polyester and tied tightly at the base.
 An original topiary for the New Year can be made from pine cones
 After all these processes, you can move on to the most enjoyable part - decorating. To do this, you need to paint the cones white and leave them to dry. After they dry, you need to give them shine with golden paint. Make a hole near the base of the cones, apply PVA glue and pierce them with a toothpick. Then you need to soak the toothpick in glue and attach it to the ball. You can attach pearl beads on top of the cones using superglue. The placement technology is chaotic, but the beads should decorate the cones smoothly. To give your homemade tree a New Year's mood, you can decorate it with tinsel.
Christmas tree topiary (video)
New Year's decoration made of tinsel
You can create incredibly exquisite New Year's topiaries with your own hands from tinsel. To make them, you need to take a foam ball base, a wooden stick, a glass, a small disk, a glass, plaster, green and silver rain, golden bows and small beads. Other materials and tools you will need are a glue gun, transparent Moment glue, double-sided tape and scissors.
Festive topiary, master class of the creative process:
- The glass is filled with plaster, in the center of which a wooden stick is placed. Then you should glue a small disk to the glass and leave it until dry.
- A wooden stick is wrapped in thin rain, securing it at the top and bottom with double-sided tape. After this, you need to wrap it with beads and secure it with a glue gun. The bottom of the stick should be decorated with wide silver tinsel and glued with tape.
- A base ball is glued onto the stick, which is decorated with green rain and decorated with small beads.
 Incredibly exquisite New Year's topiaries can be created with your own hands from tinsel
 The glass can be further decorated with tinsel, cut into pieces of different sizes. Golden bows are also glued to the surface.
Topiary for the New Year is a great opportunity to create original decoration for your home or make a wonderful surprise for your family.
Attention, TODAY only!
New Year's topiary. Master class with step by step photos.
Author: Tatyana Eruslanovna Tyagina, teacher of kindergarten No. 7 of the Kiselyovsky urban district, Kemerovo region, Russia.
The master class is designed for older children school age, teachers, parents and people involved in creativity.
Purpose: This master class is intended for making a tree of happiness - a topiary, which can serve not only as an interior decoration, but also become an excellent New Year's gift.
Target: making New Year's topiary from improvised materials.
Tasks: familiarize yourself with the technology of making topiary, develop creative imagination and fantasy; instill aesthetic taste, develop hand motor skills, perseverance; cultivate accuracy when performing work.
Initially, topiary was a garden with decorative trimmed plants and sculptures created from artistically trimmed trees. The art of topiary has a long history. Yes, back in Ancient Egypt and Persia valued the ability to give geometric shapes to bushes and trees. And the most famous example of a topiary garden is the Hanging Gardens of Babylon in Babylon - one of the seven wonders of the world. And now topiary (or European tree) is the name for small original trees, for the production of which natural and artificial materials are used. Topiary is decorative in nature, and what it will be made of depends only on the author’s imagination. And the size of topiary can be from 10-15 centimeters to half a meter.
Materials and tools for making New Year's topiary: not a large pot, a branch or stick 40 cm, newspaper, thread with a needle, plaster, artificial white fur, Christmas tree beads, artificial pine branch (brush) sold by the meter, wire cutters, scissors, glue gun, Moment glue, decorative green and red, red bow, decorative silver branch, pine cones, white gouache or corrector, various New Year's mini toys.
Work progress:
1. We make the base for the topiary: we form a ball with a diameter of 10 cm from newspaper and wrap it with threads for strength.

2. Make a hole in the ball, insert a branch and secure with hot glue. We wrap the branch with green braid.

3. Fill the pot with diluted plaster and immerse the base of the topiary in it. You don't have to wait long for the plaster to harden.


4. Decorate the trunk of the topiary with Christmas tree beads using glue.

5. Let's start making the topiary crown. Using wire cutters, cut the artificial pine brush into 17 cm pieces. My topiary took 40 of these pieces. It all depends on what diameter your ball is.


6. Bend the pine pieces in half.

7. You get these fluffy lumps.

8. Using hot glue, attach the pine fluffy lumps tightly to each other on the ball. You need to start from the bottom of the ball.

9. It turns out like this crown.

10. Now let’s decorate the crown of the topiary. For this you will need: cones, corrector or white gouache, various New Year's mini-souvenirs, a decorative silver branch.

11. Cover the tips of the cones with a corrector (you can use white gouache).

12. Glue the painted cones between the pine branches.

13. Glue New Year’s mini toys along the crown.

14. Glue decorative silver branches between the pine branches. Cover the tips of the pine needles with corrector or white gouache.

15. Let's start decorating the pot. For this you will need: white faux fur, red braid, large silver beads, a couple of New Year's mini toys (gifts), pine brush needles.

16. Cut out a “fur coat” for the pot from white fur. The pattern depends on the shape of your pot.

17. Sew the darts together and use hot glue to secure the “coat” to the pot. We tie the “fur coat” with red braid and decorate it with a bow.


18. Place pine needles in a pot, then beads and gifts.


19. Lovely New Year's gift ready for friends and family.
Ordinary pine cones can become an excellent home decoration if you apply a little imagination and effort. Looks very original pine cone topiary, made with your own hands.
The process of bleaching buds is the longest and will take at least 4-5 days, including drying them.
Making the tree itself from cones will take much less time. Decorate New Year's topiary can be varied decorative elements: pine branches, small New Year's balls, ribbons, artificial snow, beads, etc. Your imagination is the best assistant and advisor!
In this case, in addition to cones, we will use sisal balls and small Christmas balls.
For making New Year's topiary from cones You will need:
- pine cones,
- sisal white,
- small Christmas balls – color according to your wishes,
- a flower pot or any other suitable container,
- strong wire (I use steel hangers),
- some round cable (0.5 m),
- building plaster (alabaster),
- satin ribbon suitable color 0.5-1 cm wide (can be replaced with 100% cotton yarn to avoid fraying),
- hot glue gun,
- scissors,
- round nose pliers and pliers (for working with strong wire).
Of course, you can use your imagination and add any other materials, and you will get your own unique topiary tree.
It seems that everything is simple, but in reality, often, judging by experience, many questions, discrepancies and inconsistencies arise. To avoid them, and for your tree to turn out perfect, listen to my advice and carefully study the master class offered to you.
First, let's prepare the barrel.
Decorative twigs (corelius), which can be bought in florist stores, or an ordinary branch of any tree can serve as a trunk.
In this case, we will consider the option of making a twisted trunk for topiary from a round cable and strong wire.
We take a strong wire (I have a metal hanger) and a round cable.
I pulled out the strands from the cable and replaced them with strong wire. You can straighten the hanger and bite off the required length using pliers.


We bend it arbitrarily. I also bend the wire from below for strong fixation in the plaster. I made one more additional decorative curl.


A decorative look can be given using a satin ribbon or yarn: twist it in a spiral, periodically securing it with hot glue. It’s more convenient to do this right away.


I always use building plaster (alabaster) as a fixative.
The hole in the pot can be sealed with regular tape.


We dilute building plaster (alabaster) with cool water to the consistency of thick sour cream and place it in a pot.


We place the entire composition in the center and hold it until the plaster hardens.


At the base of the crown there is always a ball, which can be made of polystyrene foam, foil, papier-mâché, newspaper, etc. The main thing: the lighter it is, the better.
I have a crumpled ball of old newspapers, we wrap it with any thread.

We make a small hole into which we then fix the barrel with hot glue.


Preparing sisal balls. They are very simple to make; we roll a small piece of sisal between two palms, just as we roll a ball of plasticine in our hands.


We attach prepared sisal balls, pine cones and small Christmas tree balls to the crown base with hot glue.


We decorate as desired, and now we have an unusual, very cute holiday topiary - a decorative tree that will decorate the winter holidays!


Have fun creating!
I was glad to help!
Autumn I already made topiary, you can see it in my publication https ://www..html. I've been wanting to try making a winter one for a long time. Look what happened. I started making a foam ball in the evening...
 In anticipation New year I want warmth and comfort. And they help create his handmade crafts. One of these crafts is - topiary For it to be unusual, beautiful and delightful, to please the soul, it is worth putting in the imagination and a lot of effort to create it! Us...
New Year's topiary - Master class on arts and crafts "New Year's topiary"
Publication “Master class on arts and crafts “New Year's...”  Goal: the formation of creative self-expression of students through the acquisition of practical skills when creating a souvenir using the topiary technique. Objectives: to introduce the history of the art of creating Topiary; develop independence,...
 Image library "MAAM-pictures"
 Crumple the paper until you get a tight ball of the required diameter and secure it with thread. For the trunk, I took insulated blue wire, gave it the desired shape. For decoration, I took cones (painted them silver with acrylic paints, attached them to a flower...
 Topiary (topiary) is a garden with artistically trimmed plants and green sculptures. The art of topiary has a long history. Even in Ancient Egypt and Persia, people learned to give trees and shrubs geometric shapes. The most famous example...
My daughter goes to kindergarten and we, like many parents, participated in the competition on New Year's Eve" New Year's craft". Parents together with their children began to bring various snowy Christmas trees, snowmen, New Year's clock, fairy houses. My daughter and I thought a lot about something like this...
New Year's topiary - New Year's topiary trees
 Topiary, also called the “European tree” and the “Tree of Happiness,” is a common interior decoration in European floristry. A very good solution for those who are not “loved” indoor plants. This is a very original composition that always attracts attention. Brightness and...
 2017 in Russia was the year of ecology. Beach modern world are plastic bags that we are used to using in various stores. Plastic bags first appeared in the mid-50s in America. They turned out to be very convenient, practical and cheap. WITH...
Topiary for the New Year “Berries on the Snow” made of nuts and sisal is very easy to make for beginning needlewomen, and the tree of happiness looks stylish and atmospheric. The crown is formed on a foam ball covered with halves walnuts with snow-white paint and bright red decoration: sisal balls, berries, stamens. A New Year's topiary with a curved trunk is planted in a wooden pot and reinforced with plaster casting.
The total height of the topiary for the New Year is 33 cm, pot - 9 cm, crown diameter with decor - 18 cm. To make a tree of this size you only need 2-3 hours.
Materials for creating topiary for the New Year “Berries on the Snow”

- Wooden pot.
- Pieces of foam or sponge.
- Gypsum (alabaster) and water - 200 gr. mixtures.
- White acrylic.
- Trunk - Corilus branch - 22 cm.
- Walnut halves.
- Foam ball d=12 cm.
- Fabric for wrapping the ball.
- Artificial snow in a can.
- Thermal gun, 3 silicone sticks 20 cm each (d=11.2 mm).
- Red sisal for base + balls - 20 pcs.
- Plastic snowflakes - 10 pcs.
- Small apples in a bundle - 12 pcs.
- Large apples made of polystyrene foam - 3 pcs.
- Smooth foam plastic berries - 0.5 bunch, 20 pcs.
- Sugar berries - 1 bunch, 40 pcs.
- Snow-covered stamens - 2 bunches of 10 branches.
- White fabric leaves - 6 pcs.
- Rhinestones and half beads on a blister.
Video master class - topiary for the New Year 2019
A convenient and simple master class in excellent FullHD 1080p quality on how to make a sisal topiary for beginners on a New Year's theme. Watch, get inspired, generate new ideas and share them with friends!
How to make a New Year's topiary with your own hands - MK in 1 picture

Did you like the format of the master class in 1 picture? Watch everything from Alena Tikhonova!
Master class with photos - New Year's topiary step by step
Preparing the ball and base
Stage 1. Wrapping the ball. We slightly sharpen the prepared barrel (smooth) of the required length at one end, coat it with glue or hot silicone, and fix it in a pre-made hole in a foam ball. We completely wrap the base with any fabric.
The winding is necessary so that the hot silicone does not melt the foam ball when gluing large decor. Also, the base of the tree of happiness can be painted or wrapped with twine (knitting threads).
Stage 2. Crown formation. We clean the walnuts so that we get whole halves and empty halves inside. Minor defects or cracks are acceptable. Carefully glue the ball, leaving minimal gaps between the decor.


Stage 3. Painting the base. We paint the finished base of the crown, as well as the trunk, with white acrylic paint - always in 2 layers to get a rich color. At the same time, apply the 2nd layer with a soft brush so that the paint goes on evenly and without strokes.


Crown decor
Stage 4. Making sisal balls. You will need red sisal, which combines effectively with the white crown. We make it as described in the instructions. You don’t have to reinforce them with PVA glue, just roll them well enough. The balls should be comparable in size to a nut shell or slightly smaller.

Stage 5. Preparing snowflakes. We paint the plastic snowflakes white on the front side.


Stage 6. Decorating the crown. We paste the decor over the entire surface of the crown of the New Year's topiary - in a chaotic order, covering the gaps between the nuts and the flaws in the shell:
- Red sisal balls and small foam apples are the main decor.
- 2 large red apples on white petals are the accent and highlight of the “Berries on the Snow” topiary.
- Bouquets of stamens glued together.
- Artificial sugar berries.
- White foam berries.
- Plastic snowflakes.
We glue quickly: the foam decor melts from the hot silicone.


Pouring, decorating and filling the pot
Stage 7. Flowerpot decor. We glue plastic snowflakes, red rhinestones, miniature white half-beads - on each side of the pot, evenly.


Stage 8. Filling with plaster. We place pieces of foam plastic or sponge in the pot so that the plaster does not push the walls of the wooden box apart when it expands. Mix a thick solution of gypsum or alabaster with water (proportion 2:1), fill the pot to ¾ of the volume.
Before pouring, check the tightness of the wooden pot and seal the cracks with silicone. All the secrets for pouring plaster and other methods are in large review with photos and videos!


Last stage 9. Filling the pot. We paint the plaster surface white to set off the red sisal. Carefully gluing, we form a nest of sisal around the trunk. A large apple and a bunch of stamens complete the composition at the base of the New Year's topiary.


We treat the finished New Year's themed topiary with artificial white snow from a spray can.


