The sewing machine cannot yet completely replace hand stitches. Any clothing to be tried on is hand sewn. Also, you can’t do without a hand seam to sew on a button or hem the bottom of a coat or skirt, not to mention needlework and embroidery.
Hand stitches have different ways stitch formation, but unlike needlework, tailors most often have several types of hand stitches, and most often a running hand stitch is used, for example during the first fitting of a dress.
Hand stitches are mainly used for needlework and embroidery, sometimes for decorative decoration of clothes. Tailors use only a few types of hand stitches. Mainly for basting garment parts and manually hemming the edges of the product. Sometimes they are used to designate darts, folds, reliefs (snares).

Every seamstress should be able to do this hand stitch. With the help of such a seam, cut details, linings are swept away, folds, gathers, etc. are temporarily connected.
Choose needles for hand sewing that are short and thin; the threads should be elastic and not thick so that they can easily pass through the fabric without leaving marks from the needle puncture.
The length of hand running stitches can sometimes reach several centimeters, but as a rule does not exceed one centimeter.

Spacer hand stitch resembles a running stitch. It is used to apply relief lines, darts, and the middle of product parts. The interfacing seam is usually made on one layer of fabric. The stitch length is 1-3 cm, the distance between them is 0.5-0.7 cm.
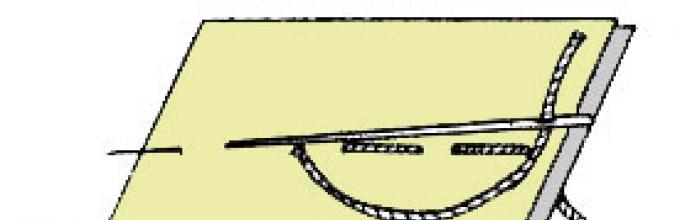
Snare or hand copy stitch

A snare or hand-traced stitch is used to accurately transfer lines of darts, pockets, reliefs, etc. for identical paired cut parts. For example, in order to determine the location of a dart on the front of a woman's blouse, it is enough to connect both shelves with a snare along the contour of the dart, and then cut this stitch between the fronts. The remaining pieces of contrasting thread color will indicate where to chalk the dart line.
It is carried out as follows: the parts of the product are folded together with the front side inward. Basting stitches are laid along the intended lines with a distance of 0.3 - 1 cm from each other. It differs from a simple running stitch in that the thread is not tightened, but loops are made 1 - 1.5 cm high, depending on the thickness of the fabric. After marking the entire outline, the parts of the product are moved apart and the loops of the thread are cut in the middle.
Currently, the copy hand stitch is almost never used, since there are other ways to transfer contour lines.
A round seam is used to finish the edges of parts

The round hand stitch can be used to finish the edge of a flounce, frill, hem of a knitted skirt, etc. If you have an overlocker that performs a rolled seam, then it is much more beautiful and easier to do such processing with an overlocker. The cut is bent towards the wrong side by 0.3 - 0.5 cm, 2 - 3 threads of fabric are picked up near the folded cut and 2 - 3 threads on the fold. It is not necessary to tighten the thread after each stitch; to speed up the work, you can do this after 30 - 45 stitches. The seam density is 3 stitches per 1 cm.
A hand-stitched seam resembles a machine stitch

Situations often occur when sewing machine cannot make a high-quality shirt, for example, when replacing a zipper in a leather jacket. In this case, a small area of the missing seam can be stitched using a hand stitch. There is no space between stitches. The needle is pierced from top to bottom. The injection is made at the exit point of the previous stitch.
Hand stitch "by the needle" (marking)

This hand stitch is done in the same way as the hand stitch, but leaves a little space between the stitches. The needle prick is made halfway between the entry and exit of the previous stitch.

The furrier's hand stitch is made with simple stitches across the edge from right to left with a small step between stitches. Stitch forward, stitch in place, in the same holes from the needle, and again stitch forward, stitch in place, etc.
Experienced furriers always repeat the stitch, that is, the needle always goes through the same hole twice. Stitch density (0.3-0.5cm) and stitch height (0.3-0.8cm) depend on the thickness of the leather fabric. The thicker the fur pelt, the higher the stitch, and vice versa.
Hand stitches are the basis of all sewing craft. Even with high-quality modern technology, you cannot do your work without hand stitches. Our master class will introduce you to a variety of hand stitches that will definitely come in handy when sewing clothes and various accessories. We will talk about the very basics of hand sewing and help you master ten hand stitches with your own hands.
Hand stitches: basic rules
How to sew hand stitches with your own hands? There are several basic rules that you should adhere to when sewing by hand.- Be sure to work on a level and flat surface.
- The hand sewing needle must match both the fabric and the threads.
- For more comfortable and faster work, use a thimble. It is placed on the middle finger of the hand with which you are holding the needle.
- As you work, control the tension of the thread: it should not be pulled too tight.
Getting Started: Node
We'll show you how to tie a knot at the end of a thread quickly and easily.
Hold the thread with your left hand. Loop the thread around the tip index finger right hand, and place it on the end of the thread. Put thumb on the crossed threads and, pulling a long thread, move your thumb to the end of your index finger, so that the threads twist around each other. Then drop the loop. Pinch the ring between your thumb and index (or middle) fingers. Pull the long end with your left hand and gently tighten the knot.
How to secure the thread at the end of the seam?
You can secure the thread in two ways: with a knot or tack. To create a knot, make a small stitch on the wrong side, on top of the last stitch. Slowly tighten the thread until a small loop remains.
Pass the needle through the loop and continue tightening until a second loop appears. Pass the corner into the second loop and pull the thread tightly, forming a knot. To make the tack, simply make a few small stitches using a backstitch. These stitches are placed one on top of the other and hold the layers of fabric together well.
Now let's learn more about how to make hand stitches with your own hands.
Back stitch
This stitch is one of the strongest hand stitches available. It is used for seams in hard-to-reach places and for securing stitches at the end and beginning. Bring the needle to the top side. Make a small stitch back (2-3 mm) and bring the needle up again, retreating the same 2-3 mm along the seam line.


On the wrong side the stitches will be twice as long as on the front side.

Back stitch with skips
This option is also used to secure the transition edge of the facing and hem.

Perform a regular backstitch, but pull the needle back half the stitch length. The needle still comes out the length of a whole stitch.

Loop stitch
Used for the manufacture of hand-processed parts: hanging thread loops and holes, thread loops, hook fasteners, belt loops. Also suitable for decorating felt or fleece parts. Sew the seam from left to right, positioning the fabric so that its cut is at the bottom.
Secure the stitch to the edge of the fabric with a loop or any other method convenient for you.
For each stitch, point the needle toward you. Stick the needle into the right side of the fabric and bring it over the thread at a distance of about 5-6mm from the edge and the same distance to the right. Do not pull the thread too tight.


Seam "Goat" ("Herringbone")
Use this stitch to join two layers of fabric with a slight degree of movement, for example to join a lining to a garment or to hem knitwear.
Sew the seam from left to right. Make a small horizontal stitch in the top layer, slightly away from the edge. Then, just beyond the edge of the top layer, sew another stitch on the bottom layer, diagonally to the right of the first stitch. Sew stitches without tightening the thread.


French setting
Use this bartack to attach the hem of the loose lining to the hem of the garment.
Sew 2-3 stitches, about 2.5-3cm long, between the garment and the lining.

On top of the long stitches, sew stitches in a buttonhole stitch, placing them as close to each other as possible. Completely cover the long stitches with loops.


Use this stitch for all types of hems.
Make an inconspicuous small stitch in the fabric of the project, and then bring the needle up diagonally across the edge of the hem. The distance between stitches is 5-6 mm.

Seam "over the edge" ("overlock")
Use this stitch to prevent fabric sections from fraying.
Insert the needle perpendicular to the cut of the fabric, making diagonal stitches across the edge. Try to keep the stitches the same size and at an equal distance from each other.

Once the stitch is finished, you can go back and stick the needle into the holes you have already made, thus creating “triangular” stitches.

This version of the “back needle” seam is used to finish sewing in zippers on fabrics such as velvet, corduroy or satin, in case the machine stitching looks unsightly.
Bring the needle up through all layers of fabric. Perform a back stitch, picking up 1-2 threads of fabric. Bring the needle to the surface, retreating 5-6 mm forward.


This stitch is a basic hand stitch used for cinching fabric, tucks, darning and non-stress seams.
Sew forward a few stitches, bringing the needle evenly in and out of the fabric before pulling the thread through.

The number of stitches depends on the thickness of the material. The length of the stitch and the distance between them depends on the location of the seam and can range from 3 mm to 3 cm.

Used for maximum discreet finishing of hems, linings, pockets, etc.
Pass the needle through the folded edge of the top fabric. Grab one thread of the bottom fabric and reinsert the needle into the fold of the top fabric.


To sew up a hole in a machine-stitched seam, sew a blind stitch, catching an equal number of threads in the top and bottom layers. Make a few stitches and then pull the seam section together.


This is the simplest straight seam. The line is drawn from right to left. The needle is always directed only forward along the line, hence the name of the seam.
The distance between stitches and the length of the stitches may vary, depending on the purpose of the seam. The ways to use this seam are very varied.
1.Running seam. It is used for basting, that is, for temporarily connecting parts in preparation for fitting. “White”, that is, finally, the parts are sewn down on a machine, along the line of the basting seam. After this, the basting stitch thread is removed. It comes out of the fabric easily if you pull it. The length of the stitches in case of basting can reach 3-5 cm.
2. Interlining seam. It is performed in the same way as basting, but only on one layer of fabric. It is used to apply lines and marks (darts, marking the middle of a part, etc.)
3. Copy seam (snares). This seam is used to transfer (copy) lines of symmetrical parts. It is performed as follows. Fold two parts and sweep them away. But unlike a regular running stitch, the stitches are made freely and are not tightened so that loops are formed. After the stitching is completed, the parts are moved apart and the thread is cut in the middle. A basting line remains on both parts, the threads of which can then be easily pulled out:

4. Assembly. To make the assembly, use this particular seam. They lay a line along the part, and then the part is assembled along this line. Then the ends of the thread are secured so that the assembly does not fall apart.
5. The “forward needle” seam can be used not only as a temporary one, but also as a decorative. You can embroider, for example, a napkin with this stitch. The peculiarity of the decorative stitch, in contrast to the “rough” stitch, is that such a seam requires even, identical stitches. Depending on the purpose and requirements for the type of pattern, the spacing between the stitches on the front side can be reduced to a minimum of 1-2 mm.

2. Seam “Back the needle”, or “Behind the needle”
This seam got its name because, after completing the next stitch, the needle returns back to the end of the penultimate stitch, and a new stitch leads from it under the place from which the thread was just pulled out. The next thread to the front part is made at a distance equal to double the length of the stitch.

This seam is otherwise called a "machine stitch" because it resembles machine stitching. And it is used in cases where you need to make a stitch of the same quality as on a machine, but it is impossible or difficult to do it with a machine. For example, when replacing a zipper with leather jacket. Another example: separated machine stitch at a short distance - a few centimeters. It takes too long to take out the machine and refuel it. It’s easier to grab it with a hand stitch. It will hold up no worse than a machine stitch, but you need to stitch it in a curly pattern so that it does not differ in appearance from a machine stitch, and tighten the stitches well so that the seam does not stretch in the future.
3. “Loophole” or overcast seam
The needle is inserted into the fabric at a stitch height distance and moved up to the edge. The first stitch is a simple stitch. Then a loop is made from the thread and a needle is inserted into it in the same way, from bottom to top. Bring it out in front of the loop and tighten it.

This seam is used in the following cases.
1. For sewing buttonholes.
2. For processing the edges of loose fabrics.
3. The buttonhole stitch is used as a finishing stitch when processing the edges of napkins, clothing, and felt products.
Depending on the purpose, the height and width of the stitches may vary. Typically, the density of a buttonhole seam is 2-3 stitches 4-6 mm long per 1 cm of fabric.

The buttonhole stitch can also be used for embroidery.

Embroidery is a creative process! Don't limit your imagination while practicing this ancient art. Retro and ethnic motifs are now in fashion.
Our six stitches will help you create embroidered designs, designs, monograms and more.
Tip: Before embroidering, use a disappearing marker to draw the lines of the embroidery design on the fabric.
Cross stitch
Bring the needle out of the fabric from the bottom right, insert the needle into the fabric at the top for the length of the cross stitch (= main stitch). At the same height at which the needle was inserted into the tissue, bring it out to the left. Continue in this manner until you have a full row of warp stitches.
Now stitch in reverse direction, making crosses (=covering stitches). Bring the needle out from the left at the same height and insert it from the right. The first cross is ready. Then withdraw the needle from the bottom left and enter from the right...

In our example, you got an oblique row of cross stitches. But using the same pattern, you can embroider rows of cross stitches in a straight line. This principle allows you to work rhythmically and is wonderfully relaxing...

Spinal suture
For this row of stitches, bring the needle from the back to the face, then diagonally to the right and up, from the face to the back. Pull the needle down.Important: the thread must be under the needle.

Re-insert the needle diagonally to the right of the last pin. The needle passes over the thread. Repeat the above steps. Secure the last loop of the row with a stitch on the wrong side.

This creates a beautiful border.
This seam can be used to overcast edges, secure appliqués, or sew open edges. If the stitches are laid very tightly, you will get a loop seam.

Chain stitch
Bring the thread from the wrong side to the face, lay it in a loop and secure with one finger. Insert the needle into the place from where it was removed and withdraw it in the middle of the loop. When withdrawing the needle, the thread should be under the needle.
Repeat the stitch described in the previous illustration, inserting the needle inside the first loop. Don't pull the thread too tight. The loops must be the same length.

At the end of the row, bring the needle inside the last loop, then secure the thread. To do this, immediately under the last loop, reinsert the needle into the fabric and pull out the thread.
This is a great stitch for making spirals, monograms, ornaments and borders.

Herringbone seam
Bring the needle from the left to the face first, then make a long diagonal stitch up to the right. Now cross this stitch with a short diagonal stitch in the opposite direction. Bring the needle out exactly at the first point of exit.
Repeat the operations as described under the previous photo. The second row of stitches is worked downwards, tightly adjacent to the first row on the right. Embroider this second row in a mirror image in relation to the first.

The embroidery pattern creates a sophisticated ribbed effect that is ideal for filling out the interior portions of motifs.
Tip: Experiment with different embroidery colors.
Seam "forward needle"
This is a very popular stitch that looks the same from the front to the back.The first row is performed from right to left. To do this, bring the needle out and insert it into the fabric from the left, then out again from the left... It is very important to ensure that the stitches are the same length.

At the end of the row, step back and fill in the empty spaces between stitches. When inserting and withdrawing the needle from the fabric, hold the needle diagonally as shown in the photo and pull it through the fabric.

A double needle-forward stitch (also called a basting or darning stitch) creates a clear outline. With this seam you can “draw” a clear line. It is suitable for quilting or for making various linear patterns and ornaments, the inner areas of which can be filled with flat satin stitch (see below).

Flat stitch (in one or more rows)
Flat stitching can be done without “framing” with a contour seam. But thanks to the contour, flat stitch embroidery becomes more flexible.The areas are filled with straight stitches, performed diagonally from top to bottom. The stitches are placed so tightly together that the fabric does not show through.

Instructions
Learn how to make the simplest, most universal stitch, the “forward needle” stitch. Make a knot at the end of the thread, insert the needle into the fabric and pull it out to the right side of the fabric. Perform the first stitch, moving from right to left: bring the needle to the wrong side of the fabric, then back to the front side. The most important thing when making a seam like this is to make all the stitches the same size in a completely straight line.
Try creating an interesting decorative stitch using simple straight stitches. Carry out a neat stitch according to the pattern of step No. 1. After this, pass the thread through all the stitches on the right side of the fabric, without catching the fabric itself with the needle. You will get a beautiful wavy stitch. To achieve more interesting effects, you can use contrasting threads. Another decorative option: make two “forward needle” seams parallel to each other, then pass the threads under the stitches in a mirror manner.
Practice making a blind seam. You can carefully connect two pieces of linen with ironed seam allowances like this: make a knot in the thread and bring the needle to the face of the product exactly in the seam allowance line. After this, pull the thread and needle into the opposite allowance and carefully tighten the stitch to no more than 2-3 mm in length. Complete the entire seam in this manner.
Hem the bottom of the fabric. Fold and iron the edge of the fabric, then from the wrong side of the product, take the first step of the “needle forward” seam. Grab a thread or two of fabric and carefully tighten the blind stitch. Sew the seam in a straight line close to the edge of the hem and be careful that the stitching is not visible from the outside of the product. It is very important to use thread that exactly matches the fabric and not to tighten the stitches too much.
Hand-sew the cut edge of the fabric to prevent the material from fraying. The simplest overcast stitches are made oblique and placed at the same, close distance to one another. Step back 3-5 mm from the edge of the fabric, secure the thread with a knot and make an oblique stitch that goes around the cut of the fabric. The thread should carefully wrap around the edge without pulling it. Sew the woven edge all the way from right to left, then (without turning the work) sew bias stitches in the opposite direction. The result was a cross stitch.
Always fasten the thread very securely at the end of each seam, otherwise the stitching will unravel. At the end of the work, pull the thread to the wrong side of the fabric and make a couple of small stitches, carefully grabbing the fabric from behind. Form a thread loop, insert a needle into it, grab the fabric again and tighten the knot.


