Today, the cosmetology industry boasts a huge number of different types of manicure. However, when a fashionable lady chooses a stylish design for her nails that will match her look, the first thing that comes to her mind is an ombre manicure, which is an extremely popular technique for painting not only nails, but also hair. Those who like to use their imagination and turn ideas into reality know exactly about this technique; it provides the opportunity to play with shades and colors, allowing fashionistas to discover new facets of spectacular design and create a luxurious and unique manicure in their own way.
Ombre is often called a gradient or degrade; this implies a soft, smooth transition from one varnish color to another without a clear and distinct boundary. It looks impressive and simply magnificent both on nails cut at the root and on nails extended up to ten millimeters.

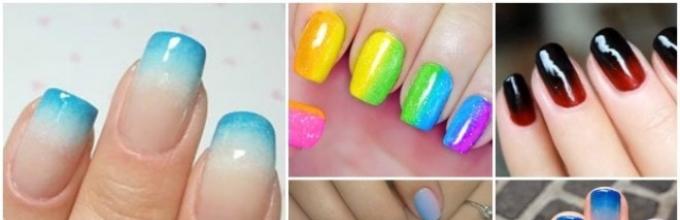
Photo of ombre manicure nail design
Advantages

 Flaws
Flaws
- high cost of high-quality cosmetic products;
- You can’t do a manicure on a nail surface that has a weak and thin structure;
- requires certain skills and abilities to create a truly chic manicure.
To ensure that your efforts are not wasted, before you start creating an ombre manicure, take care to thoroughly clean the nail surface to perfect condition. It is also necessary to take a responsible approach to choosing the shape of your nails and carefully removing cuticles and hangnails in order to get an impeccable ombre manicure that will not go unnoticed by the people around you. If you don't take these tips seriously, your ombre look will look messy and untidy.
Rules and secrets of color combinations

Fashionable ombre manicure ideas
According to ombre options
Smooth ombre
Only one color is used to create a smooth ombre. A soft smooth transition is created from a light shade at the base to a dark shade at the tip of the nail or vice versa.

Photo of pink ombre on nails
Contrasting shimmers
Contrasting shimmers are used for various colors that move from one shade to another and do not have any clear and distinct boundaries. To create such a manicure, you can use your imagination and experiment with several contrasting shades.

Photo of contrasting ombre on nails
Gradient
An easy way to create a gradient on your nails: you need to use different shades of the same color spectrum, making a transition within one nail, repeating the design on each finger. A more complicated option: use three to six different colors so that the color flow starts from the thumb, and the end result is visible on the little finger.

Using ombre technique
Vertical ombre
Vertical ombre looks great using any number of colors. This coloring technique implies smooth change of colors from the left edge of the nail to the right, which allows you to create amazing overflows. This coloring technique is suitable for those who want to visually correct the shape of the nail plate - it visually lengthens and narrows the nails.

Horizontal ombre
Horizontal ombre is a traditional classic ombre for stylish ladies. This coloring technique involves changing colors from the base of the nail to its edge. With smooth transition color shades. Various variations are allowed here: ombre can be done only on several fingers or only on one, and the remaining nails can be covered with a shade of one of the ombre colors; it is also possible to change the order of the color transition on some fingers. Pay attention to what visually shortens the nails and makes them wider.

Diagonal ombre
This coloring technique is suitable for lovers of unusual design and connoisseurs of creativity. This method of painting has more than five color shades and is located diagonally across the entire nail area.

Photo of diagonal ombre
By ombre decor
Ombre with glitter or sparkles
Stylists recommend perform ombre on a dark base so that the contrast with shiny particles is more expressive and bright. This design does not require any special skills and is suitable even for the greenest beginners - glitter is applied to the upper third of the nail with a brush or a single stroke. – an unforgettable option for an important event or any celebration.

Ombre photo with glitter
Ombre with rhinestones
An ombre manicure will only benefit from decorating it with rhinestones and will make you shine among your friends. However do not overdo it with the number and size of rhinestones– a manicure can look quite vulgar. The ombre manicure itself is self-sufficient and very beautiful, so decorate it with rhinestones sparingly and appropriately. Remember that for short nails you need to use only small-sized rhinestones and in very limited quantities; owners of long nails can experiment a lot.

Photo of ombre manicure with rhinestones
Ombre with a pattern
Before applying a drawing, you need to think it through carefully. When choosing such a decor, you need to make sure that the color of the design is harmoniously combined with the main shades of the design. Stylists recommend apply designs with white, black or silver colors. This manicure allows you to create your own individual design that will look original, stylish and bright. The drawing itself is applied to the finished ombre, and if you do not have enough skills to draw it yourself, you can use stickers, stencils, and so on.

Photo of ombre manicure with a pattern
Ombre sand
Once again, nail art masters surprised us with a unique novelty - “velvet” sand. Similar decor will allow you to get visual fluffiness on your nails. You will also have the opportunity to create an amazing, incredibly rich design that will in no way leave anyone indifferent, and you are guaranteed to make new acquaintances.

Photo of ombre sand manicure
How to do ombre nails

French ombre manicure at home
The most popular version of the French ombre is performed on nails in classic colors: pink or beige pastel shades combined with white. If you are doing a similar manicure for a special occasion, you can additionally decorate it with sparkles and rhinestones, while maintaining a sense of proportion. I also recommend using gel polish, which, thanks to its unique strength, will allow you to preserve the freshness and original beauty of your manicure for up to three or even five weeks. In addition, transparent gel polish is very good at the final stage as a fixative. And last but not least, Any decorations and decorative elements stick firmly and permanently to the gel polish.
Photo of homemade French ombre manicure in white and pink tones
Ombre manicure on video
Ombre manicure can be done using regular polishes and gel polishes. Moreover, gel polishes mix very well with each other, thanks to this you can mix the selected colors in advance and apply a material with an intermediate shade to the nail plates.
If you use regular varnishes, be sure to keep in mind that not all of them mix and match color shades well. Before applying them to the nail plate be sure to check whether the pigments of the varnishes are flaking. For those who like to perceive information visually, I offer my own selection of videos, from which at one time I studied various methods of creating an ombre manicure.
Video for beginners
Ombre with regular varnish using a foam sponge:
Ten tips for creating ombre:
Video master class for experienced people
Six ways to create ombre:
Ombre - fast and affordable:
What does ombre go with?

If you want to learn how to do an ombre manicure yourself, then read the article. Here you will learn all the subtleties and secrets.
Many people have already heard the word Ombre more than once. The first thought that comes to mind when pronouncing it is to dye your hair in different colors. But further we will talk not about hair, but about nails. You will learn how to make a stylish gradient (as it is also called differently) design on nail plates yourself at home.
How to make ombre nails at home: technique
The gradient looks perfect on both long and short nails. This manicure is suitable for both young beauties and older ladies. Transitions from one shade of varnish to another can be created with sharp or smooth boundaries.
To make an ombre yourself you will need to have:
- Two varnishes of different tones (at least)
- Regular set of manicure tools
- Warp
- Palette for mixing varnishes
- Toothpick
- Fixing coating
- Sponge


How to make a gradient on your nails?
- Do it first preparatory procedures. Remove cuticles, polish, degrease nails
- Cover each nail with base coat.
- Drop a little bit of one or two varnish onto the palette.
- Using a toothpick, carefully connect the edges
- Then dip the sponge
- Make imprints on the nail plates
- Remove all excess around the nails with a cotton swab dipped in a liquid that dissolves the nail polish.
- When your nails are dry, apply a fixative.


IMPORTANT: You don’t have to mix the tones in the palette; many masters apply strips of varnish to the foam rubber with a brush, then transfer them to the nails.

How to do ombre on nails with gel polish or shellac step by step?
You will get an original nail design if you use shellac or gel polish for the ombre technique. In addition, this manicure, thanks to the quality of these varnishes, will adhere well to the plates of your nails.
But you will need special equipment, without which it will be impossible to do a manicure. More precisely, varnishes will not dry without an ultraviolet lamp.

Tools and materials for ombre manicure with gel polishes, shellac:
- Manicure care set
- Thin cotton swabs, nail polish remover
- Varnishes of various tones, base varnish, fixing coating
- UV lamp for fixing the coating on nails
- Liquid for degreasing nails
- Colorless varnish base
- Toothpick, thick sponge

 Manicure, pedicure - ombre gel polishes
 Step by step instructions:
- Sand the nail plates with a buff, process the cuticles, straighten the nails with a nail file so that they are the same length
- Degrease your nails, apply base, let dry thoroughly
- Cure in a UV lamp for twenty seconds
- Apply a light tone of varnish at the base.
- Then paint the other half with dark gel polish.
- Use a brush to smooth out the edges, just be careful
- Dry your nails in an ultraviolet lamp (approximate drying time is 2.5-3 minutes)
- Secure the varnish with a special protective coating. And dry your nail plates in a lamp


IMPORTANT: Ombre nails with shellac should be done in the same sequence as with gel polish. Also, do not apply too thick layers of shellac on your nails, otherwise, when drying with a UV lamp, the entire manicure will be ruined. At the end, be sure to remove the sticky top layer of shellac with a special solution.
Types of ombre on nails
Now there are many gradient techniques on nails. Thanks to the imagination of stylists, you can choose a manicure that suits evening dress, and under jeans or summer dress. Let's look at the most common types of gradient manicure.


Types of ombre on nails:
- Classic ombre— to create it, two tones of varnish are most often used. Moreover, a light-colored varnish is placed at the base of the nail plate, and a dark one at the tips.
- Ombre Beverly Hills— for such a manicure, you need to prepare several shades of varnish at once, since the transition from one tone to another will take place not on one nail plate, but on all of them. For example, from light pink on the little finger to cherry on the big
- French ombre manicure- making this gradient is not easy, but after training you will succeed. The essence of this design is that the tips of the nails are coated with a light varnish, which then smoothly turns into a dark tone.
- Bright Skittles- for this manicure, bright varnishes are used and placed randomly on all nails
- Ombre with painting- this technique is suitable for manicure under an evening dress. Painting on nails with a gradient is best done in gold, silver, or black.


Device for ombre nails
An airbrush is often used for ombre nail designs that smoothly transition from one shade of polish to another. This device works like a sprayer. Only liquid varnish can be poured into this device; paint with a thick consistency will not work.
 Airbrush - a device for creating a stylish manicure design for nails
 IMPORTANT: After use, the airbrush must be thoroughly rinsed with a liquid that will remove any remaining varnish.
Ombre nail polish
To get the perfect ombre manicure, you can use various varnishes, including: gel, shellac, etc. We mentioned this above, and we also discussed how to do this nail design earlier.
The main thing is that the shades of varnishes are beautifully selected, and your hand does not tremble. Below, see examples of ombre manicures in different colors.

 Chic ombre manicure long nails in blue and white colors
 IMPORTANT: Many artists use tint to create ombre. This nail coating is easy to apply simply with a brush. The result is an excellent manicure using the gradient technique. When one layer of varnish is applied to another, a smooth transition of colors is obtained.
Red ombre on nails, photo
Red color is always relevant. And this season, a gradient on the nail plates will come in handy for any outfit.


The technique looks good - a gradient in a combination of red and cherry gel polish.


Pink ombre on nails, photo


Black ombre on nails, photo
A manicure in black colors will look gloomy, but if you dilute the black with some other color, the look will be amazing.


French ombre on nails, photo
French gradient is a combined technique for creating nail designs. Many ladies choose it for a manicure, because with this design their nails look well-groomed. They go under suits business style and other outfits.


Beige ombre on nails, photo
If you use shades of beige to create an ombre, the manicure will turn out natural. This tone will suit any outfit, because it best matches natural color nails

 Beautiful beige combined manicure - French ombre
 Delicate ombre on nails, photo
For a subtle gradient, you need to choose the right shades of varnish. Sharp transitions from one varnish color to another are undesirable.


White ombre on nails, photo
A white gradient is perfect for a wedding celebration. Usually this manicure combines other nail design techniques.

 White gradient with sparkles and rhinestones
 Ombre for short nails
If the base of the nail plate is painted with a light varnish and brighter or darker at the top, the nails will visually look longer.


 Pink manicure - ombre for square, short nails

Ombre for long nails
Ombre looks no less attractive on long nails of various shapes.


 Ombre (gradient) black and white
 Ombre pigments on nails
Pigments are widely used to create a gradient on nails. It is these paints that are convenient for doing manicures, because when applying one layer to another, a mixture of tones occurs.
Ombre pigments can be done simply with a brush. This nail design will only take an experienced nail artist 8-9 minutes of time.

Stretching during a gradient manicure with pigments is done in the following order:
- Apply base coat under gel polish
- Paint your nails with your chosen gel polish tones. Cure each layer in a UV lamp
- Prepare a thick brush and apply pigment to it. Blend it starting from the cuticle and ending in the middle of the nail plate
- Then also shade the second part of the nail with a different pigment.
- Shake off any remaining pigment particles
- Then dry in an ultraviolet lamp (for 35-60 seconds)
- Cover the pigment coating with a transparent topcoat, don’t worry - the pigment will no longer stick to the brush
- Dry the top in a UV lamp
- Remove any remaining sticky layer from the topcoat. And make your manicure neat - remove the ombre liquid around the nails

 Ombre. Stretching with bright pigments
 Vertical ombre on nails
A vertical gradient divides the nail plate into two or three tones. Thanks to this, your nails will play with different shades. In addition, this nail design can be done in all the colors of the rainbow.
The procedure for applying the coating is the same as for horizontal ombre, the only thing is that you need to print the varnishes from the foam rubber across, and not along, the nail plates.
 Rainbow, vertical manicure. Ombre
 Ombre glitter on nails
A manicure with glitter on nails done by an ombre technician will look very festive. Glitter varnish can be combined with both regular varnish and glitter varnish, but of a different tone.
 Gorgeous gradient. Manicure with glitter on short, square nails

 Ombre. Regular glitter stretch
 Video: gradient manicure
The ombre technique has been in fashion for quite a long time, and therefore it is only just arriving among the trend’s followers. This is a very original design method, popular in creating clothes, hair coloring, manicure and even interior decoration. Ombre gel polish is mainly done by girls who are active and fashion-conscious, and the colors chosen for a manicure can say a lot about the person himself, his tastes and preferences. by stages? Is it possible to do something like this? Let's try to figure it out.
What is ombre?
The term itself comes from the French language. Translated, it means “darkened” or “having a shadow.” This season, ombre nails with gel polish is the most popular trend. Externally, this method is a combination of several similar shades in one palette on one nail. The combination should be harmonious, and the transition of colors should be smooth. Otherwise, ombre gel polish can be called a gradient and can be made both horizontal and vertical. Achieving such an effect is not as easy as it might seem. Exists special equipment coating application. And everyone should learn this technique. fashionable girl, since ombre looks great on nails of any length.
There are three types of manicure using the ombre technique. In the first case, a transition is made from dark color to a light tone. In the second, the transition on the nail plate goes to a more contrasting shade. Finally, the third type involves a transition on the nails of the entire hand. In this case, each nail is painted in the colors of the same palette, but with a bias towards a more radical shade.

Color variations and combination possibilities
A contrasting combination of shades, when properly designed, gives an original and bright design. For example, we can recall the spectacular duet of red and blue or purple and yellow. In one version of the manicure, contrasting shades can be combined to create a blurred or gradual transition.
Ombre gel polish within the same color palette looks quite elegant and can complement the image of a successful business woman. This combination is close to the classic one, which is a transition from light blue to dark blue. In principle, a maximum of five different shades can be used in a manicure, but the most popular is a three-color gradient.
Masters in salons often recommend combining ombre gel polish with other popular techniques, such as French. Additionally, you can decorate with plain rhinestones. To preserve the brightness and freshness of a manicure for a long time, gel polish is just good.

The highlight of gel coatings
Ombre gel polish is not only a beautiful result, but also a long-lasting job. But achieved effect it's worth the effort, and the manicure will last three weeks or longer without any visible changes. Applying a gel coating involves a long manicure, and therefore, immediately before the procedure, it is better to try to achieve the desired result with regular varnish. But nothing is impossible, and this manicure technique is quite possible to master at home. Before work you need to prepare everything necessary tools for manicure. In particular, you will need varnishes of various shades, a transparent base for manicure, a fixative, a porous sponge or brush. To correct blemishes you will need nail polish remover, fat cream for cuticles and cotton pads.

From simple
You need to start an ombre gel polish manicure with the classics in order to work out a smooth tonal transition within the same color scheme. And the best possible result is impossible without proper preparation of the nail plate.
- So, lubricate your cuticles with a protective, rich cream to limit the risk of nail polish getting into your cuticles. If the cream gets on the nail plate, the varnish will lie unevenly and the overall result will be far from ideal.
- Apply basic foundation on the nails. If there is no perfect evenness, then it is better to take a leveling base. If there are no problems, ordinary colorless varnish will do. But the latter must be applied in two layers and allowed to dry thoroughly.
- It's time to apply the base color. Apply the varnish in two layers and let dry.
- Using a porous sponge, apply dark polish to the edge of the nail. There is no need to press, otherwise the varnish will be absorbed into the sponge.
- Now it’s the turn of the fixer, which smoothes the surface of the nail and makes the result presentable. For best effect apply several layers.
- Admire the gradient on your nails!
To the complex
Having mastered the basic method, we will improve the ombre with gel polish. The master class begins with manicure and shaping of nails. To protect the cuticle from varnish, you need to apply cream. Today, a manicure technique using special foil is often found, which can be purchased in cosmetics stores or manicure departments. This type of design is gaining popularity, and therefore many manufacturers produce special varnishes. On nails, this coating reacts to heat and changes color.
Again, this coating is possible with both regular and gel bases. We have already looked at ombre with regular polish, and now it’s time for a manicure master class on gel coating. To do this, you need to prepare a manicure set, a buff, an ultraviolet lamp, a piece of foil, a porous sponge or a thin nylon brush. To degrease nails, you need a dehydrator, and for manicure itself you will need a base, a final coat, several colored gel polishes and a solvent. From additional accessories may be needed cotton swabs, napkins for wiping brushes, toothpick and rich cream.

Tricks of the process
If you make an ombre on your nails with gel polish, then it is more rational to leave the base of the nail colorless. In this case, the manicure will last longer, since the growing part of the plate will not stand out much. You need to use the solvent with care, as removing the varnish can damage the design. But at the same time, the excess must be eliminated completely, otherwise when drying it will pull all the varnish along with it.
Before applying varnish, use a buffer to sand the surface. Afterwards, treat your nails with a dehydrator. Apply the base for gel polish in several layers and leave to dry under an ultraviolet lamp.
Ombre with foil is more suitable for beginners, as it does not require any special skill. Paint your nails with a light tone and dry well. Apply two gel polishes to a piece of foil and use a toothpick to mark their boundaries. Use a sponge to blot the polish and apply it to your nails. To blur the color, move the sponge over the nail. Remove excess polish from the skin with a cotton swab. Apply the finish and dry your nails.
Ombre with a thin brush involves applying polish to the middle of the nail with shading at the bottom border. To ensure a smooth transition, the brush needs to be wiped with a napkin more often.
Contraindications when applying gel polish
To the great joy of all devoted fans of long-term manicure, gel polish can be used by everyone, since it is harmless and does not contain toxins. In addition, gel polish performs a protective function and protects nails from brittleness and delamination. But you shouldn’t mask the fungus with a gel, as the effect will be disastrous. Therefore, before you apply ombre gel polish, make sure that your nails are healthy, have a decent length and do not break from the slightest load. To do this, you need not only to look after the external condition of your nails, but also take a course of vitamins and monitor the amount of calcium in your diet.

Gel Coat Ideas
White is good for the first time gradient manicure, which, by the way, is called a close relative of French. The very elegant result is explained by the gentle transitions of white, cream and pink. In addition, white sets off a tan. Black is very dramatic and will definitely draw attention to the hands of its owner. The same effect is observed with red ombre gel polish. Step by step with a photo, such a manicure seems simple and even everyday, but a woman who is confident and moderately daring will choose a red ombre. She will not allow herself sloppiness and minor defects. Her image in general and her manicure in particular are an object of imitation. The length of the nails is not a decisive factor, and ombre looks just as impressive on short nails.
So, if you are interested in the question of how to do an ombre manicure, then you are a bright and courageous person who is ready to keep up with the times. Although if you choose neutral colors, this design can even be worn to the office.
Ombre at home
Ombre manicure has been the most popular trend for the last few seasons. This style is used when creating makeup, clothing, and even hair coloring. As usual, before creating any design, you should prepare your nails. That is, at least give them shape and degrease them.


We will need:
- White - matte varnish(NYC- Matte Me Crazy for base layer);
- 4 shades of purple (from light to dark, in the proposed version we used: Essie- Nice is Nice, China Glaze- Spontaneous, China Glaze- Coconut Kiss and OPI- Siberian Nights);
- sponge or regular sponge;
- water in a bowl.
- nail polish remover.
- the most ordinary cotton swabs.
- Step-by-step photo and video instructions.

Step 1: Cover your nails with white or light beige polish in a couple of layers, which will act as a base polish. Wait until completely dry.
Step 2: Wet the sponge with water and squeeze out. Now draw lines on the sponge with each color of polish, from light to dark.
Step 3: Using a gentle patting motion, transfer the gradient from the sponge to the nail. You need to make sure that the lightest tone is located near the cuticle, and the darkest at the tip of the nail plate. We do this technique on all nails. By the time you've finished with the last finger, the first one should be dry. And we start all over again. Thus, in the proposed version, three layers were applied using a sponge. How many layers you apply depends only on your own preferences, but in my opinion, the more layers, the deeper and richer the amber design turns out.
Step 4: Use nail polish remover and cotton swabs to clean the skin around your nails.
Step 5: It's time to seal the Ombre manicure with a clear, matte or glossy finish, including glitter.
In order not to stain the finger rolls around the nail, you can use PVA glue or a face mask, which, when dried, forms a film. This solution, although unusual, is effective.
Look detailed videos instructions so you can do it yourself beautiful manicure.
See step-by-step photos of gradient design:

Ombre manicure with gel polish, shellac
Ungroomed nails immediately catch your eye. But what should those who cannot devote enough time and money to go to nail salon? There is a solution! You just need to learn how to do an ombre manicure at home, that is, by yourself, and modern gel polishes will provide a durable coating that will last up to two weeks.
Ombre gel polish or shellac is not difficult to implement, as it might seem at first glance. All you need is to stock up on the necessary materials and time. If you do everything correctly, then you won’t have to renew your manicure for two weeks. We recommend starting with a two-tone ombre. Video materials and step-by-step photos are included.
Accessories for ombre gel polish:
- BAF – for giving shape to nails and removing glossy shine from its surface.
- UV or LED lamp.
- Wet sponge for transferring ombre onto the nail.
- Soft brush to adjust the gradient.
- Liquid for degreasing.
- In the case of gel polish, a primer (acid-free) is required, and if you use shellac, then this item can be excluded.
- Base and topcoat.
- 2 colored gel polishes and a palette (foil).
- Special wipes or special liquid to remove the sticky layer.
The technique for creating ombre nails with shellac differs only at the stage of forming the gradient. All other steps are the same as in the classic version of manicure with shellac, gelish, bleusky and others. For your convenience, we suggest you first watch the video material from step by step instructions ombre design at home with gel polish.
1. First, prepare the nail surface. We correct the shape, polish, get rid of the cuticle, degrease, apply primer, base and dry in a lamp (UV - 1 minute / LED 10 seconds).
2. Apply a lighter tone, polarize under a lamp (UV - 2 minutes / LED 20 seconds).
3. Now you need to create a palette of two or more shades, from which the gradient will be created. Mix several shades on foil or a special palette for mixing paints using a brush.
How to get three shades from two:
- red plus just a little black or blue;
- equal shares of red and black (blue);
- a little red and a big drop of black (blue).
First way:
Use a brush to transfer all the colors onto the nail plate. Follow the sequence from light to dark. Most light shade will be at the top, and darker at the tip of the nail. The strips should run evenly one after another.
- Don't forget to wipe your brush with a napkin after each strip.
- Finally, blend the borders between the gradient joints of the stripes.
- Dry under the lamp.
- Apply topcoat.
- Remove the sticky layer.

Second way:
If there are only two colors, then you can immediately apply two color stripes to a damp sponge. And then transfer it to the nail. On which the base and the first color layer are pre-applied. But keep in mind that this manicure technique can lead to bubbles on the coating, so it’s still better to apply ombre gel polish using a brush.
Ombre shellac: video series
Watch the video with instructions on how to create a vertical ombre with shellac. Where presented interesting technique applying a gradient manicure.
With the help of the following video lesson you will learn how to do an ombre manicure at home. The technology is quite simple. After the first layer, two shades of glitter are applied, lighter at the base, darker at the tip, and all this is secured with a finishing layer.
Pay attention to the photo review of gradient gel polishes. As you can see, there are several options for implementing such a stylish design:
1. Gradient on the surface of one nail.
2. Different shades on each finger, smoothly transitioning from light to dark.

To do an Ombre manicure in pink color with glitter you will need three colors of polish.
Namely white matte, pink, raspberry and setting transparent with sparkles.

From the proposed step by step photo it is clear that all the steps will be the same as in the first option, but this time instead of a matte colorless fixative, a transparent one is also used, but glossy and with sparkles.
For those who do not want to burden themselves with studying instructions, we suggest watching the master class in video format.
Winter Ombre manicure


We suggest exploring a photo review on how to make winter manicure ombre You can safely go with it to any semi-formal event or party.
- In this case, a different color of varnish is applied to each nail.
- Index and thumb We paint them in the same tone.
- We wait for it to dry completely and move on to the shimmering glitter.
- Apply it to the sponge and then transfer it to each nail plate from the middle to the tip.
- Don’t forget about the top sealing coating and remove blemishes using liquid or acetone.


A beautiful manicure always distinguishes the well-groomed half of humanity, and if there is also an ombre or gradient on the nails, then stylish woman with a twist. It is not without reason that this design has been popular for many years; it is always beautiful, original, fresh and appropriate in any image.
Gel polish gave the coating amazing durability and the ability to use additional decorations. What else is needed for flawless hands? Perhaps you just need to understand the nuances and technique of applying it yourself.
Which name is correct
Both gradient and ombre inherently mean a transition from one color to another.
Bright style
Depending on how the change of tones is carried out, there are several variations of the fashion trend:
- on each nail there is a smooth flow of saturation or different shades, which is more correctly called ombre;
- a similar use of several tones, but with a clear boundary between them, which fits the definition of a gradient;
- painting each plate with a separate color, but the whole hand becomes a reflection of a specific range. The technique is also an example of a gradient.
Sometimes the term dip dye is used to define this manicure (translated as “dip in paint”). Strictly speaking, this is a type of ombre using bright contrasting colors (red, blue, emerald). The technique is applicable to both makeup and hair, as well as nails.
Be that as it may, due to the use of different color schemes, the manicure acquires an individual signature, can be modified to suit any style, but at the same time does not burden itself with age or style restrictions. And a young girl in a club, and business woman in the office he can find his secret to perfect hands.

In a juicy style
A review of Nivea face creams is presented. To properly deal with dandruff, read.

In gray tones
Provides deep nutrition and restoration to the skin. Find out why fingernails break and peel.
Features of creation
Since the gradient involves clear transitions between tones, the technique of its implementation is not particularly remarkable. Ombre is another matter, where the whole point is a soft, leisurely glide from one gel polish to another. This type of manicure has gained considerable attention from nail art masters, despite the fact that the execution technique has its own subtleties.
By 2017, several fashionable color trends had emerged: nude paints and shimmers of the same range are still relevant, but you can also try the contrast of pastels and some rich tone. But mixing cold and warm shades is not recommended.
It will tell you what to do when your lips are chapped.

Sponge technique (photo)
Before you start professional coloring, study their properties. Find out how long eyebrow dyeing with henna lasts.

Pink haze
In the case of a gradient, you can combine white and colored polish together, changing the saturation of the composition from nail to nail. Similar experiments are also suitable for ombre, but it is better to use different bottles, using from 2 to 5 options. For beginners, it is better not to use combinations of colors and varnishes from different manufacturers. Otherwise, misunderstanding may arise, and detachments may occur.
It is best to place light or transparent colors at the base of the platinum; this will visually increase the length, and the regrowth process will not be noticeable. The maximum number of colors is due only to the fact that more shades simply will not fit on the surface.
The variety of rainbow coatings is achieved not only by numerous combinations of tones, but also by stencils, rhinestones, sparkles - all technologies are combined with a hybrid of gel and varnish and give excellent results. And once this technique is mastered, you can try to make whole ones.
Having decided on the design, you can begin practical preparation for the process. Nothing supernatural is required compared to a regular manicure performed with shellac, list necessary materials will only be extended by a couple of points:
In fact, Shellac is the name of a specific product from SND, the world's first gel polish, which appeared in the early 2000s.

Classical
Ollin will help you evaluate the richness of the hair dye palette. It's easy to update your look with the help of

With a sponge option No. 2
Today this name has become a household name, as it once happened with Pampers and Xerox.
- Dehydrator, primer, base, top, clinser for different layers of coating.
- UV lamp that dries varnish.
- A collection of selected shellac shades.
- Manicure set for preparing nails (this item depends solely on the individual preferences of the master).
- A stencil, tape, liquid tape, very thick cream - anything that can protect the skin from getting varnish.
- Foil, toothpick and lint-free wipes as aids.
- Creating differences in colors is possible using a thin brush or sponge (which can easily be replaced with an eyeshadow sponge). The first method is gentle and affects the skin next to the plate much less, but the second is a little easier for a novice specialist to master.
TO classical way When creating a manicure with gel polish, you can add another layer - white. It is applied to the base in order to shade and brighten colored motifs.
When all the necessary components are prepared, you can proceed directly to the procedure. We will look at how to do an original manicure at home with the help of a detailed guide.

Summer motives

Holiday option
Memo to masters
To reduce the potential number of difficulties to a minimum, we present you with instructions on how to create an ombre design step by step:
- Before you start coloring, you need to prepare your hands: push back or trim the cuticle, give the plates the desired shape and treat the surface with a buffer, providing a protective film to the skin.
- A primer and/or dehydrator is applied to prepared nails to degrease and disinfect. The compositions must air dry.
- The next step is the base layer, which needs to be processed in a UV lamp.
- It is now that the creation of ombre begins, where, depending on the chosen method, three scenarios are possible:
- The first method is with a brush. The initial shade of varnish is applied to the upper half of the nail with a brush, then, leaving a gap of a millimeter, the lower part is covered with the second tone. Using short movements with a brush, stretch one composition towards the other, leaving the excess on a napkin.
- The second method is with a brush. The lightest tone is applied first to the entire plate. Next, the second varnish is distributed over the lower half, and the border is carefully shaded with a brush.
- Using a sponge. Selected shades are applied in strips to pre-prepared foil so that the total width reaches the length of the nail. The borders of the paints are lightly shaded with a toothpick. Now a piece of sponge or sponge is dipped in varnish and printed on the plate so that there are no unpainted areas left. Excess is carefully removed from the skin ridges.
- The colored layer also needs to be dried in a lamp; to achieve brightness, you can repeat the stage. It would be worth noting that the proposed options can be easily transformed to accommodate a different number of transitions and gradient direction.
- We paint the surface with a final top coat, which will create a glossy shine and hide possible roughness and streaks from the tools used, and dry it again. Use a napkin with a cleanser to remove the sticky layer. Manicure is ready!
Since several bottles of varnish are used to create shimmer, it is better to purchase the same brand. Products from different brands may have different textures, and it will be difficult to create a smooth transition between them. If you want an even more unusual manicure, you can try it.
And for professional masters it will be useful to watch a video tutorial on ombre nails with gel polish from KrasotkaPro. The video shows a technique that makes a manicure neat and elegant:
Creating beautiful shimmer on your hands is possible not only in the salon with the participation of an experienced craftsman. The shellac manicure technique is quite easy to master at home, even if it requires a few unsuccessful experiences. But, having overcome all the difficulties, your marigolds will respond to the last fashion trends, while remaining a one-of-a-kind extraordinary decoration.


