On the theme "Spring" for kindergarten. We searched the entire Internet and found 20 unconventional, but at the same time simple spring crafts that children can make with their own hands.
Not only kindergarten needs ideas for crafts for spring theme. Children who do not go to kindergarten also love to craft, and they will probably be interested in making something new and unusual with their own hands, for example, a spring cloud, a voluminous paper rainbow, or
Many of these crafts can become a wonderful gift mother or grandmother on March 8, 2019 or Mother's Day. After all, there is nothing more enjoyable than a craft that a child makes with his own hands with the thought of how happy his mother or grandmother will be with it. Needless to say, some of us even wear them on the street to show off what a wonderful gift the child gave.
20 ideas for crafts on the theme "Spring" for kindergarten
Hurray, the snow is over. And we have three months of rain, thunderstorms, colorful rainbows and magnificent flowers ahead of us. This is what we will display in crafts on the theme “Spring”, which children will make with their own hands in kindergarten.
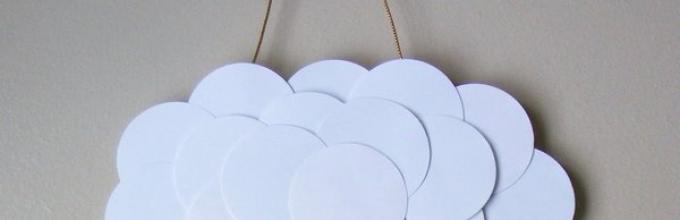
First, we suggest you make a cloud with rainbow rain. Execution and details depend on your imagination and on age characteristics children. For example, ask younger children to make a cloud with rain from ribbons (thinner or thicker), but in senior group You can try making voluminous drops from colored paper.
.jpg)

Here are a few ideas with a voluminous rainbow made of multi-colored paper for a craft on the theme “Spring”. Instructions on how to make them are in the photo.


A simple craft for children, even children from junior group, provided that teachers prepare preparations in advance.
.jpg)
You can make such a bouquet of paper hyacinths with your own hands as a gift to your mother on March 8 or Mother’s Day.

Spring craft for younger and middle group kindergarten - flowers made of ribbons, paper and ice cream sticks. Instead of textile ribbons, you can use paper serpentine that was left over after the New Year.


Everything is simple here: cut out hearts from colored paper (three for a flower, one for a leaf), pierce a hole in the middle of each of them and string them onto a drinking straw. Voila, and the “Spring” themed craft is ready. All that remains is to bring more straws to the kindergarten.


For this craft, you first need to draw and cut out flowers from paper. Then we fold a fan out of green paper and glue the prepared flowers onto it.

And perhaps even kids from nursery group.They'll just have to help them a little with the glue.

We will cover the topic of paper flowers with origami. Follow the link to find a diagram of origami tulips.

When the children are tired of creating, get dirty from head to toe with glue and cut with scissors even what was not allowed to be cut, invite them to draw spring flowers. Here are some examples of simple drawings, but dandelions and hyacinths need to be drawn with your fingers. If you wish, you can turn these drawings into appliques by cutting out some elements for them from colored paper.


And finally - a spring tree with birds that have returned from warmer climes. Tree trunk - cardboard sleeve from toilet paper or paper towels. We cut out the crown, leaves and birds from colored cardboard, and “sculpt” nests and flowers from corrugated paper, crumpling it.

Now you have a ton of ideas for crafts on the theme "Spring" in kindergarten that any child can handle. Good luck and inspiration!
Summer is a wonderful time for children's creativity. A cheerful mood, warm sun, bright colors of nature inspire children to a very exciting activity - do-it-yourself summer crafts. Making a funny little thing from scrap and natural materials together with your parents is a great joy for a child.
Don't forget that summer crafts contribute to children's development, improve their motor skills and unleash their creative potential. Teachers have long noticed this and it is not without reason that they believe that the most interesting and useful hobby for a schoolchild is children's crafts. Summer provides a huge number of opportunities for making them.
During the holidays, as well as in kindergarten or school, it is always useful to devote time to creativity with your own hands. And clear, detailed and inspiring master classes will help you create real masterpieces.

Having spent a vacation at sea with our children, we bring with us a lot of impressions and a large number of shells. They can be used in a variety of summer-themed crafts, such as these cute turtles that remind us of an unforgettable holiday. For work you will need: plasticine, shells, glass.

Step one. We make blanks from plasticine: body, head, tail and 4 legs.

Step two. We form a mouth with a stack so that the turtle smiles. The eyes are made of white and black plasticine. You can use ready-made plastic eyes.


Step three. We collect all the details together, thus sculpting a turtle. We attach the shell to the back.

The funny turtle is ready! To make it remind us of a summer holiday at sea for as long as possible, you can use polymer clay instead of plasticine.

Flower arrangement with ladybugs - master class

You can make this colorful summer-themed craft from scrap materials with your children. school age. We will need: plastic spoons, yellow cocktail straws, CD, self-adhesive paper, leaves from artificial plants, scissors, acrylic paints, glue gun.

Step one. We take it to create ladybugs and flowers, the number of plastic spoons we need and cut off their handles. We paint 8 spoons with red and 4 spoons with black paints. The red parts will be the wings, and the black parts will be the body of the ladybug. You can use a black button on a stalk as a head for the insect. Some of the spoons remain white - these are flower petals.

Step two. We cover the CD on both sides with self-adhesive paper and cut it in a circle. After the painted wings for the ladybugs have dried, take black paints and draw dots on them.

Step three. Using hot glue, we assemble ladybugs from the parts so that two of them have folded wings, and the other two have open wings. Let's start creating a composition. We glue artificial leaves onto the disk, and on top of them we form a flower from white spoons, attaching the parts in rows. Glue stamens from tubes cut 1.5-2 cm long into the center of the flower.

Finally, we attach the ladybugs - our summer composition is ready! It can be used to decorate not only a school classroom, but also a playroom in a kindergarten.
Volumetric applique on a summer theme “Flower with butterflies” - master class

Do-it-yourself summer crafts such as appliqués are perhaps the most favorite activity children in kindergarten. After all, with their limitless imagination, you can create very interesting summer scenes on an ordinary sheet of paper. Our three-dimensional applique with beautiful fluttering butterflies made from accordion-folded paper also belongs to this type of applied creativity. We will need colored paper, glue and scissors.


Operating procedure:
- First we prepare the petals and leaves of the flower. To do this, we cut squares from sheets of colored paper, and from them, cutting diagonally, 2 green and 5 orange triangles. We fold each triangle like an accordion along the lines, as shown in the photo. We bend the triangles folded into an accordion in half and glue their ends together. We got corrugated petals and leaves.
- To make fluttering butterflies, cut out rectangles of paper of different colors and use scissors to round the corners. We corrugate them and put two parts together, stretching them with a colored paper strip and securing it with glue. The butterflies are ready.
- Folding a strip of green paper lengthwise, we make a flower stem. Cut out a rectangle from paper of the same green color and corrugate it to create grass.
- We assemble the composition on plain colored cardboard, glue all the details and admire the bright colors of summer with the children.
Summer craft in kindergarten for the little ones - “Sunflower”

Do-it-yourself summer crafts done by children from the younger group in kindergarten should be simple and fun. Creating the “Sunflower” application can be done by children aged three years and older; it develops them and accustoms them to conscious activity. Working with seeds and others small objects develops the child's motor skills. For creativity we will need: colored cardboard, seeds, glue and scissors.
Operating procedure:
- We cut out the center, petals and stem of the sunflower from cardboard ourselves, if the child does not yet own scissors. You can trust him to apply glue to parts and attach them.
- Glue the petals onto the white circle, then pour glue into the middle of the flower and place the seeds there. Don't forget to glue the green stem. Our sunflower is ready! Having made more of these crafts together with your children, you can place them on large leaf Whatman paper, having “grown” a whole garden of sunflowers.
Summer craft “Sheep in the meadow” - master class

Another craft on the theme of summer for kindergarten that kids can do if we help them a little. We will need cardboard, colored paper, markers, glue, scissors and white paper napkins.
Operating procedure:
- Together with the baby, we cut out the ears and face of the sheep and draw eyes and a nose on it. Glue the parts onto colored cardboard.
- We tear the napkins into small pieces and roll them into balls. We outline the outline of the body and the fur on the head of the animal on the cardboard with a pencil. We cover the space of these contours with prepared balls. The baby can probably handle this work on his own.
- Cut out the grass and paste it to the bottom of the picture summer garden and complement the landscape with clouds, butterflies, flowers and other details that our imagination tells us.
A few more summer themed ideas
Pinwheel is a favorite summer pastime for little children. Made with your own hands, it will turn out to be original and unique in its own way. You can easily make it according to the diagrams.


Nowadays, many residents of country houses strive to decorate a clearing or flowerbed with an unusual composition that will attract the attention of passers-by and delight the owners and guests. Today you will be inspired to make crafts from various waste materials.
Plastic bottles are empty containers no one needs. Many people simply mercilessly throw them into the trash can or bin. But, experienced needlewomen carefully collect plastic bottles different shapes and size. For what? For making incredibly beautiful and original crafts for the garden and dacha. You can make different birds and animals that will become a real decoration for your garden plot.
This article is dedicated specifically to DIY crafts for the garden and dacha. You will learn about the secrets of making deer, sheep, cats, horses, etc. These funny and graceful animals, made with your own hands, also look great in the garden.

To make a brown deer, you need to take a five-liter plastic bottle and cut off the neck of it. A one and a half liter bottle is attached to the cutting site using self-tapping screws, bottom down. A liter bottle is attached to the neck of this container.
You just need to cut a circle in the center and insert the plug of the previous workpiece into it. The result is a head on a long neck and the body of a deer.

Then 4 holes are made in the five-liter bottle (bottom) and long wooden slats are inserted into them. These will be the legs of the animal.

The tail and ears are cut out of plastic containers and placed in the appropriate places on the craft.
All that remains is to paint the deer with brown and white paint, draw his eyes and attach antlers from ordinary intricately shaped twigs. The brown deer is ready!
Yellow fawn - DIY garden craft
The yellow fawn is made using the same principle, but there are a couple of nuances. The five-liter bottle is attached entirely, and the neck is the tail. The neck is made of a short wooden strip.

 DIY yellow fawn
 Cat made of plastic bottles
This animal is made in a completely different way. First you need to collect a lot plastic bottles with a volume of 2 or 1.5 liters, approximately 100 pieces.

How to make a garden craft in the shape of a cat step by step:
- From each container you need to cut off the bottom; this is the part of the bottle that is needed for work.
- Then you need to make two balls from a metal mesh: a large one for the body, a small one for the head. They are easily and securely connected with wire.
- Then you need to attach the bottoms of the bottles to the mesh. This can be done using thin wire or liquid nails.
- The hat, tie, tongue and eyes are made from pieces of old linoleum.
- All that remains is to paint the cat white(can be any other).
- Draw his eyes, nose and mustache with black paint. But decorate the tongue, headdress and tie in bright shades red
- To ensure that the structure stands firmly, it can be secured to a metal rod dug into the ground.
 Cat made of plastic bottles
 DIY sheep

The big sheep was made using the same technology as the cat. You prepare the bottoms of the bottles and fix them on a ball formed from a metal mesh. The legs are made of wooden slats. The ears and face of the animal are carved from a five-liter bottle. But the small lamb is formed from polyurethane foam.
 Sheep made from plastic bottles for the garden and cottage
DIY horse for the garden
It requires a large plastic bottle. In our example, we replaced it with a plastic flower pot. This will be the basis for the body of the animal. Wooden slats are attached to four sides of the pot with self-tapping screws. The neck and tail are also sections of a wooden stick.

The horse's head is made from a paint can, and the hooves are made from plastic trays. flower pots. The animal's mane and tail are an old blue wig. Maybe instead artificial hair attach hay or strings.
The finished figure is covered with brown paint, and a favorite plant is planted in a pot. It turns out to be both a flowerbed and an interesting character!

Pigs are the most common crafts for the garden and dacha
Large water bottles can be used as original flower beds in the shape of a pig. To do this, the side of the bottle is cut off - flowers will grow there. Then the ears are cut out from the remaining sidewall.

Take four one and a half liter bottles and cut out the necks, these will be the legs of the pig. The resulting legs are attached to the body using wire. The piglet turns white or pink.

Then you need to fill the internal space with soil, after making several holes in the belly. Now you can plant the seedlings. This piggy will look great in combination with any other flower bed.

DIY craft - peacock for a dacha garden
Peacocks are incredibly beautiful birds. You can admire their tail for ages. It's a pity that not every yard can see such beauty. Although, the situation can be fixed! You can make a magnificent peacock with a long tail from ordinary plastic containers.

The following materials are suitable for work:
- foam;
- stationery knife;
- metal rod;
- stand (log);
- old canister;
- metal mesh;
- wire (thick and thin);
- awl;
- plastic bottles of all sizes;
- scissors;
- enamel paint of different shades.
First, take a stand (it can be a board or a wooden log) and fix pieces of a metal rod on it, making two legs for the future bird. Then you need to make a body from an old canister. To do this, the container should be given the correct shape by cutting off excess parts. You can secure the canister to your feet using wire.
 Do-it-yourself peacock for a summer cottage garden
 The neck and head are cut out of foam plastic and secured with wire to the canister (torso).
And all that remains is to form the tail. To do this, you need to take a metal mesh, cut it to size and lower it along the length to the floor. In order for it to hold, it must be attached to the canister with screws or wire. That's it, the base of the future bird is ready!
Now the most painstaking stage of the work is making feathers from plastic bottles. Wings require long feathers. To do this, the bottle is cut into strips, and oval oblong blanks are cut out of them. You will also need short oval parts to decorate the body and neck of the bird.
You can attach the feathers to the canister and foam using self-tapping screws or pieces of thin wire. In this case, you need to move exclusively from the bottom up, so that each subsequent layer hides the fastening of the previous parts.

For tail feathers, it is better to use 2-liter green plastic bottles. One bottle will yield 4 feathers. You need about 70-80 pieces. The tail feather has an oblong oval shape with fringe along the edges. It is better to immediately draw a pattern on each workpiece. When attaching feathers to the tail, you can use wire or nylon thread. You should move from bottom to top, closing the previous row.
The crest, beak and fingers are also cut out from plastic containers. The final stage of work is painting the feathers with enamel paint. Colors should be bright and saturated.

Our peacock made from plastic bottles is ready!
Unusual crafts for the garden with your own hands
To decorate a flower bed, you can use a wide variety of ideas, you just have to use your imagination. For example, you can give a second life to an old non-working TV.
To do this, open the back panel, throw everything out, leaving only the body. The panel needs to be put back. We fill the soil inside and outside the TV so that it looks like the earth is pouring out of the screen. Now we plant small flowers. The illusion is that a stream of color flows directly from the screen.

An unusual flower bed can be built using the most original items. This could be a wheel from an old cart, a rubber tire, old suitcases, dishes, umbrellas, basins and even old shoes.


Every parent, sooner or later, has to hear from a teacher about the need to create crafts at home together with their child, whether he is 2 years old or 7 years old. Fortunately, today on the Internet you can find numerous photos of crafts for kindergarten that will help you come up with and bring to life a variety of ideas, for example: crafts made from foil, paper, stones, wire and all sorts of seasonal crafts for February 23 or Easter.
Many parents are wondering, why is this even necessary? Experts unanimously say that this type work is psychologically important for both the baby and the parent.

But also, when making various crafts, the imagination develops and the motor skills of the fingers, which are necessary for the harmonious development of the child, increase.

In this article we will describe several interesting master classes for kindergarten, which you can make with your parents at home with your own hands.


Applications
We all remember our childhood, when our mothers and we made origami out of paper or glued different elements on paper, recreating a complete picture. It’s easy to make almost anything your heart desires from it!

For example, with the help of your imagination you can create colorful flowers, cute cards and even carnival masks from the most ordinary colored or corrugated paper.

You can try to create beautiful work using decoupage, origami or quilling techniques, which are so simple to perform, and the result exceeds expectations.

To create this creation, you and your child will need just nothing: a brush, glue, several multi-colored sheets of paper and scissors. Be careful that your child uses cutting materials only in your presence, or do all such work yourself.

DIY crafts from waste materials
Perhaps you couldn’t even think about what old bottles or egg trays could be good for? What you and I once considered “waste” material and useless in the household can be turned almost into a masterpiece!

For example, you can make a charming fabric doll from scrap materials in the form of old unnecessary rags, or create a jewelry box from a plastic bottle.

"Plastic" caterpillar
You and your child can easily make a funny caterpillar from waste plastic bottle caps.


To make it you will need a small list of materials:
- green cardboard;
- PVA glue;
- bottle caps;
- colored paper;
- felt-tip pen;
- scissors.

Manufacturing instructions
First, take a “clearing” for the future insect - a sheet of green cardboard. Next, glue our covers onto the background using PVA glue with the empty side inward in the form of a curved caterpillar and wait until it dries completely.

Then cut out colored circles according to the diameter of the lids and glue them in a chaotic manner onto the plastic tops. At the end of our caterpillar, add cute antennae, legs and eyes.

Do you throw away toilet paper tubes? But in vain! After using a roll of paper, you can make a cute little person from the “sleeve” with your own hands or make a stand for all sorts of accessories. The surface of the product is decorated with painting, adhesive paper, rhinestones or pasting scraps of fabric.

Colored pebbles
We bring to your attention an idea for making a rainbow craft, which is easy to do with your child for kindergarten. During summer holiday We advise you to collect pebbles and shells of different sizes with your baby, which will be useful throughout the year.


To create fun crafts, stock up on several shades of acrylic paints and a brush. For example, you can make a frog out of a large flat stone by decorating it in green, and after complete drying, finish drawing the eyes, mouth and ears. Using the same principle, you can make chicken, flowers, etc.

Autumn crafts
In autumn, in the forests you can find a lot of useful natural material for excellent crafts, such as pine cones. By combining just a few of these elements of different sizes, you can create a funny bear or hedgehog with your own hands. You can fasten the cones using threads and thin wire.


You can diversify the design using twigs, leaves, or add plastic eyes or ears.

Conclusions
Children's crafts for kindergarten are those that the child must partially do with his own hands. If you have a baby from a nursery group, then, naturally, he will not do without the help of mom or dad.

The process of creating crafts in the family circle especially brings family members closer together, helps the child develop imagination and tactile perception, necessary for speech production and general development.


Don’t forget to collect useful materials on vacation, whether in a park or on the seashore: pebbles, beautiful shells, leaves, pine cones and acorns.

If you have the opportunity and desire, you can plant several small pumpkins in your garden, which store well and act as an excellent basis for DIY crafts.

Turn on your imagination and stimulate your baby’s imagination, the result will be not only perfect psychological interaction, but also original craft to the kindergarten, made with your own hands.

Photos of crafts for kindergarten


4 238 856
Evening is an amazing time when the whole family gets together and unsuspecting parents find out that they need to bring autumn crafts to the kindergarten for tomorrow. To prevent this situation from taking you by surprise, we recommend preparing in advance and familiarizing yourself with ideas for children's crafts.
We have prepared for you many step-by-step and colorful master classes of varying difficulty levels. We are sure that you will definitely find something worthwhile for yourself.
Hedgehogs are all different
Did you know that the Soviet cartoon “Hedgehog in the Fog” 15 years ago was recognized as the best animated film of all time? You see what a difficult animal this hedgehog is. It is definitely worthy of repeated embodiment using various natural materials.Volumetric hedgehog made of seeds and plasticine
A cheerful and thrifty hedgehog, cheerfully carrying mushrooms on its back, may come to visit your apartment in the fall. To do this you will need to stock up on some simple natural materials, an hour of free time and involve young assistants in the work. For joint creativity you will need:
- foil;
- leg-split;
- black and brown
- unpeeled seeds;
- PVA glue;
- acorns and leaves for decoration.

Cover the hedgehog's body with black plasticine and its face with brown plasticine. This important stage can be safely entrusted to the child; nothing will be spoiled, and all the flaws will then be hidden.

Lubricate the muzzle with a thin layer of PVA. Also moisten the twine a little with glue and wrap it tightly, row by row, around the face, starting from the nose. You'll have to stop there for now and let the glue dry. Remember this has to happen naturally. On a radiator or when drying with a hairdryer, the plasticine will melt.
The next stage is the design stage. You need to make needles for the hedgehog from the seeds. Start work from the head, arrange the rows of seeds in a checkerboard pattern. Stick the “needles” into the plasticine as tightly as possible to each other.

Decorate the face with plasticine eyes and a nose.
Mushrooms can be easily made from acorns by simply covering their caps with brown plasticine. If you wish, you can attach real leaves to them. Using plasticine, attach the mushrooms to the back of the hedgehog.
Such a cutie will definitely please your child, and will also allow you to enjoy joint creativity.
Hedgehog applique made from dry leaves
While walking through the autumn park, did you pick up a beautiful bouquet of yellow leaves? Great, add glue and cardboard to them and we’ll make a cute hedgehog.All you need is to draw an outline. Your baby will be happy to glue the leaves on himself. Just show him how it's done.

You can download the hedgehog template, we offer you 4 options:


Hedgehog applique made from seeds
Did you like the idea of using seeds for hedgehog needles, but a voluminous craft seems too complicated to implement? We have prepared another simple MK, which features a funny hedgehog, seeds and plasticine.With a little perseverance, you can make a surprisingly cute and simple craft for kindergarten.

Paper hedgehog
We bring to your attention another idea that even children from the younger group can handle. An original and cute applique using autumn leaves will not take you much time. It also comes with a paper cutting template, making it even easier for parents.
Template:

Mushrooms
You’ve already got your head full, what else could you do to surprise the seasoned kindergarten teachers who are waiting again and again for crafts from your child? We offer to capture their imagination with surprisingly realistic mushrooms made from the simplest materials at hand.
To work you will need:
- cotton wool;
- water; starch;
- long nails or thick wire;
- cardboard;
- paints and brushes;
- PVA glue;
- dry tea leaves or poppy seeds.

Pierce each circle in the middle with a nail. It will serve as the base for the leg. Instead, you can use thick steel wire. But it’s better not to bother and buy a dozen or two potential “mushroom legs” at your nearest hardware store.

Now it’s time to cook the paste. Boil a liter of water. Stir 5 tbsp in a glass of cold water. with a heap of potato starch. While stirring boiling water, pour starch into it in a stream. Stirring, bring the paste to a boil. It is ready to use, all you have to do is wait for it to cool to room temperature.

Coat the mushroom preparation with paste. Roll a cotton wool ball for the hat, dip it in paste and glue it to the hat. Wrap the mushroom stem with moistened cotton wool. Repeat this procedure several times until you get the fungus of the desired size and shape.

Don't forget to squeeze out excess glue from the cotton wool! The resulting blanks must be completely dried on a radiator or in a warm oven. Already at this stage the mushrooms turn out very nice.

The moment has come creative work- painting. It is she who will turn faded preparations into real autumn mushrooms. You can paint crafts with any paint: acrylic, gouache or watercolor.
Color the caps according to the selected types of mushrooms.

Wait for the paint to dry completely. Cover the end of the leg with a thin layer of PVA and dip it in dry poppy seed or tea leaves - this will simulate the remains of earth.

For additional shine and chic, you can coat the mushroom caps with any colorless varnish.
You can decorate a beautiful basket with mushrooms - your craft will not go unnoticed. And the secret of making realistic mushrooms will long excite the imagination of everyone who is lucky enough to see them.
These hand made beauties are the result of the efforts made.

Don't have a suitable basket? No problem! A beautiful composition using moss, coniferous or dry twigs and real dry leaves can be arranged in an ordinary cardboard box or on a small stump, or on your own.

Imagine and think outside the box - in kindergarten, and any other creativity, this is only welcome.
Autumn trees
Has your child already wondered why in the fall the trees change their green attire to a bright yellow-orange decoration? So it’s time to satisfy his curiosity, and at the same time his craving for creativity.Plasticine tree
We offer you a beautiful and simple plasticine application that even the youngest naturalists can handle.
For work, prepare colored plasticine and cardboard.
Draw a tree trunk on thick cardboard. Now let your child roll a lot of thin and long plasticine sausages in 2-3 shades of brown.

Glue them along the tree trunk, alternating shades for realism. Fill in the entire contour of the trunk and don't forget about the branches.

Add some more branches for a lush crown.

Roll out many thin sausages in red, orange and yellow colors. Roll each sausage into a spiral shape. You will see that your child will really enjoy this exciting activity.

Glue the spirals in random order onto the crown of the tree. Shape the tree to the desired size.

Make blades of grass from green plasticine. “Plant” the grass near the tree.

Complete the applique with falling leaves.

This is the kind of man-made beauty we have. A bright frame will make the picture even more expressive.
Application “Confetti Tree”
Original idea autumn tree- decorate it with paper confetti. Check out step-by-step master class by watching the video we suggested. Confetti can be easily and simply cut out using a regular hole punch. Using this technique, you can quickly grow an entire fantasy forest.Pumpkin seed trees
Have you noticed how pumpkin seed does it look like a leaf? And creative individuals not only noticed this, but also used the similarity to create an original application from this natural material.See our step by step photo MK and be inspired by your own masterpieces.


Unusual trees made from cereals
We continue to increase the degree of creativity. Now, to create a craft, colored cereals will be used. Do you have rice, semolina or millet in stock? Then try to master this method of creating an application.Or this option:
"Macaroni" tree
The unusual shape and safe composition of various pasta products makes it possible to use them in preschool creativity. Find bow- or leaf-shaped pasta and “grow” your own unique tree.
Unusual "button" trees
And if you accidentally have a lot of unnecessary multi-colored buttons lying around at home, then we know how to use them for a good cause. Try to create a bright panel that will decorate your cottage or nursery. And armed with wire and pliers, you can master the art of button bonsai.


Pumpkin
Autumn is harvest time. And even if you didn’t plan to collect a real harvest, surprise everyone with a realistic nylon pumpkin. You can make it for a children's autumn crafts competition, or just for fun, and at the same time get acquainted with an interesting technique for making nylon vegetables and fruits.
To work you will need:
- painted nylon;
- filler (foam rubber or padding polyester, even ordinary cotton wool will do);
- needle and thread;
- thin wire;
- a small piece of wire;
- green tape;
- scissors;
- brush and paints.

Using a needle, make jumpers with thread. Do them at the same distance until you go around the entire workpiece in a circle.

Use small pieces of thin wire to make round blanks for the leaves.

Cover them with green nylon, secure its ends with thread and trim off the excess. Slightly deform the edges of the leaves, giving them a realistic look. Wrap the ends of the wire with tape.

Wrap a piece of wire with tape. Wind it around the handle and carefully remove the resulting spiral. The result is a branch-tendril, which we will attach to the pumpkin.

Collect a pumpkin branch, gradually connecting the leaves and tendrils with tape in a random order.

At the top of the pumpkin, fix a piece of wire and wrap it with tape. Attach a branch with leaves to the tail.

To achieve realism, tint the depressions orange. Get wet excess moisture napkin.

As a result of the efforts made, a wonderful handmade autumn gift was obtained.
Ideas for inspiration
We have prepared for you a photo selection of unusual autumn crafts to motivate you to take action. Watch and be inspired to create together.Spectacular composition made from natural materials
Dry twigs and grass, a bunch of viburnum, a few smooth pebbles, pine cone and sand, thanks to imagination, turn into a cozy rural courtyard with a wooden house under a thatched roof. This craft looks very unusual, and you can get it absolutely free. All you need to do is go for a walk in the nearest park.
Yellow leaf bird:
Printable bird:


Bouquet of maple leaves
In autumn, fallen golden leaves just beg to be picked up. Walking through the park, it’s so easy to pick up a whole bouquet of maple trees, but its natural beauty instantly disappears in the apartment. This can be fixed. We will teach you how to make beautiful roses from maple leaves. Such a bouquet will create an atmosphere of autumn comfort in the room and will delight you with its warmth for a long time.
Autumn crafts from twigs and threads
With a little imagination, dry twigs collected during a walk can be turned not only into crafts for the kindergarten, but also into spectacular souvenirs or bright interior decorations.
Simple paper crafts
Unusual autumn leaves You can create it with your own hands, and turn an empty paper bag into a picturesque tree with a spreading crown.A few more printable templates:


Just give free rein to your imagination and follow the step-by-step photo instructions.


