The most beautiful, blooming spring holiday is very close - March 8th! He is a harbinger of spring, beauty and sunny days. On this day everything blooms and smells. The first spring flowers - snowdrops - are blooming, birds are flying in, everything in the area comes to life. On this holiday, all women, girls and girls are waiting for something special. So how can you congratulate your beloved mother, grandmother, niece, friend, sister?
Certainly, best gift made with your own hands. In this article you will see many craft ideas for March 8th.

Craft materials
So what can you use to make a craft for the eighth of March:
- Colored paper or thick cardboard.
- Pasta.
- Plastic spoons (bottles).
- Beads.
- Candies.
- Plasticine.
- Salty dough.

- "Blooming Lily"
- "Flower for Mom"
- Snowdrops spoons.
- Paper rose.
- Unusual chamomile.
- Flower of cotton swabs.
- Magnet - a heart made of salt dough.
Check out the modern home decor on this site. https://masterinterera.ru/dekor

"Blooming Lily"
You will need:
- Colored cardboard( green).
- The paper is white.
- Scissors.
- Heart templates (can be drawn by hand).


Manufacturing progress:
Let's take a heart template and cut it out on green paper. Lily flower template cut out. Cut out the center of the lily from yellow colored paper. Glue the flower onto the heart. Attach the yellow center to the flower. The blooming lily is ready!

"Flower for Mom"
We'll take:
- Black pencil.
- Thick cardboard.
- Corrugated paper.
- Stencil of a large flower.

Work progress:
We outline the stencil on cardboard. We ride from corrugated paper balls. Dip the resulting balls in glue and glue them onto the flower. The flower is ready!

Snowdrops from spoons
To make these beautiful spring flowers we will need:
- Plasticine mass (green and yellow shades).
- Plastic spoons.
- Already old unnecessary plasticine.
- Cocktail pipes (green).
- Green bottle.
- Napkins (green).
- Flower pot.


Instructions for making crafts:
We twist a ball from unusable plasticine and place it on the bottom of the pot. Roll 7 carrots from green plasticine and do the same with yellow plasticine. Attach a yellow carrot tightly to the tube. We carry out similar actions with all seven cocktail straws.

Cut off the handles of the plastic spoons. We insert three petals into each tube. We will cut out leaves for our snowdrops from a green bottle. We attach the snowdrops one by one to the plasticine located in our pot. We also attach the leaves.

IN flower pot We put green napkins to imitate grass. These wonderful snowdrops are ready, all you have to do is give them to your mother or grandmother.

Rose
To form a flower you will need:
- Double-sided paper in different shades.
- Green corrugated paper.
- Wire (preferably aluminum).
- Scissors.

Instructions:

- Cut out a circle from multi-colored paper in red shades. Draw a spiral in the resulting circle.
- We cut it carefully in a spiral, trying to be as even as possible. We twist the spiral.
- Glue the resulting structure together. Let it dry. Cut out leaves for the rose from green colored paper.
- Glue the flower bud to the leaves. We wrap the wire in green paper. We attach the bud to its base with glue.


Chamomile from cotton pads
You need:
- Cotton pads.
- White sewing threads.
- Acrylic paint.
- Plasticine mass.
- Durable, varied colored cardboard.
- Miscellaneous colored paper(any color).

Manufacturing process:
First we make the petals of our chamomile; to do this, we twist the cotton pads with the edges up. We make 8-9 petals this way. We connect the petals with thread.

For the core of the flower, take a disk and dip it in yellow paint. Let it dry. Apply glue to the center and form a flower. Let's make a stem from green paper and 3-4 leaves per stem. Forming a flower. The chamomile is ready.

Chamomile
For fake we will take:
- Cotton swabs.
- Plasticine mass for modeling (yellow).
- Felt pens or markers.
- Scissors.
- Colored cardboard.

Instructions:

We take a piece of colorful cardboard, absolutely any color your heart desires, this will be our basis. Now we need to cut the sticks into two parts, scissors will help us with this.

We make the heart of our inflorescence from plasticine. Roll a plasticine ball. Insert cotton swabs in a circle into the resulting ball.

We stick the resulting flower to thick cardboard. Using markers we draw in the stem and leaves. If you wish, you can add nice words congratulations.

Salt dough heart magnet
We will need:
- Corn flour.
- Salty dough.
- PVA glue.
- Magnetic.

Manufacturing process:
First we cook salt dough. To do this, take 300 grams of regular wheat flour and 150 grams of salt, so that the dough can smell sea salt with some kind of smell. Add water and any food coloring. Mix well.

Roll out the dough and use a cookie cutter to give it a heart shape. Let's let our heart dry out.

The dried heart needs to be smeared with glue and decorated with cornmeal on top. Apply glue to the other side of the heart and attach a magnet. You can add beads if you wish.

Finally
Every girl, girl, woman, grandmother will be pleased to receive a gift on this gentle spring holiday. And it’s even nicer if this gift is made by yourself. Therefore, do not be lazy and take a little time to make a gift and give it to your beloved women. By the way, you can show off to your friends photos of the crafts you gave on March 8th.

Photos of crafts for March 8


It is so customary that any gift is accompanied by a postcard in which the most pleasant words and wishes are written. If the postcard is beautifully made, then such a work will not be embarrassing to place on the desktop of even the most conservative organization.
Most simple postcard can do even the most small child. Most often this children's gift done using applique or coloring.

A beautiful and unusual card can be made using voluminous flowers from paper or ribbons, plasticine or spirals of paper, dried flowers and small bows. Using shaped hole punches, you can give your postcard an airy look.

A good gift would be a large postcard in which each family member can write their most pleasant wishes. You can also make a whole congratulatory album by combining all the sheets with congratulations and beautiful cards, applications, and drawings. The cover of such an unusual album can be thick cardboard or a piece of wallpaper, but it will first need to be straightened. Beautiful decoration There will be a pattern of coffee beans or rhinestones, beads, ribbons.

Modern home computer tools allow you to make unusual video cards or cute presentations, in which even distant relatives and friends can take part.

Flowers
A beautiful bouquet will always please your mother or grandmother. But a gorgeous arrangement will quickly wither, and the cost of a large piece of floral art is impressive.
Therefore, very often children make an original bouquet with their own hands.

To do this you can use:
- plasticine and chopped wool threads (you will get a sprig of mimosa or a cute willow);
- plain paper (you will get flat daisies and bright gerberas);
- several layers plain paper(you will get fluffy asters and dahlias);
- corrugated paper (usually elegant roses are made from it);
- plastic bottles (with the help of fire they will turn into lovely hyacinths and irises).
You can also crochet a flower, sculpt it from plasticine or salt dough.

A topiary would be an unusual gift. Usually this craft is made from balloon, wrapped in threads. But you can take a fairly thick wire and make a cute tree in the shape of a heart or a figure eight. Flowers or butterflies, ribbons and beads are used to decorate the crown. The trunk of a topiary can be a wire, a branch of a real tree, an ice cream stick or a cocktail straw.

Bouquets of sweets
This idea is not new, however, such a craft will be very pleasant for mom. After all, it combines flowers and sweets.

To make the craft, petals are made from corrugated paper, slightly squeezing and then spreading them across the diameter of the candy. The candy itself is attached with tape to a skewer or toothpick, the petals are tightly wrapped with thread. Skewers can be wrapped in green tape and decorated with petals made of plasticine or colored paper.

The resulting flowers will take their rightful place in the vase. They can also be used to fill a box or basket, or the body of a toy car. Mom will be pleased with such an unusual surprise.

From candies on skewers you can create a pineapple, a doll's skirt, a bunch of grapes and many more unusual and attractive crafts.

Packaging
You can even put a piece of your soul into a purchased gift if you decorate it beautifully. For this purpose, gift boxes are made from cardboard, fabric bags (any fabric is used from the most delicate organza to burlap), baskets from wicker or newspaper tubes. The latest creation can be used in the future for purely practical purposes. A master class on how to create such containers is easy to find on the Internet. There are described step by step instructions on creating lovely baskets.

For decorations, you can make a box with your own hands from woolen threads, toothpicks and thick cardboard. The same cute little thing can be presented to a friend.

Volumetric letters
Initials and words of love can be made from large three-dimensional letters, which are filled with artificial flowers and beautifully decorate any room. Making them is easy and simple from cardboard; you just need to find or come up with a high-quality drawing.

Edible gifts
This category includes all sorts of goodies, from unusually shaped sandwiches to homemade cake. Even the simplest recipe will help create a festive mood. Some of the goodies can be made very quickly, even without baking.

And holiday cookies can be placed on paper with written wishes or a beautiful openwork napkin cut out like a snowflake.

Great decoration festive table will be a bottle of champagne, decorated in the form of a doll with a skirt made of kitchen napkin with a small cap on a cork. For decoration, you can use artificial flowers, a necklace made of small beads or seed beads.

Useful gifts
Such gifts for home and garden include shelves, cutting boards, and various flower pots. You can also make a funny grasshopper from an unnecessary sock, soil and grass seeds.

A beautiful photo frame can be made from two sheets of cardboard and your favorite photo. The frame is decorated with various decorative elements.

Knitted items will be a wonderful gift. This could be a fluffy scarf, warm home socks, a rug made of terry towels.

Surprises can include embroidered napkins or towels, or unusual little thoughts covered with old jeans or shirts. Even a T-shirt can serve as a pillowcase.
Those who like to create with their own hands will find a needle case or a basket for needlework useful.

Home cooks will be delighted with oven mitts, coasters made from clothespins or wine corks, and spice jars made from baby food and beautifully decorated with beads, rhinestones, coarse salt.

In general, gifts for March 8 can be very diverse. It’s enough to look carefully at what mom likes to do and what she might need in these activities.
When something is done with your own hands, it takes on individual characteristics. How an artist puts a piece of his soul, leaving it in each of his paintings, how a writer shares his inner world. Such things immediately acquire their own unique features, their own aura, which makes them priceless. Let's look at some DIY crafts for March 8, the most beautiful ones you can make.
Purchased surprises do not have such an aura, because they are made by faceless craftsmen for the masses. That's why mothers usually keep their children's handicrafts, first postcards, plasticine figures, and sewn toys. They may be lopsided and simple, but truly priceless.
Many people use plasticine for a comfortable and soft base into which they can stick spoons and other craft materials. It’s easy to come up with your own gift idea by looking at the examples. simple crafts. For example, daisies with petals collected from the same white spoons, complemented by wide tubes left over from cocktails, or assemble a whole picture using spoons.
Here only the frame is taken separately and ready-made, everything else is a flight of thought and available materials.
You can make any flower, depending on what the recipient likes. Whether there will be poppies or chrysanthemums, the main thing is to know the shape of the petals and the design.
As a rule, all children, under the guidance of teachers, make crafts for March 8th in kindergarten. The materials will be useful for children of primary, secondary and preparatory groups kindergarten.
However, if for some reason the baby does not become part of a large children's group, he can make a surprise at home if one of the elders helps him with this.
To create an impressive craft for your mother with your own hands, you can turn any detail that is at hand into an original and beautiful souvenir or postcard.
Card with chamomile for March 8
For March 8th, you can make a charming card with daisies. We make the base of the card by folding a pink sheet of cardboard in half. Glue a green circle to the front of the card. To make daisy petals, we need thin strips of paper, which we twist with a stick or pencil.

Glue the twisted strips onto the green circle. We decorate the center of the circle with a twisted curl of yellow paper. We got the first daisy - the upper part of the future eight.

We frame the outline of the bottom of the figure eight with green leaves. Glue a small chamomile onto each of the leaves. We make small daisies in the same way as a large one, only we fold the paper strips in half. We complement the craft with yellow flowers. Postcard for March 8th - ready!

Check out another wonderful postcard using technology.
Postcard with a paper tulip
You can make a very beautiful postcard with a voluminous tulip from colored paper. Cut out a circle from yellow paper.

Fold the green paper in half and draw half a leaf on the fold. When cutting out, we get an even leaf with the center on the fold. For the postcard we need two leaves.

Fold a sheet of red cardboard in half - this is the base of the postcard. Cut out tulips from pink paper.

We fold the yellow circle around the edges. We glue the pink paper blanks together, forming volumetric flower tulip

Glue green leaves and a tulip flower to the top of the yellow blank. We cut out a narrow strip of green paper, which we twist into a spiral. The green paper strip will curl into a graceful curl.

Glue the curl to the bouquet. Glue the bouquet onto a cardboard base. A postcard with a voluminous tulip for March 8 is ready!

Here is a postcard using the same technique, but made a little differently. The ribbon bow gives this card a special charm.

Bouquet with tulips for March 8
Flowers and tulip petals can be glued onto the paper parcel itself. We fold the bundle along the edges, forming a paper bouquet. We glue ribbons to the edges of the package and tie them with a bow. We got a simple and beautiful bouquet.

How many children there are, so many options for making a paper bouquet for March 8th. You can put together a real exhibition in honor of mothers!

Postcard with a picture for March 8
A stunning postcard for March 8th can be cut out of paper. Fold the album sheet three times. We cut out a figure eight on one of the parts, and cover the other two parts with a floral pattern.

We color the card in delicate pink and lilac tones.

After the paint has dried, we decorate the craft with patterns made with a silver helium pen. When all three parts are folded in front of us we will have a very beautiful postcard for March 8th!


 Postcard with "eight" (with a surprise)
 Crafts with the “eight” for March 8
The classic version of the craft for March 8th in kindergarten is a figure eight made of paper. We cut out the base of the craft with a stand from thick cardboard.

We glue the stand and decorate the figure eight with patterns and flowers.

Another craft for the smallest kids is the “Eight” applique. The teacher cuts out figure eights in advance and prepares decorations from thin paper. The kids’ task is to glue the decorations onto the figure eight, trying to do it neatly and evenly.
 Figure eight applique
 From ordinary and metallized cardboard you can make very simple but colorful crafts “Basket with tulips” and “Tulips applique”.
 Paper craft for March 8 “Basket with tulips”
 Crafts for March 8 with flowers and bouquets
You can glue together a luxurious spring bouquet from colored paper folded like an accordion.

Using green and red paper you can create a spectacular tulip applique.

The core of a button can also be made into paper flowers. Such a bouquet will become especially original if you place it in a voluminous palm. To do this, we outline our hand, cut it out, glue only the base, on top of it - flowers, which we cover on top with our fingers.

Using the same principle, you can make the entire picture out of paper. And if you glue the fingers first, the brush will turn the other side.

You can turn cotton pads into equally impressive calla lilies. We make the stem from a cocktail straw, the core from a cotton swab, one tip of which is painted yellow. We wrap the core with a cotton pad and the stem with a wide sheet of paper. The flower is ready!

You can make a whole bouquet out of kaal and corrugated paper.

You can make it from paper and ribbon original bookmark for books "dress for mom."

Cocktail straws are great for using as stems and for creating paper flowers, which make a beautiful bouquet when wrapped in wrapping paper.


Incredible beautiful craft for my beloved mother - ““.

Postcards for March 8th to kindergarten
A very beautiful craft for March 8th can be a postcard decorated with a tulip using the origami technique.

Folded burgundy paper makes spectacular roses. By placing the roses on the heart we will get a wonderful postcard for March 8th.

A lovely card with a heart can be made from colored paper. We make the bottom part of the card, not forgetting to write a confession for our beloved mother.

We decorate the top part of the card, decorating it with lace and flowers.

We put a rivet or brad, allowing the card to open and close.
 Paper card "heart"
 Heart with roses and ribbon
It’s very interesting to see a heart panel with roses. We fold the roses themselves using a stapler or glue according to the pattern.

Cut out a heart from red paper and make many holes around its perimeter. We insert the ribbon into the holes, processing the edge of the heart.

We glue the stems with leaves, as well as the roses themselves, to the heart, forming a festive bouquet. Glue a ribbon bow at the bottom. Panel with roses for March 8th - ready!

Very beautiful postcard in the shape of a heart can be made using the popular scrapbooking technique. The base of the card is a heart made from special textured paper with a print. The scrapbooking technique is characterized by volume and layering. Some of the card decorations you can find at home, and some you can buy in scrapbooking kits. Anything will do: figurines, flowers, ribbons, paper cutouts and pictures.

We place all the details of the craft on the base, trying to give the composition a complete beautiful view. Scrapbooking postcard in the shape of a heart - ready!

There is another option for a luxurious postcard for March 8 using the scrapbooking technique. We make the base of the cardboard card. Cut out the front side from colored paper with a print. It should be 3-5 millimeters smaller than the cardboard base on each side.

Glue the ribbon along the card. We glue openwork paper figures and a congratulatory inscription to the front side.

Decorate the card with flowers and leaves. Some things you can cut out yourself, and some you can find in special scrapbooking kits. Postcard for March 8th - ready!

Craft for March 8th from corrugated paper
From paper and cardboard you can make a very impressive three-dimensional application for March 8th “flowers in a vase”. Cut out a vase from blue cardboard.

Glue flowers from corrugated paper.

 Application for March 8th “flowers in a vase”
 You can make a beautiful bouquet with bright flowers from paper:
A very beautiful three-dimensional applique for March 8 is made from yellow corrugated paper. We form a flower bud from yellow paper.

The buds rolled from yellow paper are wrapped in green paper. Green paper is rolled into a thin tube. We get a flower and a stem.

The flower is complemented by green leaves and attached to a round cardboard base. Volume applique on March 8 - ready!

Bouquet of tulips made of corrugated paper
Another wonderful craft for March 8 made from corrugated paper is a bouquet of tulips. Let's start with one tulip. Cut a strip of yellow corrugated paper and twist it in the center. We fold both parts on one side.

We need a bunch of stamens on a wire (we fix them with adhesive tape). Roll a ball out of yellow paper. We put it on the wire.

We begin to wrap the ball with stamens with petals.

When the bud itself is ready, fix the green petals with adhesive tape.

Spring bouquet of tulips made of corrugated paper. Read the detailed master class.

You can make it from corrugated paper voluminous postcard with a whole bouquet of flowers.

And this wonderful card contains not only a lovely flower and a congratulation, but also a candy.

Sweet crafts for March 8
The craft “bouquet of lollipops” looks interesting. Decorate the lollipops with paper flowers. We fix the sticks in transparent plastic cup using plasticine. Those with a sweet tooth will surely enjoy crafts made from candies for March 8th. You can put paper flowers on the lollipops and place them in a pot of plasticine.

You can use not candies for crafts, but chocolates. They will need to be pierced with a thin stick, which we will fix in the pot. We wrap the candies in corrugated paper and secure with glue. A luxurious bouquet of sweets for March 8th is ready!

Another lovely and delicious craft for March 8th “Heart made of candies”. It’s not at all difficult to make, and the result is tasty and beautiful. Detailed master class see "".

Watch the video on how to make a beautiful bouquet of purple tulips candies
Craft for March 8th “Flower stand”
Very bright and interesting craft on March 8 - “flower stand”. To make it, fold it in half green leaf paper and make cuts on it different lengths.

We glue the cut green leaf onto the base - an ordinary sheet of cardboard folded in half. We glue some of the protrusions onto the base, and bend some of the protrusions into reverse side(we do not apply glue to them).

Glue flowers onto the curved protrusions. We decorate the back and bottom of the craft with flowers, butterflies and congratulatory inscriptions.

Eight of ribbons - a gift for mothers and grandmothers
A very bright and beautiful craft for March 8th - a figure of eight made from ribbons. It is very easy to make, but looks very impressive and festive. First, cut out a figure eight from paper or cardboard.

We wrap the figure eight with pink ribbon of medium width “overlapping”. Fix the ribbon with glue.

When the entire figure eight is wrapped, we make a pendant loop in the upper part. From folded pieces of glued green and scarlet ribbons we get a festive bouquet. Eight of ribbons as a gift for mom - ready!

Bouquet of felt tulips for March 8
A very beautiful soft bouquet of tulips for March 8 can be made from felt. You can find a template for cutting out a tulip at the end of the article. For each flower, cut out two parts for the bud, two parts for the leaf and two parts for the stem.

Sew together the parts of the stem and bud. We leave one of the ends of the stem and bud unsewn and fill them with padding polyester. We insert the stem into the bud and sew them up with a hidden seam.

We sew together the parts of the leaf and sew it to the stem. We make several of these flowers. We made a charming spring bouquet for March 8th from felt!

You can make a beautiful bouquet of violets for March 8 from felt and thick drape. We make the pot stand from dense brown material rolled into a roll. Such flowers will never wither and will delight you for a very long time.

Another charming felt craft idea is a bouquet:
Craft for March 8 - painting from salt dough "Roses"
With the help of adults you can make a very beautiful wall hanging. To do this, mix the dough with green and red paint. To prevent the dough from crumbling, add PVA glue when kneading. We prepare the base of the craft - a frame with thick cardboard. We start by making green leaves, which we glue onto cardboard.

We make narrow strips of red dough, which we then twist into buds.

We frame the buds with petals made from salt dough - we should get quite lush flowers. We leave the two buds as they are and glue them to the base in the same way, adding a small stem of green dough. We will get a wonderful picture with bright colorful flowers.

Ideas for crafts for March 8 from different materials.
Plasticine and a disk make a wonderful “Spring Rose” applique.

If you are puzzled by the need to prepare crafts for March 8th in kindergarten or school, you have come to the right place. Who, if not us, will provide you with a sea of positive emotions and interesting ideas? Or maybe you're just looking for ways to do something together with your kids that don't require special skills or materials?
We invite you to plunge into the fascinating world of paper gardening and floristry. You will learn how to make fantastic flowers from ordinary paper napkins and assemble beautiful compositions from them that will conquer any heart, and not just a mother’s. Let's get started?!

If you still think that paper flower as a gift to your beloved mother - this is banal and uninteresting, then you just haven’t seen the delightful hyacinths that will never wither and will color even the cloudiest day in bright colors! What else does a woman need on the spring holiday?
So let’s stock up on colored paper and start “growing” holiday hyacinths.
To work you will need:
- double-sided colored paper;
- scissors;
- glue stick;
- wooden skewer;
- ruler and simple pencil.
Cut A4 colored paper crosswise into strips 2.5 cm wide.

Now turn the strip into a fringe: cut it into transverse strips about 1 cm wide, not reaching the edge about 1 cm.


Using a skewer, twist each strip of fringe tightly to the cut line.

Having carefully completed these manipulations, you will receive a paper strip, on the edge of which there will be cute rolls - these are the buds of our hyacinth.

For the stem, cut out a 21*2.5 cm rectangle from green paper.

Start twisting the rectangle from the corner diagonally into a tight tube. Generously coat the surface of the paper with glue and twist the tube to the end.

Turn the blank with the buds with the back side facing you and carefully coat it with glue. Wrap the stem with the bud blank, starting from the top and moving down in a spiral.

Coat the tip of the strip with additional glue for a more reliable fixation.

The first hyacinth has already bloomed right in your hands, but to make it more spectacular, take care of the leaves. Cut out a rectangle 8*2.5 cm. Fold it into an accordion along the larger side in 1 cm increments.

Cut out an oblong leaf from the resulting blank. You should get the following.

Lubricate the lower part of the strip with leaves with glue. Step back about 5 cm from the bottom of the bud and twist the leaves at an angle in a spiral, as shown in the picture below.

Our first hyacinth turned out very nice, and you will spend even less time on the rest, because you have already acquired the skills of growing paper flowers.

As you can see, even preschoolers in kindergarten can cope with such simple work, and the result is gorgeous.

Hyacinths from napkins using the cutting technique

Let's look at another way to make a craft for mom on March 8th. We continue our parade of festive and creative ideas. We offer you a simple master class on “growing” another type of paper hyacinths.
To work you will need:
- corrugated paper;
- 2 sheets of white office paper;
- colored plain napkins;
- double-sided green paper;
- 1 liter plastic bottle;
- PVA glue;
- wooden skewer;
- scissors.
First of all, prepare a pot in which we will “plant” the paper plant. To do this, cut off the bottom plastic bottle. Squeeze a sheet of white paper into a ball and place it in a plastic blank.
Cut the second sheet in half along the larger side. Roll the resulting rectangle into a tube and secure its ends with glue. Make cuts on the bottom and glue it to a wad of paper in the pot.

We have a stem for hyacinth; cover its lower part with green paper.

Tip: You can cover the stem with plasticine and stick napkins in, not placing it on glue, but sticking it and sinking it into the plasticine stem.
Cut the napkins into squares of different sizes. Each square is a future flower, so decide on the exact measurements yourself. Some people will like large-flowered hyacinth, while others will want to grow it smaller and fluffier.
Place a skewer in the center of the square and lift its edges towards it, crumpling it a little. We glue the stem with such blanks, starting from the top.

Glue the flowers as tightly as possible to each other. Even without leaves it looks beautiful.

Cut out from double sided paper oblong leaves. Glue them onto the stem as shown in the photo.

All that remains is to decorate the pot. Place it in the center of the crepe paper square. Bring the edges up and gather them around the stem, securing everything with a ribbon.

Beautiful hyacinths made from paper napkins can be taken to a crafts exhibition at school or kindergarten, given to your mother, or simply used to decorate a room with them, creating a festive mood on International Women's Day.
Using the trimming technique you can decorate entire panels:

Bouquet made of plasticine
It's time to involve a 5-6 year old child in making a present for grandma for Spring Day. We suggest collecting a cute plasticine bouquet of roses with it. The complexity of this craft is designed for preschool educational institutions, so feel free to involve your preschooler in plasticine creativity.

By the way, based on this bouquet you can easily make an original one. Just stick it on a cardboard base and write warm wishes to the recipient inside.
Callas from cotton pads
We continue the selection, the culprits of which were easy crafts for mom. We suggest surprising her with calla lilies from cotton pads. In addition to them you will have to stock up cotton swabs, yellow paint and green crepe paper.

Even the pupils senior group kindergartens will cope with this flower arrangement with minimal adult assistance. A 7-8 year old child is quite capable of growing such calla lilies on his own. The main thing is to share the idea with the children and monitor its implementation carefully.
Spring bouquet
We present to you another step-by-step master class on a spring theme. The difficulty level is low; even kids can handle this craft. middle group kindergarten

To work you will need:
- colored paper;
- scissors;
- glue.
Take a sheet of green paper, preferably double-sided, A4 size. Fold it in half along the larger side and glue along the very edge.

Make parallel cuts on the fold side, not reaching the bottom by a couple of centimeters.

Roll the workpiece into a cylinder and glue the edges. Spread the leaves so that they are evenly distributed in the bouquet.

Cut out many colorful flowers. You can use a template to make them the same or rely on your eye.


Each paper flower needs to be glued onto a leaf.

A wonderful craft for kindergarten or school spring holiday ready. If such a cute bouquet is presented to grandmother loving granddaughter or grandson, her joy will know no bounds.

Another idea in the form of a hand - palms:

Beaded lavender
A luxurious bouquet of sprigs of beaded lavender will be an excellent gift for mom on the Eighth of March or a spectacular touch in the decoration of the room.
This video master class is perfect for beginner lovers of bead art, because the flowers in it are created using hot glue. This means you will need a glue gun. But the product itself is completed very quickly, which is good news. With a little effort, you can create beaded lavender at home, practically for free.
Your friends will think that it was purchased for a lot of money from a famous designer.
Flowers made from paper napkins
An original DIY craft for March 8th does not always have to be difficult to make, but it simply must be spectacular. How to combine this, you ask? And instead of an answer, we found for you two video master classes that will undoubtedly inspire you to joint creativity with children.
1) Flowers-balls
You may not believe it, but to create a terry flower ball you only need floral wire and large plain napkins.
For one flower you need to make 4 identical blanks. For each of them you will need 4 rectangles from paper napkin size 32*8 cm.
The rectangles are stacked, assembled into an accordion and tied with wire. Then you need to unfold the paper, lifting it up in layers. Already at this stage you get a nice carnation.
But you will learn how to turn these blanks into a terry ball after watching the video tutorial.
Making such flowers will be feasible for a primary school student. You will need materials and control over the creative process.
2) Two-color terry peonies
Another idea simple crafts for kindergarten by March 8 - pay attention to the paper flowers made from napkins. They are easy to make, even a child can “grow” his own peony to please his mother, sister or favorite teacher.
In addition to napkins of two shades, you will need colored paper, scissors and PVA glue.
And all the subtleties of “growing” a peony from scrap materials are revealed in detailed video mk.
DIY flower pots
Do you already have handmade flowers for the holiday, but don’t want to put them in a regular vase? Is the desire to get creative just off the charts? We invite you to realize your creative potential in making the cutest basket-pot for topiary or bouquet. Making it from wood or weaving it from wicker is a painstaking task that requires a lot of free time and special tools.
We offer you a lightweight option that will not affect the appearance of the product in any way. To work, you will need a paper cup and ice cream sticks.
Our step-by-step photo instructions can become an idea for children's handicrafts for elementary school.
Or you can make a flower in a pot with grass:
Bouquet with sweets
Your little one is only 4 years old, but he wants to make a gift for the girl he likes? Or are you going to a children's birthday party and wondering how to beautifully present sweets to the birthday boy?
Especially for you, we have prepared photo instructions for creating a simple candy bouquet. You will need colored cardboard, wooden skewers and candies, and your child will need a desire to create.
Volumetric flower crafts using a plastic spoon
We present to your attention another simple master class on making paper crafts. The difficulty level is low, the work is suitable for junior group kindergarten

To work you will need:
- paper cup;
- plastic spoon;
- bright plain napkins;
- scissors;
- paints;
- cotton wool;
- a piece of foam;
- glue.
Glue a small piece of foam inside the cup for greater stability. Turn the workpiece upside down and paint the bottom with brown paint and the side with green. Make a small cut on the bottom so that the handle of a spoon can fit through it.
Paint the spoon with green paint, you can also use green nail polish.
Fold the napkin in several layers. Then cut out petals from it: they can be of any shape, or use a spoon as a template.

Glue the petals overlapping to the inner (concave) surface of the spoon. If you want volume, make several rows and you can combine colors.

All that remains is to make the centers for our flowers. Their role will be played by small balls of cotton wool.

Bright flowers made of felt and buttons
If you have felt and multi-colored buttons at home, and your child has a desire to make something beautiful for the holiday with their own hands, this step-by-step tutorial will definitely come in handy. We invite you to put together an elegant bouquet of felt flowers that will look stylish and unusual.
A large bright mug with felt flowers will be an entry for victory in a children's holiday crafts competition or a cute souvenir for a beloved friend.
You can print our stencils for cutting out various flowers (click on the picture, it will enlarge, after which the template can be downloaded):
Airy flower made of papyrus paper
A voluminous paper flower can become the basis of a beautiful composition or an addition to holiday gift wrapping. Making it is not difficult even for a novice florist, just follow our photo instructions.

Pasta craft ideas
Did you know that pasta is not only a popular food product, but also a valuable raw material for children's creativity? If not, we invite you to urgently fill in the gaps in your education and familiarize yourself with a selection of photographs original ideas for mandatory implementation.


Pasta creativity is accessible to children different ages, just choose a difficulty level that matches your child’s abilities. It is logical that for 3rd grade you can take on more complex ideas than for the preparatory group.


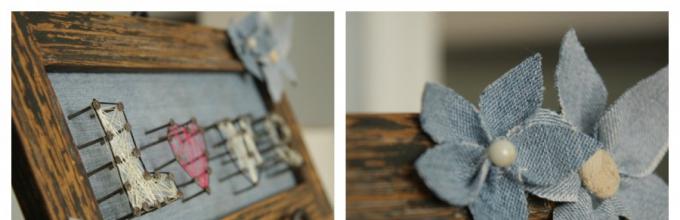
Panel in string art style
If you feel grandiose creative ambitions and want to surprise your loved ones with your masterpieces, try your hand at a rather young direction of handmade - string art.
To work, you will need small nails and threads; it is better to use plywood for the base of the panel. Additionally, get a hammer and first make a pattern of the outline of the image.
Such a craft for March 8 can become a real work of art if you put in a little effort and show patience and accuracy. For inspiration, we invite you to familiarize yourself with panels of various levels of complexity.


The world of creativity knows no boundaries, so you shouldn’t set boundaries and templates for yourself. Teach your children to think outside the box and bring something special from their hearts to every craft.

Remember that the most expensive gifts for loved ones, made with your own hands and the hands of children, do not have to be perfect at all. They must be made with soul.
© MirPositiva


