
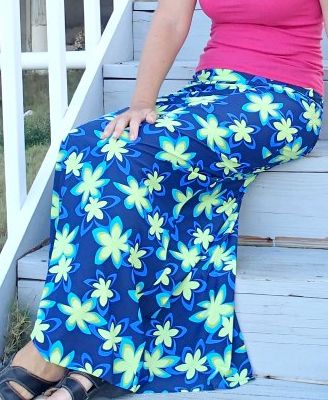
Sewing a simple floor-length skirt is not difficult even for a novice craftswoman. After all, you can do without a pattern; it will be enough to take just a few measurements. In this article we will analyze in detail what needs to be measured and how, how to cut out parts and sew. For those who don’t want to bother with drawing, I offer ready-made free patterns for a long skirt, which can be downloaded at the end of the article.
How to create a floor-length skirt pattern
First we need to decide on the fabric. It is desirable that it stretches in the transverse direction. Otherwise, the skirt will hinder movement.
Required measurements:
- Waist circumference,
- Hip circumference (optional measurement, needed for verification),
- Length from waist to outer foot.
- Step length (needed so that the skirt does not hinder movement).
With the first three measures, I think there should be no questions. But to measure the length of the step, or rather, it would be even better to say the circumference, you need to take your usual step and measure the circumference with a centimeter tape, clasping your ankles.
On fabric folded in half, set aside a quarter of the OT on top, for example, if your waist is 68 cm, then you will need to set aside 17 cm + seam allowance.
We set aside the length along the fold line, for example 90 cm. From the resulting point we set aside a quarter of the step circumference. So, if your measurement of this value was 88 cm, then you will need to set aside at least 22 cm. Of course, you can measure more, but if you take a smaller segment, keep in mind that walking in a skirt will not be very comfortable. To correct the situation, you will have to make a cut, but we sew without it.
Finally, check to see if the skirt is tight at the hips. To do this, measure approximately 18-20 cm below the waist and measure the width in this area, it should be at least a quarter of the circumference of your hips. If you have a narrow waist and very wide hips, you will have to slightly increase the waist mark and increase the width of the lower section by the same amount.
Method No. 2. According to the method of Marlene Mukai.
Marlene Mukai suggests creating a long skirt pattern using the hip circumference as a basis. Below are drawings of such skirts. We see that initially a rectangle is drawn, the width of which is a quarter of the OB. We measure a quarter OT from the top, and another quarter OB is laid down from the edge of the rectangle. The edges of the skirt need to be slightly rounded. In my opinion, Marlene Mukai’s patterns are one of the most accurate and at the same time simplest. By the way, all measurements in the drawings are indicated taking into account allowances. Size chart below.


How to sew a maxi skirt
Cut out the pattern pieces. Place them right sides together and sew the side seams. Fold the bottom.
To process the top, cut a strip of fabric, the length of which will be equal to OT, the width will be approximately 20 cm. Fold it in half and sew it to the upper section of the skirt. If you have very wide hips and the fabric is not elastic, you can cut a longer strip and then insert an elastic band into it or sew on rubber veins.

Other options for maxi skirts
Here are some more options long skirts. The size chart for these drawings is the same as for the Marlene Mukai patterns.


To do this we need three measurements.
For example, I use the standard size 48, and you take measurements from your figure or from the figure of the person for whom you are going to sew this skirt.
Skirt length Du - 68cm
Waist semicircle POT - 38cm
Semi-circle of hips POB - 52 cm
In addition to these measurements, you need to take into account allowances for a loose fit. Allowances are usually 1–2 cm along the hip line, and 0.5–1 cm along the waist line.
In the upper right corner we put point A. From it, down a vertical line we put the distance to the hip line - 18cm (for all sizes), we put point B and the length of the skirt is 68cm, we put point D.
Through these points to the left we draw horizontal lines and set aside 54 cm ( taken measurement FOB plus 2cm for a loose fit) and put points A1, B1 and D1, respectively, through which we draw a straight vertical line:
AA1 = BB1 = DD1 = 52 + 2 = 54cm.

Fig.2
From points A, B and D to the left we set aside the width of the back panel of the skirt, which is equal to half the POB measurement minus 1 cm and put points A2, B2 and D2, respectively, through which we draw a straight vertical line:
AA2 = BB2 = DD2 = 52: 2 – 1 =25cm.

Fig.3
Calculation of the depth of darts along the waist line:
The total size of the dart opening along the waist line is determined as the difference between the POB measurements with an allowance for a loose fit (52 + 2 = 54 cm) and the POT measurements with an allowance for a loose fit (38 + 1 = 39 cm), 54 - 39 = 15 cm.
Of these 15cm, half, i.e. 7.5 cm is the depth of the side darts, 3.7 cm to the left and to the right from point A2. Set aside and place points A3 and A4.

Fig.4

Fig.5
The opening size of the darts on the back panel of the skirt is equal to 1/3 of the total opening size of all darts minus 0.5 cm:
15: 3 – 0.5 = 4.5cm i.e. 2.25 cm to the right and left from point B.
Set aside and place points B1 and B2.

Fig.6
From point B down vertically we set aside the length of the dart 14 - 15 cm (constant value), we get point B3 and connect points B1 and B 2 with point B 3.

Fig.7
Determine the location of the dart on the front panel of the skirt. From point A1 to the right we set aside a distance equal to 1/4 POT plus 1 cm and place point B4.
A1B4 = 38: 4 + 1 = 10.5 cm.

Fig.8
The size of the dart solution on the front panel of the skirt is equal to 1/6 of the total amount of all darts:
15: 6 = 2.5 cm i.e. 1.25 cm to the right and left from point B4. Set aside and place points B5 and B6.

Fig.9
Down from point B4 vertically we set aside the length of the front panel dart, it is equal to the size of the tuck opening (See previous calculation) multiplied by 4. (2.5 x 4 = 10 cm) and set point B7.
We connect points B5, B6 and B7.

Fig.10
From point B2 upward we set aside 3cm (constant value) and place point B3.
We connect points B3 and A3 with a smooth line, extending it upward by 1.5 cm and placing point A5. We do the same with points B3 and A4, not forgetting to extend it upward by 1.5 cm, and placing point A6.

Fig.11
The last step was to design the side lines of the front panel of the skirt A5B3D2 and the rear panel - A6B3D2.

Fig.12
To complete the design of the waist line, you need to connect points B6 and A5, as well as A6 and B1, with smooth lines.

Fig.13
All! The skirt base pattern is ready.
This is the basic drawing on the basis of which you can design any style from the whole variety of skirt styles.
I wish you all creative inspiration!
Download in one file | Turbobit | |
The rights to this article belong exclusively to the author. Full or partial use of the materials of this article in electronic publications on the Internet is possible only if the following conditions are met:
Information about the author must be preserved. In the title or at the end of the published reprint, the source must be indicated: www.site Internet resource "Sewing Crafts Master" with a direct, active, visible to the user, not blocked from indexing by search engines hyperlink to this article.
Republication of texts in newspapers, magazines or other replication outside the Internet is possible only with the written consent of the author.
But, of course, there is a way out. We suggest mastering the basics of design in order to easily build yourself an ideal model. Let's start our course by building a straight classic skirt.
You will need:
- graph paper (),
- pencil,
- eraser,
- ruler (),
- tailor's pattern,
- calculator
- To take measurements from a figure, we will need a measuring tape
Measurements for construction
- St - half waist circumference (we divide the girth measurements in half and get half girths)
- Sat - half hip circumference
- Di - product length
How to take measurements
Waist circumference
When taking measurements of the waist circumference, you need to take special attention that the measuring tape should be positioned strictly horizontally in the narrowest place. Do not pull the tape, as this may cause the product to narrow at the waistline. Rice. 1
Hip circumference
When taking measurements of hip circumference, you also need to pay special attention to the fact that the measuring tape should be positioned strictly horizontally, passing along the most protruding points of the buttocks. The tape should also run with some freedom and without tension. The distance from the waist to the protruding points of the buttocks is the measurement of the height of the hips. 
Rice. 2
Increases in looseness of fit
- increase in waist (Fri) 0 - 1.0 cm,
- increase in hips (Pb) 0 - 2.0 cm.
To build a classic skirt, we will take size 44 (this is size 88 cm across the chest) for a height of 170.
Measurements
- St=33.5 cm,
- Sat=48.0 cm,
- position of the hip line for constructing the skirt: 18.0 - 20.0 cm (this measurement depends on the type of figure, with a significantly non-standard figure this measurement must be taken directly from the figure).
Calculation for construction
- St+Fr=33.5+0.5=34.0 cm - width of the skirt along the waist line.
- Sat+Pb=48.0+1.0=49.0 cm - the width of the skirt along the hip line and the width of the grid for construction.
- Wb=19.0cm - position of the hip line
- Di = 55.0 cm - the length of the finished product and the height of the grid for construction.
Step 1. Constructing a mesh
We take point T as the first point of construction - and from it we set the width of the grid to the right - 49.0 cm, draw a line and put point T1 at the end of the segment.Down from point T we set aside the height of the mesh and put point H at the end of the segment - the length of the product - corresponds to the bottom line of the product.
We complete the rectangle by lining up point H1 to the right of point H. The segment H-H1 is also 49.0 cm and is the width of the base grid.
Also, for construction, we need a line of hips: from point T down on the segment TH we set aside a distance equal to the height of the hips = 19.0 cm. And to the right we set aside a horizontal line and on the segment T1-H1 we get point B1.
We mark the side seam line; it will be located in the middle of the mesh, i.e. 49.0 cm/2 = 24.5 cm.
The first and important stage of construction should look as shown in Fig. 3.

Rice. 3
Step 2. Construction of darts
To construct darts along the front, back panels and side seams, you need to perform the following calculation: (Sb + Pb) - (St + Pt) = Gvyt (dart depth).49.0 cm - 34.0 cm = 15.0 cm - this is the total difference between the size of the waist and hips, as well as the total amount of darts along the waist of the product.
In the side seam we put half the difference between the hips and the waist, which is 15.0 cm/2=7.5 cm.
In turn, you need to divide the total dart along the side seam into a dart along the front panel, and a dart along the back panel, which will be 7.5 cm/2 = 3.7 cm.
Constructing a side seam dart
From point T2 to the left point T3 and to the right point T4 a distance of 3.7 cm, connect points T3 and T4 with point B2, we have a temporary side seam line.The remaining dart at the waist should be distributed in a percentage ratio of 30%/70% along the waist of the front/back part of the skirt, respectively.
The total amount of dart at the waist of the front panel is 7.5*30%=2.2 cm, the total amount of dart at the waist of the rear panel is 7.5*70%=5.2 cm.
For ease of construction, you need to divide the total amount of the dart by 2, in this regard, half of the dart of the front panel will be 2.2 cm/2=1.1 cm, and half of the dart of the rear panel will be 5.2 cm/2=2.6 cm.
The length of the front panel dart should be 8.0 - 11.0 cm, and the length of the back panel dart should be 15.0 - 20.0 cm.
For example, let's take average length darts for construction:
- dart length of the front panel - 9.0 cm
- The length of the back panel dart is 17.0 cm.
The length of the front and back darts depends on the type of figure and the height of the hips: for higher hips the darts need to be made shorter, for lower hips the darts need to be lengthened.
The location of the darts on the front and back panels should be at a distance of about 50% from the center of the front panel and back panel to the side seam.To construct the dart of the back panel, the distance T-T2*50%=24.5*50%=12.2 cm.
To construct the front panel dart, distance T1-T2*50%=24.5*50%=12.2 cm.
Construction of the back panel dart
From point T along the waist line to the right, place point T5, and lower the perpendicular down to point T51, 17.0 cm long - the length of the 3D dart. We put the tuck solution of the back panel 2.6 cm in each direction from the perpendicular and put points T5* and T5** respectively. We connect these points with point T51. The back panel tuck is ready.Construction of the front panel dart
From point T1 along the waist line to the left, place point T6, and lower the perpendicular down to point T61, 9.0 cm long - the length of the PP dart. We put the tuck solution of the front panel 1.1 cm in each direction from the perpendicular and put points T6* and T6** respectively. We connect these points with point T61. The front panel tuck is ready.The second stage of construction should look like shown in Fig. 4.

Rice. 4
Step 3. Construction of the side seam
To construct a side seam, divide segment T3B2 and segment T4B2 in half - we get points T31 and T41. From these points we build a perpendicular T32 and T42 measuring 0.5 cm.To align the waist line, it is necessary to lengthen the lines of the side seams of the front and back panels by 0.5 cm. In accordance with this, the line of the temporary side seam T3B2 and T4B2 must be extended upward by 0.5 cm and we obtain points T3* and T4*.
The third stage of construction should look like shown in Fig. 5.

Rice. 5
Step 4. Skirt silhouette
The silhouette of a classic straight skirt along the hemline may vary, and the side seam may widen or narrow slightly along the hemline. For a more formal silhouette, let’s make a slight taper along the side seam. To do this, along the bottom line from point H2 in each direction, we will set aside a narrowing of 1.5 cm and get points H3 and H4, respectively.The fourth stage of construction should look like shown in Fig. 6.

Rice. 6
Step 5. Side seam line
Through points T3*-T32-B2-H3 and T4*-T42-B2-H4 we draw the lines of the side seams of the front and rear panels. The side seam line should be smooth, made according to the pattern.The fifth stage of construction should look like shown in Fig. 7.

Rice. 7
Step 6: Waistline
Next, we connect points T5**-T3* with a smooth line - we get the waist line ZP, and we connect points T6**-T4* with a smooth line - we get the waist line PP.The sixth stage of construction should look as shown in Fig. 8.

Rice. 8
Step 7. Bottom Line
In order for the bottom line along the side seam not to be an angle, it needs to be extended downwards by 0.2 cm on each side. Next, we connect points H-H3 and H1-H4 with a smooth line at the side seam.The seventh stage of construction should look like shown in Fig. 9.

Rice. 9
The main construction of the skirt is completed, as a result we have a drawing of the front and back panels of the skirt, as shown in Fig. 10.

Rice. 10
Step 8. Construction of the belt
To construct a belt, you need to measure the length of the waistline and check it with the originally calculated value along the waistline.The lengths of the sections along the back and front panels are equal: 9.6 cm + 5.9 cm + 7.4 cm + 11.0 cm = 34.0 cm. The initially calculated width of the skirt at the waist was 34.0 cm, which means the drawing is correct.
The length of the belt is 34.0 cm at half and the width of the belt for a classic skirt is 3.0 cm.
This construction stage should look like shown in Fig. 11.

Rice. 11
Now you need to transfer the details of the skirt onto tracing paper, connect the darts if necessary, and mirror the part of the front panel so that the front part is cut out in one piece. Cut for ease of cutting, as shown in Figure 12. Allowances can be applied on tracing paper or directly on the fabric.

Rice. 12
Having understood the basic principle of constructing a classic skirt, you can add various parts(cuts, slits, pockets, fasteners, yokes, various undercuts) and create your own unique models. Such elements will add a bright personality even to such a basic model as a classic skirt. You can also create other products based on it.
In the next design master class we will tell you how to build a wedge skirt and a godet skirt.
How to build a circle skirt
A circle skirt is one of the options for a flared skirt. It also has a flared silhouette and is built around a circle. You can make your own circle skirt pattern using our master class. A step-by-step illustrated master class will tell you how to correctly take measurements, make calculations for construction and design a circle skirt, a half-circle skirt and a flared skirt based on 1/6 of a circle.Description of the retro style: You can read more about the retro style itself in our article: “Retro with a wedge: a year skirt.” Of the five proposed patterns, the first three patterns are classic six-wedge skirts, made on the same structural basis and differ different options wedge The fourth model of a retro year skirt is a straight skirt, in the base of which four half-sun wedges are inserted into the base of the fabric. The fifth model is again a version of a six-wedge skirt.
3 golden rules
Before you start working on this wonderful style, you need to familiarize yourself with the three golden rules for designing and sewing godet skirts.
1. In a skirt, flares should begin 5-7 centimeters below the most convex point of the figure. Above this point, flaring cannot be performed, otherwise the silhouette of the godet skirt itself will be lost.
2. The flare can be started from different points (lower or higher) in accordance with the type and characteristics of the figure, and the angle of the flare can also change depending on the specific need
3. The sum of the wedges is equal to the hip measurement, while the width of each wedge can vary as desired.
How to design a style: Pattern drawings for the first four skirts are given for size 48. The finished length is 75 cm, but, of course, you can make the skirt longer or shorter. The fifth pattern is designed for size 44.
Pattern - diagram 1.
Drawing of a symmetrical wedge. Its maximum width at the bottom is 44 cm.
-%D0%B2%D1%8B%D0%BA%D1%80%D0%BE%D0%B9%D0%BA%D0%B0%201.jpg)
Pattern - diagram 2.
One side of the wedge is straight, the other is flared at an angle of 45 degrees. This version of the skirt has one feature: both sides of the wedge - straight and flared - must be equal in length. The wedges are cut one at a time to obtain a front cut. The corner at point 3 must be pulled back with a hot iron.
-%D0%B2%D1%8B%D0%BA%D1%80%D0%BE%D0%B9%D0%BA%D0%B0%202.jpg)
Pattern diagram 3.
Sew the wedges around the waist to the hip line, or 7-8 cm below, then insert the wedges into the slits, the upper angle of which is 45 degrees.
-%D0%B2%D1%8B%D0%BA%D1%80%D0%BE%D0%B9%D0%BA%D0%B0%203.jpg)
Pattern diagram 4.
In the folds of the middle front and back, as well as in the side seams, we cut out strips of fabric 4 cm wide (unfolded) and 35 cm long. We insert “half-sun wedges” into these cuts.
-%D0%B2%D1%8B%D0%BA%D1%80%D0%BE%D0%B9%D0%BA%D0%B0%204.jpg)
Pattern diagram 5.
Skirt made of six wedges.
-%D0%B2%D1%8B%D0%BA%D1%80%D0%BE%D0%B9%D0%BA%D0%B0%205-1975.jpg)
Material consumption: for models 1, 2,3 you will need 1.6 m with a width of 150 cm. For a straight skirt with a half-sun wedge - 1.4 m of fabric with a width of 150 cm. The approximate fabric consumption for model 5 is 1.6 m with a width of 150 cm.
What material is preferable for sewing: You can choose any fabric, depending on the purpose for which the skirt is made. If this is an office option, then it is better to choose practical fabrics, and for summer models Lightweight fabrics are better.
Sewing difficulty level: The retro style itself belongs to the average level of complexity. Sufficient tailoring experience is required. However, the fourth model is an option for those who are already good at sewing - processing skills will be required.
What clothes and accessories can be combined with: It is best to combine such a skirt with light blouses, tight-fitting shirts and cropped jackets. You should not combine such a skirt with coarse knit sweaters, but with a voluminous pullover the style can look quite good. A year skirt goes well with a short leather jacket, creating an interesting brutal-romantic image. For footwear, you should choose shoes with heels, preferably high heels. But flat-soled shoes should not be combined with this style.
See more articles about retro fashion.
Using one pattern (in this case it is a pattern for a skirt with a yoke), you can sew several different models. Due to what? Just changing the length of the lower part of the skirt and (or) laying the folds in different ways (one-sided, counter, bow). You can, for example, add a thin belt on the belt loops, edge the edge of the yoke, etc.
The upper section of the skirt yoke is finished with a facing, the pattern is attached. This node can be processed in another way. For example, sew on a narrow and/or wide belt. At your discretion. The yoke itself should be reinforced with a gasket and/or placed on a lining.

The proposed skirt model is a good opportunity to highlight the beauty of your figure. The basis is a pencil skirt; along the bottom of the skirt there are small set-in wedges, adding elegance and femininity to this model.
The skirt pattern is given in actual size.
For sewing a skirt, the most suitable different materials. These are not only suit and dress fabrics. You can safely use suede, soft leather or knitwear. This model of a skirt made of lace fabric with a contrasting lining looks very beautiful. Since we touched on the lining, it is worth noting that for the warm season you can sew this model of a chiffon skirt.
This skirt fits perfectly with the pattern of which we offered you in.
The vertical reliefs of the skirt are a continuation of the reliefs of the jacket and divide the figure into several vertical parts, which visually elongate the figure and make it slimmer - and this is exactly what we are striving for.
There is an opinion that women with curvaceous should not wear clothes white, however, life demonstrates the inconsistency of such an opinion. It is important to skillfully choose the optimal style and then any color will “play on your side.”
Skirt pattern with two reliefs on the front panel. There is a small vent in the middle seam of the back panel, allowing for free walking while walking.

Pattern of a fashionable pencil skirt with a one-piece belt and original figured reliefs. At the bottom of the middle seam of the back panel of the skirt there is a slit that provides freedom when walking. The zipper can be located in both the left and middle seams.
To sew a skirt, you can use the most various fabrics. Classic will do suit fabric, plain painted and with a pattern or a combination thereof. You can also use raincoat fabric, denim, corduroy, taffeta and other fabrics. Depending on the fabric and finishing, e.g. finishing stitch or set-in piping along raised seams, this skirt model can be made in both sports and classic style. In any case, it is modern, feminine, original model skirts

The pattern of the skirt with narrow inserts along the vertical reliefs visually elongates the silhouette. Yoke on the side parts, lack of a belt, slits in reliefs and decorative inserts give the skirt originality and lightness. This skirt model will adequately complement the ideal image of a business woman.
The appearance of this skirt model will largely depend on what fabric you choose for the main parts and what material for decorative inserts. The most acceptable various options combinations. You can play on the contrast of colors and textures. For example, against the background of a plain skirt, circular inserts look original. In any case, this skirt model will definitely win over a strict conservative skirt.
The length of the skirt is 60 cm, but you can adjust it (length) at your own discretion.
 The highlight of this skirt is the yoke draping.
For sewing, use well-draped materials: thin knitwear, chiffon, etc.
The lower part of the skirt is flared.
If the width of the fabric does not allow you to cut the entire bottom part, break it into several parts. In this case, the lower part of the skirt will consist of several wedges.
Skirt size:
Waist 68 cm
Hip circumference 96 cm
If you have already used our ready-made patterns, then you are probably convinced that preparing a pattern for work will not be difficult. special labor. Click on the diagram located at the end of the article (the pattern will open in a new window), print it on a regular printer, glue it together (it’s convenient and quick to do this with narrow tape) and cut it out. That's all the preparation.
Be sure to check the scale: on a printed sheet with a 10x10 cm square shown, the length of each side of the square should correspond to exactly 10 centimeters.
Modeling a pencil skirt described earlier in several versions.
If you have a standard figure or know how to adjust a pattern to your parameters, this ready pattern for you.


