(Lesson on additional education, designed for different age groups.)
Purpose: to study the technology of making products from salt dough.
Tasks
Educational
To strengthen students’ ideas about the ball
Develop the ability to make a caterpillar from balls of different sizes, placing them on a sheet.
Corrective
Develop eye, attention, general coordination, fine motor skills hands
Educational
Cultivate perseverance, accuracy, listening skills, and finishing work.
Work on the formation of UUD:
personal UUD:
Respectful attitude towards the position of the interlocutor.
Respect for each other's work.
communicative UUD:
Ability to listen and engage in dialogue
The ability to express one’s thoughts with sufficient completeness and accuracy
- convey your position to others
Regulatory UUD
-planning - outline a work plan
-forecasting - anticipation of the result
-control - in the form of comparing a method of action and its result with a given standard in order to detect deviations and differences
- correction - making necessary additions and adjustments to actions in case of discrepancies between the sample and the result;
cognitive UUD:
Structuring knowledge;
Modeling an object based on a sample
Equipment:
Stacks, modeling boards, hand wipes, salt dough, green cardboard, scissors, leaflet templates. Illustrations of caterpillars.
The desks are arranged in a semicircle.
Preliminary work:
The previous lesson involved looking at illustrations and reading notes from the encyclopedia “Secrets of Living Nature.”
Progress of the lesson:
teacher:
Good afternoon
Today I suggest you make a caterpillar and cut out a beautiful green leaf for it from cardboard so that it has something to eat. To begin with, we will prepare our hands for work and try to give each other good mood.
"Ball in a circle" (game)
Goals: Development of communication skills.
Development of attention and general coordination. Repeat the concept of “Ball”.
We will pass the ball around, looking into each other's eyes and smiling.
What shape does the ball resemble?
Description of the game: Children are invited to pass the ball in a circle, looking into each other's eyes and smiling.
Our class immediately became warmer and sunnier from your smiles.
teacher: Let's think about what shapes we will use to make a caterpillar.
Children: from balloons.
teacher: how will you roll out the balls?
Children: between the palms in a circular motion.
teacher: will you make the balls the same size?
Children: you can have one, or you can have a big one at first, and then smaller ones each time.
teacher:: Well done. I also think that the caterpillar should be made from balls of different diameters, then it will turn out prettier. Don't forget that you will need to use a little less dough each time. And before you sculpt, you need to cut out a piece of cardboard so that there is somewhere to place the caterpillar itself.
Independent work of children.
Summing up.
Teacher: What wonderful caterpillars you made, now they will remind us of summer. You all tried very hard. Who wants to tell which caterpillar he liked the most?
What material did we work with in class?
Children dshare impressions of each other's work.
Topic: “Craft from salt dough “Caterpillar on a leaf”
The lesson on additional education is designed for a different age group.
Additional education teacher
education
Shchelkunova E.G.
0 62 428
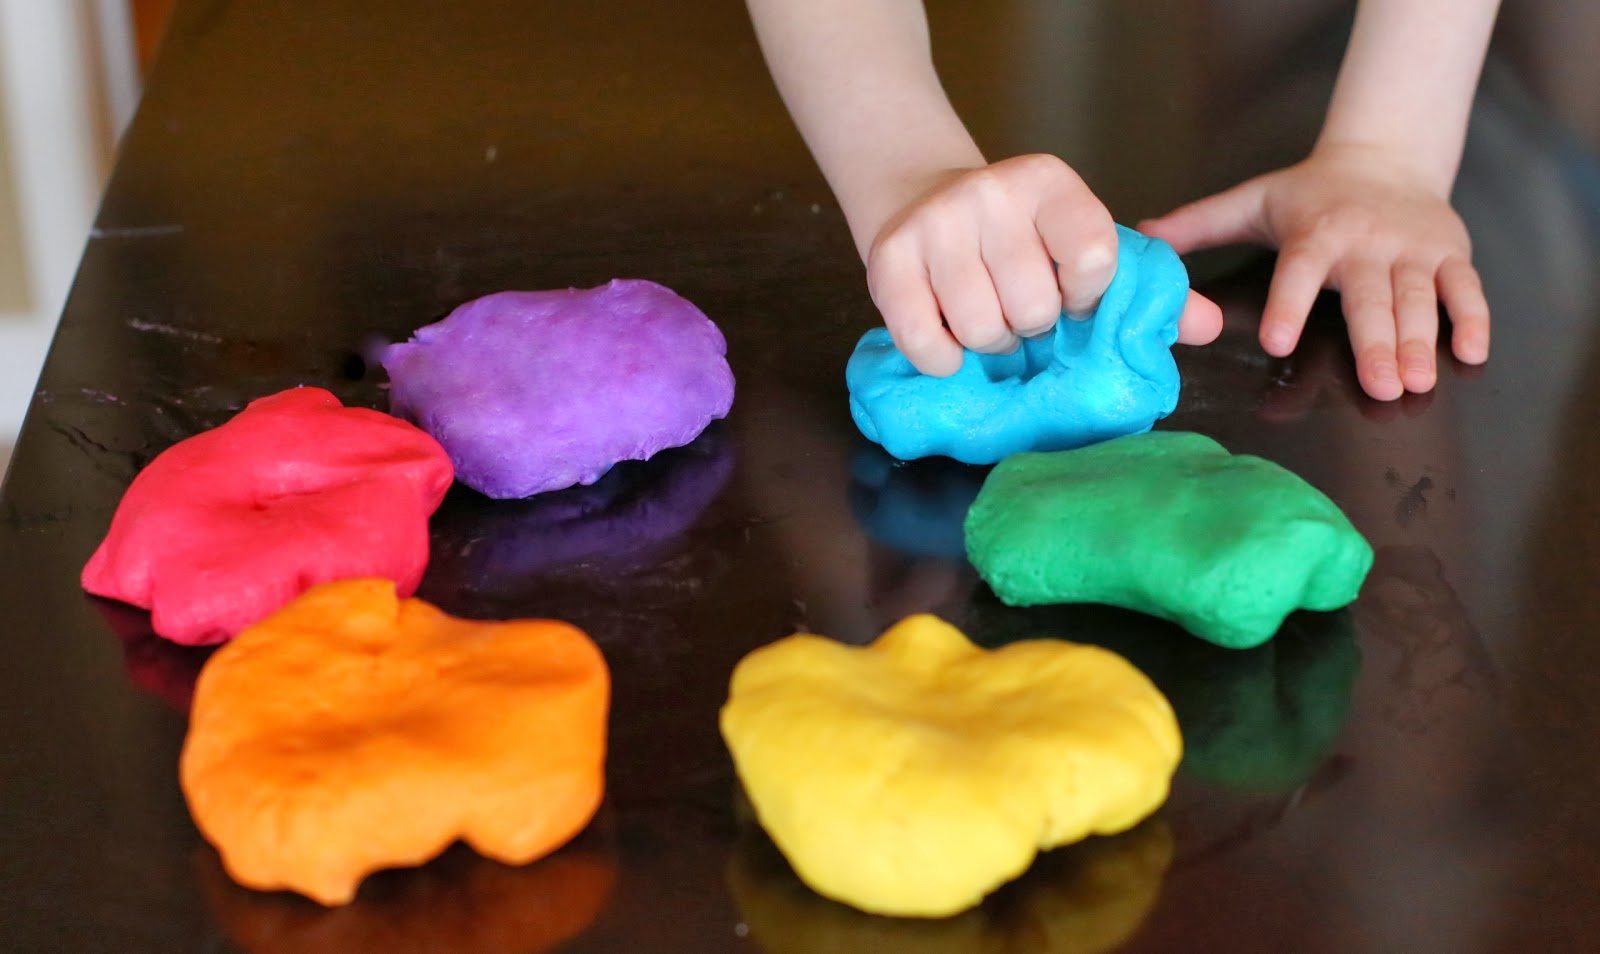
Modeling is one of the most useful activities for kids. With its help, not only fine motor skills of the hands develop, but also perseverance is developed, imaginative thinking and coordination of movements.
One of the best materials for modeling with a child - salt dough. It is absolutely safe, does not contain harmful additives and is easy to use. DIY salt dough crafts will become wonderful souvenirs for your relatives and friends.
Universal recipes
You can find a great variety of salt dough recipes. Each master adds his own additives to them, selecting the desired consistency. The main products for kneading dough are salt, flour and water.Depending on its purpose, its thickness may vary:
- dense dough - for large parts and creating massive panels;
- universal dough of medium consistency - it is convenient to make small pictures and figures from it;
- soft dough - tender and pliable, it is suitable for small elements, exquisite flowers and figurines.
Thick dough
To work you will need:- wheat flour - 1 part;
- table salt - 1 part;
- water - 0.7 parts.
That is, to knead this type of dough you need to take one identical measure (glass, cup, tablespoon) of salt and flour and 0.7 of the same measure of water.
Combine the dry ingredients in a deep bowl and add cold water little by little. The dough should be homogeneous and very dense. There will be grains of salt in it - this is normal, don't worry. Depending on the humidity and quality of the flour and salt, you may need a little more or less water. Therefore, you can’t pour it into the dough all at once.
Medium consistency dough (all-purpose)
To work you will need:- wheat flour - 1 part;
- water - 1 part;
- table salt - ½ part;
- finely ground salt (extra) - ½ part.
Soft dough
To work you will need:- wheat flour - 1 part;
- hot water - 1/4 part;
- finely ground salt (extra) - 1 part;
- PVA glue - ¾ parts.
This dough is ideal for complex work. It holds its shape perfectly, preserving the prints and texture created on it. Its quality directly depends on the quality of the chosen glue.
The figures made from salt dough with glue differ special strength. They will delight their owner for many years.
- If you plan to paint finished goods, it is better to use wheat flour, although you can also use rye flour for salted dough.
- You cannot use iodized salt - the finished figures may crack when drying.
- The dough can be tinted while kneading. For this, food coloring or watercolors are used.
- The finished dough must be wrapped in cling film or a plastic bag to prevent it from drying out.
- A failed dough can be revived. If the dough is liquid, you need to add a little more flour and knead again; if the dough is too tight, moisten it with water and knead until it reaches the desired consistency.
- Do not add fat or hand cream to the dough from which you plan to paint the products - the paint will apply unevenly.
- The finished dough should be stored in the refrigerator for no more than 2 days. It loses its qualities and it will be inconvenient to work with it.
- It is best to sculpt volumetric products on wire or cardboard frames so that they do not fall apart.
- Crafts can be dried naturally, leaving them for a couple of days, baked in a warm oven, or left next to the radiator. It is strictly not recommended to place figurines on the battery itself to avoid cracking.
- It is best to paint crafts with acrylic paint or gouache. Watercolors should not be used: there is a risk of getting wet and ruining the product.
- The junction of the parts must be moistened with water using a brush. This way they will connect firmly and quickly.
- The finished souvenir can be coated with clear nail polish or acrylic varnish. This will protect it from moisture and the paint from fading.
Cute hedgehog - toy for kids
Do you want to know what you can make with your child using salt dough? Start with the most simple crafts. The younger your baby, the simpler the products should be. joint creativity. Try to make a prickly hedgehog, and detailed description The process in this MK guarantees an excellent result and a good mood from a useful activity.
First of all, prepare universal salt dough and nail scissors. Roll a piece of dough into a drop-shaped piece.

The hedgehog's eyes and nose can be made from beads, black peppercorns, or pre-colored dough.

The needles are made using cuts. Use the tips of the scissors to make small cuts, lifting the needles up.

Perform the next row in a checkerboard pattern - with an offset. Row by row, make cuts until the entire back of the hedgehog is covered with needles.

Dry the finished toy in the oven or simply in a warm and dry room. If you wish, you can color it or entrust this important task to your child.

Original souvenir - funny dachshund
You can start preparing for the future ahead of time. New Year's holidays and make a funny dachshund as a gift for friends.
To work you will need:
- universal salt dough (see recipe above);
- cardboard, pencil, scissors;
- paints and brush;
- a piece of rope;
- clear varnish;
- toothpick;
- foam sponge;
- glue "Dragon".
Transfer the template to a piece of cardboard and cut it.

Roll out the dough to approximately 5mm thickness on baking paper. Attach the template and cut out the outline of the dachshund along it. Carefully remove the trimmings so as not to deform the workpiece.

Roll two balls and form them into oblong dachshund eyes. Glue them with a drop of water to the head of the workpiece. Moisten all sections of the dog with water and smooth it with your fingers to remove all irregularities.

Use two small pieces of dough to make eyelids and glue them above the eyes. Use a toothpick to outline the ear, paws, mouth, nose and body contours.

Now you need to add volume to the workpiece. Roll the dough into an oval, glue it onto the ear and smooth it out wet finger joint

Add volume to the dachshund's back and tail in the same way.

Use a toothpick to press oblong dents around the perimeter of the figure. Do them randomly different lengths from the edges of the body to the center.

It's time to dry the workpiece in a warm oven. Bake it until it is completely firm.
The dry figurine needs to be painted. Cover all areas where there are bulges and dents with black gouache.

After the first coat of paint has dried, paint the dachshund yellow. Pick up a little paint on a foam sponge and tint the entire body, while the dents should remain black - do not overdo it.

Draw the eyes of the dried dachshund in white. Make any inscription you wish.

Glue a piece of rope to the back of the craft.

Cover the product with clear varnish and let it dry. The result of the work done is impressive - the mischievous puppy is ready.

Dog with original coloring:


Spectacular fish - step-by-step master class
Try making a beautiful fish with your child. Just follow detailed instructions- and even a little helper will be able to master this modeling technique.
To work you will need:
- universal salt dough;
- brush;
- corrugated felt-tip pen cap;
- ruler.

Pinch the dough on one side of the circle with two fingers, forming a tail.

Correct it and smooth out any rough edges.

On the opposite side, make a mouth for the fish using the handle of a brush.


Use the edge of a ruler or the blunt side of a knife to press impressions on the tail and fins.

Roll small balls and glue them onto the fish's head. These will be the eyes.

Make pupils from smaller balls and press them onto the eyes with the handle of a brush.


It's time to decorate the blank. Use the cap of a felt-tip pen to press down the first row of scales.

Roll a lot of small balls. Glue them with a drop of water to the body of the fish immediately behind the cap imprints and flatten them with the back of the brush.


If there is a suitable imprint, make imprints in the form starfish, no - make do with an already familiar cap or take a different template.

Then push two more rows of cap impressions.

Roll into a thin sausage to form a tail.

Glue it to the blank on the edge of the tail. Fill the entire tail in the same way.

Next, chaotically stick and push a few more small balls.
Dry the resulting workpiece in a warm oven.

Color the fish, guided by your ideas of beauty and the colors available. If you stick it with reverse side magnet - it will proudly take its place on the refrigerator, decorating the kitchen of its happy owner.
Here are some more ideas with fish:


Cheerful boletus mushroom
The initial stage of learning to sculpt is already behind us - you can begin to make more complex products from universal salt dough. Try to master the lesson of making a funny big-eyed boletus. Such an interesting mushroom will be appreciated not only by children, but also by adults.
To work you will need:
- universal salt dough;
- burnt out light bulb (classic pear-shaped);
- cardboard;
- acrylic paint or gouache;
- foil;
- paper napkins;
- masking tape;
- superglue.

Cut a ring out of cardboard and put it on a light bulb - this is the basis of the future mushroom cap.

Form a hat of the desired size from crumpled paper napkins. Secure the structure with tape.


The result is something like this.

Wrap the hat in foil for added strength.


For the hat you can use dough of any color; later the whole toy will be painted. Roll out a piece of dough into a circle at least 3 mm thick and stick around the top of the mushroom cap.

Remove the hat and seal the bottom.

Use the blunt side of a knife to press the strips.

Secure the cap to the mushroom stem using superglue or Moment. It should be slightly tilted towards the back.

Get started with the design. Blind and attach the arms, legs and nose to the fungus.


You can decorate the figurine with a funny caterpillar or make another decorative element, such as a ladybug.

Dry the finished piece.

Paint the figurine, draw eyes and a nose and varnish. The amazing fungus is ready. You won’t be able to pickle it and eat it, but you can easily decorate a shelf with it.

Funny pig pendants
Such funny pendants are an unusual idea Christmas decorations or a nice souvenir for people dear to you. Such a themed gift will come in handy, because the patron of 2019 is the yellow pig.
To work you will need:
- universal salt dough;
- toothpick;
- thin rope;
- paints and brush;
- foam sponge;
- black gel pen;
- superglue.
You can make a huge number of crafts from salt dough, for example: flowers, animals, various figures, inscriptions, numbers, toys, paintings and whatever you want! Modeling from salt dough is called bioceramics. The advantage of salt dough is that it is convenient to work with, this material is absolutely harmless and crafts made from it will delight you for several years. In this article we will look at how to make crafts from salt dough with your own hands.
You will need: a glass of wheat flour, a glass of extra salt, half a glass of cold water, a bowl.

Recipe

The finished salted dough should not stick to your hands or crumble. It should be cool and easy to sculpt. I recommend watching the video master class!

There are two most common ways to dry salt dough. The first method: the finished craft will dry on its own. The main thing is that straight lines do not fall on it sun rays, otherwise it will crack. The craft can be placed on a flat surface and wait a few days. Second method: dry the finished craft in the oven for 3 to 6 hours (depending on the size of the craft). Drying occurs in batches with breaks. One approach is 1-2 hours. For quick drying in one go, set the oven to 75-100 degrees, and then the craft will dry in an hour. At a temperature of 120 degrees, the craft will dry in 30 minutes, but it is better to dry it naturally.
There are two most common ways to color salt dough. The first method: after drying, paint the finished craft with acrylic paints or gouache using a brush. Second method: food coloring is diluted in water, then added while preparing the dough. When the craft is completely painted and dried, it must be coated with transparent manicure or furniture varnish in 2-3 layers. Each layer must dry before applying the next. This way the craft will last for a long time.

You will need: colored salt dough, stack, clear manicure polish, toothpick.
Master class

The salt dough star is ready!
Salt dough caterpillar
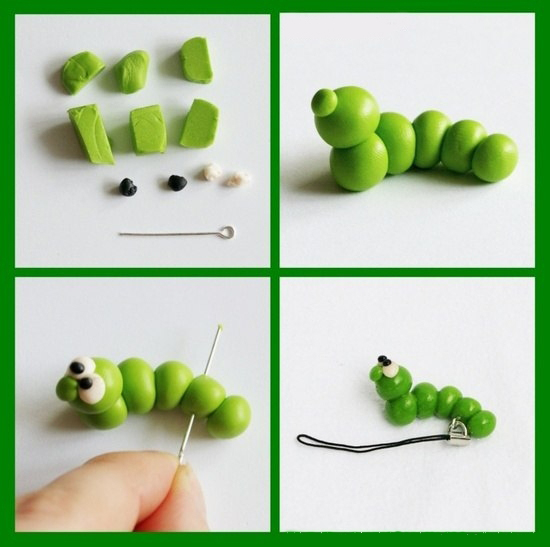
You will need: colored dough, knife, pva glue, toothpick, pendant, clear manicure polish.
Master class
- Roll out the sausage.
- Cut it into 6 equal parts.
- Roll into balls.
- Glue 5 balls together.
- Glue the head.
- Make a nose and eyes, then glue them on.
- Poke a toothpick into the hanging area.
- Dry the craft.
- Attach the pendant.
The salt dough caterpillar is ready!
Salt dough apple

You will need:
Master class
- Make half an apple, make the inside flat, pressing it onto a flat surface.
- Make a thin flat center and glue it to the main part.
- Roll 6 seeds and a stick, then glue to the apple.
- Blind the leaves, then glue them.
- Dry the craft.
- Apply varnish and wait until completely dry.
The salted dough apple is ready!
Salt dough elephant

You will need: colored salt dough, pva glue, clear manicure polish.
Master class
- Make the elephant's body by rolling an elongated ball.
- Make 4 legs in the shape of plump sausages.
- Make a proboscis.
- Make the elephant's ears in this way: roll out 2 flat cakes, glue flat cakes of the same shape of a smaller size and a different color to them.
- Make a small ponytail.
- Blind your eyes.
- Assemble the elephant in the following sequence: glue the legs to the body, then glue the proboscis, then the ears, eyes and tail.
- Dry the craft.
- Apply varnish and wait until completely dry.
The salt dough elephant is ready!

You will need: salt dough, foil, a candy bowl or similar plastic container, gouache, a brush, clear manicure polish, a modeling board, a knife or a stack.
Master class


You will need: salt dough, nail scissors, PVA glue, acrylic paints or gouache, manicure brush.
Master class

Salt dough hedgehog is ready!
Owl (eagle owl) made from salt dough

You will need: salt dough, pva glue, nail file, manicure scissors, acrylic paints or gouache, brush, wooden board with a pendant, clear manicure varnish.
Master class

The salt dough owl is ready!

You will need: salted dough, the base on which the craft will be attached, for example, a board or plate, a glass or a knife, a sheet of paper, a simple pencil, a garlic press, a rolling pin, PVA glue, acrylic paints or gouache, a brush, clear manicure polish, cloves.
Master class

Salted dough fruit basket is ready! I recommend watching the video master class!

You will need: salt dough, knife, rolling pin, simple pencil, sheet of paper, sandpaper, acrylic paints or gouache, brush, transparent manicure varnish, glue gun or pva, base for crafts, for example: a board with a frame, transparent manicure varnish.
Master class

Salt dough pencil

You will need: water, flour, extra salt, cardboard jar for the frame, PVA glue, scissors, a piece of decorative rope or corrugated paper, gouache, brush, button, stacks, acrylic varnish for crafts, toothbrush.
Master class
- Knead the salted dough in this way: add a glass of flour, a glass of salt, add water, then knead until the desired consistency of the dough. Separate part of the dough, add beige gouache, then knead.
- Roll out the cake to a thickness of 10-15 mm.

- Apply PVA glue to the outer rim of the jar and wrap it with dough. Cut off the excess with a stack and smooth the joints with a damp brush.
- Create a small dotted texture with a toothbrush on the surface of the dough.
- Knead the dough brown, roll it into a flat cake 10-15mm thick.

- Cut a 5cm wide strip of brown pastry and glue it to the bottom of the jar.
- Make 2 large owl eye bases from white dough, then glue them on.
- Make a beak out of brown dough and glue it on.
- Make eyes from turquoise dough and glue them on.
- Roll out 8 strips of pink dough, twist them into 4 flagella and make a bow, then leave it to dry for 2 hours.
- Make droplet-shaped owl wings using brown dough, then glue them on.

- Weave ropes of beige dough and glue them onto the neck of the jar.
- Roll out a sausage from white dough, draw the texture of the lace with a stack and glue it as a collar under the beak.
- Place the craft in a warm place for a day.
- Paint the bottom and wings with brown gouache and decorate with white dots.

- Draw the pupils and eyelashes with black gouache, wait until the paint dries, then paint white highlights on the eyes.
- Glue a pink bow above the wing.
- Glue a button with a bow from a corrugated strip onto the lace.
- Cover the craft with varnish and wait until it dries completely.
The salt dough pencil is ready!
Salt dough dachshund

You will need: salt dough, simple pencil, scissors, cardboard, paints, brush, rope, toothpick, foam sponge, clear varnish, PVA glue.
Master class

The salt dough dachshund is ready!
Boletus mushroom made from salt dough

You will need: salt dough, light bulb, paints, brush, foil, cardboard, masking tape, superglue, PVA glue, paper napkins, clear varnish, stack.
Master class

Boletus mushroom made from salt dough is ready! I recommend watching this video!
Funny salt dough pigs

You will need: salt dough, paints, brush, foam sponge, stack, thin rope, toothpick, black gel pen, PVA glue.
Master class

Funny salt dough pigs are ready! I recommend watching this video!

You will need: salt dough, baking sheet, rolling pin, knife, sheet of paper, acrylic paints, brush, ribbon, water, shoehorn, pencil, sandpaper, clear manicure polish.
Master class

Redkina Yulia Valentinovna
Target: making crafts using technology testoplasty.
Material: salt dough, paints, brush, form for sculpting(heart, stack, board for sculpting.
Tasks:
Educational: Expand children's ideas about caterpillars(transition state caterpillar-pupa-butterfly) . Learn to sculpt an image of an insect (caterpillars) using visual media (form).
Correctional and developmental: develop creativity, develop fine motor skills of the hands. Improve technique dough moldings. Consolidate knowledge of the colors of the rainbow (K, O, F, Z, G, S, F, develop a sense of shape and color.
Educational: To cultivate the ability to see the beauty of nature, to cultivate a caring attitude towards living nature.
Preliminary work.
Observing and examining insects in the picture.
Consideration insect photos.
Conversation about the life of insects, oh caterpillar.

Making a leaf for caterpillars


Draw veins on the leaf


Rolling sausage for the future caterpillars, divide the stack into equal parts

Rolling balls

Posting caterpillar on a leaf in a snake or semicircle

Making eyes and antennae

Coloring caterpillar different colors and leaf

Decorate

Can be colored like the colors of the rainbow (Proverb "Every Hunter Wants to Know Where the Pheasant Sits")

Here they are the caterpillars turned out to be funny!

Publications on the topic:
Speech development in children with disabilities IN preschool institution Speech education begins with the first children's words and ends with the development of coherent speech - the child's ability to speak fluently.
Abstract to the project on education and training of children with disabilities Abstract Preparing children for school is one of the pressing problems of Russian education, and especially children with disabilities. disabilities.
Modeling - very useful activity. Thanks to her, children train their fingers, developing fine motor skills. In addition, modeling allows you to develop your imagination.
Methodological recommendations for accompanying children with disabilities Explanatory note The world of a “special” child is interesting and timid. The world of a “special” child is ugly and beautiful. Clumsy, sometimes strange, good-natured.
Methods of supporting children with disabilities Recently, the issues of timely and targeted socialization of children with speech impediments have become extremely relevant.
Very soon, in a few hours, the most cheerful and noisy, joyful and magical, the most long-awaited one will silently enter the doors of our houses and apartments.
Problems of inclusive education for children with disabilities in Russia Kochetkova Anastasia Gennadievna, Barylenko Tatyana Sergeevna, Abstract: the article reveals the main problems of education in context.
Summer application made from salt dough for children
Master class. Testoplasty “Merry Caterpillar”.
Author: Andrey Orekhov, 7 years old
Supervisor: Vera Aleksandrovna Orekhova, teacher at MBDOU “ Kindergarten general developmental type No. 125", Voronezh
Description: This master class is intended for children 5-7 years old, teachers, and caring parents.
Purpose: interior decoration, gift.
Target:
1.Introduce the technique of testoplasty.
2. Making a souvenir or gift.
Tasks:
Teach basic techniques for modeling salt dough;
Develop fine motor skills of the hands;
Develop creativity, imagination, fantasy;
Develop perseverance, accuracy, and independence in work;
Develop composition skills.
Poem about a caterpillar
On a young leaf,
Warm spring
In a bad mood
The caterpillar whines:
“I really want to eat,
I would eat day and night
I just can't eat
It’s a pity to chew on a leaf.”
Friends lament:
“How to help the unfortunate?
After all, you can't be hungry,
This is terrible!
You, caterpillar, curl up
Into the cocoon as soon as possible,
Turn into a butterfly -
You'll be more fun! (Svetlana Antonyuk)

Required materials:
1. Flour;
2. Salt “Extra”;
3. Gouache;
4. Decorative eyes, flowers, leaves;
5. Cleaning wipes;
6. Cardboard;
7. Fabric;
8. PVA glue, scissors;
9. Small skewer;
10. Varnish.

Finger gymnastics" Caterpillar".
Caterpillar, caterpillar,(the palm of one hand “crawls” like a caterpillar, folding and unbending, along the inside of the other hand from the shoulder joint to the tip of the fingers)Butterfly's daughter(“crawls” back toward the shoulder along the outside of the arm)
It crawls along the blades of grass,(we do the same, changing hands: “from root to top”)
Eats leaves:(and back on the other side)
Am!
Am!
Am!
Am!(We put our palms together in front of us. With each word “Am!” one palm slides upward over the other palm and “bites” the straight fingers of the other palm with all fingers except the thumb. Then the palms change roles.)
Ate– (we stop, palms folded together relax)
I wanted to sleep. (One clenches into a fist, the other covers it - holds the fist like an apple)
Woke up– (gradually straighten our palms)
Turned into a butterfly!(we cross our arms at the wrists, our palms are now butterfly wings)
It flew, it flew, it flew!(we wave our “wings”: wrists or forearms are crossed, the left palm flaps near the right shoulder and vice versa).
Step-by-step work process:
Dough recipe:2 cups flour, 1 cup salt, 250g. water. Mix flour and salt, add water and a little PVA glue (for the strength of the product). Knead the dough.
We will need green and red dough. To do this, you need to add gouache or dye to the colorless dough and knead the dough. (The dough can be prepared with your child)

We take fabric and cardboard measuring 15 by 22 cm.

Cover it with fabric. We get the basis on which our composition will be located.

Draw a leaf template on a piece of paper and cut it out.


Place it on a napkin, trace it, cut it out.


Glue the resulting leaf onto the base and begin to sculpt the caterpillar. We make small balls, flatten them and glue them using water onto our piece of paper.


Divide the skewer into two parts and insert it into the caterpillar.


We make two small balls and attach them to the ends of the skewer.
The result was horns.

Glue the eyes (pressing them a little into the dough), make a nose and a mouth from red dough.

Using a felt-tip pen cap, we make a pattern for our caterpillar.

We make roses (“flatten the sausage” and roll it up), glue them along the edge of the leaf: top and bottom.


We take decorative flowers and leaves and decorate our base.


When the dough is dry, paint the caterpillar and roses with gouache.

Cover with varnish.
That's it, our cheerful caterpillar is ready.


Such a picture, made by the hands of your child, will decorate any room and will be a wonderful gift for family and friends, and, of course, for friends.