We have already told our readers how to decorate a children’s room with your own hands and without special expenses: how to update furniture, make funny clothes hangers, unusual pillows and amazing clocks. And here we offer 4 more simple projects that will not only be interesting to the child, but also useful for his development.
We will talk about alphabets and height meters. Both can, of course, be purchased ready-made. But you must admit, if you approach the task with imagination and create an original piece, it will look much more original and will be filled with your love for the baby.
In this guide you will learn:
- how to make the alphabet on the walls of a children's room and on curtains;
- 2 ways to create a unique children's height meter.
__________________________
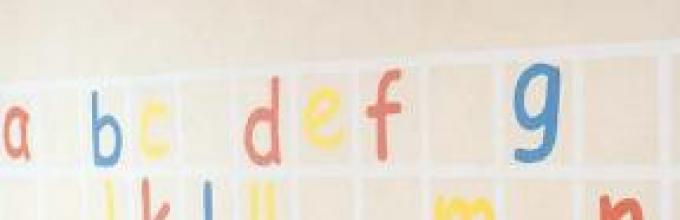
how to make the alphabet on the walls of a children's room:

You will need: stencils with large letters, paint (basic + 3 different colors), masking tape, pencil, tape measure, brushes.
Paint one of the free walls at a height of approximately 120 cm from the floor with white paint. Mark identical squares with a pencil and cover these lines with masking tape. Paint the wall with a base color (light). On separate squares (in no particular order), mark the outlines of the letters, paint the inside with paint of different colors (for example, red, blue, yellow). Remove the tape after the paint has completely dried.
__________________________
how to make the alphabet on children's curtains:

You will need: ready-made roller blinds, vinyl stickers with letters (of different sizes), two types of loose fabric (plain and floral), fabric marker, iron.
Separate the sticker from the excess elements (without removing it from the base!), place it face down on the back of the fabric, trace the outline with a marker, and iron it. Cut out the resulting letter along the contour, remove the protective layer, and attach it to the curtain using an iron. Repeat with other letters, changing sizes and fabrics. This decoration can be made in two versions: (1) many different letters + the same fabric or (2) 3-4 types of letters + different fabrics.
Do you want to stay in touch with us every day? Welcome to our Planet of Inspiration VKontakte! Take a look, scroll through! Like? Join and get inspired every day!
__________________________
how to make a children's stadiometer with your own hands, method-1:

You will need: sewing and applique skills on fabric, fabric of different colors (taking into account the chosen palette), thread, scissors, marker, sewing machine, some glue.
Draw a stadiometer doll on a sheet of thick cardboard, do not try to look like a super artist, the main thing is to outline the main contours, paint it in different colors with ordinary pencils. In accordance with the parts, cut out the elements from the fabric, sew them together and attach them to the cardboard. Felt is best for numbers; connect them to the base with glue.
__________________________
how to make a children's stadiometer with your own hands, method-2:

This stadiometer can become a part of family history if you fill it with fresh photographs year after year.
You will need: a piece of plywood (or MDF), a tailor's tape measure, several small photo frames, photographs of the child at different ages, stickers with numbers, base paint, pencil, glue, brushes.
Paint the base with a light tone, process the edges until completely smooth (glue edge furniture tape to the MDF). On the right side, mark the position of the photo frames, insert the photo, and glue the frames. Glue a piece of tailor's tape in the middle of the base, and on the left - numbers indicating the child's height.
Every mother, every father wants the room for their children to be bright, joyful, spacious, so that the details in it serve not only for beauty, but also for the development of the child. Therefore, it is not enough to put a crib, a changing table, a chest of drawers or a closet for things, books and toys in the room. It is imperative to add accessories that would please the child’s eyes and stimulate him to understand the world around him. Scientists and pediatricians agree that it is possible to develop and educate a child from the cradle.
Of course, all these necessary little things can be bought: markets and shops offer all kinds of educational toys, books and other things for our children. But objects and things created by mother’s caring hands will be much more pleasant for us and more useful for the child. So, what interior details can you create with your own hands?
Interior design
 Firstly, this is the design of the children's room itself. There are a lot of design options. The room can be made for a very small toddler or for a miniature princess, for or for.
If teenagers themselves can say and suggest what they want the room to look like, then interior design for kids depends only on imagination, skillful hands and the capabilities of happy parents.
The minimum that you can do in a room with your own hands is to paint the walls using. Ready-made stencils and paints can be purchased at almost any hardware store. Choose a stencil as you wish, but reusable ones, and water-based paint (it does not clog the pores of the walls and the room “breathes”). Pour paint into a tray, attach the stencils to the wall and use a sponge or roller to paint.
If you know how to draw, draw characters from good bright cartoons or tree branches with birds, clouds and little animals. The room will immediately become brighter and lighter.

The same can be done with a children's chest of drawers or changing table: use a stencil or use the decoupage technique.
Baby clothes
The baby grows very quickly, so you need to buy clothes very often and in large quantities. This translates into a decent amount of money. Of course, you don’t feel sorry for the money for the child, not at all! But perhaps this money would be better spent on something tasty and fortified?
Sliders
First of all, we offer you a pattern for romper suits. The side of the square is 5 cm. Such rompers can be sewn for any age. Simply cut the pattern along horizontal lines and add the missing centimeters. If you want to increase the width, cut the pattern along a vertical line and move the halves apart. These are the simplest sliders and they take little time. 
In order not to worry about the baby opening up, put her to sleep in a sleeping bag. It is also quite easy to sew. Ready-made ones are quite expensive.
A simpler option


More sophisticated option


Interior details
There is not always time to do something global - the child takes up all his free time. But while the baby or toddler is sleeping, you can do some handicrafts: not the usual embroidery, but sewing or other creative work.
Who, if not the mother, knows better what her child needs. So why do we trust domestic and foreign manufacturers when buying toys, height meters, etc. Perhaps they are of high quality - no one argues with that. But made with their own hands, they bring warmth and care from mother to child. We offer several ideas for creating accessories for a children's room.
Mobile above the crib
 To briefly distract a baby lying in a crib, a mobile is hung above the bed: various figures on a round rim at different heights. It is quite possible to make such a device yourself. Of course, it won’t be musical, but you can also turn on a tape recorder with a gentle melody. The mobile can be anything and on any basis.
Warp
It can be round, square. For it, you can take a hoop, a square frame, or just two sticks and cross them.
Threads
Mobile figures are hung on strings and ribbons.
Mobile details
 These can be stars, clouds, butterflies, birds, animals, cars and others. The material for them can be fabric, paper, ready-made toys. The main thing is that they are bright, colorful and voluminous. Mobile parts can be cut out and sewn, a 3D paper model can be made, and figures can be embroidered.
Tip: make the toys voluminous (if possible), place them at different heights, 2-3 pieces on one string, if the toys are small. If they are large, one toy on one thread is enough.
We offer ideas and ready-made templates for patterns and embroidery patterns below.
We all remember pencil marks or notches on door frames that show how we have grown. But you can’t put kids near the door; they need something more interesting. Therefore, manufacturers offer beautiful height meters. We suggest making them yourself. A height meter can be made in two ways.
Method 1
We take a wooden or cardboard strip, PVA glue, varnish, beautiful napkins or magazine clippings. We paste pictures using decoupage technique. We make marks using a centimeter and cover everything with varnish. A beautiful stadiometer is ready.
Method 2
We embroider the stadiometer with a cross. The diagrams are shown below.
Method 3
You can simply draw a height meter directly on the wall.


Developmental mat
Everything around the child should be arranged so that he or she explores the world in a playful way and develops. An educational mat is one of the ways to explore the world. On a natural piece of fabric we sew various figures, ribbons for ties, windows with buttons or buttons - everything that can develop the child’s imagination. When the outer part is ready, we sew it together with the backing and filling (sintepon), turn it inside out and sew the unstitched part. For small children, you can sew animals of different colors, rainbows, cars and dolls. For older children - buttons, buttons, numbers, colors, letters. We do not recommend sewing zippers and lacing onto a rug for very young children, so as not to injure the child. Take fabrics that are natural, bright, but not acidic colors. We offer several photo and video ideas.
Remember how, as a child, your parents would stand you at the doorframe, make a pencil mark at the level of the top of your head, and carefully sign your age? It was so cool to compare how much you had grown since last time, and it was a little disappointing when, many years later, during renovations, these marks were painted over. Nowadays, many beautiful bright height meters are sold in stores for our children. But if you still want something unusual, made with love and imagination just for your baby, check out the cool ideas for stadiometers with your own hands.
Theme for design
What to choose as a theme for the design of a stadiometer? What interests the child now, some vivid recent experience, is a win-win option. Cars, space, animals, characters from your favorite cartoons and books, a trip to the sea or to the village - look for a topic that is close to you and your baby. Using the same principle, we recommend choosing from our database or inventing games for your child.
Lena Orlyanskaya suggested measuring height in parrots, like in your favorite cartoon. It turned out very original and cute!

“Marine” height meter from Irina Mullina. Irina talks about its creation: “We were lucky with the idea, on the day of the task my dad was given a watch in the shape of a steering wheel - a souvenir from Murmansk, so we decided to play with the nautical theme, Nikitik really liked it - he immediately tore off two bottles with photographs! Therefore, we will hang the clock and stadiometer higher and periodically mark new peaks on it :))) And then you can also glue it with sea animals made of cardboard, there is still room for imagination! This will be our sea corner! All that’s left is for us to visit the sea!”


Birch tree from Anastasia Boyarskaya: “We live in the countryside, there are a lot of birch trees in our village, and they also grow on our site. And we also have a lot of children, from small to large. Therefore, in order to study nature, what surrounds us, and apply the acquired knowledge in practice, it was decided to make a stadiometer in the form of a birch tree. The birch trunk is even more interesting, it already has stripes. And the children happily accepted my idea and helped in its implementation. We decided to plant various animals, insects, and anyone else who wants to live on the birch tree.”


A height meter that grows with your child
It's great if the height meter changes with your baby. And our mothers offered many interesting ideas on how this could be realized.
And here is a wonderful stadiometer with a caterpillar from Zhanna Isina.


Giraffe with an extendable neck from Veronica Shashkova.

Matryoshka dolls from Nafisa Garaieva


Dina Butasova: “My idea for a stadiometer is this: every centimeter marks the child’s achievements, what he can do, what he says, what he does, what he is interested in. This stadiometer is a map of individual development))"

Height meter as an educational toy
And of course, a stadiometer can help you in your baby’s development. You can and should play with it and easily learn to count, study colors, animals or planets (with older children).
And for kids, a tactile toy like Lena Vedernikova’s would be great.


Svetlana Pekeshina’s stadiometer shows not only the colors of the rainbow, but also the daily routine in pictures.

A great idea from Olga Grebennikova is to place different animals according to height on a stadiometer and compare the child’s height with them. Children will be delighted with this game and will easily remember the names of the animals and the concepts of “higher and lower.”


And finally, a super height meter with planets from Maria Morozova. How to make one like this? Maria wrote about this in detail: “The base is covered with flannel, blue would be much more impressive, and a meter and a rocket are drawn with simple felt-tip pens. The planets are cut out of cardboard and flannel is glued to one side and painted on the other side. The planets are easy to hold on a flannel base and you can playfully measure a child’s height and study the solar system in one go.”

And all this was invented and made by ordinary mothers, just like you, with their own hands. And you will definitely succeed, you just need to add a little creativity and imagination! What? Is this a little difficult? Then you should hurry up and join the Galka-Igralka schools (if you are not there yet). This is a very cool opportunity to stir up your imagination and discover new and forgotten talents in yourself (even when it seems that “your hands are growing from the wrong place” and “creative mother” is definitely not about you). The game has just started, and we have almost a month of creativity and cool gifts ahead of us!
When there is a child in the family, parents always want to observe all the changes in its development, especially the mother. How much weight he gained, how much he lost, and the most interesting thing is how much the baby has grown. After all, in the first months and years of life, this indicator changes catastrophically quickly. It seems like a child is in front of your eyes every day, but after some time, you wonder when you managed to grow so much. 🙂
To find out the height and other measurements of the child, we periodically go to see the local pediatrician, but there are times when we want to take height measurements more often than just once a month or six months.
For this purpose, there are many different height meters, thanks to which you can measure your baby’s height at home every day and make marks, which will then show all the child’s achievements in heights.
This is interesting for both the baby (after one year) and the parents.
Now on the market you can choose a stadiometer for every taste and color. You can choose one so that it fits harmoniously into the interior of the children's room and is not just a measuring device, but also liked by everyone, and most importantly by the child.
We also faced the task of choosing a stadiometer, I reviewed all the options and settled on one. Which one - watch the continuation!
There are height meters — stickers, which can be glued to a wall or any hard, flat surface (a closet, for example). This type is quite popular, but it also has disadvantages:
- After removal all marks will “disappear” (You can, of course, take a photo, but over time the photo may get lost, deleted, etc., and it’s not so interesting to look at it years later). That is, there will be no memory left, which is one of the main purposes of stadiometers!
- There are difficulties with gluing if the sticker is large ( because you need to glue it carefully and gradually, tearing off the backing and smoothing it so that there are no bubbles or wrinkled stripes)
- It is not always possible to find a suitable surface ( it should be smooth and even, and preferably the wall should be without wallpaper, but simply painted)

Eat fabric height meters, sewn in the form of plush toys or dolls. They are beautiful and unusual, some can be inserted with photographs. I don’t really like this option because it’s bulky, and secondly, the fabric (especially if it’s plush) tends to gather dust.

Also, height meters are made made of PVC and paper. They are usually hung on a bar. We immediately put the paper ones aside, since a one-year-old child will definitely want to test its strength. 🙂 
Interesting option - wooden ruler-stadiometer. Often these are made only to order and painted by hand. I would have settled on this option, but the only “but” stopped me - how to store it later. This is a rather massive ruler.

Eat puzzle stadiometer. That is, before fixing it on the wall, you still need to assemble it. I don't see anything interesting in this. Once you put together 3-4 pieces of the puzzle and that’s it, it will hang on the wall with dividing stripes! In my opinion - ugly!

Recently they started printing height gauges on canvas. This is one of the new versions from BabyZoom. Looks very stylish. Canvas in the interior has always been welcome. You can order a personalized stadiometer or one with your child’s favorite characters to order. It is attached to the wall (or any surface) using double-sided adhesive tape, which is already attached to the stadiometer.


In my opinion, this is one of the best options worth considering. Great price and quality. We chose it and are very pleased. 🙂
You can order such a height meter on the website (cry)
Advantages of stadiometers on canvas:
- All marked data will remain on it when removed.
- Does not take up much space during further storage ( Can be rolled up and stored in a tube), unlike, for example, wooden height meters.
- You can make marks with any marker (not water-based) or pen
- It does not damage the wallpaper when fixing/removing it, and there is no need to screw additional bolts into the wall.
- Durable and wear-resistant material
In general, all options for stadiometers are good, but in order to choose the right one, you must proceed primarily from your preferences for materials, quality and price.
Make your own original paper stadiometer for children. All parents always want to know how much their baby has grown. Therefore, a homemade stadiometer can be an excellent gift for young parents. Making such a stadiometer is quite a painstaking task and not very fast. Be patient, but the result will please both you and the little owner. Here is an example of a stadiometer for a boy named Lesha, who has a mother, father and older brother Kirill.
To make a stadiometer with your own hands we will need:
- Thick colored paper measuring 40x15 cm (in our case, light gray).
- Four types of beautiful patterned paper. This could be old wallpaper, scrapbooking paper.
- Colored markers.
- Colored gel with glitter.
- Very thick cardboard, such as from a box of household appliances.
- Printer paper in several colors.
- Decor elements. We decided to decorate the stadiometer with images of animals that we cut out from an old alphabet.
- Glue stick, scissors, ruler, compass, pencil, nail scissors.

By the way, it will be a nice addition to the stadiometer. Meanwhile, we get to work.
Step 1
Draw a scale on thick colored paper. The step of each division is -1 cm. We begin to draw the scale not from the very edge, but at a distance of approximately 5 cm. Our scale is -30 cm.


Step 2
On colored printer paper, print out the numbers corresponding to your height. In our case, it’s from 80 to 110. At the same time, we make the round numbers larger.

Step 3
Using a compass, draw circles around the numbers and cut them out. Glue it to the scale.

Step 4
Now we make blank letters for words. We have 4 words: mom, dad, Lesha, Kirill. You can draw the letters yourself or print them on a printer. We cut out the blanks.

Step 5
We transfer the letters onto colored paper. If you draw from the reverse side, then place the letters in a mirror form.

Step 6
Cut out the letters.

Step 7
Glue the letters to the cardboard. This way we will make them voluminous.

Step 8
Cut it out. To make cutting easier, let the glue dry. Use nail scissors - they will make the job a lot easier.

Step 9
Glue the letters to the sheet with the scale. We place the pictures and glue them too. Let's put the stadiometer under the press.

Step 10
Using felt-tip pens we decorate the scale itself. Choose a marker color that is close to the circle with the number.

Step 11
Add shine and volume. We use glitter gel to add accents in some places. Let it dry thoroughly. The height meter is ready.


A few notes.
- Remember: everything you do for your child should be bright and very well anchored. Of course, you can’t count on such a thing to live for a very long time, but it shouldn’t fall apart or come unglued after a few days either.
- It makes no sense to apply a scale larger than 30 cm. If you are making a stadiometer for an older child, start not with 80, but, for example, with 85 or 90.
- The pictures with which you decorate the stadiometer should be understandable to the child. They should be simple, bright and not very small. In our case, with the help of a stadiometer, the child will learn the names of animals. You can paste images of fruits, vegetables, cards with simple colors (red, blue, yellow, green), various shapes (circle, square, triangle), etc.
- Three-dimensional letters contribute to the development of a child’s fine motor skills. They are fun to stroke and even pick with your finger.
- The words placed on the stadiometer can be anything. It all depends on what you decorate the height meter with.
- The letter paper should match the words. For the word mom we took delicate paper with butterflies, for Lesha - cheerful green, for Kirill - blue checkered, for dad - strict brown.
- The height meter is hung at an appropriate distance from the floor. Those. in our case, the first division of the scale should be at a distance of 80 cm from the floor.