Do you like to do handicrafts? Then you will enjoy doing Christmas decorations with your own hands! This is a pleasant and exciting activity for the whole family that will not leave anyone indifferent - you will spend several evenings with pleasure making Christmas tree decorations with your own hands.
What do you need to make your own New Year's decorations? You can use almost anything you can get your hands on. If you want, you can buy special supplies (sold in craft stores), or you can use what you have in any home. So what to prepare:
- plain paper (good for making patterns);
- pencils and markers;
- regular cardboard, white and colored (you can use velvet);
- sharp scissors and a breadboard knife;
- glue (PVA or glue gun with sticks);
- threads and needles;
- yarn of different shades;
- various decorative materials - these can be sparkles, sequins, confetti, multi-colored foil, stickers and much more.
This is the basic set, but in order to make a specific Christmas tree toy, you may need something else.
Simple crafts from scrap materials
Of course, you've probably seen how they are made from thread and glue. christmas balls do it yourself, but why not expand the range? We make different Christmas tree decorations with our own hands.
From yarn
This is a simple and at the same time spectacular Christmas tree decoration that can decorate any Christmas tree.

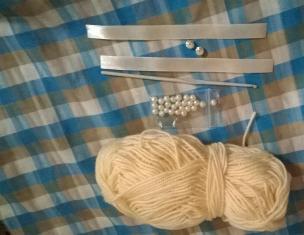
For production you will need:
- yarn;
- tailor's pins;
- plate or bowl;
- porous material (for example, a disposable tray);
- cutting paper;
- marker.
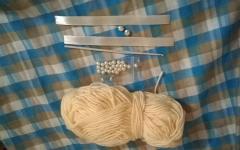
The threads need to be soaked in glue - the glue should saturate the yarn well, it is thanks to it that the decoration will keep its shape. While the threads absorb the glue, you need to make a template for your toy - draw what you want on paper. These could be DIY New Year's balls, strange birds or neat little houses. You can also try making a snowman, a couple of small trees and a star.

The template needs to be attached with pins (or ordinary toothpicks) to the porous material, and the design you need should be laid out on top - first the outline is laid out, then the interior decor. You should not cross the threads too often; the toy should be fairly flat. Once you are finished, dry the item and remove it from the pins and tie a loop in the eye. If desired, you can decorate with sparkles or rain.

From wire
How to make New Year's toys with your own hands in just a couple of minutes? Use wire!

To make toys you will need:
- two types of wire - thick and thin (thin wire can be replaced with bright threads, for example, floss. Pure white strong threads look very beautiful);
- beads, beads;
- colored tape;
- pliers.
In order to make figures or balls for the Christmas tree, cut several pieces from thick wire and give them the shape that your New Year's decoration will have. In our case, this is a star, but you can use any geometric shapes and simple silhouettes.
The ends of the thick wire need to be twisted. You need to string beads and seed beads mixed together on a thin wire, tie the end of the thin wire to the future Christmas tree decoration, and wrap it randomly.

When the toy is evenly wrapped, you need to wrap the free tail of the wire around the toy and tie a ribbon in the shape of a bow - your toy is ready.
Another original idea:

Made from ribbon and beads
Who said that making New Year's toys with your own hands must take a long time and painstakingly? Not at all. In just five minutes you can create one that will decorate both the New Year’s tree and the interior.

You will need:
- beads;
- narrow tape;
- yellow, golden or silver cardboard;
- glue "Second";
- needle and thread.
We fold the ribbon like an accordion and string it on a thread, after each loop of the ribbon you need to string a bead. The more “tiers”, the smaller they are - you see, a Christmas tree is already starting to look like. When the ribbon ends, you need to tie the thread in a knot and cut out a small star from cardboard. Next, you need to glue your Christmas tree to the star, and make a loop on top so that the decoration can be easily hung.

Interior decor made in this way looks very attractive.
From cardboard - in a couple of minutes
Some New Year's toys made of paper or cardboard take a lot of time to make, but not in this case - here you really only need a couple of minutes to make an elegant hand-made New Year's decoration.
So, you will need:
- ordinary cardboard;
- a little twine or thick yarn;
- glue;
- paints and brushes;
- napkin or cloth;
- varied decor.
Make two figures out of cardboard, glue them together, placing a thread with a loop between them - the blank for the toy is ready.

Using a loose tail of twine, wrap the tree in different directions. After some kind of thread pattern appears on the tree, you can start gluing it with a napkin. You can tear the napkin into pieces, coat the tree well with glue, and seal it tightly with the napkin. This will give a nice texture to the future toy.

After the toy has dried, you can start painting - paint the Christmas tree green.

After the paint layer has dried, shade the texture of the toy using a dry, hard brush and white paint, and then decorate it to your taste.

From bright shreds
Here you will need sewing machine, but if you really want to, you can do it without it. This best way make New Year's toys from cotton wool and fabric - just choose fabric with a Christmas ornament, or use what you have on hand.

Prepare several paper patterns - for example, deer, stars, gingerbread men, bears, letters and hearts. Cut out fabric blanks with your own hands, sew them in pairs, leaving a small gap (for stuffing), and through this small hole, tightly stuff the toys with cotton wool or padding polyester. It is most convenient to fill with a pencil.
Patterns can be downloaded here:
By the way, don’t forget - we sew on a machine from the inside, but if you decide to make toys from thick fabric with your kids, then it is better to sew them with a decorative seam over the edge - a toy with your own hands will look simply charming and will be suitable for either a home Christmas tree or a kindergarten - Usually, for kindergarten Christmas trees, children make decorations themselves.
Made from twine and cardboard
New Year's toys made of paper and cardboard will be much more interesting if you add a couple of simple materials to them. To make such a toy you will need ordinary cardboard, simple paper or natural twine, a little felt or any other fabric, as well as ordinary paper, a pencil and ruler, and a drop of glue.

The star template can be downloaded here (click on the picture, it will enlarge):
First, make a pattern on plain paper, and then transfer it to cardboard. Don't forget that the star must be double. You shouldn’t make the star too thin; it’s better to make it a centimeter or more. The tail of the twine is glued to the cardboard, then you need to gradually wrap the entire workpiece.

Place the thread as tightly as possible so that there are no gaps. To decorate the star, make a couple of leaves and berries from fabric and decorate one of the rays. Your decoration is ready.

From yarn and cardboard
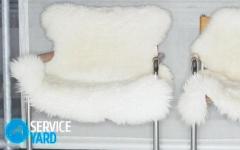
Do you want to make original and at the same time charming Christmas tree decorations with your own hands? Then it's time to make small gift hats with your own hands from scrap materials. This is a wonderful Christmas gift that looks cute and will keep you warm all winter long!

To make Christmas tree decorations in the form of hats, you will need:
- a couple of toilet paper rolls (you can just glue cardboard rings together);
- remnants of colored yarn;
- beads and sequins for decoration.
You need to glue rings approximately 1.5-2 cm wide from cardboard. If you are using a toilet paper roll as a base, cut it into several segments of approximately the same width.

The threads need to be cut into pieces of approximately 20-22 centimeters. We fold each piece in half, pass the loop through the cardboard ring, and pull the free edges of the threads through the loop. It is necessary that the thread is firmly fixed to the cardboard base. This needs to be repeated until the cardboard base is hidden under the threads.

All the thread tails need to be pulled through the ring so that our hat has a “lapel”.

Now we pull the loose tails tightly with thread and cut them into a pom-pom shape - the hat is ready! All that remains is to make a loop and decorate your Christmas tree toy with sequins and sparkles.

From beads
Making a New Year's toy in a minimalist style is easy and simple - you will need wire, beads and seed beads, a ribbon and a coin (can be replaced with a small candy, but it looks much more impressive with a coin). Try to make this Christmas tree toy with your own hands, the master class is very simple.

Make a loop on the wire and string green beads mixed with large beads on it - they will play the role of New Year's balls on our Christmas tree. Once the wire is filled, give it a herringbone shape by folding it in a spiral.
Once your tree has taken shape, bend the free edge into a loop.

We cut off a piece of ribbon, form a loop from it for hanging and pull it through the Christmas tree, and decorate the free tail with a coin (the easiest way is to glue it with double-sided tape). We tie a decorative bow on the hanging loop - your decor is ready!

Christmas balls
How to make a New Year's ball from threads? It’s as easy as shelling pears, watch our master class on spectacular lace balls for the Christmas tree.
You will need:
- several balloons;
- cotton threads;
- PVA, water and sugar;
- scissors;
- polymer glue;
- spray paint;
- decor.

First you need to inflate the balloon - not completely, but according to the size of the future decoration. Mix two tablespoons of water, two teaspoons of sugar and PVA glue (50 ml), and soak the thread in this mixture so that the thread is saturated. Then you need to wrap the ball with thread randomly. The balls need to be dried for several hours. After the glue has completely dried, you need to deflate the ball and take it out, and thread ball carefully paint with spray paint and decorate with sequins and sparkles.
DIY thread Christmas balls will turn out to be very, very impressive if you make them in different tones - for example, red, silver and gold. Try making Christmas balls with your own hands in different techniques- you can sew or knit balls, make them out of cotton wool with your own hands, or, for example, sew them out of felt - you can never have too many of these toys.
From paper
New Year's decorations made of paper are very popular among both big and small fans. New Year's miracle- try making paper ones Christmas balls with your own hands.

A DIY paper Christmas toy is made like this:

There is no additional need to decorate such a toy; it is already expressive.

Another ball option:

Or you can make a ball like this according to the master class:


From felt
DIY felt Christmas toys look very warm and cozy, and they are very, very easy to make. To make your own charming felt Christmas tree decorations you will need:
- red, white and green felt;
- red, white and green threads;
- Crystal glue;
- scissors and needles;
- cardboard;
- a little satin ribbon;
- soft filler (cotton wool, holofiber, padding polyester).

First, make sketches for your future toys. It could be anything. Once the patterns are ready, transfer them to felt and cut them out. What is good about this material is that it does not crumble, you will not need to additionally process the edge of each workpiece.
Make the same ones decorative elements- for example, sprigs of holly (by the way, did you know that this is a symbol of joy and Christmas reconciliation?). The berries need to be glued to the leaf using glue, and then a decorative knot should be made - this will give the berries volume.
We sew each piece together in pairs. By the way, it is best to sew it with contrasting threads; it will be fun and elegant. How to make New Year's decorations voluminous? Stuff them with holofiber before sewing them up completely! Spread the product well, so the Christmas tree toy will be filled more evenly. You can use the back of a pencil for stuffing.
Sew on decorative elements and your New Year's toy ready!


Try sewing felt decorations not only for the New Year tree, but also for your home - for example, a Christmas wreath decorated felt toys, looks very stylish. Look at the selection of DIY New Year's decorations, photos of master classes - and you will understand how many interesting things can be made from ordinary felt of two or three colors.

Master class on how to make New Year's garland do it yourself from felt:

Below you can download templates and patterns of different Christmas trees for felt crafts:
Felt deer, mk:
Paper toys
You can make a simple and elegant flower for your Christmas tree out of paper - you will need a little glue, a sheet of double-sided thick colored paper, scissors, double-sided tape and a stapler, as well as a few minutes of free time.

- Cut 10-12 identical strips of paper about two centimeters wide.
- Fold each strip into a loop and secure with a stapler at the very edge.
- When all the strips are folded like petals, assemble the flower by gluing the petals to each other with pieces of double-sided tape.
- Cut out the center from colored paper and secure it with double-sided tape; secure a ribbon or thread under the center. Your paper toy is ready!
See how you can make paper toys that are just as simple and beautiful!

Now you know how to make a Christmas tree toy from any material that you have at hand - it can be fabric and cardboard, paper and twine, wire and beads, you can use everything - the main thing is the inspiration and spirit of the New Year that will fill your hearts in the process of making cute Christmas decorations!
A few more original ideas with master classes


We bring to your attention a selection of New Year's crafts made from bushings. A sleeve is a cylinder (roll) made of cardboard or thick paper. The size can be any.
You can easily make such a roll yourself, but many people use toilet paper rolls, tape, paper towels or even linoleum.
Who would have thought that from this waste material, which many throw away without thinking, you can do such original and useful things. Do you still throw them in the trash? Then our selection may interest you! After watching, you will definitely start collecting all the bushings.
Father Frost or Santa
If you're one of those people who doesn't throw away toilet paper rolls, then you probably have one. It often happens that we start doing one thing and end up doing something else... it’s even funny. This is what happened with this Santa Claus. By the way, you can hang it on the Christmas tree. See how easy and simple it is to do.
Santa Claus from a sleeve
The roll must be covered with colored paper. Next, the ends need to be pressed inwards, follow the drawing as a guide. Please note that the bends must be rotated 90 degrees relative to each other.
Bend the bottom ends so that they look like legs. Glue the folds together on top and secure a loop for hanging a New Year's craft from the sleeve.
Now cut from plain paper triangle and glue it onto the craft. Use a black marker to draw a face, add boots, arms and a belt. Everything is ready!
Reindeer Sleigh
Everyone knows that Santa Claus uses reindeer. We have already made him, now we need to make him a vehicle. The roll must be folded in half and cuts made as shown in the figure. Unbend it and shape your back. To prevent the parts from opening, they can be glued together. Decorate the deer's face and antlers, draw eyes, and glue on a nose from a small pom-pom.
New Year's deer from paper tubesSnowflakes
To make such wonderful New Year's snowflakes from bushings, 32 low cylinders are needed. They can be glued from whatman paper or cut into ready-made rolls.
Pin the pieces together and then paint with white tempera or water-based paint. Let dry and decorate the ends with glitter.
Beautiful snowflakes from bushingsSnowmen
Snowmen made from bushingsWreaths and other New Year's crafts made from bushings for the wall
Recently, the use of recyclable material has become very popular among craftsmen. Including a lot of new ideas for using bushings to decorate walls. The results are very effective elements of New Year's decor.
Making New Year's crafts from bushings is quite simple. In addition, many options are easy for school-age children and up to school age. If you are interested in doing New Year crafts, then we advise you to take a closer look at these ideas.
The New Year holidays are approaching, there is less and less time left, and there are more and more worries and hassles in preparing for the holiday! It is especially difficult for mothers during these pre-holiday days. Little fidgets are looking forward to the holiday, so mothers have to come up with ideas every day interesting games and classes. If your imagination no longer works, our cool master classes on making New Year's crafts from toilet paper rolls will come to the rescue.
Such handicrafts will appeal not only to children, but also to children of primary school age. In this article we have collected for you more than 100 cool ideas for crafts for New Year from toilet paper cylinders. But don’t stop there, we only inspire you, and the coolest ideas come from you!
Father Frost and Santa Claus
The first thing the New Year is associated with is Santa Claus. Every year, on the night from December 31 to January 1, the kindest old man in the world delivers gifts to children all over the world, which they are looking for under the New Year tree in the morning. We won’t go far for ideas, but let’s start our New Year’s crafts with Father Frost and Santa Claus.
#1 Santa Claus from a toilet roll and a plastic cup
A very cute Santa Claus will be made from a toilet roll and plastic cup. In addition to this you will need colored paper(red, black), cotton wool, button, eyes, nose and glue. See the picture for how to proceed next.
#2 Santa Claus box
Here’s another cute Grandfather that even a child can make. By the way, you can put a small gift in such a grandfather, you can hang it on it as a toy christmas tree, or you can decorate a New Year's gift with them.

#3 Stuck Santa
There is a popular belief that Santa Claus enters the homes of American children through the chimney. We, residents of multi-storey buildings, cannot check this. But you can make such a cute craft for yourself.

#5 Simple Santa Claus
This simple and very cute Santa Claus can also be made with children. The bushing itself needs to be painted red. While the sleeve is drying, cut out the hat, face, beard, eyes and nose (). When the sleeve is dry, glue the face to it and Santa Claus is ready!

Deer
Santa Claus, of course, does not walk around the world on foot. They help him fly around the world in one night true friends reindeer. Therefore, we won’t go far for ideas, but we will make our grandfather deer helpers so that he can deliver gifts to all the children.
#1 Deer from a toilet paper cylinder
The reindeer sleigh for Santa Claus can be equipped with these stable animals. At the bottom of the sleeve we cut out the legs, cut out the muzzle and horns separately, draw eyes and a nose. Glue the head to the body and the deer is ready!

#2 Reindeer sleigh
But older children can handle such a reindeer sled. There are no applications here, the whole structure is solid. Step-by-step production You will find it in the diagram below.

#3 Simple deer for the Christmas tree
These cute and very simple deer can be made with preschoolers. Cover the toilet sleeve beautiful paper, make holes on the sides and insert fluffy wire. Then wind the wire onto the marker and the horns are ready. Now all that remains is to glue the eyes, nose and, if desired, decorate the deer with bells.

#4 Deer made of two bushings
But two bushings will make a deer of impressive size, especially considering that Santa Claus is made from one. The work is quite painstaking, but interesting. However, it is worth considering the age of the child. It won’t be interesting for very young children, but for children of primary school age - it’s the best!

#5 Another deer from two cylinders
Here's another variation on the deer theme. This one, unlike the previous one, is much easier to make. But in addition to toilet paper rolls, you will need dry twigs. So during your walk you can please your little one and finally take home one of his outdoor sticks!

#6 Simple toilet roll deer for toddlers
Here's another wonderful New Year's craft that you can do with your kids. For the horns we use the outline of a child's hand. You can make ears, or you can not. Eyes and nose can be drawn.

#7 Deer from a cylinder of toilet paper and sticks
And one more simple craft for the New Year for making with the kids. We paint the bushing in brown. Then we glue the horn sticks, eyes and nose. Rudolph is ready for service!

Christmas tree
Where is Santa Claus going? Well, of course, for the Christmas tree. Our next craft is a Christmas tree. Make the main beauty New Year's holidays making a toilet paper roll is not difficult, you just need to get a little creative, and we have some cool ideas for this!
#1 Simple Christmas tree made from cylinders
Let's start from the very beginning simple option. You will need different sized cylinders. We paint the base of the future tree brown, and the tree itself green. We wait for it to dry completely, then we glue the cylinders together, apply a little glue on top and decorate the tree with ribbons, sparkles, sequins and other things.

#2 Another simple Christmas tree
Here is another version of a simple Christmas tree made from toilet paper rolls. The difficulty is to find that many cylinders. If you have been collecting them all year, then success is guaranteed!

#3 Herringbone spiral
And here is another version of a Christmas tree made from a bushing. The sleeve needs to be cut in a spiral with scissors, then twisted and placed under a press for about 30 minutes. Then take it out, unfold it and decorate.

#4 Fluffy Christmas tree
You can also make a fluffy Christmas tree. The toilet sleeve will serve as the stem, and we will make the needles from colored paper cones. To create a fluffy effect, cut the edges of the cones with scissors and slightly curl them towards the top.

#5 Christmas tree for the office
But this beauty can be placed on your desktop. The kids will do it, and mom will put it to work: and workplace decorated, and colleagues are jealous.

#6 Christmas tree meadow
Well, the last craft on the theme of a Christmas tree from a toilet roll - a whole Christmas tree meadow in the picture. The craft is painstaking and requires a lot of attention and perseverance from the creator. But it’s not a shame to give such a craft from scrap materials to friends and acquaintances.

Snowmen
So, Santa Claus is ready, the team is assembled, the Christmas tree is waiting. Who have we forgotten? Well, of course, the most important assistant of Santa Claus - the Snowman. How is that possible, we need to fix it! Let's make snowmen from a toilet paper cylinder!
#1 Snowmen in hats

#2 Snowmen on the Christmas tree

#3 Simple snowmen

#4 Snowmen rappers

#5 Snowmen with a scarf

#6

#7

Angels
Another symbol of the New Year can be considered angels. But this is more likely not the New Year, but Christmas, which Catholics celebrate before the New Year, and Orthodox after. In any case, regardless of religion, it is possible and even necessary to make an angel from a toilet sleeve. The angels turn out to be very cute and we have several ideas for this.
#1 Angel with a candle

#2 Angel with golden wings

#3 Angel with wings from hands

#4 Angel with a halo

#5 Bible story

Elves
In production New Year's gifts Santa Claus is helped by a whole army of good-natured elves. Don’t forget about them when making crafts for the New Year, especially since toilet paper rolls make excellent elves. We have a couple of ideas.
#1 Elf made of colored paper

#2 Santa's Helpers

#3 Happy gnomes

#4 Felt elves

Penguins
When talking about the New Year, we shouldn’t forget about penguins. At this time of year, they feel great in our latitudes, so you can safely invite comrades from the far North to your holiday.
#1 Skipper, Kowalski, Rico and Prapor

#2 Dressy penguins

#3 Penguin family

#4 Simple penguin

#5 Punk penguins

#6 Master class on making penguins from toilet rolls

Owls
Of the winter characters, owls are especially popular during the New Year holidays. Toilet paper rolls make excellent owls. There are many techniques for performing such crafts. You will find some of them in our article.
#1 Owl applique
A very beautiful owl will be made from a toilet paper cylinder, decorated with circles of colored paper. The circles can be glued with glue, or you can use double-sided tape.

#2 Retro owl

#3 Bright owl
An owl doesn't have to be brown or gray. We have New Year holidays, a time of magic, which means an owl can be bright and shiny. See the step-by-step master class below.

#4 Owl box
And you can put a small trinket or candy in such an owl and give it to friends, colleagues or loved ones. Original and with soul.

#5 Owl with feathers
This is an ideal New Year’s craft for fans of J. Rowling and her famous wizard, Harry Potter. Make an owl with your young wizard and go to the magical world of magicians and sorcerers.

#6 Rainbow owl
You can also make such a colorful, cheerful owl. To create volume and a fluffy effect, the edges of the paper need to be cut and curled with scissors. 
#7 Owls in minimal style
If you don’t have time at all, as well as pencils, paints and colored paper, you can draw an owl with a marker. In general, simple and tasteful!

#8 Owl House
For a little owl, you and your child can make such a cute and cozy house.

Other animals
With the onset of winter and winter holidays, other animals from the forest do not disappear anywhere. Therefore, in continuation of the New Year's theme, you can make a wide variety of forest and domestic animals.
#1 Angry wolf and fox
Why wolf and fox? Well, of course, they are the ones who sometimes run under the Christmas tree in the famous children's song.

#2 Polar bear
Which other animal is associated with winter and winter holidays? Well of course polar bear. And, by the way, an excellent one about Umka is also worth watching.

#3 Brown bear
The cousin of the polar bear is the well-known brown bear. They never meet in the wild, but under our Christmas tree they will finally be able to see each other!

#5 Squirrels
You can also plant baby squirrels made by yourself under the New Year tree. By the way, we have several master classes on making squirrels, which are described in detail below.


#6 Dog
The symbol of the outgoing 2018 will be a dog, so it’s logical to New Year's craft in the form of this animal. Of course, you can’t make such a character with kids, but school-age children will be happy with both the process and the result!

#7 Dragon
New Year is a time of miracles, so why not add a little miracle to our crafts. You can make a wonderful fire-breathing dragon that will be completely tame. By the way, although he is fire-breathing, he is completely harmless.

#8 Fish
Fish are made in the same way as the dragon. If you move the stick quickly, the fish will actually swim through the air. The kids will love it! And a magical fish that can make wishes come true will never be out of place at the New Year's party!

#9 Rats / Mice
Rats or mice (whichever you prefer) will not become unnecessary guests. You can hang the mouse by its tail on a Christmas tree, on a doorknob or anywhere else. These little mice are so restless.


But step by step wizard class on making a loving couple of mice from toilet paper rolls. If even kindergarteners can handle the first two mice, then professionals will have to work with this couple. Study the steps carefully and create your masterpiece!

#10 Wrist Parrot
Planning a pirate New Year's party for the kids? Then don't forget about the parrots. The captain of a pirate ship cannot do anything without his faithful feathered assistant.

#11 Three Little Pigs
Children will love crafts in the form of their favorite fairy tale characters. We suggest you an idea with three little pigs, and you can reproduce your baby’s favorite fairy tale. All you need is a little imagination, toilet cones and a good mood!

Christmas toys
You can also make Christmas decorations from toilet paper cylinders. By the way, very practical.
#1 Flashlights
Remember your kindergarten. Do you remember? Do you remember on New Year’s Eve we all made Christmas tree lanterns out of paper? So, today we will make these lanterns from toilet paper rolls. Such a toy, unlike a paper one, retains its shape and appearance longer.

#2 Volumetric star
Beautiful volumetric star, decorated with sparkles and sequins, will come out of an ordinary toilet cylinder. How? See below.

#3 Flower
You can make a New Year's flower from a regular paper cone with your own hands. The idea is suitable for those who want to decorate the New Year tree with toys from scrap materials.

#4 Flashlights
Here’s another idea for decorating your apartment with your own hands: New Year’s lanterns made from toilet paper rolls. Beautiful and practical.

#5 Candy
You can decorate the New Year tree and interior with candies. It’s just that the real candies are a little small in size, but the homemade ones, made from toilet cylinders, are just right! By the way, you can put small candies and other sweets in this candy and then give it to friends or acquaintances.

And some more ideas
In general, the number of crafts that can be made for the New Year using a toilet paper cylinder is incredible. You just need to use your imagination and together with your children you will create real masterpieces that will delight the eye for many years.
#1 Nutcracker
Perhaps not a single New Year is complete without this fairy-tale character. Maybe you don’t watch the cartoon itself anymore, but the music from Tchaikovsky’s famous ballet sounds everywhere. Why not be inspired by this wonderful work and make your own Nutcracker?

#2 Grinch
Fans of foreign cartoons about Christmas will appreciate the idea of making the Grinch who stole Christmas.

#3 Gingerbread man
Another symbol of the Christmas and New Year holidays among our western neighbors is the gingerbread man. You can make it from a regular toilet paper cylinder. By the way, in this case it would be nice to make a gingerbread house for him!

#4 Another master class on making a gingerbread man

#5 Christmas wreath
It’s somehow not customary for us to hang Christmas wreaths on our front doors, but this Western tradition does not bypass us. From scrap materials, or rather from toilet paper cylinders, you can make a wonderful Christmas wreath, which, by the way, will serve faithfully for many years!

#6 Ninja

And the ninja turtles

#6 Bird feeder

#7 Crown


#8 Mini hat

#9 Hello Kitty

#10 Christmas Singers

#11 Paintings in a top hat

#12 Megapolis

#13 City of Elves

#14 Advent calendar
To brighten up the anticipation of the New Year holidays and long-awaited holidays, you can make an Advent calendar or Advent calendar for your child. On each of the houses are written numbers from 1 to 24, which indicate the day when one or another box needs to be opened. Each of the houses is a box in which a small surprise is hidden, so until the 25th, every day the child will receive a small gift hidden in one of the houses.

#15 Home games
From toilet bushings You can make improvised skittles and use a sock rolled into a ball to knock them down. A great game to play at home when the weather outside is bad. It is also fashionable to paint several cylinders in different colors, roll balls out of colored paper and use chopsticks to quickly collect the balls by color into the appropriate sleeve. Very fun.

#16 Beefeaters - guards of the Tower of London

Help us improve: if you notice an error, select a fragment and click Ctrl+Enter.
Place a candle inside and light it. The light will fall as if from the windows of magical snow-covered houses.
What do you need
- light paper;
- pencil;
- black marker;
- scissors;
- glue;
- glass jar;
- sponge;
- white paint.
How to do
Place a sheet of paper horizontally and draw on it the outlines of a winter city: snowdrifts, trees, houses with windows, a lantern. Color in the shapes with a black marker and cut them out along the outline. Make windows for houses.
Now glue the paper along the bottom edge of the can. Using a sponge, lightly cover the glass and the outline of the city with white paint, imitating snow.
2. Christmas tree from a magazine
Two in one: we decorate the house and get rid of old printed publications.
What do you need
- magazine;
- glue gun;
- gold spray paint;
- red and gold foamiran with glitter or red and gold paper with glitter;
- pencil;
- scissors;
- beads
How to do
Place the magazine so that the spine is on the left. Fold the first sheet, connecting the top edge to the left. Fold the lower right corner towards the middle.
In the same way, deal with the remaining sheets. Open the magazine approximately in the middle and go along the fold with a glue gun. Fold the right sheet, gluing its edge to the middle of the magazine.
Flip over the glued part, cover the center of the magazine with glue again and glue the next sheet. Do the same with the remaining sheets. You will end up with a cone. Cover it with spray paint.
On the back of foamiran or paper, draw two identical large gold stars and several smaller red and gold stars. Carefully cut them out.
Connect two large stars with the sparkles facing out and glue them to the top of the tree. Post on New Year's tree the rest are stars and beads.
3. Santa Claus from a tin can
What do you need
- double-sided tape;
- can;
- beige foamiran;
- scissors;
- colored fabric;
- glue gun;
- white faux fur;
- blush;
- wide brush;
- white felt;
- black paint;
- white paint;
- brush;
- gold ribbon.
How to do
Place tape at the bottom, top and middle of the jar. Wrap the cylinder with foamiran and cut off the excess. Glue the edges of the foamiran with double-sided tape.
Wrap colored fabric around the top of the jar and glue it with a gun. Wrap the edges of a narrow strip of fur inside and glue it together. Place the resulting strip along the top of the jar.
Use blush to draw the cheeks of Santa Claus. Cut out a mustache from white felt, and a round nose from the remains of beige foamiran. Glue them to the jar.
Draw the eyes with black and white paint. Glue eyebrows from white felt on top. Wrap the gold ribbon around the colored fabric and tie it in a pretty bow.
4. Wreath made of paper napkins
This beauty can be placed on a table or attached to a wall.
What do you need
- 5 round openwork paper napkins;
- pencil;
- ruler;
- scissors;
- glue;
- cardboard;
- white paper;
- glue gun;
- small artificial fir branches with cones;
- red artificial berries;
- white paint;
- brush;
- red bow.
How to do
Cut each of the three napkins into four equal parts and roll them into cones, brushing the edges with glue.
Cut a circle with a diameter of 10 cm from cardboard. Cover it with glue on one side and glue it to white paper. Cut a circle out of it, retreating 1–2 cm from the edges of the cardboard.
Make vertical cuts on the paper. Coat the edges of the cardboard circle with glue reverse side and glue the cut paper to it.
Glue whole napkins to the circle on both sides. Mark the middle on the one that ends up on the front of the workpiece. Using a glue gun, place the prepared napkin cones in a circle.
Glue spruce branches and berries to the center of the wreath. Lightly coat them with white paint to imitate snow. Place a bow under the composition.
5. Christmas vase
This craft can be used as a stand for writing instruments or cosmetics, as a candlestick, or simply as a beautiful decorative element.
What do you need
- notebook sheets of paper;
- glue;
- glass beaker;
- scissors;
- glue gun;
- gold spray paint;
- twine;
- wooden decorative elements.
How to do
Roll the sheet diagonally into a thin tube, periodically brushing the paper with glue. Place the workpiece vertically against the glass and cut it approximately to its height.
Make enough tubes to cover the entire glass. It is better if they are slightly different in length.
Attach them to the glass using a glue gun. Cover the future vase with paint outside and inside. Wrap pieces of twine around the bottom and top and glue the wood decor in the middle.
6. New Year's gnome made of fabric
A cozy decor element in Scandinavian style.
What do you need
- colored fabric;
- scissors;
- glue gun;
- white faux fur;
- wire;
- gray fleece;
- black felt;
- wooden ball;
- New Year's decoration.
How to do
Wrap the cone in fabric, cut off the excess and glue with a glue gun. From the fur, cut out a beard in the shape of an elongated diamond and a long mustache that looks like the letter “L”.
Glue the beard to the cone. It should take up most of it. At the top, part the fur and place the mustache so that the beard hangs slightly over it. This will make the figure more voluminous.
Cut a piece of wire approximately the length of the cone and insert it into the top of the workpiece. Wrap the fleece around the wire so that it extends slightly over the beard. Cut off the excess, connect the fleece to the cone and secure the edges of the fabric with glue.
Cut out eyes from felt and glue them under the hat. Below, place the gnome's nose - a wooden ball, and glue a New Year's decoration onto the hat.
Cute gnomes can be made from scrap materials. This video shows how to make them from socks:
7. Bottle toy
When looking at this decoration, you can hardly guess what it is made of.
What do you need
- stationery knife;
- 2 plastic bottles volume 1.5 l;
- yellow paint;
- brush;
- wire;
- 6 Christmas balls;
- PVA glue or acrylic glue;
- gold glitter;
- glue gun;
- red narrow ribbon;
- 3 red bows;
- decorative flower with sparkles.
How to do
Cut the bottles slightly above the middle. In the center of each lid stationery knife make a hole. Cover the caps with yellow paint and cover the bottles with them.
Thread a piece of wire into the caps so that its ends are in the bottles and a loop is formed on top. Place three balls on each end and twist with wire. The balls must be inside the bottles.
Coat the outside of the bottles with glue and cover with glitter, leaving a small strip along the bottom edge. Attach a red narrow ribbon to it using a glue gun.
Glue the bows together. Twist the top of the wire slightly over the bottle caps. Using a glue gun, cover the twisted area with a bow and glue a decorative flower onto it.
8. Volumetric snowman made of threads
If you insert a garland into this cute snowman, he will decorate the room even at night.
What do you need
- 2 balloons;
- scotch;
- white yarn;
- scissors;
- PVA glue;
- water;
- needle;
- 2 thin wooden branches;
- glue gun;
- black double-sided paper or cardboard;
- colored tape;
- colored fabric;
- 2 black buttons;
- cardboard;
- orange paint;
- brush.
How to do
Inflate the balloons and tie the ends. One ball should be slightly smaller than the other. Glue them together with tape to form a snowman. Tie the gluing area with yarn so that the balls are even closer to each other. Cut off the remaining thread.
In a wide plate, combine glue and water in equal proportions. Moisten the yarn thoroughly with the resulting mixture and wrap the balls tightly. The thread should cover most of their surface. Leave the workpiece until completely dry. To speed up the process a little, you can use a hairdryer.
Pierce the balls in several places with a needle and carefully remove the rubber through the holes. Cut some thread at the bottom of the snowman so he can stand. Insert branches on the sides - these will be his hands - and secure with a glue gun.
To make the hat, cut out a rectangle from black paper and glue its edges together. You can also take a toilet paper roll and paint it black.
Cut out two circles from paper: the diameter of the resulting tube and a larger one. Glue the smaller one on top. Cut the larger one in the middle and connect it to the bottom of the hat. Wrap the crown with colored ribbon.
Apply glue to the brim of the hat and attach it to the snowman's head. Wrap a rectangular piece of fabric around the neck and glue its edges to each other and to the bottom ball. Place buttons nearby.
Make a small cone out of cardboard, paint it orange and glue it in the middle of the top ball. Cut out a mouth and eyes from black paper and place them next to the snowman's nose.
9. Volumetric Christmas tree made of threads
This Christmas tree is made according to the same principle as volumetric snowman. But there are a couple of important nuances.
What do you need
- a cone-shaped foam blank;
- stationery pins;
- PVA glue;
- water;
- white yarn;
- beads;
- glue gun
How to do
Wrap the foam in film and pierce it in several places with pins. Thanks to the film, the workpiece will be easier to remove, and the pins will help the thread hold in place.
Combine glue and water in equal proportions and thoroughly moisten the yarn in the mixture. Wrap the workpiece with threads, catching them with pins. Leave overnight to allow the tree to dry completely.
Remove the needles and carefully remove the workpiece. Place beads on top using a glue gun.
10. New Year's Crescent
An unusual version of the usual New Year's wreath.
What do you need
- jigsaw and/or scissors;
- plywood or cardboard;
- twine;
- PVA glue;
- sponge;
- white paint;
- 2 cones;
- wooden decorative snowflake;
- glue gun;
- small artificial spruce branches;
- silver Christmas ball;
- white decorative braid with pompoms;
- silver artificial berries;
- brush;
- wooden bead.
How to do
Using a jigsaw or scissors, cut a crescent-shaped piece from plywood or cardboard. Make a small hole at the top and insert a piece of twine there - the future loop.
Gradually lubricating the workpiece with glue, wrap it tightly with twine. Using a sponge, apply a little white paint to the rope and pine cones, imitating frost. Paint the wooden snowflake completely.
Using a glue gun, attach the snowflake to the bottom of the crescent moon with most of it sticking out over the edge.
Glue fir branches nearby, and on them - cones and a ball. Arrange pom pom string and berries.
Using a brush, lightly tint the branches with white paint. Insert a wooden bead into the string that is threaded through the top hole and tie the thread with knots at the bottom and top.
11. Christmas tree made of ribbons
What do you need
- pencil;
- white paper;
- scissors;
- green cardboard;
- stapler;
- red narrow ribbon;
- green narrow ribbon;
- white narrow ribbon;
- glue gun;
- pink foamiran with glitter or pink paper with glitter;
- gold glitter.
How to do
Make a template out of white paper as shown in the video. Place it on green cardstock, trace and cut out. Fold the piece in half and fasten it at the bottom with a stapler.
Cut strips 12 cm long from the ribbons and glue the edges of each of them. Attach them to the workpiece in a circle: the bottom row is red, the next is green, then red, green, red and white.
Cut out two identical stars from foamiran or paper, glue them together and place them on the top of the tree. Sprinkle the New Year's craft with glitter.
It's simple, interesting and fun to make crafts from cones. This is because the most ordinary cone can turn into any toy, animal, bird, or funny object. By attaching various parts to the cone, as well as fastening the cones together, you can create a whole collection of crafts, such as toys, souvenirs and quite useful items.
To create a cone, draw a circle using a compass and divide it into 4 parts. Then all these sectors are cut, and the resulting quarters are rolled into a cone. Such a cone will be narrow, but if you cut off more than a quarter of a circle, the cone itself will become wider.
What kind of crafts can be made from cones?
Dog

Roll half of the brown paper circle into a cone and the body is ready. Add dog ears, a muzzle, paws and eyes and you will get a cute dog, and most importantly - very easy to create.
Elephant

The base, that is, the body of the elephant, is a gray thin cone from the fourth part of the circle. Plus a head with large ears, smoothly flowing into the trunk, legs and tail. Everything is simple and fast, especially since a head template is included to help.
Simple paper cat

The simplest craft consists of a black cone and a small cylindrical head attached to the top of the cone. You will also need protruding ears, elongated eyes, a nose, whiskers, paws and a tail. Cats using this technique look original and are beautiful in various colors.
Lion

The work is interesting not only for its conical body, but also for its head, the mane around which is made of thin paper strips glued into loops. Flowers are often made this way.
Crow

You can make a funny crow or crow from a cone. Moreover, the work is very simple. The base is a black cone, the wings are one piece and the head is in the form of a circle. You will also need a wide beak made of yellow paper and paws in the form of strips of paper folded into an accordion.
Paper penguins

The work is so simple that in a matter of minutes you can make a whole family of penguins, with mom, dad and babies. Children quickly remember the sequence of actions and complete the task with ease.
Dragon Toothless

In the continuation of black characters, I present to you the handsome Toothless from the cartoon “How to Train Your Dragon.” It also consists of a conical body and complementary paper parts, for which there is a template to help create.
Frog

An excellent craft made from a cone, as simple as possible. The body is a wide green cone, plus a minimum of complementary details in the form of four identical paws, eyes and tongue. All.
Bee from a cone

Bright butterflies

The craft is very similar to the previous one, differing only in the shape of the wings and colors. Such a butterfly is extremely easy to make, the main thing is the availability of colored paper of various shades and your own imagination.
Pig from a cone

The simplest craft for children, even the smallest. They may need a little help in creating the cone, but they can handle the rest of the components with pleasure and without problems.
Cone chickens

Here the cone is not in its original form, since when rolling it you need to leave the ends. But the technique is still the same, chickens are easy to make, like all crafts from cones.
Ladybug

Most likely, this is a surprise bag in the form ladybug, with which you can put sweets and present such a gift to your mother. Using a cone as a basis, you can make such a surprise in the form of a variety of characters.
See step-by-step instructions.
Witch

You can make more than just animals from a cone. In this version, it is a witch, but it can also be any little people, fairy-tale characters, for example, an astrologer, forest fairies, gnomes, and even a snowman.
Hedgehog

Look what a wonderful hedgehog you can make! Moreover, the hedgehog consists entirely of cones, only some of them are cut to form something like needles. And he himself is not in a vertical position, like previous crafts made from cones, but horizontal.