A happy birthday card for grandma will cheer up the recipient, make her happy and remind her of your attention, love or friendship. The congratulations in the picture should contain only the best and sincere wishes. When choosing a picture, be sure to pay attention to the words in poetry or prose. Here you will find many pictures with congratulations to girls and men. You can choose any one and send an electronic picture to a girlfriend or friend on the wall on social networks, or save a postcard/picture to your phone/computer and send it via email or via a messenger like viber/whatsapp/skype. Congratulations in verse. Stylish pictures.
Beautiful birthday card for grandma. The grandmother is knitting in a chair, the kitten is playing with a ball. Happy birthday! My beloved grandmother!
Beautiful birthday card for grandma. Bouquet of red roses. Happy birthday. Most best mom and grandma!
Save to computer, phone:
Beautiful birthday card for grandma. Vase, flowers, butterflies, hearts.
Save to computer, phone:
Beautiful birthday card for grandma. Funny cute picture. Grandmother, samovar, granddaughter, cat, teddy bear. I have been friends with my grandmother for a long time. She is at the same time with me in all my undertakings. To my beloved grandmother! Happy birthday!
Save to computer, phone:
Beautiful birthday card for grandma. Cat with cake. Happy Dnyushechka! Cheers, grandma!
Save to computer, phone:
Beautiful birthday card for grandma. Roses, pattern. Granny is a dear. Happy Birthday, Grandma!
01/09/2013
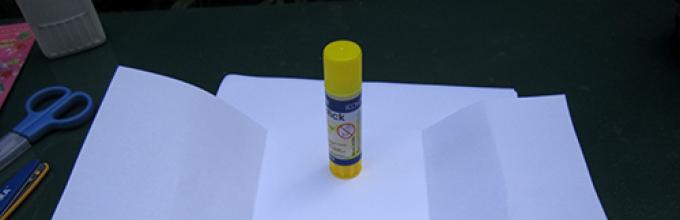
We decided for our grandmother for her birthday make a postcard with your own hands. After all, everything that is made with one’s own hands, and especially with children’s hands, is the most pleasant and truly expensive. In addition, making postcards is another educational option for children. Since my son doesn’t like prepared templates, we improvised everything. For our children's craft, we used:
- sheet A4
- double-sided colored paper
- quilling strips
- scissors
- simple pencil

We started by folding the leaf three times.

Then the top two were connected in the middle, and the sides were bent. This is how the postcard acquired its original appearance.


Place the circle approximately in the center of the postcard and trace it with a pencil, cutting off the excess from the postcard. 
We put the postcard aside and move on to the rays of the sun. To do this, we glue loops from colored stripes.

Maxim liked the loops the most, he didn’t let me glue a single one :) here’s how they turned out

The weather turned bad, we had to move from the street to home 🙁 We put the loops aside and started decorating the inside of the postcard. To do this, we cut out a vase and about 20 multi-colored circles folded in half, from which we will make flowers.

A bouquet was collected in the middle of the postcard

Maxim didn’t want to pose with the postcard 🙂 so we moved on to the front of the postcard. To do this, the rays were glued to the postcard in a circle.


When all the rays were glued, our sun was glued on top of them, whose eyes and mouth were first glued, and itself was cut in half.

For any person, regardless of age, a birthday means the beginning of something new, where cherished desires come true and, of course, the most secret dreams come true. On this wonderful day, the birthday person eagerly awaits gifts and congratulations from his loved ones. After all, they are the ones who make the recipient smile and rejoice.
Each of us, without exception, loves surprises. Therefore, if you are going to celebrate a birthday, you need to prepare for this celebration in advance. Let's look together at several options for postcards that you can make yourself and give to your loved one.

How to draw a birthday card for mom?
Of course, the card should look beautiful and touching. Perhaps you want to do something specific? Then we advise you to write the usual, but very pleasant inscription on the product itself: “To my beloved mother.” To make it, take scissors and glue, and also stock up on the following items:
- A blank for needlework (you can take thick cardboard).
- A background image (you can take regular colored paper, a piece of scrap paper, and so on).
- Chipboard for inscriptions (buy a ready-made one in advance or use a stapler that forms the edges).
- Decorative elements (flowers, butterflies, beads, leaves) – 2 pcs.
- Large decorative elements(bow, flower) – 2 pcs.
- Decorative tape.
- Lace or scalloped ribbon.

Manufacturing process:
- To begin, make a sketch using a regular pencil. Add colors that will give you the opportunity to understand what shades you will use while working.
- Glue the background to the card blank. Arrange large flowers. Complete the overall composition with decorative elements.
- Dry your work thoroughly.
- When it dries, decorate it with glitter.
- After that, write wishes to dear mommy on the card.
- Inside the card you can draw beautiful flowers or bows and write a wish to your loved one.
How to draw a birthday card for dad?
A greeting card to your beloved daddy for his birthday is, to say the least, touching. It is difficult to choose a theme for such a postcard, but there is one detail that you simply must apply - this is the style. If you get a stylish card, believe me, your dad will definitely be delighted with such a gift. Even if the postcard itself does not contain symbols of “masculinity,” for example, an image of a car, a weapon, or fishing.
You can make a card for daddy with embroidery, threads, and so on. Try to bring all the patience and love into your own creativity. To begin with, select the theme of the postcard; for example, any element of a man’s portrait can be suitable, for example, a beard, a smoking pipe, hipster-style glasses. Choose the shades you want. Calm and beautiful people who will harmonize with each other are considered ideal.


Manufacturing process:
- Take the card base. Cut out a “shirt” for her.
- Cut out a triangle in the center of the shirt.
- Glue a rectangle under the “shirt”.
- Take satin ribbon. Tie a tie from it in the form of a knot and glue it to the base.
- Glue the “shirt” on top of the tie.
- Using a special outline, make “stitches”.
- Glue buttons onto the card.
- Write congratulatory wishes inside the card, add small drawings, for example, balloons.
How to draw a greeting card for your grandfather's birthday?
You can give your grandfather beautiful postcard, which you will make with your own hands. To create this craft, you will need to spend a minimum of free time, plus a lot of imagination, and also take scissors with glue, and stock up on the following:
- Colored cardboard
- Colored paper
- Paper strips for quilling
- Buttons
- Double-sided tape


Manufacturing process:
- To create a blank for a postcard, take cardboard. You can use double-sided or single-sided cardboard. Fold it into two equal parts.
- Carefully press down the line where the card will fold.
- Then make a small cut at the top of the card, approximately 2 centimeters.
- Fold the edges of the card so that you get a collar.
- Make a “vest” from colored stripes. Carefully glue the strips to the outside of the product, alternating colors at your own discretion. Instead of paper strips, you can draw stripes using pencils or paints.
- Take a strip brown. Glue it in the center of the card.
- Also, cover the edges of the vest with this strip.
- Make a bow. Attach it to the collar using tape or glue.
- Glue small pockets on the right and left sides. And glue a button in the center (you can have one or several at once).
- Next, design the inside of the card as you wish.
How to draw a greeting card for your grandmother's birthday?
Grandma is exactly the person who is always ready to feed her delicious pies and pies, listen and give useful advice. If you want to surprise your grandmother with a unique gift on her birthday, give her a beautiful card. But not the one you can buy in a store, but one made with your own hands.
To make a postcard, take the following materials and tools:
- Cardboard colored and white with black
- Lace - approximately 12 cm, but no less
- Ribbon white– 30 cm
- Artificial flowers – 3 pcs.
- Buttons matching the color of the paper – 3 pcs.
- Scissors
- Ruler with glue
- Pencils
Manufacturing process:
- Cut out a 16 cm * 20 cm rectangle from white cardboard. Bend this rectangle into two equal parts. This will give you the base of the postcard.
- Take black cardboard. Cut 2 rectangles from it (15.6 cm * 9.6 cm and 8 cm * 3.2 cm).
- Take colored cardboard. Cut out rectangles from it (15.2 cm * 9.2 cm and 7.7 cm * 2.9 cm).
- Glue the colored cardstock over the black to create a black frame.

- Assemble the backing.
- Glue the smaller rectangle and "Happy Birthday" onto the smaller rectangle.
- Then glue the lace. Cut a 12 cm strip from the white ribbon. Glue it on top of the lace.

- Make a bow from the ribbon and glue it to the backing. Also glue flowers and buttons onto a small rectangle.
- Glue the backing to the base of the product.
- Next, decorate the card as you wish using colored pencils. Don't forget to write a congratulations.


How to draw a greeting card for your friend's birthday?
What can you give to your beloved friend? Habitual gifts, sometimes, are no longer able to please the birthday person. But a postcard made by yourself can really surprise any person. Moreover, you will spend only 30 minutes for production, maybe a little more. So, you should have the following materials in stock:
- A piece of double-sided cardboard
- A piece of snow-white cardboard
- Scissors
- Blade or knife
- Double sided adhesive
- Measuring accessories (ruler with pencil)
- Ribbon
- Decorating elements
- Hole puncher

Manufacturing process:
- Take colored cardboard. Cut out a rectangle and bend it into 3 equal parts. Mark the outline of the handbag on the cardboard.
- Cut out the postcard shape.
- Take a blade or knife. Cut out the handle of the bag. Fold it inside the product.
- Using tape, stick a rectangle cut out of snow-white cardboard into the inside of the bag. You can use a hole punch to cut out the edges of the rectangle.
- Decorate the product - tie a bow and glue it to the clasp. Glue the decorative elements.
Please your beloved friend with this card!
How to draw a birthday card for a friend?
If you have a very close friend whom you have known almost since birth, you can draw him an unusual and bright card for his birthday. Try to imagine what exactly your friend likes and depict it on your postcard. We suggest you make the following postcard. Take:
- Snow-white paper (landscape sheet)
- Ordinary pencil
- Multi-colored pencils
- Scissors with ruler

Manufacturing process:
- Take the paper. Fold it in the center.
- On the inside of the paper, using a simple pencil, draw whatever you want, for example, balloons.
- Then write wishes for the birthday boy in multi-colored letters. Place the inscription on balloons or write nice words at the bottom of the postcard.
- Once you have decided on the design of the card, paint it.
- You can use multi-colored pencils, or watercolors. It all depends on what you can work with best.
- If you want to draw beautiful nature on a postcard, then it is advisable for you to use paints for this. With them you can more naturally convey the shades of nature and its violence.
How to draw a birthday card for your sister?
Do you have a younger sister? Is it her birthday very soon? Then you should worry about the gift in advance. To make the final result very colorful and beautiful, then take the following elements:
- High density colored paper – 1 set
- Markers or felt-tip pens
- Multi-colored pencils
- Colored pens
- A simple pencil, well sharpened
- Scissors with glue
Manufacturing process:
- Take the paper. Bend it in half.
- On the outside, draw an image, on the inside, write a wish for the birthday girl.
- Now start drawing. Take a simple pencil. Draw an oval on the card. Draw a curved stripe in the center of the oval (this will be the center of the teddy bear's face). Then draw the muzzle and nose itself.
- Sketch the nose, leave a small highlight.
- Next, draw the eyes, mouth, eyebrows and ears of the bear. Color them with colored pencils.
- Draw the torso. Draw 2 parallel rounded stripes from the head (this is how you get the body of the bear).

- Draw 2 lower legs for the bear.
- Then draw a cake in the drawing and decorate it. Add one top paw.
- Then draw another upper paw.

- Design the background of the postcard. You can draw balloons, and on each balloon write the letters that spell out the phrase “Happy Birthday.”
- Finish the card - simply color it with different colored pencils.

As a result, you will receive a beautiful postcard that your sister will definitely be delighted with.
How to draw a birthday card for your brother?
If you want to give your little brother an unusual gift, then make him a card yourself. You can draw an elephant on a postcard. Read below how to do this.
- On a blank sheet of paper, draw a couple of circles that should be superimposed on each other. Just keep in mind that these parts must be different in size.
- Draw an elephant's trunk in the center of a smaller circle. Above the trunk, draw eyes and eyebrows.
- Draw the elephant's ears big. Apply smooth stripes at the top and wavy ones at the bottom.
- Bottom of the circle larger size draw the legs.
- Make folds on them (knees and claws).
- Draw a tail for the elephant and a tassel at its tip.
- Use an eraser to remove additional lines, and carefully outline the main ones.
- Color the elephant as you wish. Write your wishes.

How to draw a birthday card for a teacher?
A handmade greeting card is the best gift for a teacher from a student. There are a large number of options, but we suggest you use ours. To create such a card, stock up on materials:
- Cardboard (you will use it to make the base)
- Gouache paints or watercolors
- Napkin

Manufacturing process:
- Make the base for your card. Take snow-white cardboard.
- Then take the prepared paints. Dip your fingertips into the paint.
- In the central part of the postcard, draw using this method flower.
- Wait for the card to dry completely.
- Write a beautiful poem inside the card. You can even come up with it yourself.
How to draw a birthday card for your aunt, godmother, or woman?
Flowers must be depicted on the card for aunt and godmother. After all, all women, without exception, adore them. We invite you to make the following version of the postcard, which you can give not only to a loved one, but also to a neighbor, a friend’s mother, and so on.

Manufacturing process:
- First, draw a vase on the card. Mark the places where the flowers will occupy.
- Then draw the flowers themselves, for example, roses. The quantity is not that important. The most important thing is that it is odd.
- Finish drawing the rose petals. Then draw a beautiful bow on the vase.
- Draw rose leaves.
- At the very end, add all the elements. Color the drawing with red or burgundy paints. You can paint the vase blue.
How to draw a birthday card for a man?
For a man, for example, for a boss, you can make an interesting postcard in an antique style. You can look at the drawings in advance, which are very suitable for that time. After you select a drawing, print it on a printer or draw it. Especially if you love to draw.
To make it, take:
- Base paper (cardboard paper, colored or white).
- Scissors.
- Knife.
- Elements for fastening.
- Decorating elements.
- Pencils or paints.

Manufacturing process:
- First, decide on the color scheme and the main pattern.
- Make a base for a card of any shape. If you want the card to open, then fold it in half.
- On the postcard, paste a photo, pieces of material and other decorative elements. Make sure they fit the overall theme.
- Glue these elements one by one onto the base.
- Draw congratulatory words on the inside and outside of the product with bright pencils.
- If you want to make the card more interesting, tie a thin ribbon around it and then tie it with a bow.
How to draw a birthday card for a boy?
Every child dreams of having all his cherished desires come true. And who can fulfill them? Of course goldfish. You can do it greeting card, decorating it with a goldfish. The baby will definitely believe that she will make his dreams come true. To do this, take:
- Blue cardboard (the size of a landscape sheet).
- Gold nail polish or gold jewelry is also gold in color.
- Glue.
- Gel pen (preferably several different colors).
- An ordinary pencil.
- Eyes (beads).
- Scissors with a ruler, plus double-sided tape.

Manufacturing process:
- Fold the cardboard in half. The blue side should face outward. Draw an outline of the fish in the center. Circle it with a pen. Draw the crown and fins.
- Draw an eye with a simple pencil or stick on a prepared eye (bead).
- Lubricate the fish with glue. Sprinkle gold jewelry in the form of small balls on the fish.
- Then draw air bubbles.
- Write “Happy Birthday” at the bottom of the card.
How to draw a birthday card for a girl?
Girls, as a rule, unlike boys, love it when they are given unusual and bright gifts. If you give a card that you make yourself, you will definitely be able to give the girl a lot of positive emotions. For your own creativity, take:
- Colored paper.
- Snow-white paper.
- Glue with scissors.
- Cardboard.
- Paints or colored pencils.

Manufacturing process:
- Draw hedgehogs on snow-white paper using pencils or paints. Glue different sized mugs onto the card.
- If you want some of the balls to be voluminous, stick balls of similar size onto the drawing, but fold them in advance in the form of a book. Write a beautiful wish on the inside of each balloon.
Isn't it a wonderful card? You can also make it for a nephew or niece, for a goddaughter or godson, and so on.
How to draw a birthday card for kindergarten?
Now let's try together to make a postcard for the youngest children who are still in kindergarten. Draw a cute cat with a cake in its paws.
- First, make a blank for the postcard.
- On the outside, draw a ball, a muzzle, eyes, a nose and a mouth of a cat. If you wish, you can draw whiskers for the cat.
- Draw the cat a festive cap, ears and tail.
- Draw a cake with candles in front of the cat.
- Add stripes to the animal on the body and tail.
- Behind the cat, draw wrapped gifts.
- Write “Congratulations” inside the card.

Video: DIY postcard
A postcard made by yourself is a great gift idea for a loved one. To do this you just need to invent original congratulations and decorate it festively using available materials. A grandmother will certainly be delighted with such a gift received from a grandson or granddaughter, and parents will be delighted with a postcard from a son or daughter. You can use any handicraft technique in your work, it depends on the age and skills of the author of the craft.
How the finished postcard turns out depends only on its creator. The main thing is to approach the matter not formally, but with love. To do this, you need not only to make a beautiful “cover”, but also to think over the content of the congratulatory text. Do-it-yourself anniversary cards, as well as colorful homemade greetings for the New Year, Christmas, “men’s” and “women’s” holidays are a great way to show your attention to family, loved ones and friends.
Benefits of a homemade gift
In Soviet times, children of preschool and junior school age Traditionally, people gave homemade drawings or cards to family and friends during the holidays. Then this tradition became a thing of the past, but now it is gradually being revived. A handmade card is the best way to congratulate a close relative on his birthday or anniversary, as well as on his professional holiday. Here are the main advantages of this craft:

How to make congratulations to family and friends
 To make a pleasant surprise can be used Japanese technology origami, as well as the traditional East Slavic cutting technique - silhouette cutting. For origami and scrapbooking, thin colored or plain white office paper is best. For kirigami - volumetric paper crafts- colored cardboard is better so that the finished craft holds its shape well. But the cardboard should not be too thick, otherwise working with it will become noticeably more difficult. Do-it-yourself voluminous birthday cards look very impressive.
Before you start work, you need to prepare everything you need. To the child preschool age You will definitely need an apron for work to protect your clothes from glue drops. You need to lay an old newspaper on the table for the same purpose.
Before you make a birthday card for your grandmother, grandfather or other loved one, it is advisable explore the tastes of the hero of the occasion. Depending on the tastes of a loved one, the design theme is chosen. If you decide to make a photo collage, from magazines and family photo albums drawings and photographs on a specific topic are cut out and arranged on a postcard, then carefully glued and combined into a single composition. If the author decides to draw himself, it is best to choose simple, but bright and recognizable images. In order to make a greeting card yourself, you need:

What to write in a postcard
If the card is intended for a loved one, you can write any affectionate or funny words, for example: “Dear granny”, “Dear mom”, “Cool grandfather”. You can also use pet nicknames (not offensive). The main thing is that in the congratulatory text:

The correct logical structure of the text is also very important. As a rule, any congratulation on a holiday, in verse or in prose, consists of the following elements: the actual congratulation with an address to the addressee and a designation of the holiday (for example: “Dear Mashenka! I want to congratulate you on the International women's day!”), a block of wishes (most often they wish older people health, and young people love) and a conclusion with the date and name(s) of the congratulator, for example: “With love, neighbors in the country. January 1, 2018." When composing the text It is recommended to follow this plan, then the congratulations will be short but succinct.
Who to give a greeting card to
Nowadays, a handmade postcard is a rather unusual gift, because you can buy a piece of cardboard with a bright picture and printed poems in any supermarket. However, older people do not like to receive store-bought greeting surprises because they are expensive. Therefore, a homemade, beautifully decorated congratulation is the best gift for a grandmother or grandfather from their grandchildren . The main thing is to come up with an original text. And you can draw anything that your wild child’s imagination suggests. Typically, homemade greeting cards are considered the best gift For:

For which holiday is it better to give?
 Homemade postcard - wonderful gift for any holiday. The main thing is that the theme of the crafts’ design corresponds to the main theme of a particular holiday. You can make a card with your own hands very easily, because the theme can be absolutely anything, depending on the tastes of the birthday person. A birthday card for grandma or grandpa is, of course, classic flowers, but you can also decorate the greeting with a beautiful landscape.
Most often, such surprises are presented on anniversaries and birthdays. Teachers and educators usually reap the benefits children's creativity in my days professional holidays. Mom, grandmother, elder or younger sister It will be a pleasure to receive a hand-made congratulation on International Women’s Day as a gift from your grandson, son, or brother. Dads and grandfathers, especially those who served in the army, will certainly be pleased with a children's postcard with an applique in the form of a ship or an airplane, made for Defender of the Fatherland Day.
 Real scope for creativity opens up on Valentine's Day, which is traditionally celebrated all over the world on February 14th. In Russia, this holiday has become widely celebrated quite recently, however, in many schools and even kindergartens, children, under the guidance of teachers, make colorful “Valentines” for their beloved parents, friends and relatives. In Russia, there is also a similar holiday - the Day of Family, Love and Fidelity, the symbol of which is the field chamomile. On this day, you can please your family and friends with these modest flowers made from cardboard or colored paper. A holiday wish is written on each chamomile petal.
Handmade postcard - one of the best ways express your love, gratitude, respect for a loved one. This homemade product will perfectly complement any purchased gift and will be remembered by the hero of the occasion for a long time. But the main thing is that making a postcard with your own hands will take very little time, a maximum of half an hour.
Attention, TODAY only!
According to Russian traditions, it is customary to give gifts to everyone on their birthday. On such a day, every birthday person expects pleasant surprises. Therefore, an invitation to this holiday should definitely be accepted. Grandma is the most main man for each of us. That’s why you shouldn’t miss her birthday. But what should you give your grandmother? The answer to this question is not difficult to find. For example, you can always make crafts for your grandmother’s birthday with your own hands. Grandma will always be happy with a gift made by herself. In general, take note of our ideas and boldly start making something interesting.
Newspaper roses for grandma
Today it is customary for every woman to come to her with flowers, which are given to her for any occasion. This rule also applies to close relatives. But if money does not allow you to buy a bouquet of fresh flowers, then you should make them from paper. Such a gift, of course, will be kept by grandma for a long time, unlike a real bouquet. This means that grandma will remember her day with a happy smile.
To make such a bouquet take:
- Old pages from books or newspapers and scissors,
- glue and tape for decoration.
Work progress:
Templates of rose petals are depicted separately on sheets of cardboard. A total of 5 of them are needed. However, they must have different sizes. Thanks to these blanks, the craft can be made much faster.

Once your templates are ready, take the newspaper and cut it into long strips. Moreover, the width of the stripes should be equal to the width of the templates. After which each strip is folded like an accordion. Next, a petal template is placed on the strip and traced around it. Then the petal is cut out. To work, you will need 5 petals of each size. And the width of the small part should be 3 cm. Each subsequent part will have a width of 1-1.5 cm more. The upper part of each petal is rounded.
When the petals are ready, you need to make a stem. In this case, the sheet is rolled into a tube and the end is secured. As a result, there will be no unwinding of the part.
Now let's start assembling the flower. A petal is glued to the paper tube, which should be 2-3 cm above the stem. The remaining parts are also attached in sequence. They start from the smallest and end with the largest. Once you have glued all the petals, leave the rose to dry.
Using this principle, you can make several of these flowers, from which a beautiful bouquet is formed for your grandmother.

Beautiful card for grandma
The next birthday craft for grandma from her granddaughter looks very festive. And it’s very easy to make such a miracle. The child will undoubtedly enjoy this activity.
So, in this case, it is worth decorating the front of the card. To do this, you just need to bend a blank album sheet. Then it is taken colored paper, from which 9 circles are cut. They must have different sizes and must be even. Buttons are also used to decorate cards. They must be bright color in the amount of 3 pieces.
Place 3 circles at different heights at the top of the card. In this case, circles of larger diameter are used. On top of the mugs, another smaller mug is glued. After this, a button is glued to the center. The result should be pretty flowers.
But the postcard is not finished. You need to use a felt-tip pen or pencil to fill in what is missing. And write a beautiful congratulation inside.

Useful craft for grandma
The question of what craft to make for your grandmother for her birthday will always be relevant due to the fact that every person loves his grandmother very much. A craft for grandma will not only be beautiful, but also useful. This time we propose to make an original vase. You will need quilling paper and a glass jar.
Work progress:
- First of all, the strips are rolled into a snail. In this case, all snails should have different colors and different sizes.
- Now take a container under the vase and cover it with these circles in a chaotic manner. This is done all the way to the top.
- The finished vase will cope with its direct functions and create a special atmosphere in the room.

Hot stand
One more easy craft for grandma's birthday - this is a hot stand. In this case, you should use:
- Burlap and planks,
- Coffee beans and glue gun.
Work progress:
To begin with, the base is covered with burlap on both sides. And the upper part, which will be the front part, is covered with grains. Do the work in a circle, starting from the edge. To make the pattern beautiful, each grain is glued neatly and securely.
Several such stands can be made. At the same time, you can form the name of your grandmother from them.

Grandma's box
If your goal is - beautiful craft grandma for her birthday, then make a very cute box for her from the materials you have on hand. The main material for work is popsicle sticks. And such a product is made in literally 20 minutes. Your grandmother will store all sorts of little things in such a box. Therefore, the product will always be in sight.
To make such a craft you need to take: popsicle sticks, paints and a glue gun.

Work progress:
First of all, all the sticks are painted with all the colors of the rainbow. After this procedure they should dry.
After which they are laid on the surface next to each other. In this way, achieve the width you need. Then, using glue, you also need to coat a couple of sticks. They are placed crosswise at both ends.
At the next stage, they begin to build up the walls of the box. Wooden sticks are placed on top of each other so that they cross at the corners.
A lid is also made for this box. It is made in the same way as the base of the box. Also here you should not forget about the handle, which is attached to the inside. The handle will be 4 sticks that are glued together.


