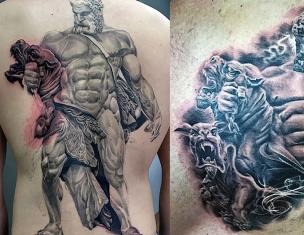
Some examples of men's machine knitted patterns for inspiration and repetition. It is clear that it is almost impossible to repeat one after another.
The difference in the type or thickness of the yarn will already make a significant difference. The same model knitted from different thicknesses of yarn will look like two different things. No worse or better, just different.
Since handmade is unique, then knitting jumpers for men is not only a rational activity. These are protective things, especially if knitted by loving hands for beloved men.


There are an incredible variety of weaves that can be used for men's jumpers on a knitting machine. Even hand-drawing, embroidery on loops or color transition on a card will give original options.
But the most important thing is the pattern according to which you will knit the jumper on the machine. They can be taken from Burda or from ready-made descriptions knitting.
Favorite things that don’t even need to be ripped out will do the same. Knitwear is flexible and will allow you to accurately fit the item to your figure.
Take an idea, cut out a pattern, adjust it to your figure specific person and don't forget that you you will need your own loop test. No machine, even if you take the threads indicated in the description, will give exactly the same density. There are bound to be discrepancies. As a result, the item will need to be bandaged. And no one needs this.
Ideas for men that can be knitted on knitting machines are in the air. They can be taken from knitting magazines, spotted on colleagues or in store windows. Have fun creating.
Size: 50-52.
The product was made on a single-frame machine of the “Neva-5” type.
You will need:
- yarn - 500 g of dark cherry color yarn;
- 50 g each of burgundy and mustard colors (wool or semi-wool).
Main knitting: cooking surface. The bottom of the product, the collar, the cuffs are made with an elastic band * 1 knit, 1 purl * with needles No. 3 or by unraveling and raising the loops (or on a double-stitch machine).
Knitting density:(square 8”) 25 p. x 35 r. = 10 x 10 cm.
Model pattern:

DESCRIPTION OF THE WORK
First page (74 rows): The mustard-colored lower corner begins to be worked on the 40th loop to the right of the center one. Extensions are made 1 p. in every 2nd row (up to 21 p.). Next, we knit 10 stitches on each side of the corner with the same slope. In this case, in the 49th row from the beginning of the corner, a horizontal mustard-colored stripe is made on both sides of it (= 12 rows). The upper triangle is made on 25 loops, removing 2 stitches in every 2nd row until one loop remains.
Second stripe (40 rows): A mustard-colored diamond begins on the 50th loop to the left of the center one with a slope of 1 p. in every 2nd row (= 21 p.), then in the reverse order. In the 15th row from the beginning of the diamond, a horizontal strip is knitted burgundy color(=12 rows).
Third stripe (42 rows): The mustard-colored bottom corner begins on the 20th loop to the right of the center one. Extensions are made by 2 loops in every 2nd row (up to 21 stitches). Next, knit 10 stitches on each side with the same slope. In the 31st row from the beginning of the corner, a horizontal mustard-colored stripe is made on both sides of it (= 12 rows).
Back: cast on 157 stitches with an auxiliary thread and knit 5-6 rows, then switch to the main thread of dark cherry color and knit 122 rows, make marks on the armhole, knit 92 rows to the neckline. To decorate the neckline, push the middle 33 sts into the PNP in every 2nd row, then on both sides 2 times 5 sts, knit 1 time without decreasing. In row 222, bind off the shoulder loops. Slip the neck loops onto the auxiliary thread.
Before: performed according to scheme 20 partial knitting. Cast on 157 stitches with an auxiliary thread and knit 5-6 rows, then switch to the main thread of dark cherry color and knit 16 rows, then according to the pattern: 1st strip, 10 rows with dark cherry thread, 2nd strip, 3 th strip, then with a dark cherry thread. At a height of 106 rows, mark the armhole and knit 86 rows to the neckline. To decorate the neckline, push the middle 17 sts into the PNP in each 2nd row, then on both sides 1 time 4 sts, 2 times 3 sts, 2 times 2 sts, 4 times 1 st and 5 times knit without decreasing. In row 222, bind off the shoulder loops. Slip the neck loops onto the auxiliary thread.
Sleeve: cast on 91 stitches with an auxiliary thread and knit 5-6 rows, then switch to the main thread of dark cherry color and knit: for the right sleeve 94 rows, then perform the 3rd strip; for the left sleeve 110 rows, then perform the 2nd strip; then for both sleeves - with a dark cherry thread. For bevels, add 1 stitch on both sides in every 6th row 24 times and in every 4th row 4 times (=147 stitches). At a height of 47 cm from the beginning, close all loops.
Assembly: sew the product knitted seam. Sew one shoulder seam. Hang the neck loops onto the needles. Knit 12 rows square. 6”, 12 rows square. 5”, 12 rows square. 6". Unravel every 2nd stitch and lift with a knit stitch catcher. For sleeve cuffs, attach sleeve loops, removing every 3rd st. Knit 31 rows, p. 6". Unravel every 2nd stitch and lift with a knit stitch catcher. Close the loops with a needle. For the bottom, knit an elastic band as for cuffs, removing every 6th loop. Sew side seams and sleeve seams.
Hello girls everyone.
I knitted a gift for my husband for his birthday, they asked for a warm, plump, embossed one.
I was too lazy to braid, I had long wanted to try relief knitting according to jacquard patterns, I tried patterns that are clearly visible, by the way, one of them is a pattern for a robot, I had to think about how to divide the patterns among themselves, the idea was given by Natasha (SilverRainOzersk). Thanks again Natasha, I separated it with rollers. I would like to say that it is difficult to knit rollers for two-pieces on a machine; the carriage jammed on the samples, I found detailed description on the Craftswoman forum
On machines of the Braiser-Silver type it is difficult to perform large volumetric rollers; the drawbar does not work. The maximum you can knit on one needle bed is up to 6 rows, and then you have to be cunning... In principle, you can knit more, but you will have to be even more cunning for everything to work out. So..They can be used to separate both stripes and jacquard, it looks beautiful.1. Small roller - 2 rows. We knit without any problems on ZI and PI using a card machine; the electronic one does not have XX in both directions on the lock, so there are two options: either we shift the “stubs” of the side levers when moving from right to left so that the needles do not get knitted, but this is dangerous, or you should program the pattern in the program for this case: S-J - without selection and use as needed.
2. Middle roller - 4 rows. Carriages are knitted without problems on both ZI and PI, respectively. with the car model (description above).
3. Roller - 6 rows. After the first 2 rows, be sure to hang both side 7-shaped hooks with small weights. After 4 rows, so that the loops on the working needle bed are knitted well, we force them into the PRP (P-carriage, selected ruler, etc.).
4. Large roller - more than 6 rows. In this case, we proceed according to step 3, but it is also advisable to use some suitable tool (a decker is not suitable), after the 5-6th row, move it from above between the needle beds so as to push the accumulated fabric down and be sure to place the needles in the PRP before each pass of the carriage .All this applies to ordinary rollers on two backgrounds, since on one background the rollers are made any and slightly differently, and the patterns of “decorative” rollers already contain up to 6 rows maximum. Only Passap can make patterns with voluminous complex rollers, since it does not have a web pull and has a slightly different technology.
As for embossed jacquard, maybe someone doesn’t know, I’m giving a description from the magazine Lubo Delo

p0057.png

p0058.png
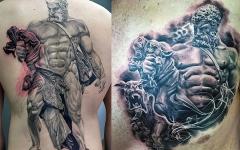
Double knitting, Belorussian thread, three threads. It turned out warm and plump. Rollers six passes. 
0_a2172_8afb44b2_L.jpg
The photos are not important, the camera doesn’t want to take proper photos 
Men's sweater on knitting machine always looks very nice. Smooth loops and even pattern. This is a very fashionable and warm product. Craftsmen often choose rough drawings for this option. For example, large braids or volumetric patterns . Everything to visually emphasize the shoulders and wide torso. Let's figure out how to knit a sweater on a knitting machine for the man you love.
 Execute beautiful product Not only the master will help, but also high-quality yarn. Using the wrong machine thread means putting yourself at great risk. At any moment, the thread can simply break and the fabric will be damaged. There will be pulled threads and a damaged pattern. That's why Yarn should be selected specifically for the knitting machine.
These are special bobbins, knitting with which will not be difficult even for a beginner.
Pay attention to the composition of the thread; for a warm winter sweater, you should use yarn with a high wool content. But more lightweight model may consist of threads with acrylic or other synthetic fiber.
How to knit a men's sweater (jumper) on a knitting machine?
Knitting a sweater on a machine will always be faster, but a beginner will have to study a little literature to master the technique of operating the machine. At the very first stages, you will need to understand how to make the required width of the set of loops. In principle, it is not much different from hand knitting.
 Initially, it is necessary to make two separate parts of the sleeve. Separately knit the fabric of the front part and the fabric of the back part. Assembly is most often done using a needle and thread yourself. But the main advantage of machine knitting will be the speed of execution. Many craftsmen are also accustomed to consider smooth loops to be a great advantage of using the machine method.
Men's sweater on a knitting machine with pigtails
Original the men's sweater model includes several techniques at once. This is a pearl pattern and braids on a knitting machine. To highlight the braids and collar of this model, a thread of a different color was used. The result is a very original product.
 For work use:
- knitting machine;
- light brown yarn for knitting machine;
- white.
Measurements
Take several measurements to complete the product.
To do this you need to measure:
- shoulder width;
- arm length from the shoulder with an extra 2 cm;
- length of the product from the shoulders to the elastic band;
- Measure the length from the elastic to the beginning of the armhole line.
 Sample
Using a simple pearl pattern, which is used for most of the sweater, you need to knit a small square. Next, using this fabric of pearl elastic, count the knitting density - the number of loops horizontally and vertically.
These two indicators are the knitting density, and then you will need to use them to construct the entire product. How many loops will be useful for casting on loops for sleeves, and how many to use for the back and front front.

Pearl elastic pattern
Sleeves
For the sleeve, you must first make a pearl ribbing pattern. Please note that the sleeve itself in this case starts from top to bottom. Knit the required length and make small decreases along the edges of the sleeve. Decrease 2 stitches in every 10th row (one on each side). Next, use a 2*2 elastic band to knit 6 rows from a special punched card. Do the same with the second part.
Back
The back is knitted from the bottom of the product and starts from a 2*2 elastic band and consists of 6 rows. Then knit the fabric without increases or decreases to the beginning of the neckline. For her, make smooth decreases. You can also use a punched card for this. Knit to the required length and finish knitting.
Before
For the front part, you need to knit a similar part, but reduce the fabric by 1/4. Remove from the right edge and in this place there will be braids, which will also be made using a knitting machine.
Braids
For braids, use a fabric with braids; to do this, take only 1/4 of the entire set of the front part and knit along the length of the entire shelf.

Pigtail patterns for sweaters
Assembly
First, attach the braids to the unfinished front piece. Next, connect the front and back parts at the shoulder seams, and all that remains is to sew in the sleeves and make the side seams, both along the sleeves and on the sides. All that remains is to make a collar for the sweater; for it, use 2*2 elastic bands from a punched card. The collar is made using white yarn.
So a beautiful sweater for a man is ready on a knitting machine.
 Working with a knitting machine is very convenient. With it you can easily get a product in just one evening, when when knitting by hand it takes about a week for a huge product. Many craftsmen are so accustomed to such machines that they are not ready to exchange them for regular knitting. Execute beautiful thing possible without a single mistake with knitting machines. Inspiration and good luck to all masters and all beginners in mastering a new craft.
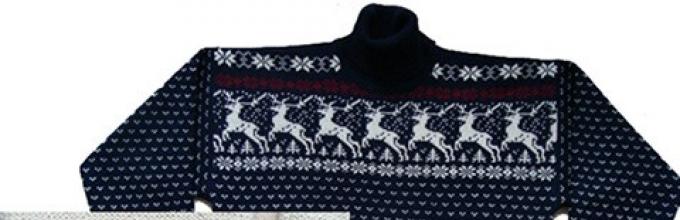
Sweater size 52-54.
Snood size 35 x 80 cm.
You will need
- For a sweater: 400 g of gray, 100 g of white and black yarn (40% alpaca, 60% wool, 100 g/300 m).
- For snood: 300 g of fancy yarn (50% alpaca. 50% acrylic. 100 g/ 250 m);
- knitting needles No. 4.5.
For a sweater: stockinette stitch, rib 2/2, pattern according to scheme 1.
For snood: pattern according to scheme 2.
Machine test:
For a sweater: 32 p. x 37 r. = 10 x 10 cm, knitted stockinette stitch on a Brother knitting machine at 8 gauge.
For snood: 19 p. x 22 r. = 10 x 10 cm.
Attention! The sweater was made on a Brother knitting machine at 8 count.
Description of knitting a men's sweater with an ornament
Back
Put 204 needles into work, pick stitches on two elastic needle beds and knit 2 rows with black yarn and 34 rows with gray yarn at a density of 5/5. reset the counter. Transfer the loops from the front font to the back and knit at gauge 8 in stockinette stitch. After knitting 114 rows on the counter, knit as follows: *2 rows of white yarn, 2 rows of black, 2 rows of white. 4 rows of grey, 6 rows of black, 4 rows of grey, 2 rows of white yarn, 2 rows of black, 2 rows of white, 34 rows with a pattern according to the pattern, 2 rows of white yarn, 2 rows of black, 2 rows of white, 4 rows of grey. 6 rows of black. 4 rows of grey. 2 rows of white yarn, 2 rows of black, 2 rows of white, then knit to the end of the piece with gray yarn*. At the same time, knitting 150 rows according to the counter, for the armholes, close on both sides in every 2nd row 2 times for 3 p., 3 times for 2 p., 6 times for 1 p., then in every 4th row 2 times 1 p. Having knitted 226 rows according to the counter, divide the work in half and knit both halves separately, closing for the neckline in every 2nd row 1 time 9 p., 1 time 6 p., 1 time 5 p., 2 times 3 p., 1 time 2 p., 1 time 1 p. At the same time, knitting 228 rows according to the counter, for shoulder bevels, close in each 2nd row 6 times 8 p.
Before
Knit like a back. Having knitted 210 rows according to the counter, divide the work in half and knit both halves separately, closing for the neckline in every 2nd row 1 time 8 p., 1 time 5 p., 1 time 4 p., 2 times 3 p., 1 time 2 p., 3 times 1 p. Perform shoulder bevels in the same way as on the back.
Left sleeve
Put 80 needles into work, sort the loops on two elastic needle beds and knit 2 rows of black and 34 rows of gray yarn at a density of 5/5, reset the counter. Transfer the loops from the front font to the back and knit at density 8 in stockinette stitch, adding sleeves on both sides for bevels in every 7th row 20 times, 1 p. Having knitted 114 rows according to the counter, knit as a back section from * to *.
Having knitted 150 rows according to the counter, for the okat, close on both sides in every 2nd row 2 times for 3 sts, 1 time for 2 sts, in every 4th row 4 times for 1 st, in every 2nd row 20 times 1 p., 1 time 2 p., 2 times 3 p. and 1 time 12 p. Having knitted 220 rows according to the counter, bind off the remaining loops.
Right sleeve
Knit like the left one.
Collar
Put 204 needles into work, sort the loops on two elastic needle beds and knit 2 rows of black and 78 rows of gray yarn at a density of 5/5, reset the counter. Separate the stitches on two needle beds to knit the pocket for the kettle stitch and knit 6 more rows in stockinette stitch, ending with a auxiliary thread.
Assembly
Steam the parts. Sew shoulder seams. Pin the collar by placing the edge of the neckline into the collar pocket.
Sew in the sleeves. Sew side seams and sleeve seams.
Description of knitting snood
Cast on 67 stitches on the knitting needles and knit 350 rows with the pattern according to pattern 2, bind off the loops. Make a seam.