New Year 2019 of the Yellow Earth Pig is approaching, and each of us is preparing for this wonderful holiday. Some people plan to celebrate the holiday at home, with their family, while others, on the contrary, in a noisy company of friends, on the street. In both cases, I would like to beautifully decorate the New Year's meeting place. Typically, the New Year's decoration of the home consists of a Christmas tree, all kinds of garlands and beautiful festive compositions from Christmas tree branches and tinsel. On the street, traditionally, a snowman is made from snow and decorated with various fun accessories. But what if you want to have such a funny snowman in your apartment, or it happens that there is little or no snow outside? For such cases, we offer some great ideas on how to make a snowman for the New Year 2019 with your own hands from scrap materials.
Snowman made from plastic cups
In order to make such a rather unusual snowman, you don’t have to work hard, because creating such a miracle is as easy as shelling pears!
To make it you will need:
- plastic cups - 300 pcs.;
- PVA glue or stapler;
- plasticine.
Work progress:
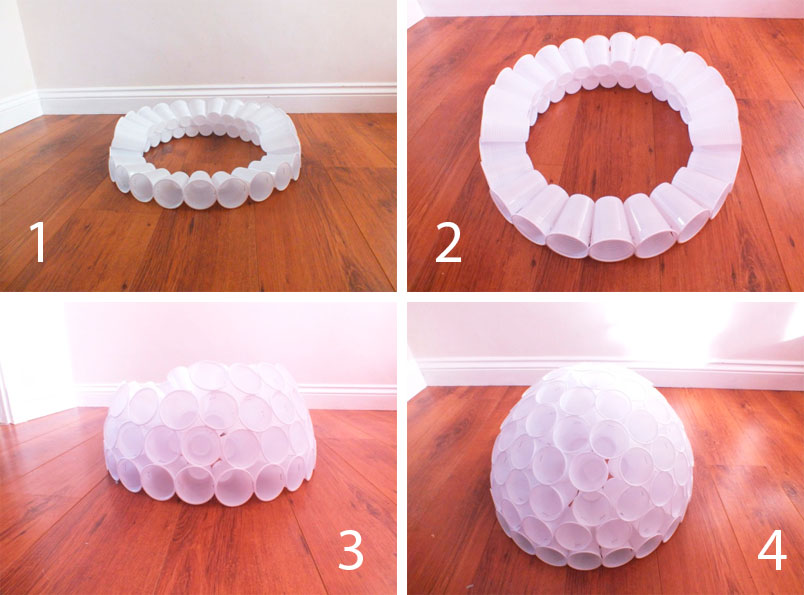
- 30 glasses should be laid out in a circle and fastened together using a stapler or glue. The first row is ready. According to the same principle, we make the second and all subsequent rows. For each subsequent row, fewer and fewer glasses will be required, since they are cone-shaped. Thus, the first lump should be obtained.
- The next lump should have a more round shape and smaller dimensions. We take 22 plastic cups and form the second lump in the same way as the first. After that, we turn it over and lay out the missing rows. If desired, you can make a third lump, however, in this case, it may be too unstable.
- Connect both lumps and make sure that everything turns out correctly and evenly.
- Let's start decorating. Make eyes from black plasticine and a nose from orange plasticine. Wear a hat or cap. You can also use a scarf, ribbons, fabric and other elements for decoration.
- You can put a New Year's garland under the snowman, in which case it will also glow. The main thing: show your imagination! This decoration can be installed indoors or outdoors.
Master class on making a snowman from plastic cups
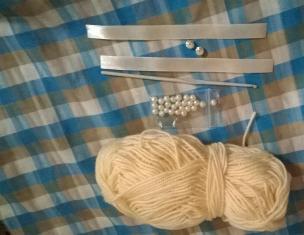
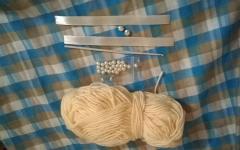
Snowman made of threads

One of the easiest options for making a snowman for the New Year 2019 with your own hands is using ordinary threads. It looks original and is done, surprisingly, quickly and easily.
- A skein of white thread,
- PVA glue,
- Balloons – 5 pcs.,
- cotton wool,
- Needle.
Work progress:
- First of all, you need to inflate the balloons, they will be the body. 3 - different sizes and 2 - the same (for hands).
- Use a needle and thread to pierce a jar of PVA glue. The thread must be saturated with glue. We remove the needle and wrap the thread around the inflated balls, which have been previously coated with a small amount of vegetable oil (so that the thread does not stick to the ball). Try to wrap the balls as carefully as possible so that there are no gaps at all. Once all the balloons are wrapped, place them in a warm place to dry completely (at least 24 hours).
- After this, pierce each ball with a needle and remove its remains by the tail.
- We sew all the parts together with white thread. For maximum effect, you can coat the stitching areas with glue. Leave it until completely dry.
- The eyes can be made from buttons or beads, the nose and mouth from colored paper. Wear a hat and scarf. Our snowman is ready for the New Year!
Master class on making a snowman from threads
Snowman made from beer caps

A snowman made from beer caps does not require great creative skills to make. Even a child can easily make such a New Year’s craft with his own hands. And since a snowman from ancient times is considered a good helper in the fulfillment of cherished desires, such a craft will not only serve as a decorative element, but will also attract good luck and luck to your home.
To make it you will need:
- Bottle caps;
- Acrylic paints - white, black, orange, red;
- Brushes;
- Ribbon;
- Hot glue;
- Buttons;
- Scissors;
- Glitter (at your discretion).
Work progress:
- Take three bottle caps and paint them white, then glue them together with hot glue.
- Glue a red ribbon to the back of the future snowman, making a loop at the top.
- Using a thin brush, draw the eyes, nose, mouth and buttons on the snowman.
- We tie a thin ribbon, which will serve as a scarf, between the first and second lids. To make it more beautiful, you should glue a button or other decorative element that you like.
Our cheerful snowman is ready for the New Year!
New Year's craft "Chocolate - snowman"

New Year's holidays in every family, of course, are not complete without sweets. But, given the fact that the New Year is a time of magic and the fulfillment of all cherished desires, you should definitely transform an ordinary chocolate bar into a rather cute snowman, thereby intriguing your children with beautiful homemade packaging.
You will need:
- white or blue paper;
- Scissors,
- Black felt-tip pen,
- PVA glue,
- Orange corrugated paper;
- Scarf and hat (can be made from a sock or corrugated paper);
- Fir branch with beads or other decorative elements.
Work progress:
- We take a clean sheet of paper and wrap a chocolate bar in it, and so that it does not unfold, we glue it with PVA glue.
- On the finished snow-white tile, draw the eyes of the snowman with a black felt-tip pen, and form a nose from a small rectangular piece of orange corrugated paper, tightly wrapping it into a cone and gluing it with glue.
- We draw a smile with a black or red felt-tip pen, and create a blush on the cheeks using a red pencil, which we use to shade on a small piece of white paper, and then lightly rub it on the cheeks.
- We make a hat and a scarf from a sock: cut it in half and sew one part, where the heel remains, using a needle and thread. Using a thread from the top of the hat, we create a bubo. To make the hat seem mischievous, sit slightly at an angle and tighten one side of it with thread.
- We cut the scarf in a semicircle from the second half of the remaining sock and tie it around the snowman’s neck. To prevent the ends of the scarf from sticking out in different directions, we secure them to the tile itself with double-sided tape. We decorate the scarf with fir branches and beads or anything of your choice. Ready!
Master class on making a chocolate snowman
Candy snowman

You can make a snowman quite creatively for the New Year 2019 using candies; it will fit perfectly on your holiday table or near the Christmas tree.
To make it you will need:
- Candies "Raffaello";
- Foam balls (one small, the other a little larger) - 2 pcs;
- White paper;
- Hot glue;
- Toothpicks - 3 - 4 pcs.;
- Scissors;
- Foil;
- Chenille wire (fluffy, flexible);
- Silver cardboard;
- Rain.
Work progress:
- Take two foam balls and cover them with white paper.
- We connect the finished glued balls together, place them on top of each other (a small ball on a large one), placing them on toothpicks, and securing them with hot glue.
- We make mittens: cut out mittens from foil and insert a small candy into them and seal it inside with hot glue.
- Using chenille wire, we wrap both mittens around the edges, making them fluffy, and twist it at the base of the mitten.
- We paste the resulting snowman with candies: we paste the bottom ball in three rows, at a short distance, and on the top - three candies.
- We wrap the entire snowman in rain, securing it with hot glue. We put a cap made of silver cardboard on the head and also attach it to glue.
- We glue eyes taken from an old soft toy onto the face, a nose from gold foil, a mouth from red rain or other material.
- We glue on the mittens, and then the legs, made using silver cardboard in an oval shape. Well, that's it!
Snowman made of cotton wool

Such a craft will certainly interest the guests of your home, and probably none of them will immediately guess what this beautiful snowman is made of.
We will need:
- Deodorant bottle
- PVA glue,
- cotton wool,
- Buttons,
- Beads,
- Ribbon,
- Crepe paper.
Work progress
- Carefully cover the bottle with cotton wool using PVA glue and place it in a warm place to dry. Attach the scarf (ribbon) with glue.
- Sew several small buttons onto the body. Make eyes from beads, and a mouth, eyebrows and nose from crepe paper. It will turn out very fluffy and soft.
Master class on making a snowman from cotton wool
Snowman made of balls

This is probably the simplest New Year's craft that even a schoolchild can make with his own hands.
For production you will need:
- multi-colored markers or felt-tip pens.
- modeling ball – 1 pc.,
- white balloons – 2 pcs.
Work progress:
- We inflate white balloons of different sizes and tie them together using threads or ponytails.
- We inflate the modeling balloon and secure it in the form of a scarf where the white balloons are tied. Use a black marker to draw eyes, orange for a nose, and red for a mouth.
Master class on making a snowman from balls
Snowman made from a sock

To make such a snowman for the New Year you will need very little time and effort.
Materials:
- White socks
- Two buttons
- Scissors,
- Rubber.
Work progress:
- Cut the elastic from the sock.
- Secure it on the wrong side with an elastic band and turn it inside out.
- Now fill the sock with rice and cotton wool.
- Give the shape of the snowman using an elastic band: secure it in the middle.
- Make eyes out of buttons, put on a hat and scarf. It will make a great souvenir or Christmas tree decoration.
Master class on making a snowman from a sock
Fabric snowman

From fabric you can make with your own hands not just a unique snowman, but also an excellent soft toy for your child.
We will need:
- White fabric,
- Threads,
- Needle,
- Buttons,
- Sintepon,
- Ribbon,
- Beads,
- Cardboard.
Work progress:
- Sew a small bag from white fabric, then fill it with padding polyester.
- Using thread, tie it tightly in two places to form the head and body. Sew a ribbon and secure beads at the ends.
- Make a nose out of red cardboard and eyes out of buttons. You can tie a scarf made of plaid fabric around your neck.
Master class on making a snowman from fabric
Light bulb snowman

Did you know that you can make an original Christmas tree decoration from an old light bulb? It's very easy and simple!
New Year 2019 of the Yellow Earth Pig is approaching, and each of us is preparing for this wonderful holiday. Some people plan to celebrate the holiday at home, with their family, while others, on the contrary, in a noisy company of friends, on the street. In both cases, I would like to beautifully decorate the New Year's meeting place. Typically, the New Year's decoration of the home consists of a Christmas tree, all kinds of garlands and beautiful festive compositions from Christmas tree branches and tinsel. On the street, traditionally, a snowman is made from snow and decorated with various fun accessories. But what if you want to have such a funny snowman in your apartment, or it happens that there is little or no snow outside? For such cases, we offer some great ideas on how to make a snowman for the New Year 2019 with your own hands from scrap materials.
Snowman made from plastic cups
In order to make such a rather unusual snowman, you don’t have to work hard, because creating such a miracle is as easy as shelling pears!
To make it you will need:
- plastic cups - 300 pcs.;
- PVA glue or stapler;
- plasticine.
Work progress:
- 30 glasses should be laid out in a circle and fastened together using a stapler or glue. The first row is ready. According to the same principle, we make the second and all subsequent rows. For each subsequent row, fewer and fewer glasses will be required, since they are cone-shaped. Thus, the first lump should be obtained.
- The next lump should have a more round shape and smaller dimensions. We take 22 plastic cups and form the second lump in the same way as the first. After that, we turn it over and lay out the missing rows. If desired, you can make a third lump, however, in this case, it may be too unstable.
- Connect both lumps and make sure that everything turns out correctly and evenly.
- Let's start decorating. Make eyes from black plasticine and a nose from orange plasticine. Wear a hat or cap. You can also use a scarf, ribbons, fabric and other elements for decoration.
- You can put a New Year's garland under the snowman, in which case it will also glow. The main thing: show your imagination! This decoration can be installed indoors or outdoors.
Master class on making a snowman from plastic cups
Snowman made of threads
One of the easiest options for making a snowman for the New Year 2019 with your own hands is using ordinary threads. It looks original and is done, surprisingly, quickly and easily.
- A skein of white thread,
- PVA glue,
- Balloons – 5 pcs.,
- cotton wool,
- Needle.
Work progress:
- First of all, you need to inflate the balloons, they will be the body. 3 - different sizes and 2 - the same (for hands).
- Use a needle and thread to pierce a jar of PVA glue. The thread must be saturated with glue. We remove the needle and wrap the thread around the inflated balls, which have been previously coated with a small amount of vegetable oil (so that the thread does not stick to the ball). Try to wrap the balls as carefully as possible so that there are no gaps at all. Once all the balloons are wrapped, place them in a warm place to dry completely (at least 24 hours).
- After this, pierce each ball with a needle and remove its remains by the tail.
- We sew all the parts together with white thread. For maximum effect, you can coat the stitching areas with glue. Leave it until completely dry.
- The eyes can be made from buttons or beads, the nose and mouth from colored paper. Wear a hat and scarf. Our snowman is ready for the New Year!
Master class on making a snowman from threads
Snowman made from beer caps
A snowman made from beer caps does not require great creative skills to make. Even a child can easily make such a New Year’s craft with his own hands. And since a snowman from ancient times is considered a good helper in the fulfillment of cherished desires, such a craft will not only serve as a decorative element, but will also attract good luck and luck to your home.
To make it you will need:
- Bottle caps;
- Acrylic paints - white, black, orange, red;
- Brushes;
- Ribbon;
- Hot glue;
- Buttons;
- Scissors;
- Glitter (at your discretion).
Work progress:
- Take three bottle caps and paint them white, then glue them together with hot glue.
- Glue a red ribbon to the back of the future snowman, making a loop at the top.
- Using a thin brush, draw the eyes, nose, mouth and buttons on the snowman.
- We tie a thin ribbon, which will serve as a scarf, between the first and second lids. To make it more beautiful, you should glue a button or other decorative element that you like.
Our cheerful snowman is ready for the New Year!
New Year's craft "Chocolate - snowman"
New Year's holidays in every family, of course, are not complete without sweets. But, given the fact that the New Year is a time of magic and the fulfillment of all cherished desires, you should definitely transform an ordinary chocolate bar into a rather cute snowman, thereby intriguing your children with beautiful homemade packaging.
You will need:
- white or blue paper;
- Scissors,
- Black felt-tip pen,
- PVA glue,
- Orange corrugated paper;
- Scarf and hat (can be made from a sock or corrugated paper);
- Fir branch with beads or other decorative elements.
Work progress:
- We take a clean sheet of paper and wrap a chocolate bar in it, and so that it does not unfold, we glue it with PVA glue.
- On the finished snow-white tile, draw the eyes of the snowman with a black felt-tip pen, and form a nose from a small rectangular piece of orange corrugated paper, tightly wrapping it into a cone and gluing it with glue.
- We draw a smile with a black or red felt-tip pen, and create a blush on the cheeks using a red pencil, which we use to shade on a small piece of white paper, and then lightly rub it on the cheeks.
- We make a hat and a scarf from a sock: cut it in half and sew one part, where the heel remains, using a needle and thread. Using a thread from the top of the hat, we create a bubo. To make the hat seem mischievous, sit slightly at an angle and tighten one side of it with thread.
- We cut the scarf in a semicircle from the second half of the remaining sock and tie it around the snowman’s neck. To prevent the ends of the scarf from sticking out in different directions, we secure them to the tile itself with double-sided tape. We decorate the scarf with fir branches and beads or anything of your choice. Ready!
Master class on making a chocolate snowman
Candy snowman
You can make a snowman quite creatively for the New Year 2019 using candies; it will fit perfectly on your holiday table or near the Christmas tree.
To make it you will need:
- Candies "Raffaello";
- Foam balls (one small, the other a little larger) - 2 pcs;
- White paper;
- Hot glue;
- Toothpicks - 3 - 4 pcs.;
- Scissors;
- Foil;
- Chenille wire (fluffy, flexible);
- Silver cardboard;
- Rain.
Work progress:
- Take two foam balls and cover them with white paper.
- We connect the finished glued balls together, place them on top of each other (a small ball on a large one), placing them on toothpicks, and securing them with hot glue.
- We make mittens: cut out mittens from foil and insert a small candy into them and seal it inside with hot glue.
- Using chenille wire, we wrap both mittens around the edges, making them fluffy, and twist it at the base of the mitten.
- We paste the resulting snowman with candies: we paste the bottom ball in three rows, at a short distance, and on the top - three candies.
- We wrap the entire snowman in rain, securing it with hot glue. We put a cap made of silver cardboard on the head and also attach it to glue.
- We glue eyes taken from an old soft toy onto the face, a nose from gold foil, a mouth from red rain or other material.
- We glue on the mittens, and then the legs, made using silver cardboard in an oval shape. Well, that's it!
Snowman made of cotton wool
Such a craft will certainly interest the guests of your home, and probably none of them will immediately guess what this beautiful snowman is made of.
We will need:
- Deodorant bottle
- PVA glue,
- cotton wool,
- Buttons,
- Beads,
- Ribbon,
- Crepe paper.
Work progress
- Carefully cover the bottle with cotton wool using PVA glue and place it in a warm place to dry. Attach the scarf (ribbon) with glue.
- Sew several small buttons onto the body. Make eyes from beads, and a mouth, eyebrows and nose from crepe paper. It will turn out very fluffy and soft.
Master class on making a snowman from cotton wool
Snowman made of balls
This is probably the simplest New Year's craft that even a schoolchild can make with his own hands.
For production you will need:
- multi-colored markers or felt-tip pens.
- modeling ball – 1 pc.,
- white balloons – 2 pcs.
Work progress:
- We inflate white balloons of different sizes and tie them together using threads or ponytails.
- We inflate the modeling balloon and secure it in the form of a scarf where the white balloons are tied. Use a black marker to draw eyes, orange for a nose, and red for a mouth.
Master class on making a snowman from balls
Snowman made from a sock
To make such a snowman for the New Year you will need very little time and effort.
Materials:
- White socks
- Two buttons
- Scissors,
- Rubber.
Work progress:
- Cut the elastic from the sock.
- Secure it on the wrong side with an elastic band and turn it inside out.
- Now fill the sock with rice and cotton wool.
- Give the shape of the snowman using an elastic band: secure it in the middle.
- Make eyes out of buttons, put on a hat and scarf. It will make a great souvenir or Christmas tree decoration.
Master class on making a snowman from a sock
Fabric snowman
From fabric you can make with your own hands not just a unique snowman, but also an excellent soft toy for your child.
We will need:
- White fabric,
- Threads,
- Needle,
- Buttons,
- Sintepon,
- Ribbon,
- Beads,
- Cardboard.
Work progress:
- Sew a small bag from white fabric, then fill it with padding polyester.
- Using thread, tie it tightly in two places to form the head and body. Sew a ribbon and secure beads at the ends.
- Make a nose out of red cardboard and eyes out of buttons. You can tie a scarf made of plaid fabric around your neck.
Master class on making a snowman from fabric
Light bulb snowman
Did you know that you can make an original Christmas tree decoration from an old light bulb? It's very easy and simple!
What is the symbol of snowy winter? Of course, a snowman! Unfortunately, not all areas of our homeland are lucky with winter precipitation... However, you can give the interior a winter flavor and decorate the Christmas tree by making snowmen from ornamental materials.
We have prepared several interesting master classes for you and your children.
1. Snowman made from a sock.
Here a piece of white children's leggings is used for the body, and a hat and jacket are made from a striped sock. The nose and eyes are made of beads. The ends of a piece of leggings need to be tied and stuffed with synthetic padding or cotton wool, tied with thread to form a body, and then put on our hero.
Another similar option, but here we add cute fabric scarves.
2. DIY snowman made from old hats.

This beauty is made from two old children's hats, stuffed with padding polyester and decorated with large bright buttons.
2. From pompoms
This furry friend is made from two pompoms, which are also easy to make using string. Or you can use pompoms left over from old hats and scarves.
2. Snowman made of wooden buttons.

Your little one will be happy to paint large wooden buttons with a felt-tip pen. All that remains is to tie them with threads and put on a hat made from the finger of an old glove.
2. From salt dough.

Amazingly cozy and homey little snowman! By following the link, you can read about New Year's.
2. Crochet

Even little knitters can cope with this task. Two circles knitted with a single crochet, the mouth is made of thread, the eyes are made of buttons.
2. Snowman made of lids.

Even from ordinary bottle caps you can make something interesting. You need to glue a ribbon to the back surface, decorate the hero’s neck with a ribbon and a button, and draw a face with acrylic paints.
2. Snowman candle holder from a jar

DIY snowman made from wood cuts. Step-by-step instructions with photos
DIY craft from cut wood. Step-by-step instructions with photos.
Veronika Soloninkina, 10 years old, student of the “Handicraft” association at the Lesnovsky Children’s Art Center.
Supervisor: teacher of additional education Novichkova Tamara Aleksandrovna MBU DO Lesnovsky House of Children's Creativity.
Job description: The master class is intended for school-age children, creative people who love to work with natural materials and create unusual crafts.
Purpose: The craft can be used for an exhibition or a Christmas tree decoration.

Target: making a snowman from a cut tree.
Tasks:
- introduce the history of the appearance of snowmen;
- teach the consistent production of crafts from cut wood;
- consolidate the ability to work with a heat gun, observing safety regulations;
- encourage creativity and non-standard solutions when creating crafts;
- develop artistic taste and imagination;
- cultivate neatness, hard work, independence, and respect for nature.
Materials and tools:
Wood cuts;

- thermo gun;
- buttons, red bead;
- washcloth, stick;
- scissors;
- viscose napkin.

From the history of the appearance of the snowman.
According to an old legend, at the end of the 15th century, around 1493, the Italian sculptor, architect, poet Michelangelo Buonarroti first sculpted a snow figure. According to historical researchers, the first written mention of a snowman is found in a book of the 18th century. It talks about a “beautiful snowman” of gigantic proportions.
In Europe, snowmen were always made next to houses, generously decorated with garlands and household utensils, wrapped in scarves, and given branchy brooms. A mystical character can be discerned in the details of their “robes”. For example, a nose in the shape of a carrot was attached to appease the spirits who sent harvests and fertility. An inverted bucket on the head symbolized prosperity in the house.

In Rus', snowmen have been sculpted since ancient pagan times and were revered as the spirits of winter. They, like Frost, were treated with due respect and asked for help and to reduce the duration of severe frosts. By the way, snow women and the Snow Maiden are our Russian heritage. Our ancestors believed that winter natural phenomena (fog, snow, blizzards) were controlled by female spirits. Therefore, to show them their respect, they sculpted snow women.

In Rus' they believed that little snowmen are angels whom you can trust with your dreams. Since ancient pagan times, in the understanding of the Russian people, snowmen are angels descended from heaven. After all, snow is a gift from heaven. This means that a snowman is like an angel who can convey people’s requests to God. To do this, they sculpted a little snowman from freshly fallen snow and quietly whispered their cherished desire to him. They believed that as soon as the snow figure melted, the wish would immediately be taken to heaven and soon come true.

Today in our civilized world, creating snow figures remains not only a favorite pastime for children, but also a socially organized holiday. Records are being set all over the world for sculpting the tallest snowmen. The tallest snowman in Europe flaunts on the slopes of a ski resort in Austria, in the city of Galtür: its height has reached 16 meters 70 centimeters.

And the record for creating the tallest snowman in the world was set in the United States of America in 1999, its height is 37 meters 20 centimeters, and its weight is 6 thousand tons of snow.


The tallest snowman in Russia was made in Moscow in 2013. Its height was 9m 40cm.

In addition, in Moscow for several years in a row, the annual Snowman Parade competition has been held at the estate of Father Frost in Kuzminsky Park. Our snow figures may only be as tall as a person, but their number (several dozen) is very impressive!

A small preface to the creation of a “wooden” Snowman.
Dad and I went out into the yard and decided to clear the snow. They took shovels and got to work. The path was cleared. They began to push the snow away from the fence. We see a birch log lying near the fence. White, thin and smooth. Who put it there, when? Nobody remembers anymore. It lay there and didn’t bother anyone. And then dad decided to cut it into firewood. But a thought flashed through my head: “Shouldn’t we make crafts out of it?” I told my dad about my idea. You came up with a great idea, my dad supported me and went to the garage to get a saw. Soon the work began to boil. The whole bag was cut into even, round birch rings. We brought them home, laid them out near the stove, and dried them for three whole days. I touched them with my hands, stroked the rough cut, and I myself imagined various crafts that I would make. After all, in our association we often work with natural materials. When the sections were dry, dad sanded them. I helped by cleaning the cuts with sandpaper. How even and smooth they are now! What a sight for sore eyes!
The next day, I brought the sections to DDT and showed them to my teacher. We briefly discussed the plan for working on the craft and decided to “make” a snowman, only a wooden one.
Snowman, Snowman,
You are like a Borovichok mushroom,
Sturdy and nice
And so elegant!

Step-by-step execution of the craft.
Insert twine into the hole that was made earlier (dad drilled it) and make a loop.

Hot glue the second circle with a loop to the large saw cut.

Add a small cut, the “head” of a snowman.

Glue on the eyes and nose.

Draw a mouth and glue buttons.

Let's make a hat for our Snowman. Cut off a quarter of the viscose napkin. We make a fold and cuts to create a fringe.


Glue the edges and tie the upper part with a thread. The result is such a cute blue hat.


We cut a strip of fabric for the scarf, make a fringe by cutting the edges.

Let's put the cap on the Snowman's head. To ensure that the hat holds well, we secure it with glue.

We tie a scarf.

The broom is missing. Take a stick and some sponge. We tie the washcloth tightly with a thread and now the broom, the necessary attribute of the Snowman, is ready.

We hand the Snowman a broom.

The Snowman went out into the street and began to sweep away the snow in the yard. It made a whole snowdrift.

New Year is coming soon. The Christmas tree is already decorated. It’s just sad to celebrate the holiday alone.
Winter comes when the first snow falls, which means New Year is very close. Our children happily run into the yard and make huge snowmen with their own hands. So let's create a winter fairytale atmosphere at home! In this article we will look at how to make original snowmen for the New Year.
You will need: glass jar with a screw-on lid, foam ball with the diameter of the jar's circumference, chocolate candies, glue gun, brush, PVA glue, white glitter, scissors, white Christmas tree tinsel, small black pompoms, orange polymer clay, colored lace, red and green felt , cotton wool, knife.
Master class

The gift snowman is ready!

You will need: 3 plastic lids, cotton wool, white foamiran, green felt, scissors, buttons, black paint, glue gun.

Master class

The cotton wool snowman is ready! Even more snowmen I recommend watching this video!

You will need: bushings, felt, glue gun, paints, sponge, decorative eyes, soft wire, buttons, glitter, orange tic-tac, glitter balls.

Master class

Snowmen made from bushings are ready!

You will need: a sheet of cardboard, a simple pencil, scissors, string, tape, plasticine in white, orange, brown, black, blue, purple and green, skewer, stack.
Master class

The plasticine “Snowman” pendant is ready!

You will need: 3 white boxes of different sizes, acrylic base, glitter, tassels, acrylic paints, toothbrush, pattern template, buttons, orange felt, thread, needle, filler, scissors, glue, pencil, ruler, scrapbooking paper, hat, scarf.
Master class

The box snowman is ready!

You will need: bottle of wine, white and red acrylic paint, acrylic primer, black and orange polymer clay, black felt, cotton pad, alcohol, gloves, fabric with New Year's colors, red satin ribbon, snowflake, sponge, crystal glue moment, scissors.

Master class

3D snowman

You will need: white paper, printer, scissors, template.
Master class

The volumetric snowman is ready!

You will need: terry cloth in white and green, any orange fabric, red or blue fleece, holofiber or other filler, black beads, sewing pins, threads, needle, scissors, glue gun, ruler, pencil, sewing machine, paper, tweezers, curly scissors, blush.
Master class
- Make circles for the snowman's body in this way: prepare templates of wedges (petals, drops) of the following dimensions - 10.5 cm diagonally; 8.5 cm and 7.5 cm. For each ball, prepare 6 wedges.

- Connect 2 wedges and stitch them together using a machine. You should get 9 parts, 3 for each circle.
- Pin 3 parts together, machine stitch them, turn them inside out and fill them with holofiber.

- Sew the circles together from largest to smallest, forming the body of a snowman.
- Sew the nose this way: fold the orange fabric in half, draw a triangle, cut it out, machine stitch it, turn it inside out and stuff it with stuffing, then attach it to the snowman’s head with a blind stitch.

- Sew on beads for eyes.
- Draw a template of the snowman's arms and legs on paper, then transfer it to white terry cloth, cut out the parts, stitch, stuff with filler and sew up the hole with a blind stitch.

- Attach the arms to the body using the thread method, and attach the legs with a hidden seam.
- Sew the hat this way: cut out a rectangle of red fleece measuring 21x15 cm, fold it in half and stitch. Cut the edge with curly scissors on one side of the workpiece, and cut the fringe on the other side.

- Place the hat on the snowman's head, tuck the base, gather the fringe into a bun, tying it with a piece of fleece, then glue the edges of the hat.

- Make a scarf in this way: fold the red fleece in half, prepare a strip measuring 25x6cm, cut the fringe at the ends of the scarf with curly scissors and put it on the snowman’s neck.

- Draw a template for the mittens, transfer them to red fleece, cut them out, stitch them, turn them inside out, decorate the edges with curly scissors and put them on the snowman’s arms.

- Make a Christmas tree in this way: mark a triangle measuring 17x16 cm on green terry cloth, cut it out, fold it in half and stitch, leaving a hole for stuffing.

- Cut out the base of the tree, attach with pins and stitch it. Turn the cone inside out, stuff it with filling and sew the hole closed with a blind stitch.

- Sew the Christmas tree to the snowman, glue multi-colored circles of fabric onto the tree as decoration and rouge his cheeks.

- Sew a whole collection of creative snowmen using the same method.

You will need: corrugated paper of white, golden and red color, chocolate Chupa Chups with surprise and round candy, wire, glue, padding polyester, red braid, beads, scissors, ruler.
Master class

A snowman made of candies and corrugated paper is ready!

You will need: white sock, rice, thick white thread, needle, scissors, pins with colored heads, buttons, glue, a piece of fabric for a scarf, large tape.

Master class


You will need: thick white threads, 2 balloons, PVA glue, glue gun, scissors, sticks, ribbons, scarf fabric, tape, sheet of paper, printer, hat template.
Master class


You will need: light bulb, white and black paint, brush, sponge, fabric for a scarf and hat, buttons, scissors, thread, glue gun, sticks.
Master class

The light bulb snowman is ready!

You will need: polymer clay of white, yellow and red colors, toothpicks, a stationery knife, decorative eyes and a nose.
Master class

The polymer clay snowman is ready! I recommend watching this video!

You will need: 300 white plastic cups of 200 ml each (for a 2-tier snowman, and if you want, create a 3-tier one - you need 450 cups), a stapler, scissors, a glue gun or superglue, a scarf or tinsel, colored paper for the eyes, nose, mouth and button, hat, garland.
Master class
A snowman made from plastic cups is ready!