
What is it impossible for our people to imagine without? New Year? Surely without Olivier, “The Irony of Fate” and the smell of juicy tangerines. And if the first two points do not seem problematic, then citrus fruits are an insidious thing. There are allergies to them. And the invigorating holiday aroma is often present solely in our imagination. And real fruit smells no better than plastic. But the smell is half the festive atmosphere. Therefore, we suggest showing a little resourcefulness and making an original and very fragrant decoration for your home - a real orange garland!

Garland is an equally poorly replaceable attribute winter holidays, like citrus fruits. So why not combine them, and at the same time, combine business with pleasure by making original decoration for home? Which with its aroma will drive away the blues for a long time and remind you of the festive season.

To make an orange garland you will need:
1. 2-3 medium sized oranges;
2. Twine or fishing line;
3. Additionally and purely optional: tangerine peels, cones or bay leaves
Step 1: preparing oranges correctly


Cut the oranges into large, dense rings. Take a baking sheet, line it with parchment and place the orange slices. Leave to dry at least overnight, or better yet, for two to three days. After drying time, return the oranges to the kitchen, preheat the oven to 110-120 degrees and send the citruses to bake on 3 hours.
Step 2: stringing


The oranges are ready for further transformation when they acquire a light golden brown crust. Let them cool and in the meantime prepare a long skein of twine or fishing line. Using a thick needle or nail, make two holes side by side in each slice and string them one after another in a long row.
Step 3: Additional Decorations


And here you can find out how to make another holiday accessory -. No scent, but it glows beautifully.
Perhaps one of the most beautiful ways decorating your home for the winter holidays is about bringing natural beauty and comfort into it. The aroma of pine branches and cinnamon sticks, the citrus scent of oranges, a wreath of refreshing eucalyptus greeting you as you enter the house...
So today we will share an incredible in a simple way Add a natural touch to your holiday decor by creating dried citrus garlands that exude a delicious, spicy aroma. And if you hang them on the windows, then dried oranges, letting in sunlight, will fill the room with warmth and bright orange light, serving as small “stained glass windows” - very beautiful.
How to do it?
Preparation: 5 minutes
Baking: 3 hours
We will need:
Oranges (we took 2 oranges for three garlands)
Sharp knife
Parchment paper or baking sheet
Baking tray
Twine
Preheat the oven to 150ºC. Place parchment paper or baking sheets on a baking sheet. While the oven is heating up, take a sharp knife and thinly slice the oranges: each piece should be no thicker than 3-4 mm. Then place the circles on a paper towel (it is also advisable to cover the top) to allow the excess juice to be absorbed.
Bake the oranges for approximately 3 hours until the slices are dry. Make sure nothing burns! To do this, do not forget to turn the oranges over during baking (that is, after about 1.5 hours).
Note: Another recipe recommends drying over low heat (140-160ºC) for 4-10 hours.
When our oranges are sufficiently dried, we begin to create a festive garland. To do this, you need to make two holes in the upper part of each circle. To avoid accidentally ruining the slice, you can use a sharp nail. Thread the thread through the holes, spacing the oranges evenly apart. When all the thread is full, make a knot at each end.
Ready! Now our garlands can be lovingly hung on windows or walls. If you use them as a decoration for a spruce tree, then these fragrant slices will play the same role as lanterns, absorbing light New Year's garlands. And they will look no less original on a chandelier.
Another option is to add dried apple rings, slices of lemon, grapefruit, lime to the oranges on a string (in fact, anyone has enough imagination here :)), pine cones, etc., then with such a garland you can surround a large beautiful candle on festive table. The view will be unique.
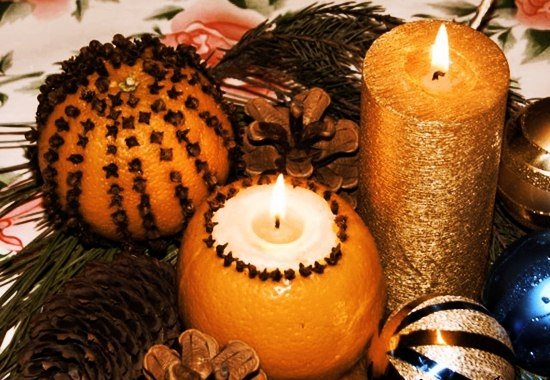
Orange candles and pomanders
On Yule you always want your home to smell delicious. This probably comes from childhood, when cookies were baked for the holidays, and from the street, having played enough snowballs, you could run into a warm cinnamon-ginger house.
ᅠᅠThere are a lot of options on how to bring the Yule spirit into your home, starting from, in fact, preparing cookies and aromatic oils and ending with the Christmas tree. Our favorite method for people who don’t have time to do anything is to find an orange and a clove at home in the chaos of work and preparation for the holiday and play fruit inquisitor.
Anyone who has cleaned citrus fruits in a room knows that households can come running from the corridors and kitchen to the smell. Orange, studded with cloves like in horror films, gives an equally strong aroma, and a little more tart.
ᅠᅠAll you need is the orange itself, a clove and a toothpick or knife (the skin of the orange will need to be pricked or cut, because sticking a dried bud into the thick side of the fruit is a tricky business).
ᅠᅠPrick an orange from pole to pole and insert cloves into the punctures. You can do it beautifully: cut strips in the sandpaper parallel to the lines and thread ribbons through them. Tie a loop and hang it on the Christmas tree, windows or any other place where your favorite cat’s paws cannot reach.
ᅠᅠWell, my favorite method is to make orange candles when you have 20 minutes free. You can dilute the action with warm socks, your favorite cat and a glass of mulled wine.
Let's take:
ᅠᅠ a couple of oranges,
ᅠᅠ cloves,
ᅠᅠ knife,
ᅠᅠ a round spoon (or just a tea spoon, but you’ll have to tinker)
ᅠᅠ a plate for the pulp,
ᅠᅠ paraffin (shards or a candle with a wick),
ᅠᅠ wick (if you take a candle for remelting, then use the one that is already inserted into it),
ᅠᅠ pencil.
ᅠᅠ1. We put on warm socks, turn on our favorite movie, pet the cat prophylactically (our hands will be covered in juice later) and cut off the top of the orange with a knife.
ᅠᅠ2. Scoop out the pulp with a spoon and you can eat it as you go. :3
ᅠᅠ3. We break the candle, take out the wick, it will come in handy.
ᅠᅠ4. We cut the wick into the required quantity/length, tie it to a pencil, place the pencil exactly in the middle of the opened orange, the tip of the wick should reach the bottom.
ᅠᅠ5. In a water bath, carefully (very carefully) melt the paraffin and no less carefully pour it into the orange.
ᅠᅠ6. Let it harden.
ᅠᅠ7. We decorate the edges of the orange with cloves.
ᅠᅠIf you are lazy about fiddling around, you can simply cut off the lid, “dig” a hole in the orange and put an ordinary tea candle there. As it flares up, it will heat the orange and cloves. The smell will linger wonderful.
Witch balls:: DIY homemade amulets
Traditionally, a shiny gold or silver ball should be hung above the windows so that, sparkling with its mirrored sides, it will drive away evil and negativity from you and your home. ᅠᅠJust remember to wipe it from dust so as not to get the opposite effect.
ᅠᅠHowever, colored or transparent witch balls were also popular, so don’t limit yourself.
:: MANUFACTURING::
ᅠᅠ
ᅠᅠTo make such a talisman, you will need:
- clear balls (best)/colored/gold or silver Christmas tree balls, not sealed and with a mount for hanging
- filling depending on your purpose: herbs, essential oils and stones
- acrylic gold or silver paint (optional if your balloon is clear but you want to paint it)
- wax candle
- Smudging: juniper, frankincense or wormwood
ᅠᅠIf you want to hide the contents of the ball from prying eyes (which is not necessary), then slightly dissolve (!) acrylic paint with water to dilute the thickness of the consistency, drop a few drops inside and shake well so that the paint is distributed throughout the entire ball. Let dry.
ᅠᅠFor the lazy: the same thing, just paint it with a brush.
:: FILLING::
ᅠᅠFill your balloon depending on what you are making it for.
- For love and well-being on this front, rose petals, rose quartz tumbling or pink tourmaline and a few drops of lavender or rose essential oil will do the trick.
- To protect against negativity, use salt and smoky quartz tumbling. Morion, wormwood, juniper or white sage are also suitable. Essential oils can be used the same as herbs: juniper, wormwood. Frankincense works well. Please note that essential oils must be natural.
- For prosperity and well-being, citrine and pyrite, sage and cinnamon (and/or their essential oils) are suitable. However, nutmeg would be good too
- For success in studying or learning new things, do not forget rosemary (and/or its essential oil) and amestist or rock crystal.
- To improve health, use jasper and mistletoe.
ᅠᅠWhen filling the witch ball, concentrate on what exactly you are doing and why. If you consider it necessary, read the plot. But the main thing is to create a talisman with confidence and peace inside.
ᅠᅠWhen you finish filling it, put the “lid” on it, light a candle and drip wax into the joint, sealing the ball.
ᅠᅠ Light incense, juniper, white sage or wormwood on the incense burner and pass the finished ball through the smoke.
ᅠᅠThat's it, you can hang it.
:: Location on the tree or at home::
- The more desirable and priority the goal, the higher we hang the ball.
- Another distribution option: we hang balls of knowledge and love closer to the top of the tree, balls of protection and prosperity - in the middle.
- You can also hang love balls above the bed, prosperity - above the workplace, protection - above the windows or door, health - in the kitchen or in the room of someone who will need this health
ᅠᅠIf you use them not for the Christmas tree, but for ritual purposes, then store the ball on the altar until the desired fulfillment, after which it must be buried away from crowded places and water.
Usually, in order to make a Christmas tree decoration with your own hands from oranges, you first need to dry them. You can read more about how to properly dry oranges so that they can later be used to create a New Year’s interior in an apartment.
And yes, don't forget. You can dry not only oranges, but also lemons in this way.
We also remember that there are oranges of different colors in the world. Therefore, we dry not only the usual orange fruits, but also the red varieties.

So, we have dried citrus slices ready. The question arises, what to do with them next?
The most obvious solution to creating an orange New Year's tree decoration with your own hands is to tie one single citrus circle to a ribbon.
It will look like this.

However, when making such decoration, you should keep in mind that dried citrus slices are quite fragile objects. Therefore, making holes in them to pull ribbons through can lead to irreversible damage.
So, a more correct option is to insert a small paper clip or wire into the orange circle, and then attach a string to it.

A very common option for homemade orange decorations is to combine several citrus circles together. You can see a photo of such a DIY Christmas tree decoration below.

Additional variety for orange decor New Year's tree Can add cinnamon sticks.

By the way, when using a combination of cinnamon and citrus fruits to decorate the Christmas tree, you should remember that this is not only a toy, but also a wonderful one. Of course, citruses themselves have the ability to fill the air at home with pleasant aromas, but in combination with cinnamon they work more effectively.
The next option on how to make a Christmas tree toy with your own hands is to use fresh, rather than dry, orange slices. Such decorations are used less frequently, but are nevertheless used. Usually, before tying a circle of orange or lemon to the tree, clove buds are inserted into it. This also gives the Christmas tree decoration additional aromatic properties.

Quite often, not individual citrus mugs, but whole pomanders are used to decorate the Christmas tree.

Simple but very effective way creating an orange-based pomander, you can find in.
Another thing to think about when creating an orange decoration is New Year's toy with your own hands on street tree . Sometimes the same decorative options are used to decorate trees outside as for trees inside the house. This is not true. Because such toys turn out to be small and simply get lost on the street. And their wonderful aroma dissipates into nowhere.
Therefore, it is customary to decorate street spruce trees with citrus bird feeders. In order to create such a feeder, you need to take half the peel of a large orange or grapefruit. Make holes on its sides for a string and hang it on a spruce tree. The toy must be stable and not tip over. Once this has been achieved, birdseed is poured into it.
You can see a photo of such a large outdoor Christmas tree decoration, created with your own hands, below.

Citrus fruits for preparing dried oranges for the Christmas tree must be without damage (there should be no marks from blows, cracks, or signs of frostbite on the peel). You can take not only oranges, but also other citrus fruits, for example, grapefruit, lemon, lime.
Citrus fruits need to be washed very well to get rid of dust, dirt and possible wax deposits. Wipe dry.
Using a sharp knife, cut the oranges into thin slices. The thickness should be approximately 0.3-0.4 cm, but not more than 0.5 cm, otherwise they will take a very long time to dry in the oven. Try to cut the oranges so that all the segments are the same thickness throughout, because the thin edge will dry out and start to burn faster, while the thick edge will remain moist.

Now you need to blot the orange slices with paper towels or napkins to remove as much juice as possible. To do this, cover the cutting board with several layers. paper towels, spread the orange slices in an even layer, cover with another layer of towels on top and press lightly with your palm to excess moisture absorbed into them.

Place the baking sheet in an oven previously preheated to 70-80 degrees to dry for 4-6 hours. The drying time for oranges will depend on the thickness of the fruit itself and the characteristics of your oven. I dried my oranges for 4.5 hours in a gas oven. To achieve a temperature of 70-80 degrees, you can insert a wooden spatula with the oven door slightly open.

Every hour you need to turn the citrus slices over so that they dry evenly.
If the smaller circles on the baking sheet are already completely ready, they can be removed from the oven: carefully separate them from the paper and transfer them to a wire rack to cool.

Cool the finished dried oranges completely on a baking sheet or wire rack.


You can make fragrant decorations from these dried oranges by attaching a bay leaf and a cinnamon stick to them. This bunch will fill the room with spicy aromas.

If you want to preserve dried oranges longer and use them as an addition to dishes, then store them in a tightly closed jar. It is enough to grind dried oranges in a coffee grinder or blender and add them to fish and meat dishes, and also use them to make cocktails and add them to baked goods.

What is it impossible for our people to imagine the New Year without? Surely without Olivier, “The Irony of Fate” and the smell of juicy tangerines. 

And if the first two points do not seem problematic, then citrus fruits are an insidious thing. There are allergies to them. And the invigorating holiday aroma is often present solely in our imagination. And real fruit smells no better than plastic. But the smell is half the festive atmosphere. Therefore, we suggest showing a little resourcefulness and making an original and very fragrant decoration for your home - a real orange garland!

A garland is as poorly replaceable an attribute of the winter holidays as citrus fruits. So why not combine them, and at the same time, combine business and pleasure by making an original decoration for your home? Which with its aroma will drive away the blues for a long time and remind you of the festive season.

To make an orange garland you will need:
1. 2-3 medium sized oranges;
2. Twine or fishing line;
3. Additionally and purely optional: tangerine peels, cones or bay leaves
Step 1: preparing oranges correctly


Cut the oranges into large, dense rings. Take a baking sheet, line it with parchment and place the orange slices. Leave to dry at least overnight, or better yet, for two to three days. After the drying time has passed, return the oranges to the kitchen, preheat the oven to 110-120 degrees and bake the citruses for 3 hours.
Step 2: stringing


The oranges are ready for further transformation when they acquire a light golden brown crust. Let them cool and in the meantime prepare a long skein of twine or fishing line. Using a thick needle or nail, make two holes side by side in each slice and string them one after another in a long row.
Step 3: Additional Decorations


If desired, include bay leaves, pine cones or dried tangerine peels in your fragrant garland to enhance the smell and feeling of the holiday. Use your imagination!


