Bags are an indispensable accessory in our daily life. We go with them to work, to the store, on dates, to various meetings, simple walks, important events, and so on. Today not only in women's wardrobe you can find a bag, but also in children's, and even in men's.
We invite you to familiarize yourself with several master classes that describe sewing bags in detail. Patterns are included with each of the proposed types of bags. And these are simple fabric, denim, household, travel, men's and clutches.
How to make fabric bag patterns with your own hands
The easiest way is to find a ready-made pattern on the Internet or in a magazine. Then, if necessary, you can simply increase or decrease its size and begin cutting and sewing the selected type of bag.
The second option is to draw patterns for a fabric bag with your own hands. To do this, you will need to sketch out a model of the future bag and imagine what elements it will consist of. For example, it can only have a front and back wall, bottom, sides, the handle can be sewn separately or be one piece with the main part, and so on.
Small cloth bag
Such a small fabric handbag is very relevant at any time of the year. It is great for walking with friends and for everyday wear, because it will fit the necessary cosmetics, phone and notepad.
Master class on sewing a small fabric handbag:
- Cut out the paper parts of the fabric bag pattern with your own hands.
- Transfer the pattern to the reverse side of the fabric, cut out the required number of parts.
- Sew the two sides together (front and back), the sides and the bottom together.
- Sew the sides together.
- Sew the bottom completely to the walls.
- Place the lining over the fabric frame.
- Sew the lining and frame together, leaving a small opening so you can turn the bag inside out.
- Sew the hole closed with a blind stitch.
- Sew the lid of the bag.
- Make a strap and sew it to the bag.
A small fabric bag is ready!
Clutch bag
This clutch is very convenient because its size is adjustable with buttons. When closed it is small in size, but when unzipped it becomes a spacious bag.
Master class on creating a clutch:
- Transfer the details of the fabric bag pattern with your own hands onto the prepared material.
- Cut out the required number of parts.
- Make a bag out of them.
- Make the lining in the same way.
- Place the lining and bag together.
- Turn the bag right side out.
- Glue two pairs of magnets or buttons.
- Sew on the snake.
The clutch bag is ready!
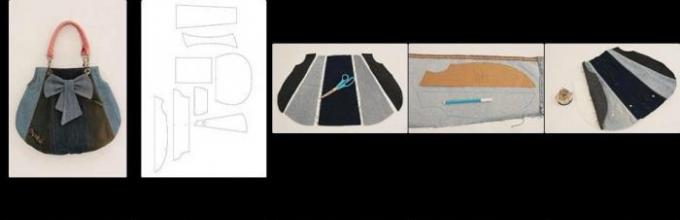
Denim bag
Master class:

- First of all, you will need a denim bag pattern, which is located above. Print it out and cut out the pieces.
- Now the denim bag pattern is transferred directly to the fabric.
- Cut out all the parts.
- Sew the pattern pieces together as shown in the picture above.
- Make and sew the lining.
- Turn the bag inside out, fasten the handles and decorate it with a bow.
Everything is ready!
Men's bags
It has long been no secret that men also need a bag. As many keys, a wallet, a handkerchief as possible, mobile phone and put other small things in your pockets? After all, it is much more convenient to put all this in one small bag, especially since today there are many different styles specifically for men. We suggest you sew one yourself.
Step by step instructions for sewing men's bags:

- First of all, you will need a pattern for a man's bag. An example of this is above. Just take it and print it out, then cut out the individual elements.
- Take fabric for the bag. It is better to opt for a thick one (for example, waterproof, nylon, leather, and so on).
- Take fabric for the lining (it is better to choose cotton) and dublerin (this is a special fabric for connecting the lining and the main fabric).
- Transfer the pattern to the fabric and lining. Cut out all the parts.
- Glue the dublerin using an iron where it may be needed.
- Make a belt. Take its parts, fold the right side in half inward and sew the parts together. Unscrew the belt.
- Sew the lining to the main parts of the bag.
- Sew on the snake.
- Sew on the bag lid and pockets.
- Collect all the parts and stitch them together.

The man's bag is ready!
Summer bags
Summer bags are also called beach bags. As a rule, this is a fairly lightweight design with one large zip compartment. They can be sewn from different fabrics either knit or crochet. Pattern summer bags the latter type is not required. In this case, you simply take and knit a large piece, which is then sewn together.
Step-by-step master class on sewing a summer bag from fabric:

- First you will need a summer bag pattern. For example, you can use the one above. This bag consists of two front walls and sides, a bottom, handles and an inner pocket.
- Cut out the paper pattern pieces.
- Place the pattern on the back of the fabric and transfer the pattern.
- Cut out all the details from the fabric, stepping back from the edge a couple of centimeters.
- Cut out the lining.
- Sew two pockets in the center of the two linings. Don't forget to fold the edges.
- Place the lining and front wall, lining and side wall together. Put it all together.
- Assemble the second wall and side in the same way.
- Sew together two pairs of walls and sides.
- Sew the bottom to all the walls.
- Make handles. To do this, fold each ribbon in half lengthwise with the right side inward and stitch the edges. After this, unscrew the handles.
- Sew the handles to the bag. Fold the edges of the lining and walls inward. Place the straps on the bag and tuck the ends under. Sew everything together in two rows for greater reliability.

Summer beach bag is ready! It is suitable for both going to the beach and walking around the city with friends.
Travel bag
Travel bags should be comfortable and roomy. And although there is a wide variety of them, it is difficult to find the most suitable one. If you want to sew such a bag yourself, then read the instructions below.
Instructions on how to sew a travel bag:

- The pattern for a travel bag is not much different from the pattern for a summer bag. Home distinguishing feature- it is necessary to increase the size of all walls and bottom by at least one and a half to two times.
- Transfer the pattern onto the fabric. For travel bags, it is better to choose the following types of fabric: polyester (900d, 1200d, 1800d or 2400d), nylon.
- Cut out all the pieces of the bag and lining.
- Repeat steps 6-11 from the previous master class. If desired, you can make several internal and side pockets.
- Sew a zipper to the top of the bag.
- Sew on the handles. Additionally, you can sew on another long handle.

The travel bag is ready!
Shopping bag
A shopping bag is something between a summer bag and a travel bag. It usually consists of one large compartment and is made of durable material (for example, nylon or cotton).
Detailed sewing instructions shopping bag:

- The shopping bag pattern is the outlined outline of a simple bag with handles, often called a “T-shirt.” An example of such a pattern is above.
- Cut out the pattern from paper.
- Attach the paper pattern to the back of the fabric, which you previously folded in half. The fold should be at the bottom, where you plan to make the bottom of the bag.
- Cut out the details of the bag, stepping back from the edges of the pattern a couple of centimeters. Don't cut the bottom.
- Sew the fabric together, leaving holes in the places for folding and handles, that is, at the top of the bag.
- Sew the handles together.
- Fold the fabric where you don't want the bag to be sewn and finish the edge. Either carefully baste or glue using adhesive tape for hemming.
- Turn the bag inside out.

The shopping bag is ready!
A bag is one of the necessary and stylish accessories of a modern woman. You can make an original, unique bag with your own hands - sew it from scrap materials according to detailed master classes in our article. Interesting models can be created from old unnecessary things.
How to choose fabric for sewing a bag, depending on its purpose
The catalog of fabrics produced by the light industry is varied. Any of them, rustling or fleecy, rough or smooth, denim, leather, can become the basis for a bag. The principle of eclecticism (combination of styles), used by modern designers, allows any combinations and fantasies.
The following fabric options may be most suitable for a bag:
- Canvas– canvas is an extremely durable material used for making sails. If earlier this variety was produced from hemp, today it is made from synthetic fibers.
- Cordura- material used by American tailors for sewing military ammunition. Durable and durable material, the wear resistance of which is 5 times higher than nylon.
- Denim– denim, a durable fabric that does not allow dust to pass through and lasts a very long time. Combines with any type of decoration, guipure lace, embroidery, decorative details.
- Lake– original fabric reminiscent of leather, shiny and smooth. The industry produces plain varnish or covered with a patterned print. The fabric is durable, does not allow moisture to pass through, and has a low cost.
- Plain gabardine, with which decorative elements are perfectly combined. A bag made of such fabric can be washed often, the appearance of the product will not lose its attractiveness.
- Oxford– backpack fabric with increased strength.
- You can also use light fabrics - linen, silk, cotton, the colors of which are extremely rich. With this option, you will need to select fabric for the lining.
Features of making leather patterns
For leather bag can be used old thing or purchase scraps of thin leather, but the manufacturing process will not be easy, so it is important use the following tips:
For any model you need to create a pattern. Beginning fashion designers should remember that sharp corners on leather products are difficult to achieve., so all lines should be smooth. You can draw such a line using a pattern. Based on the pattern, templates are prepared from hard paper, according to which all the leather parts are cut out, this makes it easier to work.
Jeans patterns
All kinds of ideas for sewing bags from old jeans open up scope for the designer’s imagination.
There are many options for implementing the plan:

Here are some tips for making denim bags:
- Such bags are sewn using ready-made patterns.
- No need to look for fabric large sizes. The patchwork style, combining denim and lightweight fabric, is very fashionable today.
- The product will become more expressive if you add decorative elements to it.
- To ensure that a denim bag keeps its shape, a lining is sewn into it, which can be made of bright fabric. If you make it longer, the protruding part of the fabric can be used for additional finishing.
- Diagram of the simplest bag: four pieces of fabric square shape, two - rectangular, four long narrow strips for handles.
Fabric patterns
To sew a bag with your own hands (master class), you can develop different fabric models yourself or find ready-made patterns on the Internet.
After the model is selected, you must:
- Having made the pattern, transfer it to the wrong side of the selected fabric, and cut out two parts at a time. An option is that handles are cut out along with the side parts.
- In order for the product to come out neat, the parts must first be basted, ironed well, and only then sewn.
- The two central walls of the product and narrow side parts are stitched together along the width, then the bottom is sewn on.
- The lining is made in the same way and placed on the sewn part.
- The model is turned right side out and the edges are processed.
- Handles are sewn on if they were cut out separately.
- All that remains is to sew in a zipper or decorate the lid.
In order for a fabric bag to keep its shape, the fabric needs to be strengthened, that is, glued with double tape, which is done after the material is selected.
Felt pattern
Felt bags are becoming increasingly popular because they are beautiful, bright, soft and cozy.

Working with felt is easy:
- The material does not stretch, so there is no need to draw a pattern. Having decided on the size of the product, you can simply cut out two squares or the same number of rectangles and get to work.
- The edges of the fabric do not fray, so there is no need for additional processing of seams.
- After basting and sewing the bag, you need to think about the handles for it. Options can be different: from the same felt, thin chain, belt.
- To make the product look neat, it is better to sew a contrasting color lining that will hide the internal seams.
- All that remains is to complement the sample with decor. It can be made from felt fabric of a different color. The cut out funny figure is simply glued or sewn with an overcast stitch.
The costs for such a product are quite insignificant.
Burlap patterns
Burlap is a natural, inexpensive material. Products made from it look impressive and remind of the harmony of man and nature. The material is soft and pliable.
Working with it is easy and at the same time not simple:
- Before starting work, the fabric must be ironed thoroughly so that even shapes can be cut.
- The edges of the burlap are crumbling, so the entire base needs to be coated with glue.
- Internal seams need overcasting.
- In order for the product to retain its shape, a more rigid lining is required.
Fur and suede for bag pattern
Sew a bag with your own hands (master class), different models are easy from fur, suede of the simplest design, which always look rich. You want to pick them up and try them on with your outfit. To create such an exclusive piece, you will need some leftover fur, natural or artificial, which will not be easy to work with. 
Most likely it will be painstaking handmade. When sewing a fur product on a machine, the work progresses slowly: the fibers fall under the needle. In addition, you need a machine that sews thick fabrics.
If you want to have fur bag has not disappeared, then you will have to do the following:
- You will need a pattern.
- After it is done, the existing fur is laid out in the direction of the pile and pattern.
- The elements of the future product are placed on it parallel to the center of the cut. Outline the parts with an automatic pen so that the line is visible.
- You need to be careful so that fur defects do not fall under the pattern.
- Fur, like suede, cannot be cut with scissors. You should have a furrier's knife at hand.
- You need to grind down the parts according to how the pile looks. All lint should be hidden under the seams.
- The process can only be performed with a sharp, rather thick needle, using nylon threads. You only need to pierce fur or suede once.
How to turn an old umbrella into a fashionable bag
You can sew an interesting bag with your own hands from an old umbrella. The master class you watched will suggest different models of lightweight bags that do not require much space in the owner’s handbag.
But this is not the only advantage of such a product:
- the fabric from which umbrellas are made has extraordinary strength, so the new accessory will not be demolished;
- products folded in such a bag will not get wet in the pouring rain;
- stylish design (the colors of umbrellas are usually original) and a little imagination will make this thing unique.
 How to sew a bag with your own hands from an old umbrella. Master class with photos


The procedure for creating a bag will be as follows:
- An old umbrella can be ripped into triangular sections, but the umbrella clasps should not be cut off.
- Parts need to be washed and ironed.
- Next, the parts are folded so that a continuous fabric is obtained, the parts are basted and sewn on a machine along the front side with a hidden seam. The edges of the resulting piece of fabric are also joined.
- The product is folded to form a rectangle with absolutely right angles. The bottom of the product, screwed inside out, is ground down and overcast.
- Handles are made from the remaining fabric. They can be made triangular or the usual rectangular.
- All that remains is to process the top edge of the bag.
- Having folded the new accessory and secured it with an umbrella clasp, you can go to the store.
Master class on sewing a beach bag
No need to buy for summer holiday beach bag You can create it yourself, and it will be just as stylish and fashionable. When planning to get creative, you need to collect any scraps that are available in the house.
It is important that they have a bright large ornament.
These could be:
- printed tapestry, raincoat fabric;
- bright chintz fabrics, printed cotton, linen;
- rough burlap.
Thick fabrics, felt, felt, denim should be left for other purposes. You immediately need to select the lining fabric, some kind of “sliding fabric”: single-color satin, satin, silk.
It is better for beginning craftswomen to take on a simple rectangular model, although if you round off the lower part, the product will look more original. Large bags are fashionable today. 


Having decided on the dimensions and finding thick paper, you can start creating a pattern:
- Draw a square with a side of 50 cm - these are the side walls of the bag. If desired, the bottom of the bag can be rounded. To get an even semicircle, use a compass or pattern.
- From the selected flaps, two such parts and two from the lining fabric are assembled.
- A rectangle is marked, the length of which is 50 cm, width - 10 or 20 cm. These are the side part and the bottom. You will have to cut 6 such parts from the fabric (the bag and lining are taken into account).
- A handle is drawn - a rectangle, 60 cm long. The width can be different. You will need four pieces for the bag.
All that remains is to sweep, iron and sew, decorating the product decorative elements.
How to sew a travel bag
Sew a bag with your own hands (master class), different models can be made from denim, leather, thick drape.
You can create it from old jeans, spending one evening on the whole process, while saving your own money:

Once the top is sewn on, the accessory is considered complete.
Making your own sports bag
Sew a bag with your own hands (master class), different models can be made from tarpaulin, raincoat fabric sporty style. You can choose a style with a belt or with a handle. Quilted padding polyester is used for the lining, and fleece is used for the rigidity of the bottom. You will need a zipper and rings for handles.
Step-by-step instructions for creating a bag:
- Taking an old newspaper, you need to fold it so that the edges match.
- Fold the corners, but not to the center. Draw a horizontal line along the folded corners.
- Cut off the top along this line. Cut the resulting figure along the center line of the newspaper. Mark the top, bottom, and fold of the product.
- Lay out the pattern on the selected fabric and cut it out, not forgetting to leave a two-centimeter seam allowance.
- Baste the top and bottom of the bag, sides, stitch them, sew on a zipper.
- Cut out the lining in the same way and make several pockets on it.
- Sew on the bottom, lining on the sides.
- Having cut out the handles, attach them to the bag.
- Insert a lining into the base of the product, pin at the seams and stitch.
The work on creating the bag is completed.
Sewing a bag in patchwork style
Bags in the patchwork style are summer, so you need to choose cotton or linen fabrics for them, but such a product will have to be ironed often. You can take non-shrinking, durable synthetic fabrics.
Having prepared the necessary things (scraps, lining material, glue stick, pen strap, scissors), you can start sewing:
- find fabric for the base: length – 29 cm, width – 25;
- lay out the patches on it so that their edges overlap each other by 1.5 cm, pin them together with pins so that they do not move;
- the corners of the scraps should be glued and only after that should you start stitching by hand or on a machine along the length and then along the width;
- you should cut the workpiece and insert the bottom, pre-glued (14/25 cm), reinforced with non-woven material;
- sew the side parts, sew rings for the handles;
- sew the corners, turn them inside out;
- decorate the lining, sew it inside;
- process the top edge of the product and attach handles.
Knot bag
It’s easy to sew a knotted bag with your own hands, but it’s better to watch the master class. Your own imagination will suggest different models. Cotton fabrics with cheerful patterns are suitable for such a product, although evening fabrics can also be used. Products are double-sided.


The interior is usually plain. The bottom can be round, semicircular, with recesses. The accessory can be miniature (worn on the arm) or large, like a backpack.
To make a knot bag, you need to spend about an hour:
- you need to draw a sketch of the future product (the bag resembles a T-shirt with wide shoulders, one of which is 5 cm longer than the other) and cut it out;
- the pattern is transferred to the fabric (seam allowances are required);
- the lining is marked (it is better to take non-woven adhesive-based);
- the product is swept away from the handles, then the sides, bottom, and seams are stitched by machine;
- All that remains is to sew the lining and sew it on.
Belt bag
Belt bag– an ideal gift for your beloved man. To make it, you need suede or thin leather, felt or fleece. The basis will be patterns taken from the Internet, because it is quite difficult to develop the shape of a bag on your own.
- The manufacturing process begins with sizing and stitching the back wall to which the zipper is sewn. The second side of the zipper is sewn at the top of the lid.
- A second zipper is marked on the convex side of the lid.
- The front wall is attached to the free edge of the zipper.
- If necessary, pockets are made (they will be fixed with Velcro).
- Slings with fastex are attached to the front and rear walls.
Simple Shoe Bag
A schoolchild may need a bag for a change of shoes and sports uniform. To create such a bag, you can use raincoat fabric in two shades. 


You need to prepare:
- rectangular piece of fabric bright color, 40 cm in width, 64 cm in length;
- 2 pieces of fabric in a contrasting color (length – 40 cm, width – 24 cm);
- for the pocket, a rectangle of fabric (16 cm by 21 cm);
- lace.
The sewing sequence is as follows:
- the pocket is decorated with the child’s initials and attached along a line drawn on the side;
- the upper sections of fabric of different colors are stitched on the front side;
- the parts are folded right sides together and stitched;
- the part under the drawstring is folded and ironed, stitched without reaching the center;
- All you have to do is insert the drawstring and you can put things in the bag.
There are many ideas for sewing bags, here are some of them:
- A wicker bag made from old jeans will be original. Cut old trousers into strips and weave fabric. Sew or glue it onto the fabric base. Having folded the workpiece, sew the sides. All that remains is to sew on the handles.
- A semicircular clutch is convenient to take to the cinema. From a piece of wrinkle-resistant fabric, cut out two round pieces and the same circle from padding polyester. Having placed the parts on top of each other, they should be stitched and trimmed with narrow braid. A zipper should be sewn into the blank and the product should be decorated.
- The bag looks original in the form evening dress or a piece of cheese.
- The next model can be considered exclusive - a transforming bag from a vest to a bag. You can leave the house wearing a quilted vest and return with a bag in your hands.
- You can make a bag in the shape of a clock, the arrows of which point to the exit from the house.
The bag is not complicated in terms of self-made thing. Thanks to the large selection of models, a novice craftswoman can choose one of the most simple options. They will help you create an original and stylish accessory detailed master classes with photographs of patterns and finished products.
Article format: Vladimir the Great
Video: How to sew a bag with your own hands
Master class. How to sew a bag from jeans with your own hands:
How to sew a crossbody bag with your own hands:
Sewing a bag from genuine leather with your own hands is quite difficult. Therefore, I recommend that beginners first sew a bag from artificial leather. The technology for sewing it is not very different from sewing a bag made of fabric or jeans, with the exception of finishing front seams.

A leather bag always looks elegant and fashionable and the price of a genuine leather bag is always high. Maybe that's why many people try to sew a bag or handbag, but, as a rule, they fail. The fact is that sewing bags and leather haberdashery is a separate direction in the sewing business, much like sewing shoes, so it is not surprising that many people are unable to sew a bag with their own hands.
In this article I will not explain how to sew a bag step by step. There are thousands of models of bags and it is impossible to make a universal video or master class in the form of a photo. But you can give universal advice on how to make a pattern for a bag model you like, perform one or another technological operation, how to install accessories with your own hands, etc.

It is difficult to sew any products made of genuine leather, especially bags with a rigid frame. And this is due primarily to the special technology of sewing genuine leather, the presence of special tools and a sewing machine, the use of special applied materials, and, of course, the presence of experience.

First of all, you will need a sewing machine capable of sewing leather. Modern models sewing machines Do not use rough materials such as leather for sewing; read the instructions carefully. The only option is to find an old Podolsk-type machine from friends or relatives, maybe even with a manual drive. By the way, you can even buy it from an advertisement, but not more than 1000 rubles.


A construction knife with a replaceable blade can also be used for cutting leather. Do not forget that the blade of such a knife is not only replaceable, but segmented. Using pliers, carefully break off the dull part of the blade, and it will become sharp.
Paired with such a knife, you will also need a piece of plywood or board on which you will cut out the leather parts of the bag.

If your bag model has a lot of metal fittings, buy a punch like this in the store right away. Using it, it will be easy to make a neat hole for buttons, rivets and other accessories.

Instead of leather glue, you can use this adhesive tape.
This is not the entire list of tools needed to work with genuine leather y, but the most important ones. Without them, you will not be able to sew a high-quality leather bag. In addition, look at the general photo, you will need a special hammer, awl, thread, sewing needles, etc.

In addition to the main parts for the bag, you will also need many small elements, which are quite difficult to take into account at once. I will explain everything in detail as I assemble the bag. For now, just keep in mind that all skin scraps, even small ones, need to be saved; they may be useful to us in the future.

Make patterns for any parts of the bag immediately with allowances. Leather is quite an expensive material to forget about allowances when cutting and make other mistakes.
Seam allowances 0.7-1.0 cm.

The remaining parts have a rectangular shape and it is not necessary to make a pattern, at least use graph paper for them. However, perhaps you will decide to sew just such a model from fabric in the future, then ready-made patterns will make your work easier.
Two options for soft shaped bag patterns

It is not necessary to create a pattern for a bag from paper, but it won’t hurt to make a pattern of the main parts. The fact is that it is almost impossible to determine the size and shape of a bag using a paper pattern. When sewn, the bag acquires volume and, therefore, changes its calculated dimensions and shape. Therefore, make paper patterns of the main parts of the bag, pin or glue them and make sure that the shape and size of the bag suits you. If not, feel free to adjust the pattern and try it on again.

The consumption of genuine leather for sewing a bag must be calculated accurately. Moreover, you always need to buy more leather, since sometimes you have to “work around” various defects in the leather (crumpled areas, holes, abrasions, etc.)
But on average, to sew a genuine leather bag you will need a skin measuring 100-120 square decimeters or approximately 1.0-1.2 square meter.
Depending on the model, the presence of finishing elements, pockets and other details, and most importantly the size of the bag, you can keep within 180-100 dm/sq. But in any case, you need to lay out the details of the cut, since leather is often sold with defects (stains, holes, folds, dents, etc.)
Don't forget about the finishing details of the bag. Because if you don’t have enough of a small piece of leather, you won’t be able to buy a small piece. Genuine leather is sold only as whole skins. By the way, sometimes it is the size of the skin that determines the model and size of the bag.
If you don't have enough experience, don't start sewing a bag from new leather right away. Find an old raincoat or jacket in your wardrobe. Take it apart and try to match the remaining areas of leather for parts of your bag. As a last resort, such leather can be combined with pieces of artificial leather or fabric, such as corduroy.

The connecting seams are sewn down with allowances of 0.7-1.0 cm. Do not forget to check the degree of pressure of the presser foot on the fabric and the height of the rack. Leather is a fairly dense and rough material, and in order to avoid damage to a household sewing machine, it is better to sew it on an industrial machine or an old manual sewing machine such as Podolsk, Singer.
To make it easier to pierce several layers of leather, you can buy special sewing needles for leather at a sewing supply store. They have a special blade shape and such a needle does not pierce the skin, but cuts it.

Not always, but often, the seam allowances of the stitched parts of a leather bag need to be glued. For this operation, you can use regular rubber glue and a brush. But it is better and more careful to glue the allowances using adhesive double-sided tape.

Tear off the paper protective strip and press the seam allowance.

To ensure that the seams on the front of the bag look even and smooth, you will need a hammer. Tap lightly along the seam with a hammer or the handles of heavy metal tailor's scissors.

It is very difficult to make finishing stitches on leather, since a regular presser foot will “slow down” the top layer of leather, the stitch will be “shallow” and even a tear in the leather may form due to frequent piercing with a needle. This is a responsible operation, treat it as responsibly as possible, since the skin cannot be stitched twice. You must do the finishing stitch the first time without mistakes or rework.
Therefore, be sure to change your regular foot to a Teflon-coated foot. There are a number of other devices for sewing leather, but this Teflon foot is the simplest and most inexpensive way.

And if you also play it safe and rub the seams with moistened soap, the seam will be flawless.
See Decorative stitching on a tricky area.

After the base of the leather bag is assembled along with pockets and other finishing elements, begin making the belt. Determine what type of clasp you will use, what hardware, and how you will attach the strap to the bag.

Do not use accessories that are too expensive and difficult to install. Metal zippers, metal rings, rivets, zippers, and buttons are easy to install with your own hands. And they definitely need to be used when decorating a leather bag. Metal gives natural leather greater solidity and attractiveness, emphasizing the noble properties of natural material.

And to install the fittings you will need this kind of punch No. 3 or No. 4. You can even buy a set of these punches if you regularly sew leather items, especially bags.
Punching a hole in the skin, place it with reverse side dense wooden gasket. You cannot punch holes on a metal surface; the punch blade will quickly become dull. And make sure that other parts of the bag do not accidentally fall under the punch.
For summer, a bright fabric bag is a real find. For a walk, to the beach, to the store, to meet friends - you will have many reasons to wear your new accessory. In addition, the “highlight” of this DIY fabric bag is that it easily folds into a compact cosmetic bag and just as easily transforms into a large, roomy bag!

The cosmetic bag, when opened, is the bottom of the bag itself.
It can be round, oval or rectangular with rounded edges.

Assembled bags
Assembling a cosmetic bag
So, first let's start making the cosmetic bag itself. You will need materials such as:
- Zipper (at least 10 cm, longer if possible). You can cut the zipper off old trousers, jeans, or skirts.
- A large zipper, 40 cm long (again, can be cut from something used, for example a bag).
- Cosmetic bag pattern. One of its parts will be from the outer fabric, the other from the lining material, and the third from dublerin.
On double fabric, no seam allowances are needed, only a hole for the zipper is needed

The process of assembling a cosmetic bag takes place in several steps.
- First, you need to cut out blanks for a cosmetic bag from fabric and dublerin. Then, using an iron, you need to glue the dublerin to the wrong side of the outer part, while centering it so that you get the same fabric edging on each side.
- The outer fabric with glued dublerin and the lining must be folded together with right sides together. Next, you need to machine stitch along the long edges of the zipper opening. Fasten all seams at the beginning and end of the line. Make sure that these two lines are of equal length.
- Next, carefully cut the fabric through two layers along the intended line.
- The lining must be pulled to the front side through the hole. The edges of the hole need to be smoothed thoroughly to make it even.
- The zipper needs to be placed under the hole (under two layers of fabric), stitched along the edges of the hole. This way we will sew the zipper. It is better to use a special zipper foot.
- Now determine where the makeup bag will fold in half, and then along this line, sew a seam through two layers of fabric.
- Turn the wallet inside out. Our lining layer is divided into two halves. The half without a zipper needs to be folded over the half with a zipper, this is how you can form the lining of the pocket. To secure the fabric, you need to stitch close to the edge. The pocket is already ready!
- Now it's time to attach the long zipper. Again, install the zipper foot on the sewing machine. Turn the cosmetic bag over with the front side up and the zipper so that the reverse side is visible. Sew on the zipper, starting from the middle of the cosmetic bag.
- Make sure that the zipper is sewn slightly under tension. This will ensure ease of opening and closing. The pink line is the seam line, it should not go very close to the zipper teeth.
- We carefully sew the zipper along the edge of the wallet, and make small cuts on the zipper tape so that it fits well on the rounded edges.
- Having reached the other end of the midline, you need to bend the zipper so that its teeth reach almost to the very top of the midline, and the remaining part of the unattached zipper is perpendicular to the cosmetic bag.
- Now you need to sew a zipper around the second edge of the cosmetic bag. The zipper must be bent symmetrically along the second side, starting from the center line.
- We sew until we get to the place where the zipper begins. Next, you need to similarly bend the head of the zipper so that it is symmetrical with respect to the center line of the cosmetic bag and secure its end well. Make sure the zipper is sewn symmetrically around the middle!


This line in the photo is at the top, above the sewn zipper


In the photo the middle is marked with a tailor's pin with a red head

The photo shows that at the very beginning the tail of the zipper is slightly curved - sew the same way.


The cosmetic bag is ready! We put it aside and proceed directly to sewing the fabric bag itself with our own hands.
Assembling the bag
Before you start sewing the bag itself, you need to prepare everything you need:
- Fabric - 30*67.5 cm
- Two pieces of fabric for handles, each 7*33 cm.
All seam allowances are already included in the measurements. First we will make the straps of our bag.
To do this, both long edges of the fabric need to be folded 6 mm to the wrong side and ironed.


Machine stitching should be done along the long edges and the straps are ready.

Now they need to be placed above the top edge of the bag.

Above this very top edge, the ends of the straps should extend 2.5 cm. Sew the straps in place.


We continue to sew a bag with our own hands, the master class is already at the very equator, the hardest part is behind us.
We pull the straps up, bend the top edge of the bag 1 cm to the wrong side. We smooth this place with an iron.

And now we have to sew the cosmetic bag (which will serve as the base) to the bag itself. We make 4 marks along the base of the bag, and the same along the circumference of the cosmetic bag. Place the wallet and bag right sides together. We align all the corresponding marks, making sure that the straps are located opposite the long edge of the wallet. Pin in place if necessary. To secure, sew along the edge.
Very important points that will help you do this job neatly:
- You need to use a special zipper foot - you won't see the zipper between the layers of fabric, but the foot will help you feel the zipper teeth.
- The product must be placed under the zipper foot so that the material of the bag is on top and the fabric of the wallet is below. Not the other way around.
- You will need to make small cuts along the seam allowance (along the base of the bag). This is necessary so that our fabric bends more easily.

Now we sew along the edge of the base of the bag, excluding only one point (where the tail of the zipper “meets” that same center line). We fasten the seam, leaving an opening of approximately 1-1.5 cm.

The hole is necessary so that the zipper slider can pass through it later.

After this you will see that the base of the bag is almost ready.

And the bag itself will look like this:

The bag must be turned right side out and the slider very carefully pushed through the hole left.

Now turn the bag inside out again, cut off the seam allowances and the excess zipper tape (to reduce it). This cannot be done before, otherwise the slider will simply fall out.
Well, we can say that the bag itself is ready. You can, however, sew a finishing seam along the edges of the cosmetic bag. This will make it look neater. And don't forget to secure the edges of the hole that was left to push the slider through. To do this, you need to bend the seam allowances and the zipper tape under the cosmetic bag and sew a finishing seam through all layers except the fabric of the bag itself (move it to the side).

When you reach the hole, sew it very carefully, as close to the edge around the runner as possible.

And now the bag is definitely ready, for now we put it aside.

Of course, you already understand how to sew such a bag with your own hands, but this is not the end of the work)
Sew the lining
To make the lining we will need:
- Lining fabric for the bag - 30*67.5 cm (including seam allowances). We recommend choosing nylon as a fabric; it is waterproof and does not unravel.
- A piece of lining fabric cut along the contour of a cosmetic bag. We take seam allowances into account.

Sew up the side and attach the base of the bag. This is done by analogy with the previous work (sewing the bag itself). But it will be easier to do all this now, because you don’t need to insert a zipper, nor do you need to leave a hole. Just stitch around the very base to secure it. Make sure that the oval of the base of the lining clearly coincides with the shape of the base of the bag itself. After all, this is not a circle that can be sewn on any way you want, you have to try.

Make sure that the side seam is done correctly and that the lining completely matches the shape of the bag.
Final assembly of the bag
Let's move on to the final part of our work. Turn the bag right side out. The lining remains turned inside out. Next, proceed according to the scheme:
Insert the insides into the bag, remembering to line up their oval bases.

Align the folded upper edges of the two layers and sew close to the edge with a finishing seam. This will hold the two layers together.

Now we make another seam around the entire perimeter, 2.5 cm lower than the previous one. The second seam will secure the ends of the straps of our bag.


Hooray! Finally, our transforming bag is ready!

Now fold it and zip it up.


We have a cosmetic bag, a wallet or a small clutch that you can take with you anywhere.

What is the beauty of such a product? First of all, its compactness, elegant appearance and matching your clothes. A cute, aesthetic product that is in no way inferior to its store-bought counterparts. By putting it in your regular bag or in the glove compartment of a car, for example, you will take it out at the right time, and then hide it again. This transforming bag is practical and very fashionable. The product may have a completely different shape, and there are simply countless color options.
Color compatibility
Let's say we've already figured out how to make a bag with our own hands, but how to choose the right color and texture of the fabric?
Today, the choice of fabrics allows our imagination to run wild as much as we like. Someone loves pastel colors that never go out of fashion - this will be an interesting, classic solution.
Of particular note are the bright bags with floral print. They attract attention to their owner, and now you stand out from women with ordinary bags or standard shopping bags! This bag also looks great in the middle of summer on the beach.
The following unions are in fashion today:
- Pink + gray
- Lilac + pink
- Pink + purple
- Blue + yellow
- Light green + orange
- Red + orange
- White + emerald
You can get creative and choose a fabric with a child's pattern or a print that imitates the design of Louis Vuitton bags.
If you decide to change the design of your bag a little, remember:
- the circumference of the bag should always correspond to the perimeter of the cosmetic bag
- the main zipper should be at least 7 or 8 cm longer than the perimeter
- It's better to use a long zipper: you'll cut off the excess at the end, and working with a long zipper is much easier.
Try, experiment, despite the long description, this work will not take very much time. In the process, you yourself will figure out how and what to do next. Having sewn one such bag, you will probably decide to make your friends happy with such a useful and stylish product. By the way, wonderful gift with your own hands!
Every fashionista knows that accessories make an image complete and interesting. But spending a lot of money on jewelry and leather goods is not an option, and sometimes finding the right handbag model is very difficult. However, this does not stop needlewomen: they can make any bag model with their own hands in a short time. The result is a beautiful, high-quality, and most importantly, unique accessory that can make your girlfriends envy. In our article you will find colorful and original bags made from various fabrics, as well as pattern diagrams and descriptions of how to sew a bag with your own hands.
Patterns for sewing bags with your own hands quickly and easily
This model is very practical and can be made from a variety of fabrics. One condition: the fabric must be dense and durable, otherwise the item may turn out to be short-lived. Patterns can be easily made from whatman paper or an old newspaper.

This instance is as easy to perform as the previous one. To perform them, a minimum set for a seamstress is required - sewing machine, threads, scissors, tape measure, sheets of white paper for patterns. After you make paper patterns, you need to cut the canvas and sew it on a machine.
We make a stylish clutch in the shape of a rose ourselves step by step

Great model for romantic evening or official reception. To complete it, you will need thick fabric and a minimal set of seamstress tools. First you need to cut out the parts below. The main fabric for the details is highlighted in pink, and the reinforcing fabric is highlighted in grey.

Also below is a diagram of the rosette assembly.

In addition, it is very important that each petal of the future bag is sewn from 2 parts, and also depends on the central part of the assembly (the parts should be more curved) so that the rose opens. Each pair must be sewn along the outer edges; all seam allowances must be notched, turned inside out and ironed. The result should be a boat-shaped piece. When all parts of the flower are made, you can begin assembling according to the diagram.

Green indicates the edges of a relatively complex part. It must be twisted into a spiral so that one edge (raw) closes in a circle. To do this, try to roll this edge into a weak tube and place it on the table. This is how the core of the flower is formed. All protruding seams are stitched using any artistic method. The second part is lightly overlapped on one of the sides and immediately attached to the middle. We sew the next petals with some offset so that they do not overlap each other. It is recommended to stitch off all edges using finishing stitch after each sewn leaf. You need to sew enough of them so that the handbag acquires the required dimensions. The next stage involves making the gasket. It can be made from three layers of dense fabric, glued with dublerin. This is done to ensure that the finished bag holds its shape well. The lining is sewn by hand, starting from the middle. There we bend the gasket and grab it along the marked edges. This is necessary so that the finished flower does not fall apart into several parts. The end result should be a circle with a rosette with raw edges. Next, we assemble the remaining parts: a zipper is sewn between the two strips, and a gasket is sewn to the bottom of the bag, stitched strictly in the middle. Then we connect all the resulting elements into a ring. As for the lining, it is quite easy to do. We take any design of 2 identical circles, placed along the same stitching line. They should also be sewn on by hand, strictly along the line of the zipper. Handles are sewn at the discretion of the housewife: it can be a thin, elegant lace or chain.
Master class on creating a model from cotton fabric

This cute and simple design is perfect to complement everyday look, going for walks in the park or around the city.
To complete this you will need cotton fabric and a minimum set of sewing tools. First you need to make handbag patterns, which are shown in the photo.

The letter A represents the top two parts of the bag. You need to cut two such blanks from fabric.
The main part of this bag is two large blanks, marked in the pattern layout plan with the letters “B”.
Cut out 2 main patterns from paper and connect them with tape along the dotted line. This is necessary so that you already transfer the whole half of the bag onto the fabric.
The inside of the bag also consists of 2 large parts, each of which is presented in the form of two separate patterns, separated by a dotted line. You need to cut 2 pieces of each pattern.


Separately, cut out a handle and an internal pocket from a piece of cotton fabric.
Thus, in our article we showed how to make a bag with your own hands. Stylish accessory made with your own hands will go perfectly with your clothes and will serve you for many years.
Video selection on the topic of the article


