Our love for children is expressed not only in kisses and endless hugs, it is expressed in a variety of little things, and every little thing is priceless. We want to give our children the best, and it’s so great when we can make this best with our own hands.
This master class will help you express love in another way - by crocheting a charming Panama hat for a girl, you will put your motherly adoration, tenderness and care into it. It will become a kind of amulet for your princess, protecting her head from treachery sun rays. Let this Panama hat be made from threads of the color you need, suitable for most of the child’s outfits. Or let it be bright so that the girl stands out with her individuality. The Panama hat you knit, even if you are a beginner, will be soft and comfortable; it will be less subject to wear and tear than a purchased one; it will be practical and at the same time very touching and sincere, because in every loop there will be a particle of your love.
Step-by-step photos and videos of the process of knitting a Panama hat for a girl will show you how easy it will be to cope with the task. A hook, threads, just a little free time, and, most importantly, your love - that's all you need!
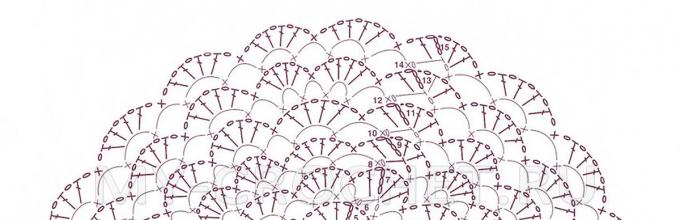
Crochet pattern for a Panama hat (can be enlarged):

The hat is crocheted for a head volume of 50-52 cm.
For knitting, we need yarn of two colors Lira from Vita Cotton (composition: 60% cotton, 40% acrylic, 50 g/150 m) and a hook No. 2.5.

We make a ring of thread (sliding loop).
1st row: we knit 3 air lifting loops,

inserting the hook into the ring we knit 15 double crochets,


2nd row: we knit 1 lifting chain loop and in the same base loop we knit a single crochet,

knit 3 air loops,

We skip 1 base loop and knit a single crochet into the next one,

*again we knit 3 air loops, skip 1 loop and knit a single crochet in the next one*.

We continue to knit from * to the end of the row.

At the end of the row, having knitted the last single crochet, we knit 1 chain stitch and close the row with a half double crochet, inserting the hook into the first single crochet of this row.

3rd row: we knit 3 lifting air loops + 1 air loop according to the pattern, i.e. only 4 air loops,

inserting the hook into the same arch we knit 1 double crochet, 1 chain crochet and 1 double crochet,


*


repeat knitting from * 2 more times.


We close the row with a connecting post into a 3rd lifting air loop.

4th row: knit 1 chain stitch and 1 single crochet in the same base loop,


at the next top of the double crochet of the previous row we knit a single crochet,

then 3 chain stitches and 1 more single crochet into the next top of the double crochet. In this row we will knit 1 single crochet in each double crochet of the previous row and 3 chain stitches between the single crochets.

*we knit 3 chain stitches and a single crochet into the next double crochet of the previous row.*

We knit from * to the end of the row.

We close the row by knitting 1 chain stitch and a half double crochet into the first single crochet of this row.

5 row: knit 4 air loops,

in the same arch we knit a double crochet, 1 chain stitch and a double crochet,


*in the next arch we knit 4 double crochets with 1 chain loop between them,


We knit from * to the end of the row.

We return to the first arch and knit 1 double crochet and 1 chain stitch into it.

We close the rows with a connecting post, insert the hook into the 3rd lifting air loop.

6th row: we knit 1 chain lifting loop and a single crochet in the same base loop,

knit 3 air loops

in the next double crochet of the previous row we knit a single crochet,

again we knit 3 chain stitches and a single crochet into the next double crochet,


In this row we make increments through 1 element, * those. in the next element we knit 1 single crochet in each double crochet of the previous row and 3 chain stitches between the single crochets,

then we knit 3 air loops and in the next element we do not increase, we knit a single crochet between the 1st and 2nd double crochets, then 3 air loops and a single crochet between the 3rd and 4th double crochets, then 3 air loops*


At the end of the row we knit a single crochet into the double crochet of the previous row,

we knit 1 chain stitch and close the row with a half double crochet, which we knit into the first single crochet of this row.

7th row: knit 4 air loops,

in the same arch we knit a double crochet,


*in the next arch we knit 4 double crochets with a chain loop between them,

then we knit 1 chain stitch, 1 double crochet into the middle loop of the next arch and 1 more chain stitch.*

We knit from * to the end of the row.


We close the row with a connecting post into a 3rd lifting air loop.

8th row: we knit 1 chain lifting loop and insert a hook between the chain of air loops lifting the previous row and knitting 1 single crochet in the next double crochet.


in the next element we insert a hook between the 1st and 2nd double crochets and knit a single crochet, then 3 chain stitches and between the 3rd and 4th double crochets we knit a single crochet.

In this row we make increases every 2 elements, in the next element we knit single crochets at the tops of the double crochets of the previous row and 3 chain stitches between them,

*next we knit 3 chain stitches and in the next 2 elements we insert a hook between the 1st and 2nd double crochets and knit a single crochet, 3 chain stitches and between the 3rd and 4th stitches we knit a single crochet and 3 air loops, in the 3rd element we insert a hook into the tops of the double crochets and knit single crochets and 3 air loops between them*

Repeat from * to the end of the row, then knit 3 chain stitches and a single crochet between the 1st and 2nd double crochets of the very first element,


9th row: knit as row 7, 4 chain stitches and double crochet in the arch,


*in the next arch we knit 4 double crochets with a chain loop between them*,


Repeat knitting from * to the end of the row.

In the first arch we knit a double crochet, 1 chain crochet, a double crochet and 1 more chain stitch.

We close the row with a connecting post into a 3rd lifting air loop.

10th row: we knit without increments, 1 chain stitch and between the chain of chain chains of the previous row and the next double crochet we knit a single crochet,

*

We repeat knitting from * to the end of the row, at the end of the row we knit 3 air loops

between the 1st and 2nd double crochets of the first element we knit a single crochet,


11th row: knit as rows 7 and 9.


Row 12: in this row we will make increases every 3 elements, knit 1 chain stitch, and a single crochet between the chain of chain stitches from the previous row and the next single crochet.


*Next we knit 3 air loops and in the next 3 elements we insert a hook between the 1st and 2nd double crochets, we knit a single crochet, 3 air loops and between the 3rd and 4th double crochets we knit a single crochet, don’t forget knit 3 air loops between the elements,

in the next element, at the tops of the double crochets of the previous row, we knit single crochets and 3 chain loops between them*.


Row 13: knit as 7, 9 and 11 rows.


This is what we get. At this stage, the diameter of the bottom of my Panama hat is 16.5 cm. I knit it for a head circumference of 50-52 cm.

Row 14: we knit as row 10 without increases, 1 chain stitch and between the chain of chain chains from the previous row and the next double crochet we knit a single crochet, then * we knit 3 air loops, in the next element we knit a single crochet between the 1st and 2nd double crochets, then 3 air loops and a single crochet between the 3rd and 4th double crochets*

We repeat knitting from * to the end of the row, then between the 1st and 2nd double crochets of the first element we knit a single crochet, 1 chain stitch and close the row with a half double crochet, which we knit into the first single crochet of this row.

Row 15: we knit as 7,9,11 and 13 rows.


The depth of the cap at this stage is 15 cm.


Row 26: knit 1 chain stitch and a single crochet into the same base loop,

knit 3 air loops,

insert the hook into the tops of the second and third double crochet of the previous row and knit 1 single crochet and 2 chain stitches between them,


*insert the hook again into the top of the second double crochet of the previous row and knit a single crochet, then 2 chain loops, and at the next top of the double crochet we knit a single crochet, then 3 chain loops.*

We knit from * to the end of the row. By tying a single crochet at the end of the row to the top of the second double crochet of the previous row,

We knit 1 chain stitch and a half double crochet into the first single crochet of this row.

Row 27: we knit 4 chain stitches and a double crochet in the same arch, then 1 chain stitch,

in the middle loop of the next arch we knit a single crochet and 1 chain stitch,

*in the next arch from 2 chain loops of the previous row we knit a double crochet, 1 chain crochet, a double crochet, 1 chain loop, a double crochet and 1 chain crochet,

In the middle loop of the next arch we knit a single crochet and 1 chain stitch*.

Repeat knitting from * to the end of the row.

At the end of the row we return to the first arch and knit a double crochet and 1 chain stitch. We close the row with a connecting post into a 3rd lifting air loop.

Row 28: we knit 1 chain stitch and a single crochet between the chain of chain stitches from the previous row and the next double crochet, then 3 chain stitches,


Repeat from * to the end of the row. At the end of the row we knit a single crochet in the first element, 1 chain stitch and close the row with a half double crochet, which we knit into the first single crochet of this row.


Row 32: thread white we tie a row with single crochets, knit 1 chain stitch and a single crochet in the same base loop, then we knit 1 single crochet in each loop. We close the row with a connecting stitch in the first single crochet of this row.

Panama hat is ready. You can decorate it at your discretion.

The easiest way is to knit a chain of air loops.

I knitted a chain of the required length and threaded it through the holes of the hat.

I tied a simple bow, decorating the ends with small beads.

I will be glad to see your panama hats, knitted according to this master class, in the group’s photo album
You can't do without a hat on hot summer days. A crocheted Panama hat will provide good protection from the scorching sun.
Selection of yarn and hook
In order to knit a headdress, you will need yarn, two hooks of different sizes and a pattern. For work, take tools No. 2 and No. 1,3, and threads YarnArt Begonia . They are made from 100% mercerized cotton. The length of thread in a skein of 50 grams is 169 meters. The yarn is completely natural, which means hypoallergenic , so knitted hats made from it are ideal for both adults and children. It is very pleasant to the touch, has a smooth, clear structure, glides well and does not cling during operation. The description is given for a head size of 55 cm.
Knitting the bottom of a hat
Knitting the bottom of a headdress is not difficult. We start by closing three air loops into a ring and proceeding to the first row of work. We knit 4 more vp. and repeat 7 times one column with yarn over and one air loop.
We begin the second row with five air loops, after which we repeat one st. 7 times. s n. and two v.p.
The third row begins in the same way as the first. Then under every two v.p. of the previous row you need to knit two sts. s n., two v.p. and again two tbsp. s n. In each loop of the column of the previous row we knit one stitch with yarn over . Don't forget to make a connecting loop at the end of each row.
Fourth row begins with four air loops. In two loops of the previous row, as in the third row, we knit two sts. s n., two v.p. and again two tbsp. s n. Between them make two air loops, between which a column is made with yarn over
A visual diagram is shown in the figure.
Starting from the end of the fourth row, we make an offset so that the mesh is knitted in a checkerboard pattern. It needs to be done as follows. Connecting loop at the end of the row we knit not in the third loop, but in the fourth. After this, we continue to work, as the diagram shows, until the bottom of the cap is 17-17.5 cm in diameter.
If you knit a hat of a different size, then the diameter of the bottom is calculated based on the volume of the head. It is divided by 3.14 and added to the resulting figure 1.5-2 cm.
Knitting crown and band
Having finished the bottom of the hat, let's start making the crown. We do it exactly without any additions. We knit this way until the length of the product from the beginning is 18 cm. The knitting depth for a headdress of a different size is simply calculated. The volume of the head is divided by 3 and 1 cm is added to the resulting value.
In order to connect peg , change the hook from No. 2 to No. 1,3 and get to work. It is needed for a denser fit products to the head. Okolyshek knitted in stitches without yarn over . For it you need to complete 4 rows.
In the last row of the band we make holes in order to stretch a cord through them, which will decorate the hat. Four on each side will be enough.
Hat brim
The brim of the hat is made in a column with yarn over . In each new row you need to knit 10-12 increases, distributing them evenly throughout the row. We continue the images until the required length of the fields.
To make the edges beautiful and neat, we tie them through a post.
Decoration of the finished hat
Ready knitted products You can decorate it with a cord by threading it through specially provided holes. It may be the same color as the product itself or different from it.
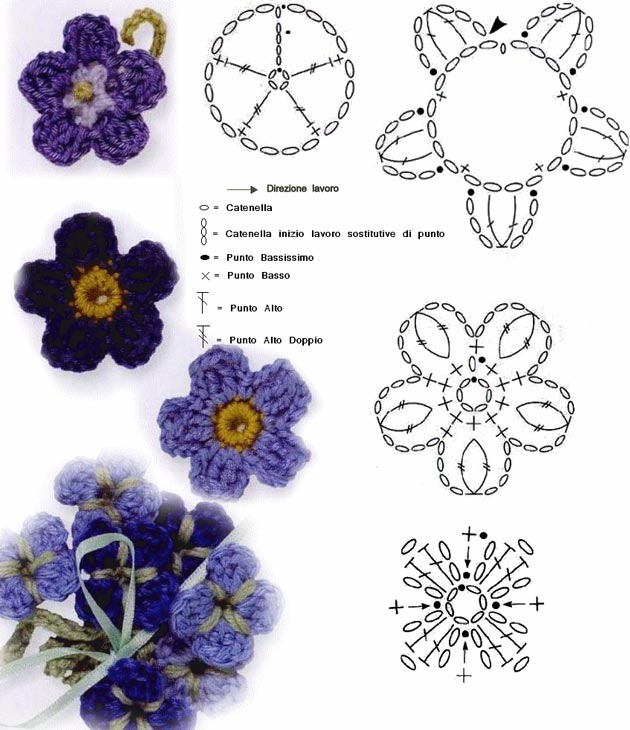
Another decoration option is flowers. A diagram will help you connect them.
In a sliding loop you need to knit 8 stitches with yarn over . This is the first row of our flower. In the second we make 8 groups of 5 air loops each. To raise the third row, perform 5 ch. Next from the first ring of the previous row knitting 6 columns with two yarn overs , between each of which we make an air loop. From each next ring you need to make 7 columns with two yarn overs with one v.p. between them. Each group of columns with two yarn overs We also separate it with an air loop.
Knitted hats and their care
In order for a headdress to retain its shape well and make you happy for a long time, you need to take proper care of it.
It is recommended to wash knitted items by hand in warm water with the addition special means. You need to dry the hat on a form, for example balloon, inflated to the required size. You need to steam it until completely dry using a damp cloth. In this case, the product is straightened and given the desired shape. After steaming, it is returned to the mold to dry completely.
If desired, you can starch it. This will allow it to better retain its shape and protect the fibers from dirt, preventing it from penetrating inside. In order to prepare starch, mix 2-3 tablespoons of the substance with cold water in a cup until smooth and pour into 1.5 liters of boiling water. Bring the mixture to a boil, stirring constantly. After it has cooled, cover the clean, damp cap with starch inside and out and dry.
This summer hat can be knitted for both kids and adult ladies. It will decorate your head and protect you from the scorching rays of the sun.
A selection of different crochet hats
https://youtu.be/6Vap9i2XSN8
These magical Panama hats for girls were knitted by legendasun from Osinka.
For knitting you will need yarn - YarnArt Begonia 169m/50g (consumption for the hat itself - 1 skein);
hooks – No. 2.1 and No. 2.5.
So,
4 v.p. close it in a ring.

1r. - 4 v.p. (3 lifting loops and 1 ch for the arch), 11 CH.
2 rub. - in each arch of the previous row we knit 2 dcs, separated by 1 ch. It turns out 12 t.n. "tick".
3 rubles - we begin to make “tick” increases. In each subsequent row there will be six such increases. The essence of this increase is to knit an additional “tick” between the arches of the previous row.
4r. - make 6 tick increments every 3 ticks of the previous row.
5 rub. - make 6 tick increments every 4 ticks of the previous row.

6r. - we knit without increments. In each arch of the previous row we knit 2 dcs, separated by 1 ch.
7r. - make 6 tick increments every 5 ticks of the previous row.
8 rub. - we knit without increments. The bottom begins to round out a little.
9r. - make 6 tick increments every 6 ticks of the previous row.
This is where the increases end and we continue to knit the hats to the required depth without them. I’m pretty good with the number Pi; my bottom is 13 cm.
I got 26 rows from the beginning of knitting and the height of the hat to the brim is 17 cm.


For the fields we knit 2 rows of sc. In the second row we make increases in every 5th column. In the next row, in each top of the column of the previous row, we alternately knit 1 embossed column and 1 DC. That. crochet number 2.1 we knit three rows of fields. Then we change the hook to No. 2.5 and knit 2 more rows. The photo shows that the brim becomes perpendicular to the hat itself from the first row of knitting.

We knit the last row in crab step with crochet number 2.1. In the last photo I showed what the seam looks like. The hat is ready!


Join our groups - there is even more interesting stuff:


Decorate the hat to your liking. Here are some example diagrams:


There is no diagram, my improvisation. Very convenient for decorating “flower beds”.

We knit a chain of 15 ch. We knit a sc into the second loop of the chain. Then in each loop to the end of the chain - half-column, 2 CH, 2 C2H, 3 C3H, 2 C2H, 1 CH, 1 half-column, 1 RLS. We turn the leaf and reverse side we knit in a mirror order - 1 sc, 1 half-column, 2 dc, 3 dc, 2 dc, 2 dc, 1 half-dc, 1 sc. We connect with the help of SS to the tip.
Next, using a SS (only through the leaf), we knit a groove in the middle of the leaf. We knit an additional 25 ch. - 10 v.p. for the stem and 15 vp. for the second leaf, which we knit similarly to the first. We return to the beginning along the stem using the same SS.
We dial 15 v.p. for the third leaf and knit it in the same way as the previous two. The branch of leaves is ready.
Making knitted summer hats is no more difficult than crocheting an ordinary napkin. You can decorate the hat to your taste, with ribbon or flowers, embroider a knitted summer hat glass beads, add a brooch...
If the headdress has a neutral shade that doesn’t match your outfit, then in a few minutes you can make it a full-fledged part of it.
It is enough to tie a women's neckerchief or a narrow scarf around the headband of the hat, which will balance the colors and create a harmonious image.
1 option

Knitting pattern included

Approximate dimensions:

Option 2

A cloche hat is an elegant accessory women's wardrobe. It looks like a small bell. The hat gained popularity in the 20s of the last century.
The name of the product comes from the French word cloche, which translates as bell. The hat is made of felt, which fits to the head, creating an elegant silhouette.
Initially, the cloche was worn to completely cover the forehead. Next, the hat underwent minor transformations and the brim began to turn upward.
Summer openwork version cloche hats


Another option for a cloche hat 
Beige hat

Summer hat crocheted from yarn natural color, it is better to knit from IRIS.
Crochet hat pattern


Design of the edge of the hat brim - MK from Irina:
There are many types of regilin. I have plastic regilin, it looks like this

You can see the fishing line on the cut, so that’s what we’ll use. In order for the fields to keep their shape well, it is better to use two fishing lines, since one will not give the fields the rigidity we need, but will sag.
So, cut the required length of fishing line and fold it in the form of a double ring. The resulting ring should lie close to our fields. 
If you cut off less regilin than necessary, the margins will tighten (there will be a bell). And if you cut off more regilin, the fields will “disturb”.
I tried to glue the ends of the regilin together with Superglue, but it was unsuccessful. I tried to solder it over a fire, but it was unsuccessful. But connecting with tape worked best. Just don’t wrap the tape in a thick layer so that when tying this section of the brim doesn’t stick out. This is the connection I got 
Next, we begin to tie the brim of the hat with single crochets, gradually tying in the regillin. Where the brims have a bend, we simply stop clinging to them, and only tie the regilin. Next we cling to the fields again. It looks like this. 
Please! Glad to be of service.
Good afternoon Olga! I am turning to you with a big request. Could you knit me a Panama hat, about the size of a lilac one with a circumference of 56 cm, but I would like a white one. If you agree, then we will agree on the price and everything else, My phone number is 89213167585, Nadezhda.
Wonderful panama hats!
My eyes are wide open!
Which one to choose for your granddaughter?
Thank you!
Thank you very, very much!
Everything is clear and accessible!
Thank you! Wonderful Panama hats
Thank you, Panama hats are just a miracle. I want to knit everything for my granddaughter.
thanks for the site
I had no idea that a child’s Panama hat could be decorated so clearly! Prospect and respect!
Thank you very much, great help for us beginners in knitting, very grateful to you.
very beautiful, real summer in hats!!!
Can I see on your website how to decipher the abbreviations? And if not, where is such information available???
Good afternoon. Panama hats are wonderful! But I can’t get a Panama hat with rounded brims. Even after adding 5 single crochets, the fields turn out to be a wave ((. I knit white with two roses and small round fields.
Good evening, Marina! It all depends on the density of the knitting. And it is possible that the finished product will need to be starched a little. Good luck in needlework)
Hello, Yulia! Abbreviations can be found in any knitting magazine or book. I will try to post them on our website. Thank you very much everyone for your nice reviews. Pamper your daughters and granddaughters with your handicrafts more often)
In the 3rd Panama hat, in the photo, starting from the 7th row, there are always 4 dc, and one in relief, and according to the description, there are dc in each base. there should be 2 dc...
Believe the photo or description??
Please tell me, is it necessary to make increases in the openwork part of the latest model (summer hat)? For some reason it doesn't work out as planned...
Hello, Dmitry! The description was compiled by the authors, so it is better to stick to it. And of course, look through your work, if possible, try it on, because all the distortions and shortcomings will be noticeable. Good luck to you)
Hello, Elena! In the description latest model there are no surcharges in the openwork part. If you adhere to the scheme, then you will have it as in the photo - step by step. Maybe you started knitting more tightly, pulling together, than you started?
How to knit a relief stitch? Please tell me.
Hello, Olga! A lesson on knitting a relief column can be viewed on YouTube https://www.youtube.com/watch?v=Rc2GQedfeIs
Good afternoon Today I accidentally came to your site, was looking for accessible descriptions for knitting panama hats, I’m delighted! everything is clear and easy! Now there will be something to do in the evenings. My granddaughter is 8 months old, I want to knit a poncho with sleeves by spring (I have a beautiful melange yarn - bright, colorful), I can’t find the same descriptions and diagrams - clear and understandable, maybe you have one?
Thank you so much for such beauty and detailed explanation and accessible diagrams.
A hat with a relief column... tell me, is it front and back?
Please tell me, when knitting an openwork lilac Panama hat, how to finish the rows (make a transition from one to another) on the bottom and on the openwork part? Confused.
Thank you very much for detailed description and plans for panama hats!!! I have already knitted a couple for my daughter. Good luck to you!
Thank you, Maria! It’s great that our site helped and everything worked out for you. Health to you and your family!


