
The word "papier-mâché" is translated from French as "chewed paper" or "torn paper." This technique first appeared in France. Trays, toys, snuff boxes, candlesticks and even decorative stucco were made from papier-mâché.
1:928 1:933There are two ways to create papier-mâché products.
1:1040The first is modeling from a moldable mass, consisting of soft paper and adhesive.

The second involves gluing torn paper in layers, this type is also called mashing.

The papier-mâché technique is not at all complicated, but it requires accuracy and patience. The process of making a planned item can take several days due to the long drying time of the material.
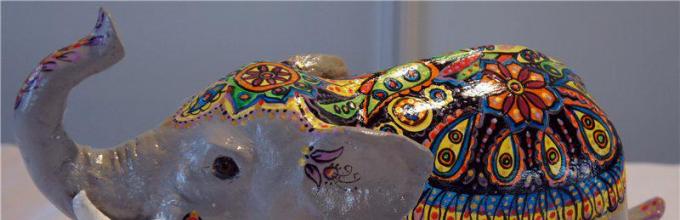
But the time spent will not be wasted, because as a result, you can create a wide variety of things with your own hands, such as decorative elements interior, boxes, piggy banks, figurines, masks, dolls, rattles and much more.

Papier-mâché is often combined with the decoupage technique. Such a union makes it possible to create truly real masterpieces.


The first method is modeling from mass
Usually, newspaper sheets are used to make the mass, but this is not important; you can use toilet paper, paper towels.
We tear or cut newspaper sheets into small pieces, put them in a deep vessel and fill them with water. It is best to use a mixer, grinding in small portions. But you can do it yourself; to do this, pour hot water over the torn paper and leave it to soak for about 3 hours.
Then knead with your hands until a homogeneous mass is obtained. Excess water must be drained through a sieve, and a mixture of glue and paste must be added to the resulting thick mixture. Knead until it starts to stick a little to your hands.

If not used at one time, it can be stored in a cool place for several days; do not freeze. During storage, the mass may become liquid; in this case, squeeze it out and add glue.
The mass is prepared with glue and paste, because when using only glue, it is difficult to sculpt, and paste alone does not provide the necessary strength. To increase the strength, you can add small sawdust.

The paste for the mass can be prepared as follows:
Mix flour and water in a ratio of 1:3, mix thoroughly so that there are no lumps.
Place on the fire and bring to a boil, stirring continuously.
Then remove from heat and let cool.
The paste is stored in the refrigerator for several days, tightly wrapped in plastic wrap.
The product must be painted with tempera, alkyd or oil paint. Gouache and watercolor are not suitable due to the fact that they get dirty and wash off.

To make gouache more durable, add a little PVA glue to it. Cover the painted product with colorless varnish. Before painting, the product must be sanded and primed.
The second method is mashing (sticking pieces of paper)

Masching involves pasting a prepared form with pieces of paper. The paper should be soft; newspaper sheets are also suitable for this.
The most ideal option is mixed pasting: Apply a first layer of colored or white paper, coat the surface with glue, then cover it with a second layer using contrasting colored paper or scraps of newspaper.

This is used in order not to get confused in the number of layers. In any case, the last layer must be made of white paper. You need to make at least 8-10 layers. Allow each two coats to dry before applying the next two. It is necessary to ensure that the pieces of paper overlap each other slightly when pasting, lie flat and do not wrinkle.
Paper for printing should never be cut with scissors., exclusively tear into small pieces by hand. The edges in this case are thin and well smoothed in the finished product.
Depending on how the papier-mâché was made, mashing can be internal (pasted from the inside) and external (external). If you expect that the pasted form will remain inside the product, lubricate it with glue before work. But in case of subsequent removal, cover the mold with Vaseline or thick cream.

Wallpaper glue is very suitable for mashing, which can be replaced with homemade paste.
The paste is prepared in the same way as when working with papier-mâché mass, but you can also make it as follows:
starch is diluted with water at room temperature and stirred until sour cream thickens.
Continuing to stir, add boiling water in small portions until you get a clear, thick liquid similar to jelly.
After cooling, the paste is ready for use.
It cannot be stored for a long time; it is better to prepare it fresh every time.
Casein glue is also used for work, which is sold in hardware stores.

Small parts are completed with a mixture of scraps of paper and glue. It must be remembered that when dried they greatly decrease in size. If this happens, then after complete drying, cover the parts with torn paper to the required size.
The product is dried at room temperature for approximately two days.
Drying on a radiator is contraindicated, as it may crack.

The finished, completely dried workpiece must be removed from the mold and treated well with sandpaper, trying to achieve an even surface. Then prime. To do this, it is better to use a water- or latex-based primer. The primer is applied with a flat brush. Before applying the next layer, let the previous one dry.

The completed item is painted and varnished, just like a product made from papier-mâché.
In the previous lesson we told you, how to make a papier mache mask with your own hands . Today we will talk in detail about how to make papier mache- that is, the mass from which we will sculpt our original crafts .
Papier-mâché translated from French means “chewed paper.” It's a mixture made of cardboard or paper and an adhesive element (starch, gypsum). Masks, toys, boxes, jewelry and even pieces of furniture can be created from papier-mâché.
Prepare workplace: cover a large spacious table with oilcloth (which you don’t mind throwing away) or newspapers. You should have a piece of dry cloth on hand to wipe your palms from glue. before going into detail about how to make papier mache with your own hands and about what materials and tools will be required for the work, let’s touch a little on the issue of crafts making techniques and some nuances.
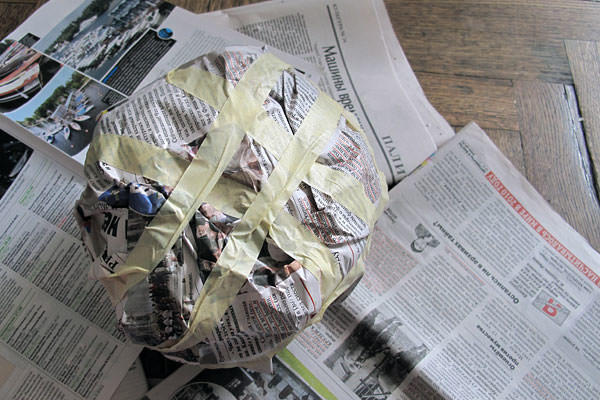
With the help of technology , plates, elements for interior design and much more. It is most interesting for children aged 5-10 years to participate in this process. The child’s mood rises, his fingers develop, and his aesthetic perception develops. Carrying out work from papier-mâché does not involve complicated steps: you need to cover the selected shape with several balls of non-rigid paper. You will have to be persevering and spend some time to turn your plans into reality.
Decide right away whether the form will remain inside the craft or whether you plan to take it out. In the first case, the form is lubricated with adhesive, in the second - with Vaseline, and the first layer of paper is placed on top.
Paper (newspaper) can only be torn by hand; cutting it with scissors is unacceptable. The first paper layer of papier mache should completely cover the shape of the papier mache craft. Then it is lubricated with glue and the next layer is applied. It is better to take paper of a different color for each layer, so as not to get confused about how many balls are glued. While maintaining the order of actions, the form you need cover with several layers of paper.
How to make papier mache crafts step by step? Tear paper or newspaper into smaller pieces , the longer you have to work. Large elements should be dipped in glue (to get wet) and then placed on the mold. They can create folds that must be straightened out immediately with your fingers. We do not apply glue to the mold.
There is a technology to perform papier-mâché made of paper consistency. Here you can let your imagination run wild and paste over, for example, a balloon.
Choosing an adhesive for papier mache mass:
For papier-mâché, the ideal option is wallpaper glue. Dilute it following the instructions on the package.
In the absence of one, cook the paste.
We dilute the starch in slightly warm water and stir until the consistency becomes similar to sour cream. Remembering to stir constantly, add boiling water until the substance becomes transparent and thick like jelly. Let the finished paste cool. The liquid does not retain its qualities for a long time; it must be boiled again for each product.
Next, we will tell you in detail about how to make papier mache at home with your own hands. Prepare a special mixture to create amazing crafts or fancy masks are very easy! You will learn how to prepare a workbench and what materials and tools will be needed for the work, and you will also be able to learn manufacturing techniques DIY papier mache products. Make crafts from different materials- exciting and useful activity and it is advisable to involve the child in the process of making crafts from the very beginning early age(to begin with, you can introduce a small child to the properties of paper and plasticine, and when the baby grows up, you can teach him to make crafts from natural materials,clay, plastic, foil, thread, etc.)
Now you can make original crafts with your own hands from such a wonderful material as papier mache. Using papier mache you can make a product of the most bizarre shape and paint it in the most bright colors! Such the craft will be a wonderful gift to anyone significant event for your friends and acquaintances - be it New Year, Valentine's Day or Birthday.
NEXT ARTICLE.
The papier-mâché technique has been popular for a very long time. It is used to create different forms and figures made from mass, where paper is used as a base. Over the long period of existence of this technique, many different recipes have been collected, how to make papier-mâché mixture at home. In this article we will look at options for the most popular and proven papier-mâché recipes used by professional craftsmen. Making such a mass with your own hands is absolutely not difficult and not expensive.
Recipe for papier-mâché mixture No. 1.
We will need:
Gray toilet paper.
Universal PVA glue (can be used for construction).
Flaxseed oil.
1. First of all, tear the paper into small pieces and put it in a deep bowl.
2. Then fill it with boiling water and leave for a day. All paper should be submerged in water.
3. After the allotted time, wring out the soaked paper. For this, ordinary gauze or fabric is most often used, but this can also be done using a synthetic mesh with a small hole. As a result, the mass should remain slightly moist and it is better to squeeze it out in small portions, approximately 100-150 grams.
4. Then grind the squeezed out lumps of paper in small portions in a blender and place them in a free container. This is done so that in the end papier-mâché mass turned out to be more uniform.

Fig. 1 Masks made from papier-mâché mass
5. When all the paper has been ground, add universal PVA glue to it in small portions. Approximately one roll of toilet paper requires 200-250 g of glue.
6. Mix everything thoroughly and add linseed oil (1 tablespoon per 1 roll of paper), then re-knead the mass until it has a homogeneous consistency.
Thanks to linseed oil, the working mass will be much more plastic. From such a mass you can create any shape. It is worth considering that after drying the form decreases in size from 2% to 6%.

Fig.2 Figures made from papier-mâché mass
Recipe for papier-mâché mixture No. 2.
We will need:
Gray toilet paper.
Universal PVA glue.
Fine-grained putty.
Liquid soap.
The whole sequence of actions is the same as in the first papier-mâché recipe. Only here, after the PVA glue, we add putty (5 tablespoons per 1 roll of toilet paper) and liquid soap(1 tablespoon per roll of paper). Putty is needed to make the mass more plastic, and liquid soap gives additional smoothness to the resulting figures.

Fig.3 Decorations made from papier-mâché paste
Recipe for papier-mâché mixture No. 3.
We will need:
Water - 1 liter.
Dry wood glue – 500 g.
Thin paper (newspaper) – 250 g.
Natural Drying Oil – 100 g.
Rosin - 20 g.
Fine chalk - 3 kg.
1. First of all, soak the wood glue in water and cook it until a homogeneous mass is formed, without allowing it to boil (see the ratio of water and glue on the packaging).
2. Then we prepare the paper. To do this, chop it into small pieces, add water and cook for about an hour over low heat.
3. After that, let the paper cool to room temperature, and then you need to knead it as much as possible until it becomes homogeneous.
4. Then we are faced with the task of squeezing out all the paper using gauze as best as possible.
5. Add the resulting lumps in small portions to the hot glue and stir.
6. Then add drying oil and crushed rosin.

Fig.4 More masks made from papier-mâché mass
7. Heat the entire papier-mâché mixture over a fire and stir constantly until the rosin is completely dissolved.
8. The resulting mixture must be allowed to cool completely and only after this can you begin to knead it into chalk.
9. To do this, pour a pile of chalk onto a flat surface and make a depression in the center.
10. It is into this that we add cooled glue in small portions.
12. For greater plasticity, add drying oils in small quantities. Papier-mâché mass ready to go.

Fig.5 Vase made from papier-mâché mass
Recipe for papier-mâché mixture No. 4.
We will need:
Egg boxes.
Flour paste.
1. Prepare boxes for eggs (with interesting ideas you can find crafts made from such boxes in). First of all, they need to be brought to a state where they can be worked with. To do this, tear the boxes into small pieces and pour boiling water over them.
2. Leave it in this state for a day, then change the water and leave it for another day.
3. After the specified time, they should be well soaked, after which they should be squeezed out well using a colander.
5. To the resulting mass we begin to add flour paste, the consistency of which is similar to liquid sour cream, and mix everything thoroughly.
6. In the received papier-mâché mass mix 2-3 tablespoons of flour. The mass should be soft and plastic. This mass is good for making masks.

Fig.6 Works made from papier-mâché mass
A cheap and durable material from which you can create any three-dimensional compositions at home is papier-mâché. In French, papier means “paper” and mache means “ground, chewed, compressed.” The literal translation accurately conveys the technology used to create the material.
The sculpture is created in two ways: increasing volume or cutting off volume. To increase the volume, you need to successively add layers of paper soaked in glue. To cut off the volume, you first need to form a shape from a viscous and plastic mass, into which paper turns when mixed with water and glue.
What paper is suitable for making papier-mâché with your own hands?:
- Soft multi-ply or single-ply paper. Napkins, toilet paper, paper towels. The softer the cellulose fibers, the faster they absorb water and glue.
- Plain printer paper. It takes a long time to absorb water, but if there is no other option, this one will do.
- Notebook sheets, writing paper, notepads, watercolor paper. You can use any cellulose-based material, even cardboard. Thick and glossy sheets are poorly saturated with water, so you first need to compress the paper so that it becomes softer.
- Newspaper. This is an ideal option, since the newspaper sheet is quite durable, and at the same time soft. How many layers of newspaper you need to apply depends on the size of the product.
Before starting the process, you need to decide what technique the product will be created in.:
- Machining. The technique involves gluing a rigid frame shape. For the form you can use: foil, bottle, jar, wooden block, any product that serves as a support for the final composition.
- Modeling. Three-dimensional figures can be formed from papier-mâché in the same way as from clay or sculptural plasticine. Important point– this is drying; it is impossible to dry such a product quickly. It is more profitable to first create a frame and dry it, and then add volume using additional layers paper. For modeling, a viscous mixture of cellulose and glue is created, which becomes hard when hardened. Hands should be washed immediately after sculpting. warm water and with soap, then the glue will be washed off.

Before realizing your idea, you need to make a sketch and decide how to make papier-mâché: by modeling or mashing. A sketch will help you avoid mistakes, determine the technique and work out the image in detail.
The sketch can be approximate, not detailed. It is important to indicate the proportions and approximate dimensions of the product.
Machining: master class
Masching is a meditative activity that takes place in stages and sequentially. Haste can ruin the product, so you should prepare yourself for measured work.
Master class on working with papier-mâché (video)
MK using this papier-mâché technique:
- Prepare paper cut into small pieces in advance. Some crafters claim that torn paper is better than cut paper, but it's really a matter of personal preference. To strengthen it, you can use a bandage; it also needs to be cut. It is convenient when the paper is of different colors. For example, if you take a newspaper, then layers with text will alternate with layers on which bright advertisements are printed. The difference in color will help you figure out where you need to add the next layer and where it already exists.
- Prepare a sufficient amount of PVA glue. The glue can be diluted with tap water, then it penetrates the paper faster. The maximum dilution ratio is 3 parts glue to 1 part water; the more water used, the looser the product becomes. Too much water will cause the sculpture to “float” and lose its shape. For detailed and thin products, undiluted glue is better. In addition to PVA, you can use wallpaper glue or homemade paste. The instructions for the glue contain information about its toxicity; you need to choose environmentally friendly glue without a strong odor, because it will take a long time to glue.
- For the paste you need starch and boiling water. Pour starch into a cup, add boiling water and stir until smooth. The thickness of the paste should resemble sour cream. After finishing the work, the paste must be immediately washed off from the cup, after hardening, this will be problematic.
- If the frame mold later needs to be removed from finished product, you need to lubricate its surface vegetable oil, Vaseline or any greasy substance to prevent the mass of paper from sticking to the frame.
- If you do not plan to remove the mold, it can be covered with PVA or paste. After the preparation of consumables is completed, you can begin creating the sculpture.
The technique for doing the work is very simple, it’s easy to do it yourself if you have patience. The paper is applied layer by layer, the glue is distributed with a large brush. You need to dry the layers either until dry or semi-dry.
How to quickly dry papier-mâché: options
After completing the volume expansion, the product should be left for 2 days. It will not dry quickly at room temperature.

How can I speed up the process?:
- Place the product in the oven at 50-100 degrees;
- Use a heater, battery or heat gun.
Some craftsmen claim that the product may crack when heated. This is not true. To check for personal experience How the sculpture reacts to temperature, you can mold a very small piece and place it in the oven. If the glue composition tolerates heat well, then dry it in the oven. If any defects arise, dry most of the work at room temperature.
How to make papier-mâché smooth after drying:
- Smooth out unevenness using sandpaper or sandpaper;
- Sand the surface with fine sandpaper;
- Cover with acrylic artistic or construction primer;
- Apply paint, varnish, mosaic or decoration.

If you make a large and simple figure from papier-mâché with your own hands, for example, a stump for a summer house, coarse sandpaper is used to speed up the process.
If the figure is small and detailed, for example flowers or fruits, you should immediately use fine sandpaper.
How to remove papier-mâché from a mold
If the sculpture needs to be separated from the frame form, you need to lubricate the form with Vaseline or any greasy cream before gluing. Conventional cling film is also used to process the mold. It is wrapped tightly around the frame so that there is no air gap left. Then the papier-mâché is removed along with the film.

The adhesive tape resists glue well; the smooth texture of the adhesive tape will protect the form from adhesion to papier-mâché. Taping is done in pieces, without gaps.
Papier-mâché: how to make it using the modeling method
The machining technique makes it possible to create thin and durable things. If the work is more integral, without small parts, it is more profitable to use modeling.
To prepare the mixture for modeling, you will need:
- Basin, cup, bucket, any container of suitable size that you have at home;
- Mixer or drill with an attachment for mixing paint;
- Sieve or mosquito net.

To make the mixture durable, wallpaper glue or PVA glue is added to it. To make the mixture plastic, you need to prepare a paste.
For paste:
- Pour boiling water over the flour, 1 part flour to 3 parts water;
- Bring to a boil, stirring;
- Break up the lumps, give a uniform consistency;
- Cool and add to mixture.
You can use starch paste.
Making a sculpture from a modeling mixture:
- Pour small pieces of paper into a basin;
- Add warm water and paste;
- Add glue and beat until smooth using a mixer or drill with a paint stirring attachment;
- Let it brew for 2-3 hours;
- Stir again;
- Let it brew for 2-3 hours;
- Squeeze out the water, if there is excess, pass the remaining mass through a sieve or mosquito net to separate large pieces;
- Sculpt.

The mass must be flexible enough to hold its shape. You can dry it at room temperature, and if it doesn’t crack, then in the oven at 50-100 degrees.
Working with papier-mâché at home
High-quality drying and compliance with proportions are a necessary condition for obtaining beautiful and neat work. During drying, the product should not be moved, touched or poked with sharp objects to check readiness. Wet papier-mâché should not be dropped or squeezed. Drying should be done in rooms where children and pets do not run around, which could accidentally damage the product.

In order to be able to transfer the sculpture from the desktop to where it will dry, you need to immediately create it on glass, a tray or a board.
If, by an unfortunate accident, some part of the papier-mâché has separated or the product has broken, you should dry everything until ready, then glue and sand the defects at the joint. You can increase the volume and restore a sculpture that has been injured.
What can be made from papier-mâché
The material has a wide range of applications and is used to create any round or flat sculpture, high relief or bas-relief, and stucco decorations.

Application of papier-mâché:
- Wall decor with stucco;
- Costumes for children's parties, helmets, swords;
- Masks on the walls;
- Round vases, three-dimensional flowers, figures of people and animals;
- Interior decorations, decorative plates, bottles.
Flowerpots made of papier-mâché (video)
After the product has dried, it is sanded, primed, and then coated with acrylic. Acrylic is best paint for papier-mâché, which creates a protective film.
You can finish the job by applying glossy or matte acrylic varnish, with a brush or spray can.
Papier-mâché technique (photo)


.3_%D0%BC%D0%B0%D1%88%D0%B8%D1%80_.jpg)


Let's try to make a copy of some papier-mâché cutlery. You probably worked with papier-mâché at school, because the technology for creating it is very simple, although it requires perseverance and accuracy. Our instructions will help you remember your “youth”!
To create the simplest papier-mâché, namely making dishes from it, you will need very few tools and materials:
- scissors
- starch or flour based glue
- “paste” (you can use PVA glue)
- any utensil
- tassel
- paper (newspaper is fine)
Process
First you need to prepare a “paste”, a glue based on flour or starch. Of course, you can use standard PVA glue, but the paste is still more convenient and practical: it is made from natural materials, which means it is non-toxic and non-poisonous.
- Mix pure starch (or flour) with a small amount of cold water until all lumps disappear completely. Then, stirring gently, pour boiling water into the starch and bring to heat. Heat the mixture until a transparent mass is obtained.
- Next, start cutting paper for papier-mâché. Using scissors, finely cut the paper into strips and various shapes. During the creation process, any pieces of paper will suit you.
- Apply with a brush reverse side dishes (in our case, a saucer). Begin carefully, trying not to go beyond the boundaries of the dish, gluing pieces of paper onto the saucer. Try to cover the entire area with an even layer. Repeat until the thickness of the paper layer reaches the size you need.
- It should be noted that all operations with papier-mâché can be carried out in several stages, each time waiting for the previous layer to dry.
- After finishing work, let the paper dry for 24 hours.
- After waiting a day, pry the edge of the paper layer with the tip of scissors or a knife and gradually begin to remove the resulting “cast.” After this, trim the uneven edges with scissors and begin decorating the resulting dishes.
- Various watercolor and acrylic paints will help you with this. To begin with, you can paint the dishes with one layer of paint, a kind of primer. And then apply patterns and any other illustrations on top of it. Don't limit your imagination.
- The finished papier-mâché can be varnished to make the design glossy. In addition, this will make the dishes stronger and more durable.
I hope that this modest detail will add a piece of comfort and warmth to your interior.


