What is kusudama? This is the name of the art of creating various crafts from paper modules. This is one of the many types. As a rule, it represents bright plant compositions with many different flowers and additions to them, made in the shape of a ball. They are perfect as a small gift or to decorate your room.
 Making a kusudama ball is not difficult. This process is somehow resembles a creature modular origami
. And this idea, like the familiar origami, originated in Japan, and a very long time ago. Previously, kusudama balls were filled with medicinal herbs and left near the bedside of patients, which contributed to their recovery. It is also believed that they were used in ancient Japanese rituals.
Making a kusudama ball is not difficult. This process is somehow resembles a creature modular origami
. And this idea, like the familiar origami, originated in Japan, and a very long time ago. Previously, kusudama balls were filled with medicinal herbs and left near the bedside of patients, which contributed to their recovery. It is also believed that they were used in ancient Japanese rituals.
Now it’s just a small beautiful one that will appeal to lovers of cute trinkets, interior details and elements. Nothing special is required to make it. The materials can be found at any office supply store. What do we need?
Materials and tools
Schemes for manufacturing kusudama modules. How to make kusudama
So, in any origami scheme there is symbols that help you in your work. They are also found in kusudama patterns. These are various arrows, dotted and solid lines, designations of angles and equal segments. If you follow the instructions for creating kusudama MK (master class), you can easily make your first craft using the kusudama technique. Here are examples of schemes and various resulting products.
Kusudama lily
 To make flowers in the form of kusudama, for example, origami lilies, and then fold several such buds into a ball, you will need 12 modules, that is, 12 flowers.
To make each part, you should prepare 3 squares of paper, the side length of which may vary depending on the desired size, but each subsequent square should be 1 cm larger than the previous one.
For example, to create one flower module you need to take squares measuring 13, 14 and 15 cm, respectively.

We will make parts of the lily according to following diagram:
- To start, take the smallest of the 3 squares and work with it. Make it into a so-called "double square"– a basic origami figure. To do this, fold the square in half and 2 times diagonally, unfold and bend the middle parts inward. You should get a three-dimensional square-shaped part.
- Then you need to bend each of the faces of our square towards the center, while smoothing them out. We do this with all four faces.
 Now we bend the lower corners to the center and repeat on all sides. The result should be a figure resembling a rhombus.
- The next step is one of the most difficult. You need to pull the inner bottom corner out. In order to do this, you need to make a fold exactly in the middle of the figure, which must subsequently remain inside the workpiece, and the inner corner must be pulled up. Next, we perform this step on all sides of the workpiece.
- Now bend the bottom corner up again exactly in the middle of the figure.
 Let's do it now vertical fold in the middle of the figure and bend it back. This step is performed to determine the middle of our part.
- Now we bend the lower parts to the center (from the corner to the base slightly above the middle of the workpiece). We do the same action on the other side of the module.
- We bend the entire upper part of the work on all four sides. The fold line should be located slightly above the middle. These are our future petals. They need to be straightened to a horizontal position and can also be slightly bent for beauty. Our first lily for the kusudama ball is ready!
 From the remaining two squares larger size We make the same parts and put them one inside the other in order. The first module of our kusudama ball made of lily flowers is ready.
- It is better to assemble the modules into a finished ball using thread and a needle rather than glue, as this option will be more durable.
Five leaf kusudama flowers
I would like to offer you another scheme for creating kusudama crafts for beginners. It will consist of 12 modules, each of which will require 5 square sheets of paper. Side length is 10 centimeters. So let's get started.
 Take 1 of the prepared squares and fold it in half diagonally to form a triangle. We bend its corners up towards the middle (towards the top of the triangle). In the end a diamond should form. Now we bend the corners on one side, as when making a lily. To do this, you need to draw the middle and make a fold along it. We do this with 2 corners on one side. For the resulting convex parts of the part, fold the top parts down, and then the side parts towards the center, along the existing fold line. We connect the extreme surfaces of the part and glue them together. You should get an oval-shaped part with “stamens” inside.
For 1 flower you need to complete 5 such parts and start assembling. Glue them together by connecting the corners. And then, using the same principle, collect the entire kusudama ball, consisting of 12 flowers. If desired, decorate it with bows and beads. You can glue them on or sew them on. Our craft is ready!
In addition to MK in pictures and diagrams, on the Internet you can also find and learn the kusudama technique through video master classes, with the help of which you can make a wide variety of unusual crafts using this technique.
Sofia Kuznetsova
Kusudama"Lily" from paper
Spring has come, which means that the theme of flowers is more relevant than ever! In search of new solutions, the idea arose to make a ball of small paper lilies for decoration kindergarten. We will make such balls from modular origami structures - we will make kusudama. This ball consists of many flowers lilies, fastened together using PVA or hot melt adhesive pistol:
So, to work we will be needed:
1. office multi-colored paper
2. pencil
3. ruler
4. scissors
5. PVA glue or hot glue gun
Since the ball consists of individual flowers, let's start creating one such flower.
It also consists of three modules fastened together. First you need to choose the color of the future flower; it can be anything. I make yellow flowers with green sepals. We take the prepared paper and cut out three square: 14 cm (green, 13 cm (yellow, 12 cm (yellow).

Below is the technology for folding one module, it is the same for our three blanks:


We fold the remaining two blanks in the same way, we get three modules lilies:

Glue the larger yellow module into the green one, and then the smaller yellow module into the yellow one and you get a flower lilies. All that remains is to create 15 more of these flowers and glue them together. The ball is ready!
Publications on the topic:
"Spring Kusudama" Kusudama is a paper model in the shape of a ball, which is formed by gluing together many identical modules. IN.
Kusudama is a paper craft in the shape of a ball, glued together from several parts. It is called the "medicine ball". Today I present.
Purpose: to make toys for holiday decoration Christmas tree; introduce parents to various technologies for making New Year's Eve.
The holiday of March 8 is approaching, and we are all worried about making gifts for mothers. For older children preschool age flight of fancy.
The water lily is one of the most beautiful aquatic plants on our planet - a brilliant beauty for which there are no rivals in the waters of the whole world.
Step 1. We will need colored paper, scissors, glue, pencil, ruler. Step 2. Cut out two squares from red paper. They should.
Japanese origami has long been popular among the population. different countries. This technique allows you to create stunning masterpieces from simple paper. Moreover, it is not so difficult to master; almost anyone can make simple fakes. One of the directions is spherical models, which are assembled by gluing together different figures. This technique is called kusudama. For beginners it is perfect.
Kusudama appeared in Japan many centuries ago; even during the times of serving the cult of the Sun, it was used in various rituals. The sun was depicted with red clove balls with medicinal herbs inside (“kusuri” translated as medicine), which were hung on the four cardinal points. This tradition continues to this day, and kusudama can be seen at every Japanese holiday.
But there is another theory of the origin of this word, but it is also connected with medicinal properties. Previously, the healing fruits of the camphor tree (“kusu” in translation means camphor) were put into fakes and placed in the room in order to free it from harmful microorganisms and disinfect the room as a whole. It was believed that the aroma of camphor could heal the human body and soul.
But, no matter where the story begins, in any case it is connected with treatment, which means it will be useful to know how to make kusudama yourself.
Preparing for work
Before you start creating a masterpiece, you need to take care of the set necessary tools and materials. As is already clear, the most important step is the selection of paper.

It can be absolutely anything; moreover, at the very beginning it is best to experiment on ordinary colored paper, which children work with in creative classes.
After the technique has been more or less mastered, you can look for a professional base in city stores or use glossy pages, they will give the future ball individuality.
Of course, you also cannot do without sharp and adhesive objects, as well as decor. Required:
- scissors;
- PVA glue;
- a spool of thread of a matching or contrasting color;
- needles;
- beads, ribbons, sequins, buttons, etc.
 By the time you prepare the material, you should already have an idea for the future product; you can search for kusudama diagrams in pictures for beginners using the Internet or books. Most often, balls are assembled from separately made various modules, for example, bells, lilies, roses, and sakura flowers.
If you have absolutely no ideas, then you can use the classic scheme, which has been known for many years.
Classic version of the product
To make a classic kusudama ball pattern for beginners, you will need 24 sheets with equal sides, in other words, squares of paper. They can be either the same color or contrasting. You also need the tools listed above. Assembling a magic product step by step begins with folding the component parts or modules. To do this:
- Take one square and fold it in half diagonally to end up with a triangle. Its sharp corners are bent into the center so that the end result is a square again.
- Next, the folded corners are folded into reverse side from the center, while maintaining its shape.
- Using your finger, straighten the resulting triangles on the sides so that the center line of each is extended to the surface.
- The protruding parts of the triangles are bent towards the center from the top to the sides so that the lower part again takes the shape of a square, after which there should be two wings on both sides. Glue is applied to one of them and the figure is fastened in a semicircle using paper clips or a clothespin. Another 24 elements are made in the same way. In the photo the diagram looks like this.

After each petal is ready and the glue is dried, the origami flowers are collected. They consist of 4 modules, but you can use more if you want the figure to be more voluminous.
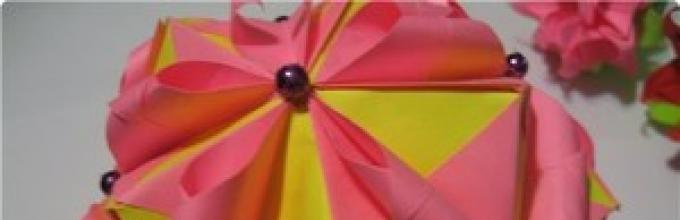
At the final stage you should get 6 flowers, which connect with each other. Four in a circle, and the fifth and sixth from above and below. The classic version is ready. Of course, you can also decorate the ball with decorations, if you so desire.
Usually, when getting acquainted with the technique, they start with the classic kusudama patterns for beginners, because they are the easiest to understand.
But this does not mean at all that they are less beautiful, so you should not immediately pursue complex options, but rather pay attention to simple products.
Master class balloon Butterfly
Another good and simple version of the kusudama ball pattern made from paper for beginners is the butterfly. It is very beautiful and is said to bring happiness to its owners. It differs from the classic version in that in this case you will need not squares, but rectangles, and the smaller side should have a ratio of 1:2 to the larger one. For a more original performance, it is better to use in equal parts plain paper and corrugated. Thus, you need to prepare 30 sheets of each. Start with a strip of plain paper:
- An even rectangle is folded in half, then unbent and the upper left and lower left corners are folded towards the center.
- Next, the corners are folded again towards the center so that the result is a rhombus.
- Free opposite corners are folded in half. The resulting rhombus is folded in half into a triangle, after which the product is returned to its original state and we proceed to work with corrugation.
- The sheet is folded in half with the wavy side inward. Next, the two sides are bent to the middle, two rectangles should be visible from above and one from the bottom in the center. The lower right and upper left corners are folded evenly.
- Now we start assembling the module. Place the second one in the center on the first piece and fold the lower part along pre-marked lines to secure the corrugation.
- Before the last addition into a triangle on corrugated paper Apply glue and fix until dry. We can assume that the first module is ready; the remaining thirty pieces are also added.
- The last step, as always, is general assembly. All steps can be seen in more detail in the image.

The main thing is not to forget to glue the tape or thread in the center if you plan to hang the figure. Additionally, the butterfly can be decorated with rhinestones and sequins, but you don’t need to get too carried away, because the resulting masterpiece already looks wonderful.
Origami kusudama - pretty interesting hobby, which you can master together with your children, and the ball patterns presented on the Internet will help you acquire a new hobby on your own and simply.
Currently, kusudama is the art of creating balls (they are also called kusudama) from many identical flower-like modules. It turns out such an interesting bouquet of original colors, which is not a shame to give.
Kusudama – interesting hobby, which will not only help you pass the time, but will also bring joy to you and your loved ones.
Do you want to do original gift, surprise a person and make him feel good - give him a kusudama. Kusudama – best gift with your own hands!
In this article you will see how to assemble an origami lily:
It can then be used as a module in the lily kusudama ball assembly diagram for beginners.
1. First of all, take a square sheet of paper and bend it diagonally.

2. Then along the second diagonal.

3. Just turn it over.

4. Now fold it in half. One way and the other.

5. Lifting it slightly, fold it so that it forms a “double square.”

6. Here he is, in fact, basic form"double square"

7. Now from the side of the closed corner we fold two opposite corners towards the middle.

8. This is what you should get:
9. Turn it over and do the same.

10. The next stage is to hide the corners inside. We take steps 10 – 12 with each corner in turn. First we bend it, then we hide it.

11. You can hold it with your finger.

12. This is still one corner. Let's hide it.

13. If everything is done correctly, then we get such a figure. There are like four pages on each side. One of them needs to be turned over.

14. Flip through and get what is shown in the picture below.

15. Simply fold the corners towards the middle.

16. It turns out like this:

17. Open them back.

18. Pull the middle of the pocket and fold the corners inward.

19. We lay them the same way we bent them in step 16, only not on top of the pocket, but under it.

20. And cover.

21. Fold the remaining corner up.

22. We do the same on all four sides. This is an important step in the lily kusudama assembly scheme.
23. We have pages again. Let's look through one of them.

24. From the closed side we make a bend towards the middle.

25. It turns out like this. A little more and our lily is ready.

26. Do step 24 for the remaining 3 sides.

27. Almost everything. We just open the petals.

28. Ta-dam!

29. The petals can be twisted with a pen or something else. That's all.

Master class from href="http://stranamasterov.ru/user/8411" title="User information.">СанкА. !}
Original: stranamasterov.ru/node/17089
Kusudama "Lily" is both beautiful and simple. It’s not difficult to make it yourself. It just takes a little care, perseverance and patience. Kusudama consists of This pattern is sometimes called iris. But no matter what it is called, this flower is one of the classic origami figures, which dates back hundreds of years. Although for kusudama you can use another lily model, for example. For kusudama you will need 36 flowers lilies. But don't let this scare you. Nobody forces you to do everything in one evening. By making at least 6 flowers a day, by the end of the week you will have the required amount.
For kusudama of small diameter (about 10 cm), you can use colored blocks of note paper. The square size is 8x8 cm or a little larger. This paper can be purchased at any office supply store.


Yellow and orange modules are made according to. The green module (sepal) can also be made according to the same scheme, only at the end one more step will be added, and the sepal will have a more open shape

Below you can watch a video on how to fold a lily flower and assemble 1 module for kusudama.
You can fold the sepals along. But in this case, it takes more time to fold one module. In the end, I didn’t feel much difference, so I used this scheme only for modules replacing the kusudama brush, where it really looks more advantageous


You need 12 of these flowers (12*3=36 pieces in total). If you want to decorate kusudama tassels with them, then add two more (2*3=6 pcs.)

When all the lily flowers are ready, we can begin assembling the kusudama.
Gather Kusudama is possible in several ways:
Method 1: Kusudama can be glued together.


Three more flowers are glued to this row on both sides. Honestly, I don’t really like this method; traditionally kusudama is assembled without glue.
Method 2: Kusudama can be sewn


So we sew the first row of 6 colors. And two more rows of three flowers. We fasten it by passing thick threads or ribbons through the flowers.
But I like the very last option. In my opinion, it is the most convenient - you don’t need to make any rows, all the flowers are collected on one thread, and if bald spots appear, you can immediately add the missing flowers. Or maybe I like this method better because I came up with it myself :)
Method 3: Kusudama can be sewn at the center (core)
And in order to sew flowers by the core, you need a core. We make the core from half a square. Cut the square in half


And we make a small “accordion” from this strip

Something like this


By the way, both a bead and stamens made of corrugated paper can serve as the middle.
Let's start assembly. Take a needle with a strong thread, for example “Iris”. And we begin to pierce the bottom corner of the lowest module


6 flowers assembled - half a kusudama

Having collected 11 flowers together in this way, we examine the kusudama from all sides, distribute the flowers, achieving the correct spherical shape. We evaluate the remaining free space. It should be enough for just one flower - the last twelfth

If there is more space, then add another flower. We will attach the last twelfth flower differently. All kusudama will rest on it. Therefore, the ends of the threads can be safely tied into a knot

Before us is almost finished kusudama. By the way, you can make a wonderful topiary from this kusudama. We glue the kusudama ball onto a beautiful trunk secured in a pot with plaster and the lily topiary is ready. But let's not get distracted...

All that remains is to make the suspension. Take a thick beautiful thread, lace or ribbon and fold it in half. If you have tassels at the ends - buds, then fold the lace or ribbon not in half, but one end higher, the other lower. If there are beads in front of the kusudama, then string them onto a ribbon. To do this, you can thread the ribbon into a needle with a large eye or push the ribbon into the bead using a toothpick


We pass the ribbon (lace) through the kusudama - place one end of the ribbon between the flowers on one side, the other end - on the opposite side


Then we pierce the corner of the middle and upper module. To facilitate the passage of the tape (lace), the corners of the modules can be trimmed slightly. But do not overdo it with the size, so that later the middle does not jump out through this hole.

If the tape (lace) is thick, then it may be easier to pull one end through first and then the other. After we have pulled the ribbon through the last flower, we tie its ends above the middle with a double knot

Pull the top loop a little so that the bottom flower “sits” in its place


All that remains is to design and attach the tassels - the buds. I made the lower module of the bud (sepal) like this. The two upper modules follow the usual pattern. We twist the leaves on all modules inward


Here is our finished bud, which we use as a brush
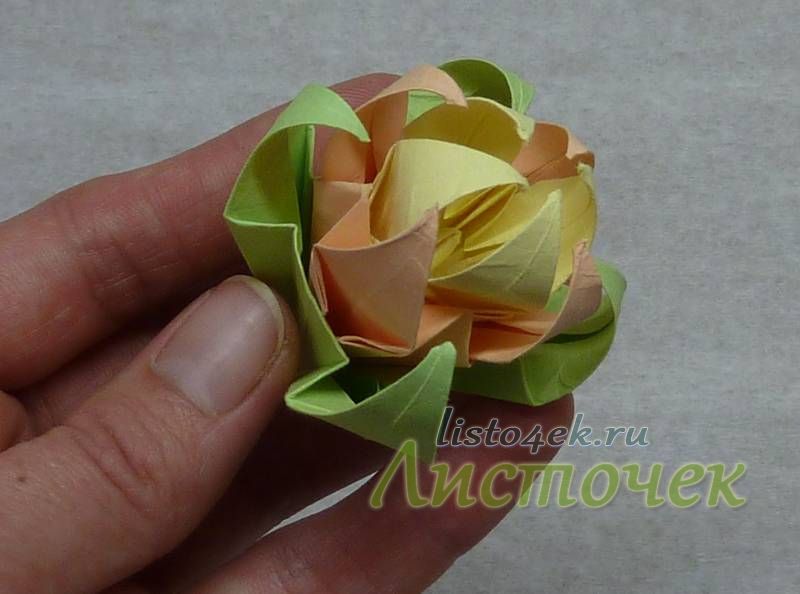


Kusudama “Lily” is ready!


